
My C6 Audio Install
 01-11-2010, 02:21 PM
#21
Racer

Thread Starter


As for the jacuzzi, I can definitely use it right now. I started putting the interior back yesterday and my fingers are hurting.
Thanks. I love the look and the floor always looks clean even if it's full of dirt. Downside is that if you work on your car and loose a black screw or something tiny, good luck finding it. The pattern makes it hard to find little stuffs. I usually lay a carpet next to the car and keep all my tools there.
**************************************** ******
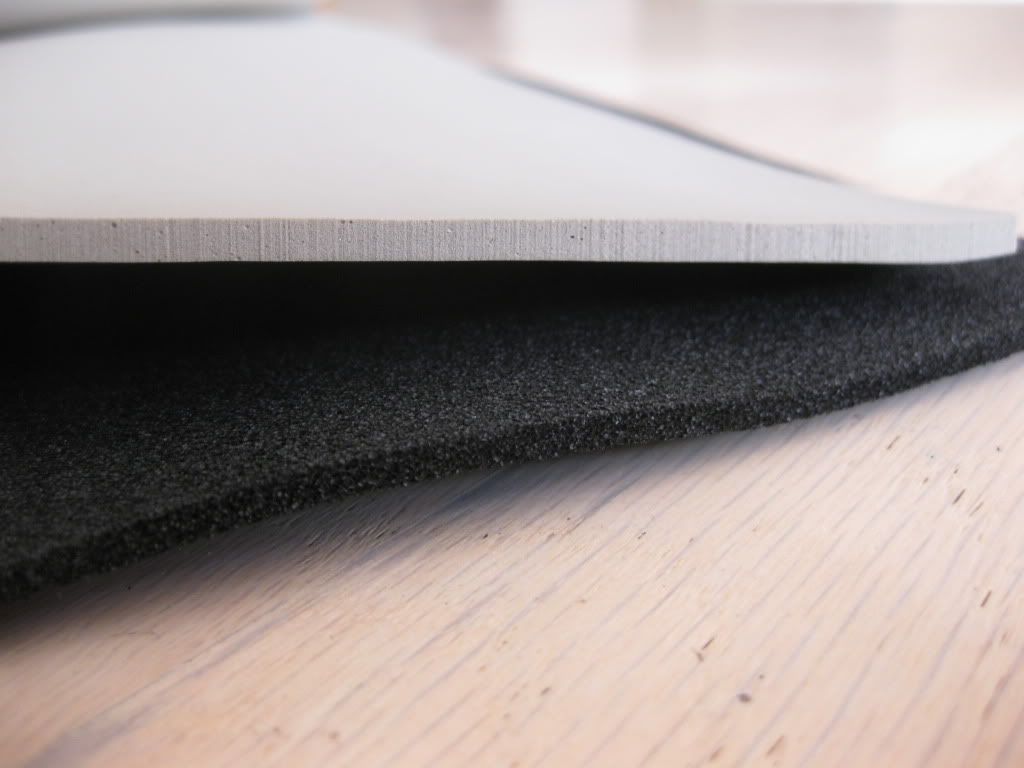
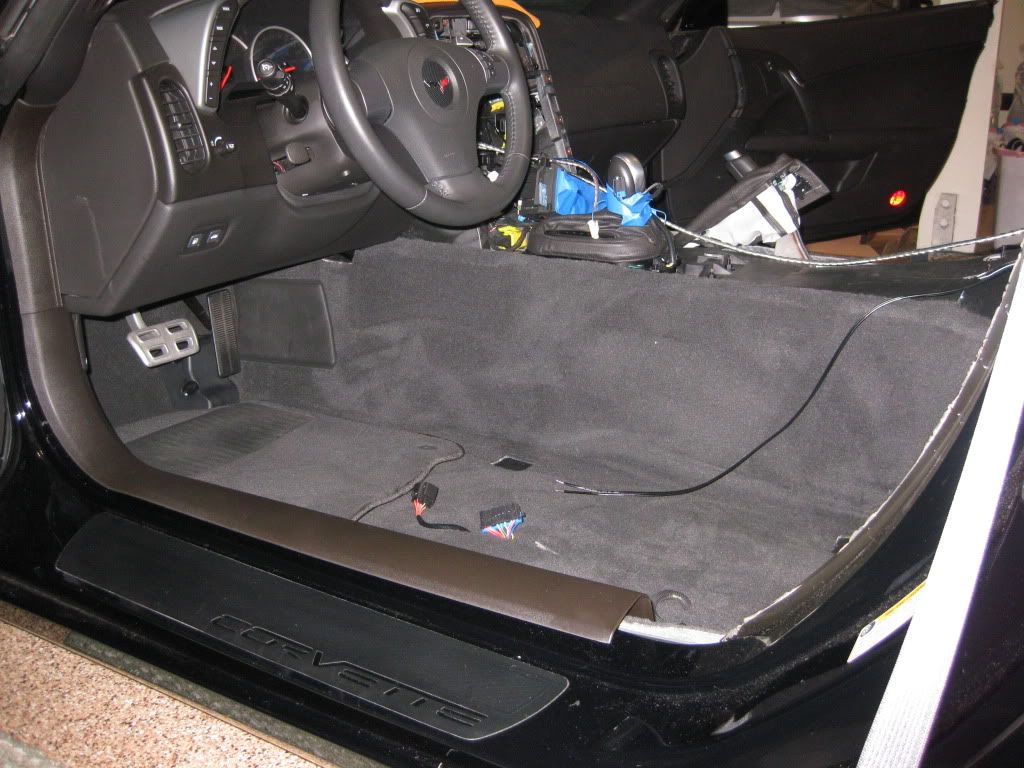
Ok, so I started puting the interior cabin together yesterday, well at least in the main cabin. Prior to putting back the carpet. I added an extra layer of closed cell foam (CCF) to the floor.
http://www.sounddeadenershowdown.com/products/ccf
These are similar to Ensolite except they are way more resilient and can withstand more weight. They have less air pocket in between so they are better for this purpose. Here's a closed up shot between the two.
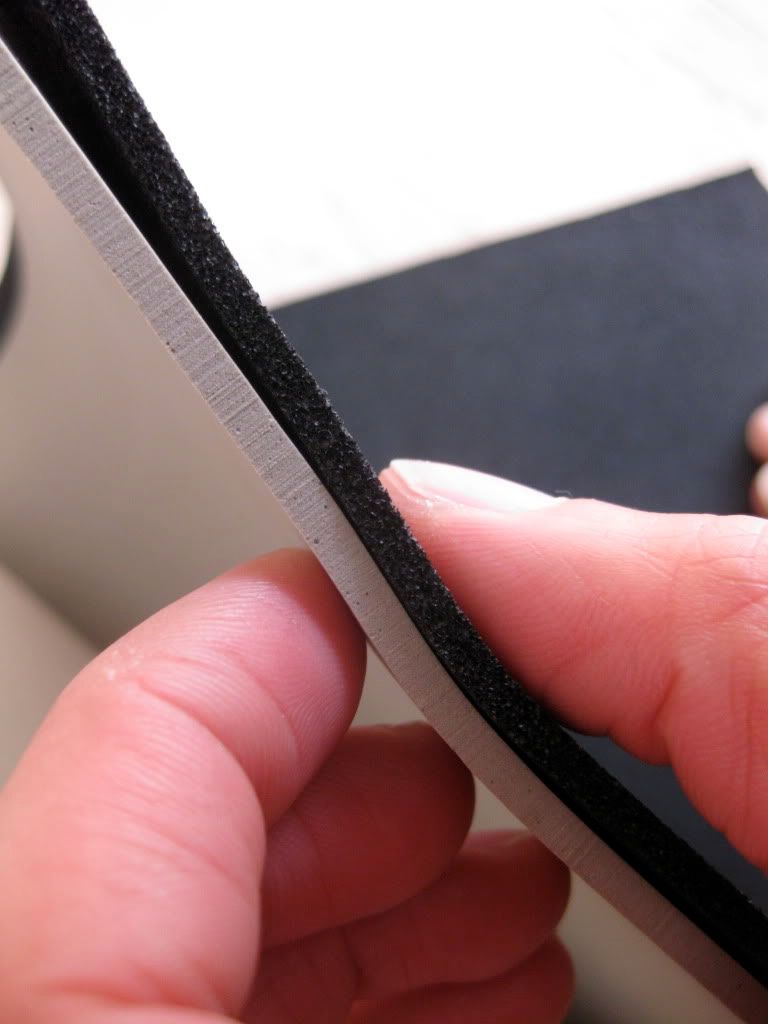
Here's the CCF under the MLV and on top of the heat shield.
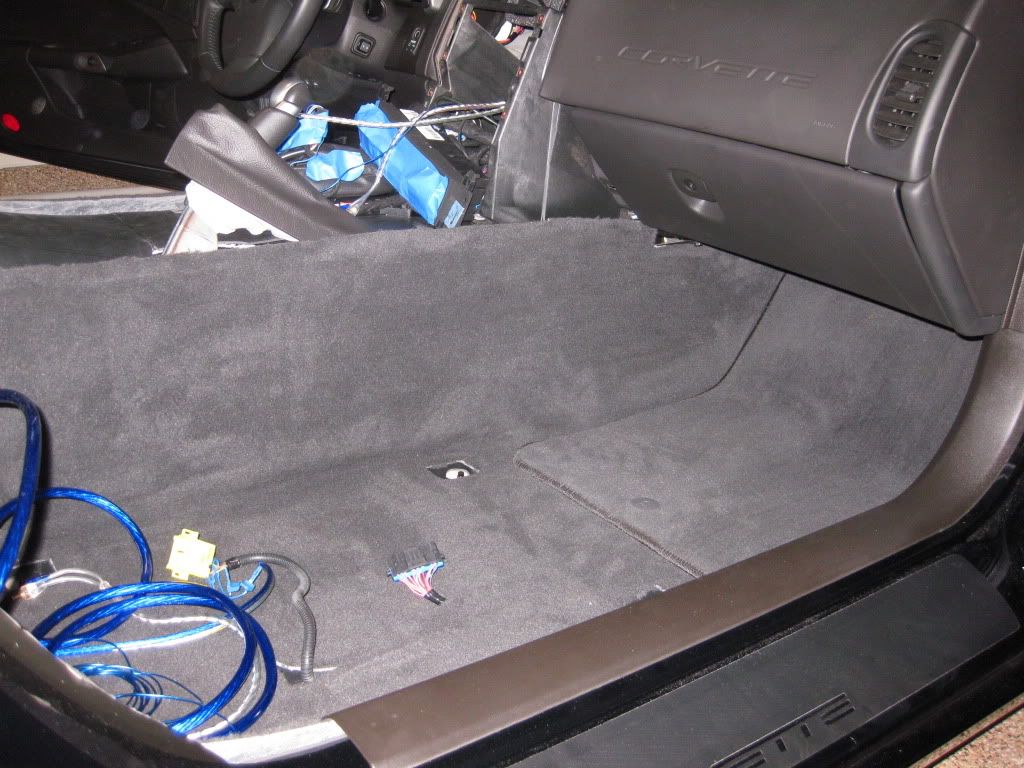
After running all the wires the cabin carpet are installed. Wasn't easy with all the insulations. But boy it sure feels good looking at the car with the carpet installed. Can't wait to take her out. I miss driving her already.

 01-11-2010, 02:35 PM
#22
Racer
Thread Starter
That's correct, the blue wire from the HU goes to the blue wire on the gmco. If I remember correctly, it's all color to color. That is the way I did mine and don't have any problems. If you want your HU to dim with your lights, do as Mark said and run the orange/white wire from the HU to the grey/white wire (I think that's the color) at the traction control button. Your blue/white wire from the HU needs to go to your amp/amps to the remote power connection. If you have 2 amps, you can just jump the wire from one to the other.
And should I take all the wires that need to be grounded back to GMCO BLACK ground wire versus going to the chasis ground? So that the only wire that needs to be grounded directly to the chasis is the amp ground wire.
01-11-2010, 03:09 PM
#23
Tech Contributor
A ground is a ground. I believe most just use the same OEM wire via the GMCO, but any ground will do. If you have long power cable runs it wouldn't hurt to put the ground connection closer to the gizmo, but you shouldn't notice either way.
01-11-2010, 05:11 PM
#24
Racer
Thread Starter
Thanks, looking forward to doing the stereo soon. I got to do some soldering this weekend (coating the tips of the exposed copper wires). That was fun to do.
01-15-2010, 01:29 AM
#25
Racer
Thread Starter
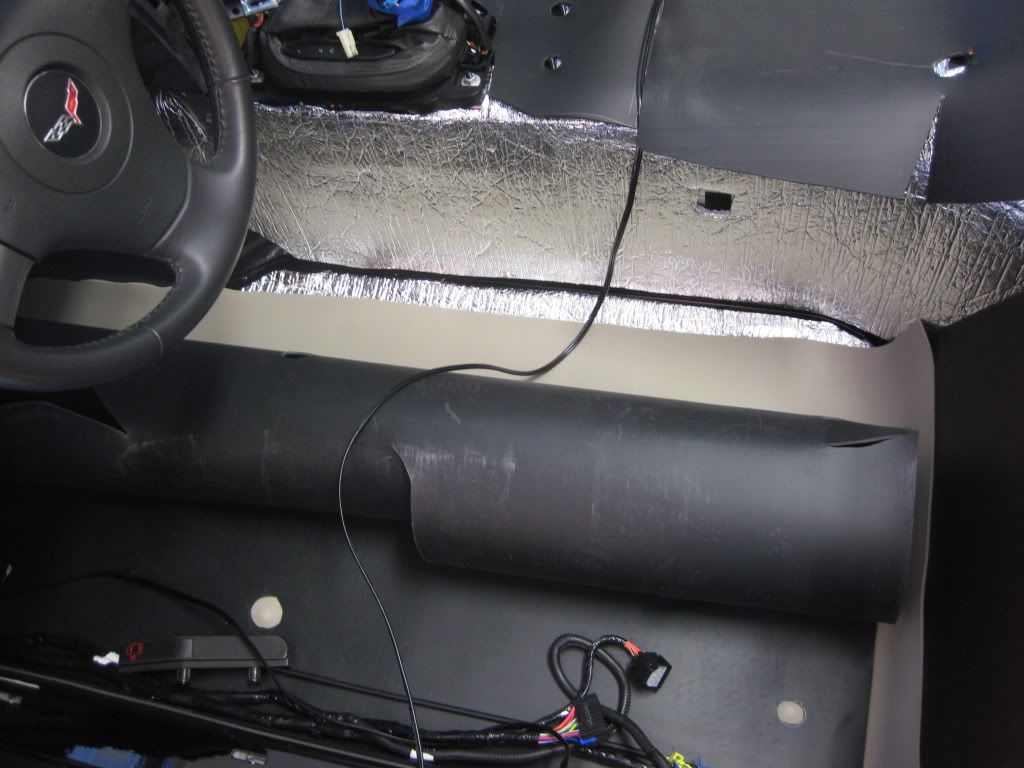
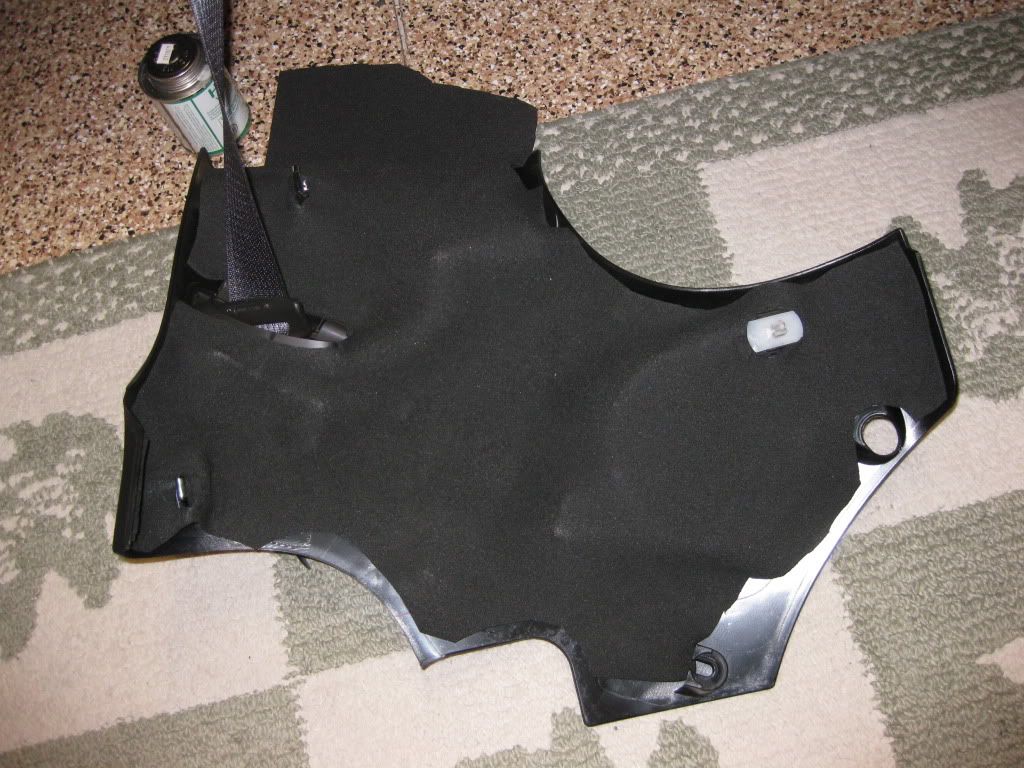
So I got most of the hatch area trim panels put back. It helped by trimming the MLV about an inch from all the corners. That allowed most of the trim and carpet pieces to fit. Again, on the vertical surfaces I had the MLV on top of the foil kit and finally a layer of Ensolite over the MLV to minimize buzzes and rattles. On the flat panels I just put 2 layers of Ensolite between the foil and the MLV. Again, the ideal material on the floor is the closed cell foam I talked about earlier since they are a lot more resilient. I just didn't have enough of that stuffs so I used the Ensolite since I have them laying around.

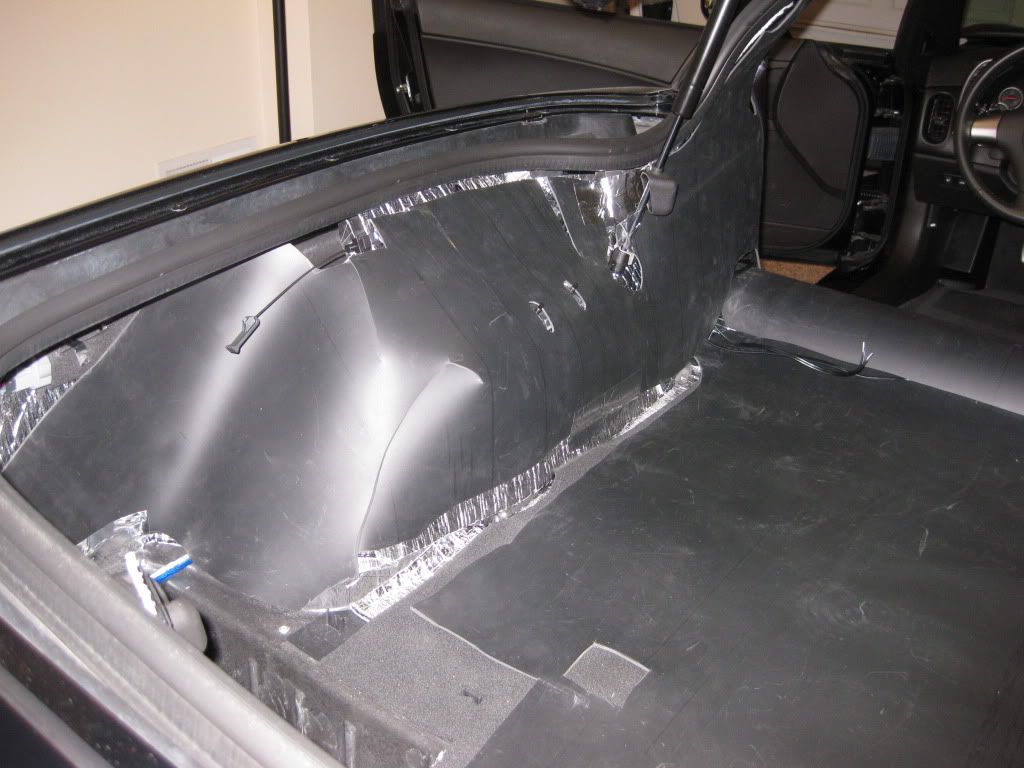
Notice the rear speaker areas are completely covered. I think this will dramatically improve road noise coming from the rear.
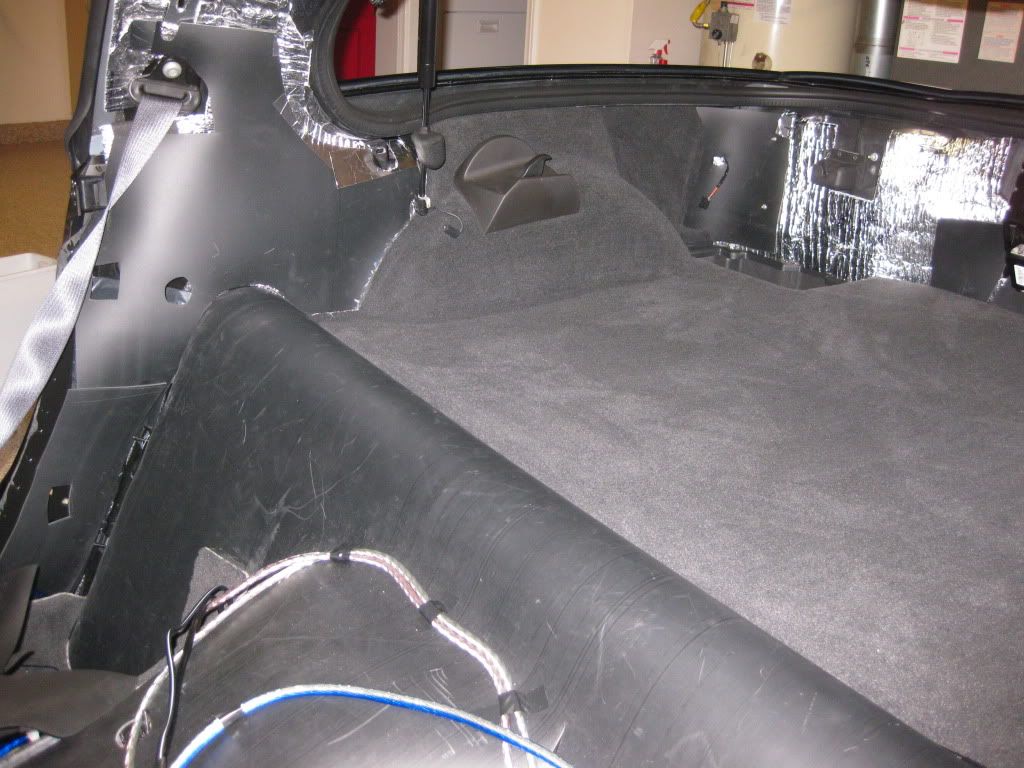

And I routed the power cable to the battery via a factory gommet above the right side of the fuse box. I mounted the fuse holder in front of the battery.
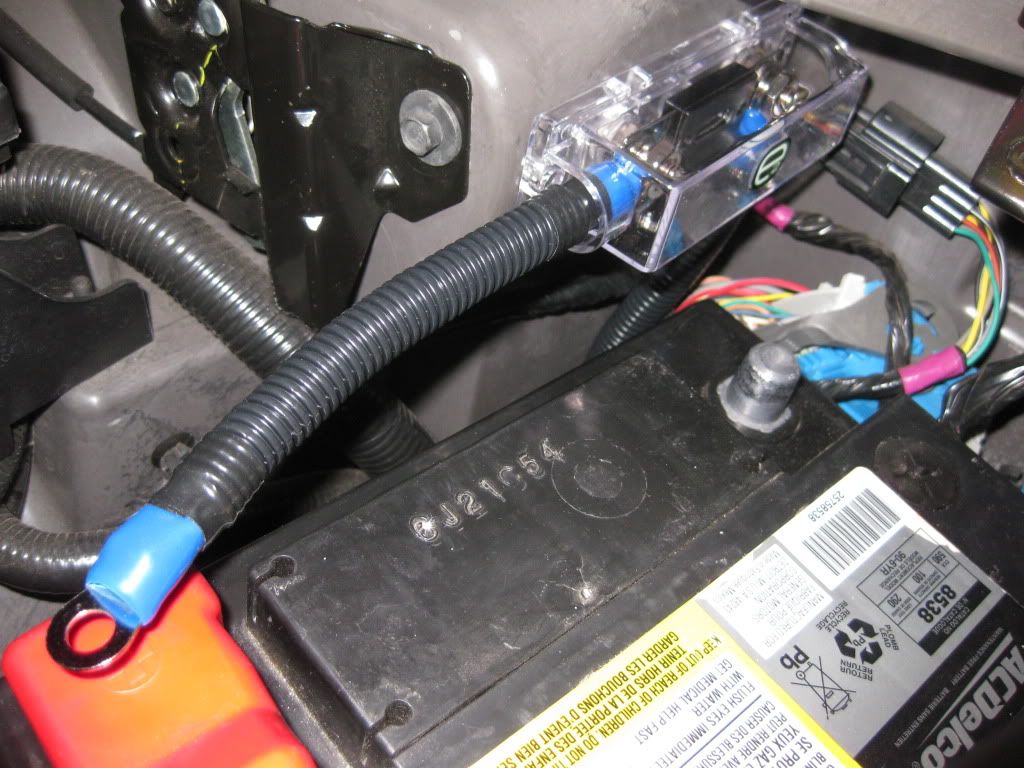
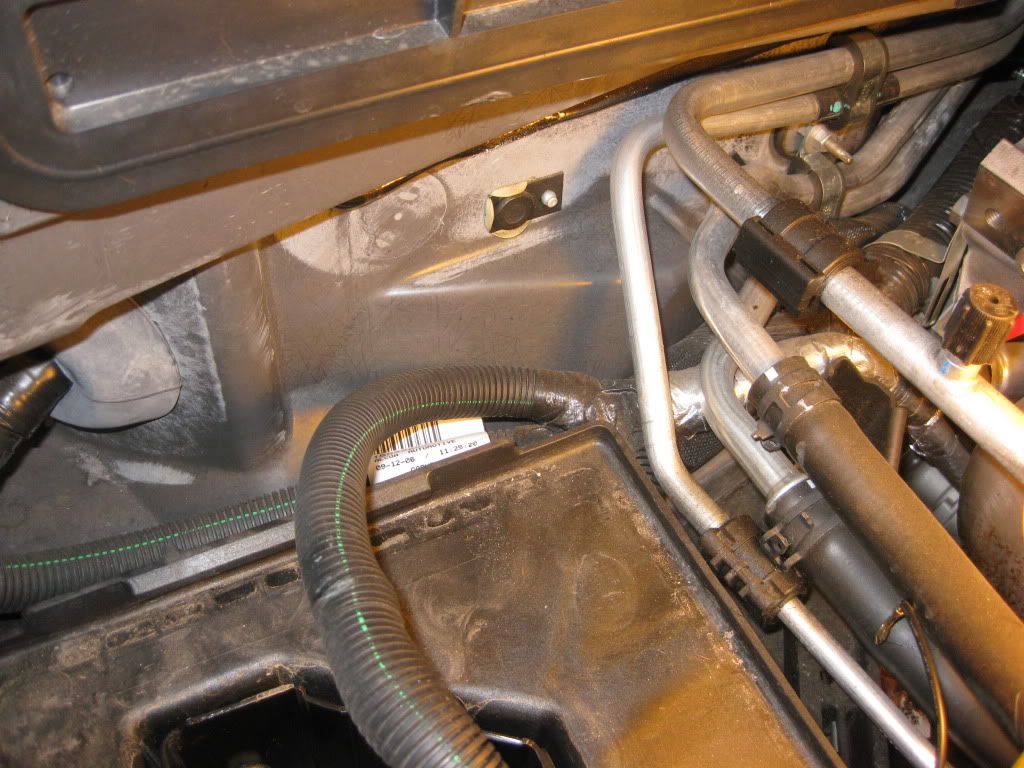
A shot of the gommet (on the left) from the engine compartment with the battery removed.
Looking forward to the stereo install.
Notice the rear speaker areas are completely covered. I think this will dramatically improve road noise coming from the rear.
And I routed the power cable to the battery via a factory gommet above the right side of the fuse box. I mounted the fuse holder in front of the battery.
A shot of the gommet (on the left) from the engine compartment with the battery removed.
Looking forward to the stereo install.
01-15-2010, 01:37 AM
#26
Safety Car


Very nice job you are doing.  You are going to have the quietest Corvette in the country. Also, one of the heaviest. Now you need to put some of that tender love and care into the engine.
You are going to have the quietest Corvette in the country. Also, one of the heaviest. Now you need to put some of that tender love and care into the engine.
01-15-2010, 09:24 AM
#27
Racer
Thread Starter
As for weight, I probably added somewhere around 85 lbs of MLV and another 15 lbs of CLD/foil insulation. I'm going to have to drive her harder to make up for this. Or like you said perhaps juice up the engine a little bit.
 01-15-2010, 10:37 AM
#28
Intermediate
I'm diggin this write up. Great attention to detail, plenty of pictures, well documented. You have inspired me to document my install when I do one.
If I might ask a few questions for clarification? With all the materials you installed on the floor, about how much thickness (total) would you say that you added under the carpet? Have you had any "fitting" issues when reinstalling the carpet since you have that added material underneath?
Many Thanks! Keep up the great work with both the install and documentation!
- Doc
01-15-2010, 11:27 AM
#29
Racer

Member Since: Aug 2008
Location: Sterling Heights MI
Posts: 402
Likes: 0
Received 0 Likes
on
0 Posts
Wow, another awesome job/write-up!
Looking at Patches's install and yours, I feel the strong need to properly do the sound insulation.
I'm sure it'll make a great improvement in terms of being able to enjoy the sound clarity.
What I'm not quite understanding(from my lack of knowledge, of course), is why covering 35% with the deadener(dynamat type stuff) is most effective.
I've seen many installers cover the whole interior with the dynamat stuff, some even double layer them.
Of course not many used the MLV, CCF, stuff, which I'm sure will do great in cutting down road noise.
But your help in understanding the logic behind this would be greatly appreciated.
How hard would you say the whole process was?
I've said so many inapropriate words when I was installing the door panels.
Boy, were those PIA to reinstall!
I could NEVER get the top clips to fully fit, no matter what I do.
Even after getting them lined up and everything installed, the top clips pop out when I shut the door!! Ugh!!
The slamming method(where you install all the white clips and slamming the upper door panel to make the metal clips clip back in) probably didn't help.
I'm even considering removing the clips all together to at least stop it from rattling.
Judging my skill from the difficulty I had installing the door panels, what other difficulties/challenges might I find?
Also, what was the rough cost of all the sound insulation materials?
Thanks again!
Dan
01-15-2010, 02:00 PM
#30
Racer
Member Since: Aug 2008
Location: Sterling Heights MI
Posts: 402
Likes: 0
Received 0 Likes
on
0 Posts
Sorry to bother, but I got one more question.
Don't cars generally have air passage that lets the cabin air flow through in the hatch/trunk area?
Where are the ventilation in a C6 and what did you do with it? Covered it up or left it open?
Thanks again,
Dan
Don't cars generally have air passage that lets the cabin air flow through in the hatch/trunk area?
Where are the ventilation in a C6 and what did you do with it? Covered it up or left it open?
Thanks again,
Dan
01-15-2010, 04:11 PM
#31
Pro


Nice job.
Do you have any plans for the underside of the hatch lid ?
The inner skin resonates around 40 hz in my C6.
I haven't come up with a solution that looks acceptable yet.
Do you have any plans for the underside of the hatch lid ?
The inner skin resonates around 40 hz in my C6.
I haven't come up with a solution that looks acceptable yet.
01-15-2010, 05:30 PM
#32
Tech Contributor
 01-15-2010, 06:20 PM
#33
Racer
Member Since: Aug 2008
Location: Sterling Heights MI
Posts: 402
Likes: 0
Received 0 Likes
on
0 Posts
Wow, never thought it'd be behind there.
I wonder how it'll affect the air flow though.
I mean, if air is coming through the HVAC vents and there's no place to exit, that can't be good, right?
Something to think about I guess.
Thanks again!
Dan
01-16-2010, 01:31 PM
#34
Racer
Thread Starter
With all the materials you installed on the floor, about how much thickness (total) would you say that you added under the carpet? Have you had any "fitting" issues when reinstalling the carpet since you have that added material underneath?
Many Thanks! Keep up the great work with both the install and documentation!
- Doc
Many Thanks! Keep up the great work with both the install and documentation!
- Doc
I had no problem fitting the carpet back on. It was the vertical surfaces (doors, body side panels) that proved to be a challenge.
Wow, another awesome job/write-up!
Looking at Patches's install and yours, I feel the strong need to properly do the sound insulation.
I'm sure it'll make a great improvement in terms of being able to enjoy the sound clarity.
What I'm not quite understanding(from my lack of knowledge, of course), is why covering 35% with the deadener(dynamat type stuff) is most effective.
I've seen many installers cover the whole interior with the dynamat stuff, some even double layer them.
Of course not many used the MLV, CCF, stuff, which I'm sure will do great in cutting down road noise.
But your help in understanding the logic behind this would be greatly appreciated.
How hard would you say the whole process was?
I've said so many inapropriate words when I was installing the door panels.
Boy, were those PIA to reinstall!
I could NEVER get the top clips to fully fit, no matter what I do.
Even after getting them lined up and everything installed, the top clips pop out when I shut the door!! Ugh!!
The slamming method(where you install all the white clips and slamming the upper door panel to make the metal clips clip back in) probably didn't help.
I'm even considering removing the clips all together to at least stop it from rattling.
Judging my skill from the difficulty I had installing the door panels, what other difficulties/challenges might I find?
Also, what was the rough cost of all the sound insulation materials?
Thanks again!
Dan
Looking at Patches's install and yours, I feel the strong need to properly do the sound insulation.
I'm sure it'll make a great improvement in terms of being able to enjoy the sound clarity.
What I'm not quite understanding(from my lack of knowledge, of course), is why covering 35% with the deadener(dynamat type stuff) is most effective.
I've seen many installers cover the whole interior with the dynamat stuff, some even double layer them.
Of course not many used the MLV, CCF, stuff, which I'm sure will do great in cutting down road noise.
But your help in understanding the logic behind this would be greatly appreciated.
How hard would you say the whole process was?
I've said so many inapropriate words when I was installing the door panels.
Boy, were those PIA to reinstall!
I could NEVER get the top clips to fully fit, no matter what I do.
Even after getting them lined up and everything installed, the top clips pop out when I shut the door!! Ugh!!
The slamming method(where you install all the white clips and slamming the upper door panel to make the metal clips clip back in) probably didn't help.
I'm even considering removing the clips all together to at least stop it from rattling.
Judging my skill from the difficulty I had installing the door panels, what other difficulties/challenges might I find?
Also, what was the rough cost of all the sound insulation materials?
Thanks again!
Dan
I have never installed a sound system like this before. The last time I installed a stereo was 10 years ago. I replaced my OEM Acura Integra stereo with another Sony HU. All I had to do was buy the bracket, the stereo, and a harness. The only tool used was probably a screwdriver. For this installed for example, I bought an electric solder ($15) and learned how to use it, a heat gun with shrink wraps ($40) and learned how to use that for the first time. I didn't know what a crossover does or how to connect them (instructions manuals are great). So I'm learning a lot of new skills as a result of this project and I thoroughly enjoy the entire process.
So while I lack the skills and experiences, I do have a passion for learning new things and I love working on my vette. That's when the CF comes to the rescue. There are so many great and helpful people on this forum. Guys like Patches, pentavolvo, Markcz and many others have been great to learn from. I remember reading Patches writeup when I replaced my C5 headlights with some HIDs, and then later how to change the headlight gears when it was broken. So you can pretty much do almost anything with the vette if you love doing it. I started about 2 weeks ago I'm 3/4 way done with my install now. I can tell you I would never pay someone to do what I've been doing. It's too much fun to give away.
As for the install, even if you kept your stock sound system, doing a proper vibration/sound insulation alone will improve the sound quality significantly. This is the one area I have some experience with. About 8 years ago I installed some vibration dampers in my BMW 3 coupe and kept the OEM stereo. The bass hits harder and the overall sound was way better.
With vibration dampers (CLD), you only need to cover 25% (for aluminum and steel) to 35% (fiberglass) of the total surface area to be effective. So a 10x10" area (100 sq in) only needs a 5x5" (25) piece of CLD. You can certainly cover 100% of the area, but you're not getting any more result that could be appreciated by your ears. All you've done is double the weight you put on your car. Many installers cover 100% and some even double them up
 because the vibration damper industries (Dynamat and other vendors) have been promoting them. Guess what, they make more money if you double up. I can tell you 25-35% coverage has helped make my doors feel like solid lead now. All this with the benefit of less cost, less weight penalty, and much much easier to apply.
With regard to the use of MLV, here's something I wrote recently on another post:
-------------------
External noises traveling through your car cause the body panels to vibrate. As a result, the panels act as a secondary source of noise. The CLD, BXT stuffs or Dynamat are great as a vibration damper and prevent this 'secondary' noise only.
Now to stop the source of the original noise in the first place, you need mass loaded vinyl (MLV). I'm in the process of installing full noise/vibration damper insulation to my car right now. I apply a layer of vibration dampers first, followed by the madvette kit, and finally a layer of MLV over it. On the doors, I'm also planning to put a fourth layer of closed cell foam to minimize door rattles.
Foil/bubble kits (madvette) are great as a heat insulation but do very little for noise. The disadvantage of using MLV is that it is heavy. A square foot weighs a pound, but they do wonders for sound insulation.
You can learn more about it here:
http://www.sounddeadenershowdown.com/cgi-bin/index.cgi
---------------------------
I have not had a chance to take my car out yet so I can't tell you how much improvement the MLV has made. I can tell you that with the engine running, all the doors and windows closed, it sounds as if all my windows/windshields are not even there. Before the noise of the idle engine was uniform throughout the entire car, now most of the noise is coming through the glass!
The most difficult part of the install was to cut the MLV and then fit them to the trim. I found an exacto knife the most helpful tool for this. MLV is pretty tough, I use the knife to cut mostly away from me while I pull the piece already being cut apart slightly, that makes it easier to cut. On the MLV, if you cut everything 1/2 to 1 inch smaller than what could theoretically fit on a door panel, you'll have no problem putting your trim panels back.
As for reinstalling the door clips, I had very little problems. At first I tried slamming the upper door panel because I read about what a PIA it was to reinstall. That didn't work for me. So I tried this technique and it worked like a charm.
Start by lowering the windows, roughly line up the upper 2 outer pins (don't have to insert them). Tilt the panel (top toward windows and bottom toward you. With all the insulations, this was the only way to get the pin close enough to where they should be. Slightly put the upper panel so that the most rearward pin engage the door, then down to fully engage ONE PIN AT A TIME until you get to the forward pin. It only took me 2 mins to do it on the second door. It might be helpful if you put a box beneath the door panel so support it so you don't kill your back doing it.
As for the costs, look at the second post on the first page for a full breakdown. I would discourage you from the Madvette kit though, took them almost a month to deliver the kit (they usually promise you a week). Probably one of the poorest customer service I've experienced from a vendor here. Still waiting for them to fulfill an order made in the beginning of December what was promised to be delivered by Xmas!
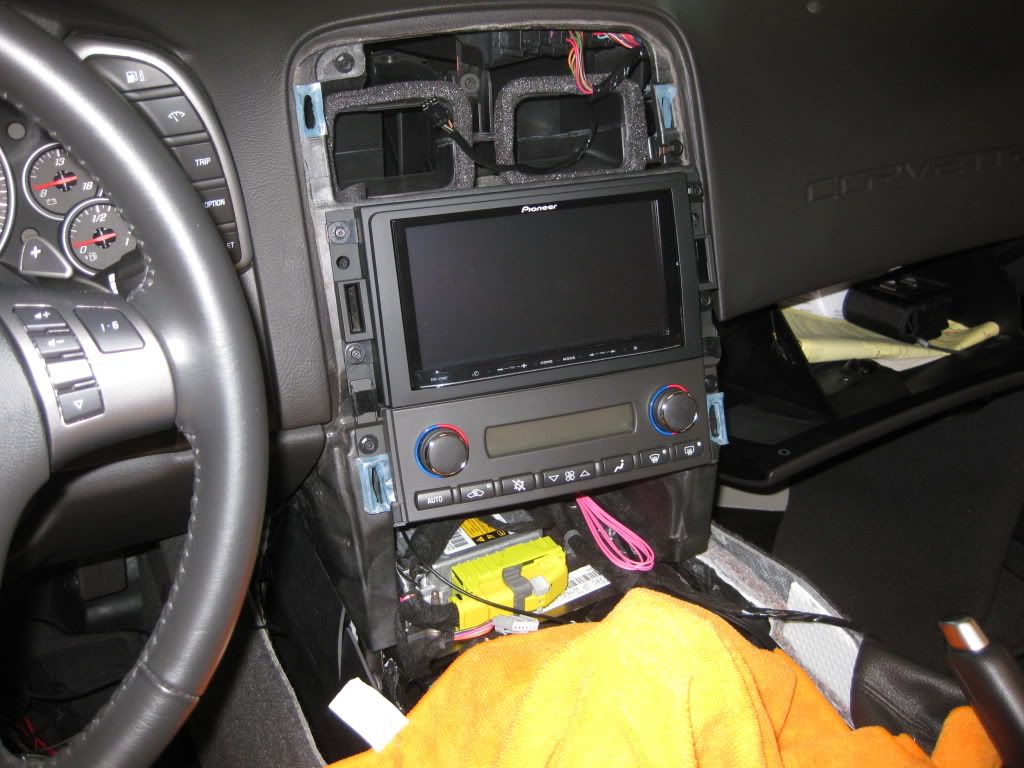
Now it's time to have some fun. Today I'm finishing up the harness connections and installing the HU. One problem I noticed, the Z110BT HU seemed a little too long and the back of the unit comes in contact with the rear (pin) support. I'm thinking of removing that support so the unit fits flush against the dash. Any suggestions?
Last edited by MSO4; 01-16-2010 at 01:38 PM.
01-16-2010, 09:19 PM
#35
Tech Contributor
One problem I noticed, the Z110BT HU seemed a little too long and the back of the unit comes in contact with the rear (pin) support. I'm thinking of removing that support so the unit fits flush against the dash. Any suggestions?
01-17-2010, 09:13 AM
#36
Advanced

Sorry I didn't see this earlier, was out of town. In my case, I originally grounded everything in the dash to the gmco black wire. I had a noise/whine issue. Not bad, but present and it bugged me. I simply moved the HU ground to a chassis ground spot and it went away. You may not have the same problem as I have heard of others using the gmco ground without issue. Just wanted to mention it just in case. Keep up the good work, it looks great!
01-17-2010, 03:45 PM
#37
Racer
Thread Starter
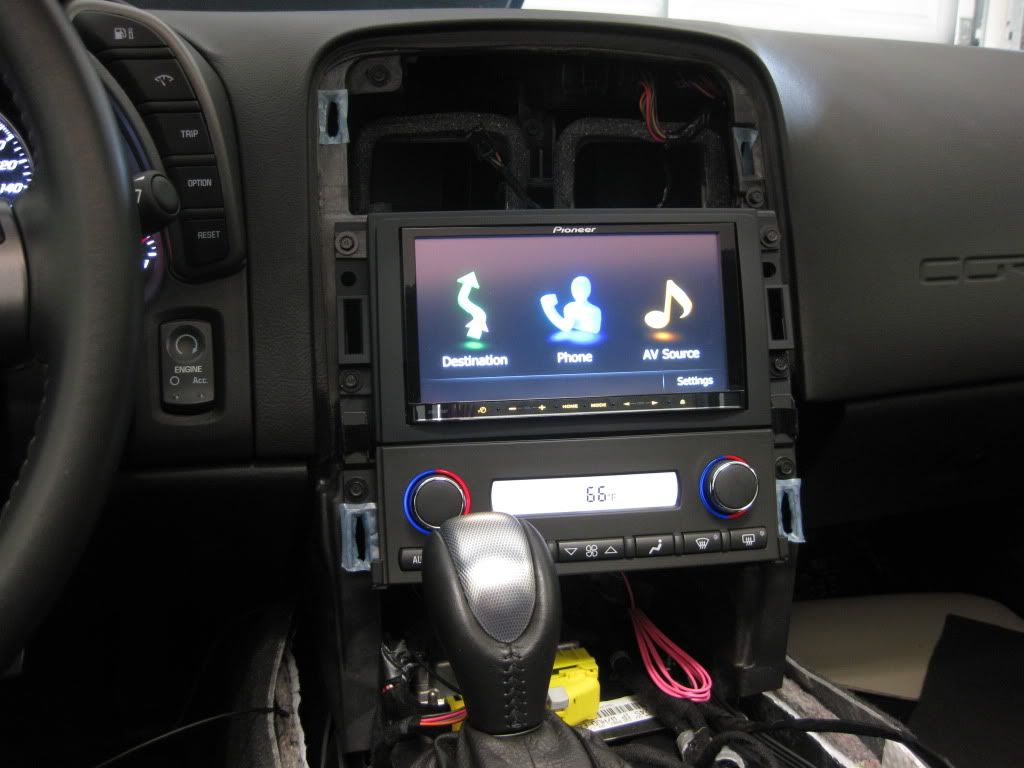
If you used the same plastic mounting adapter that I did there's a plastic trim ring that goes around the front of the radio. That trim piece is at least 1/8" deep, plus the radio can stick out a tad and still look good. Is it hitting when it's flush with the mount body? Or is it hitting with the trim ring already installed and the radio sticking out a tad?
Sorry I didn't see this earlier, was out of town. In my case, I originally grounded everything in the dash to the gmco black wire. I had a noise/whine issue. Not bad, but present and it bugged me. I simply moved the HU ground to a chassis ground spot and it went away. You may not have the same problem as I have heard of others using the gmco ground without issue. Just wanted to mention it just in case. Keep up the good work, it looks great!
01-17-2010, 04:44 PM
#38
Racer
Thread Starter
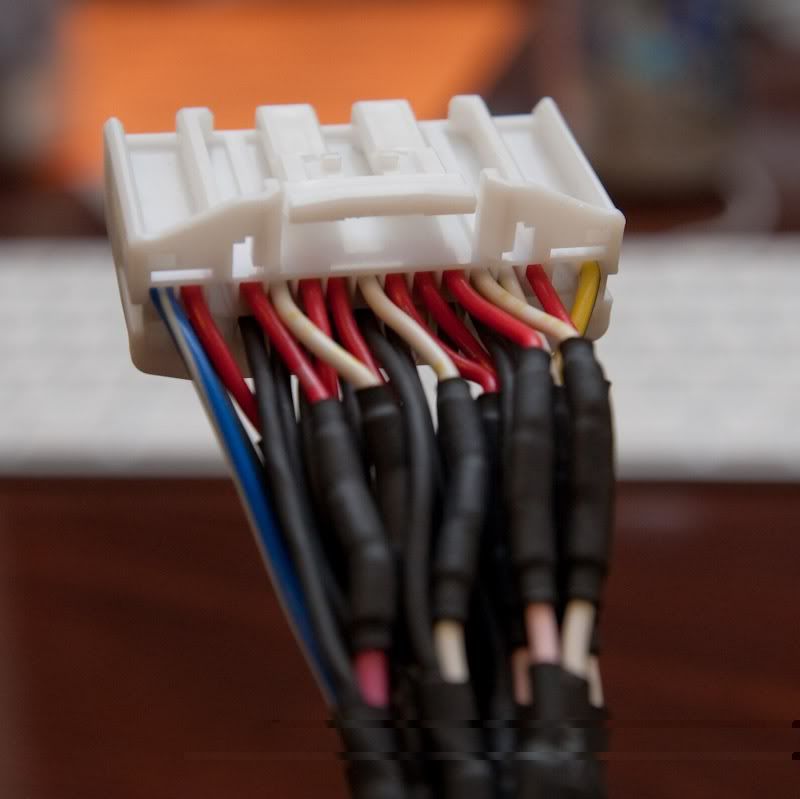
So this weekend I started working on the harness and other electrical components of the install. I�ve been very excited about this stage of the install. Again, I have an �07 3LT with the Bose, no OnStar and no Nav. If you have these options you might need a different harness.
Basically the harness (PAC C2R-GM24, also known as GMCO) allows you to connect your OEM harness to your new HU without cutting up the factory wires. In addition you retain things like chimes and status update of the car computer. I used this opportunity to do some hacking of the HU as well as making the necessary connections so the OEM steering wheel buttons will work with the new HU via the SWI-PS module.
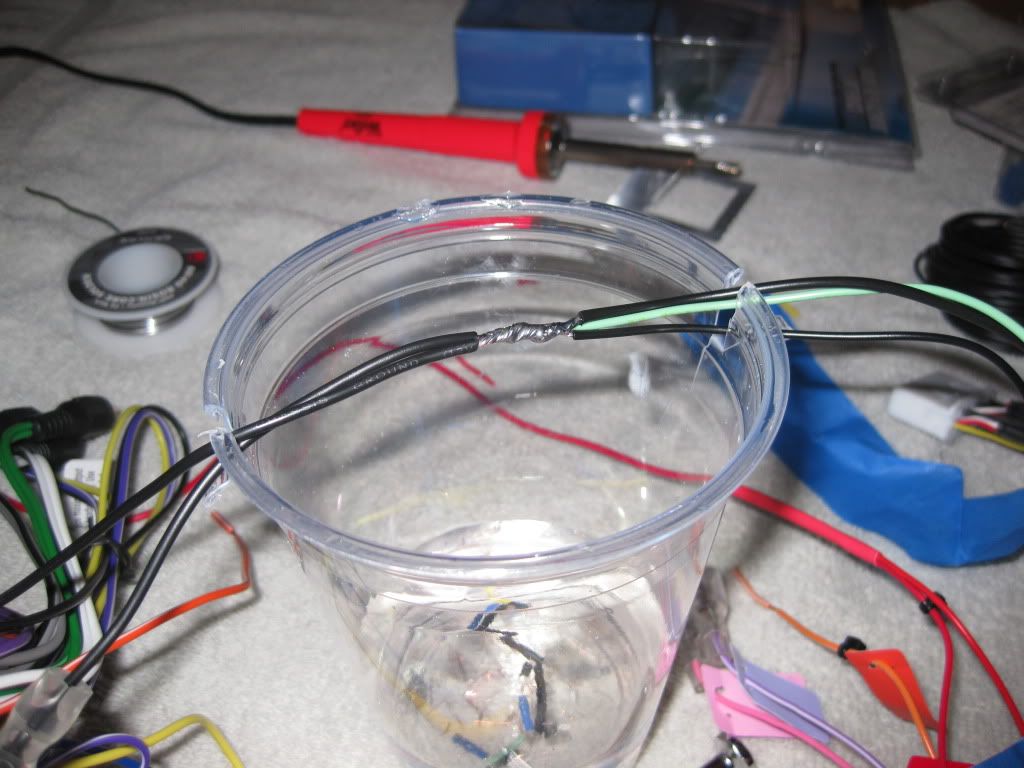
Use whatever wire connection you are familiar with. I choose to solder the wires and shrink wrap the connections afterward. Certain connections contain more than one wire. For example, the BLACK ground wire from the GMCO connects to 4 other wires (black ground from HU PowerCord, green from HU parking hack, black ground from SWI-PS, and the MUTE wire).
There were 2 unused wires on the GMCO (orange and orange/white). I moved those two wires to 2 new positions on the GMCO (A6 and A7) and used them to wire the SWI-PS.
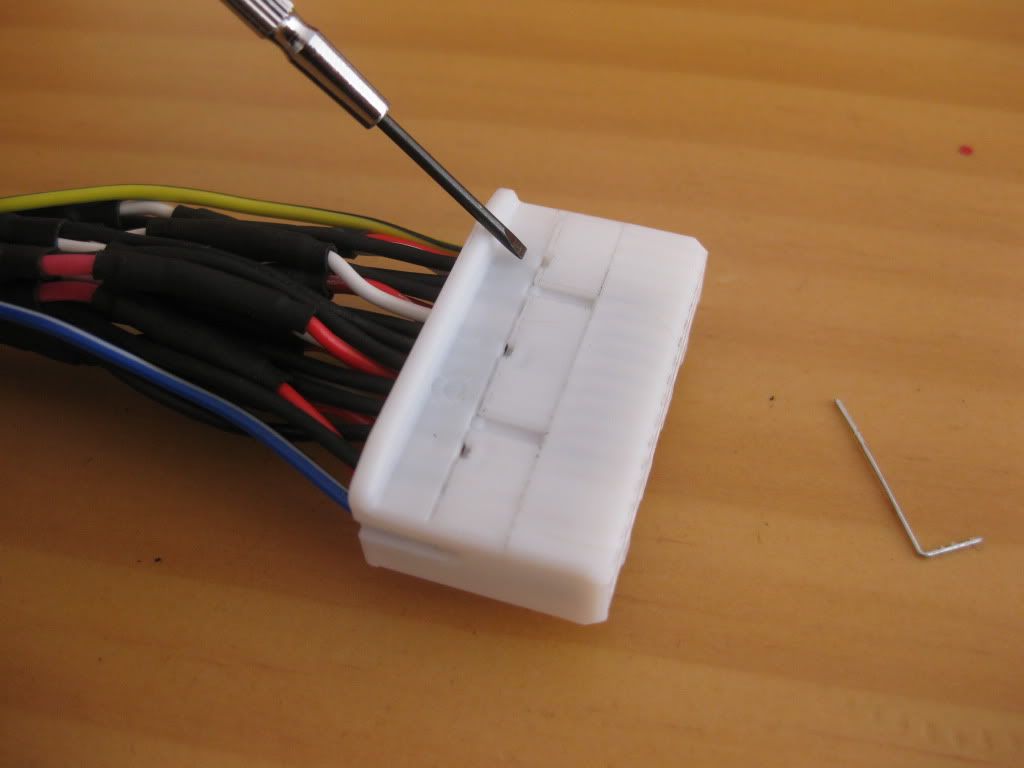
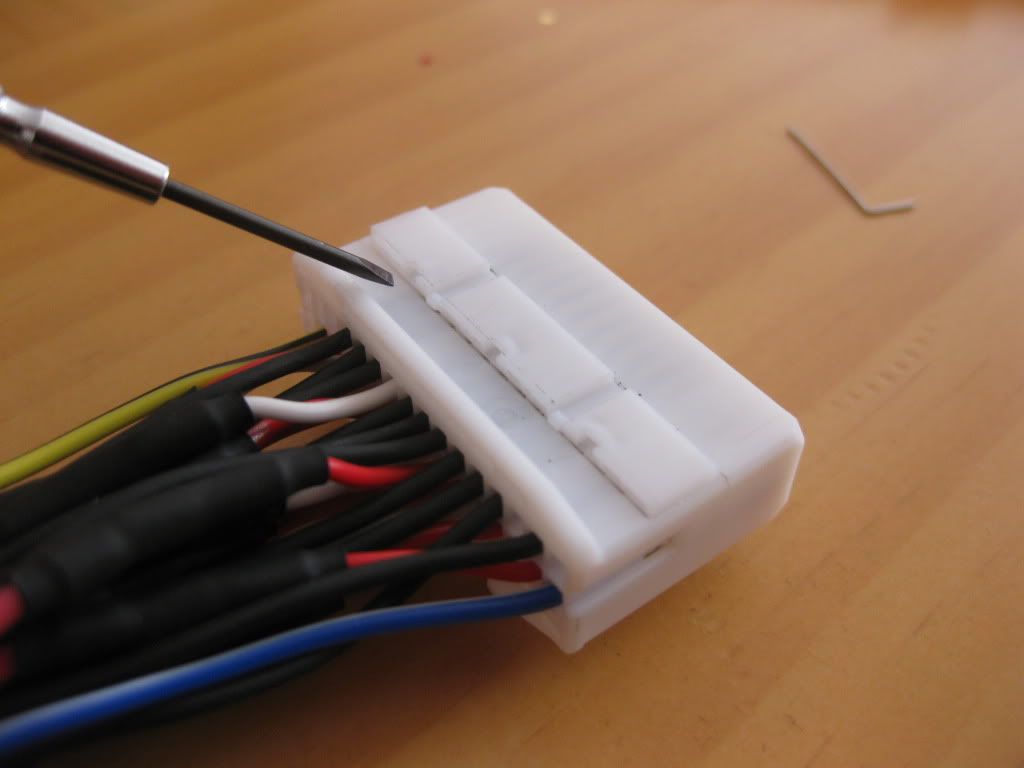
Start with the GMCO harness, remove the dark tan retaining clip.

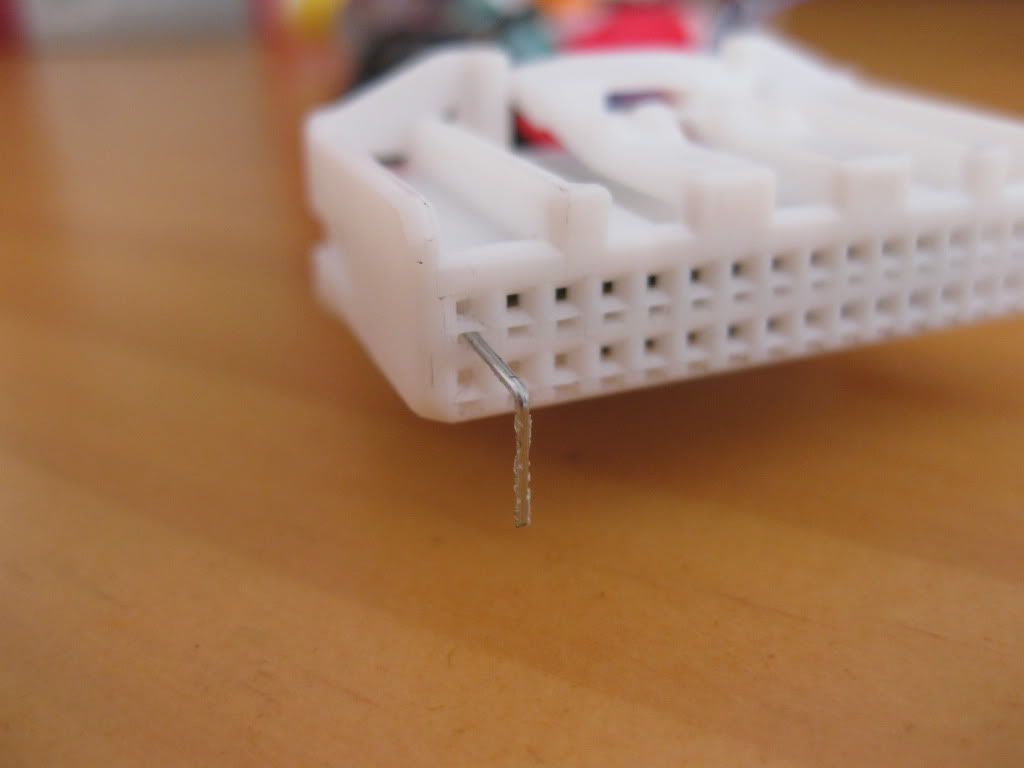
Then use a small pin or needle and insert the pin like this with a slight pressure downward. What you are doing is pushing on a �spring� locking mechanism that allows you to withdraw the pin from the harness.
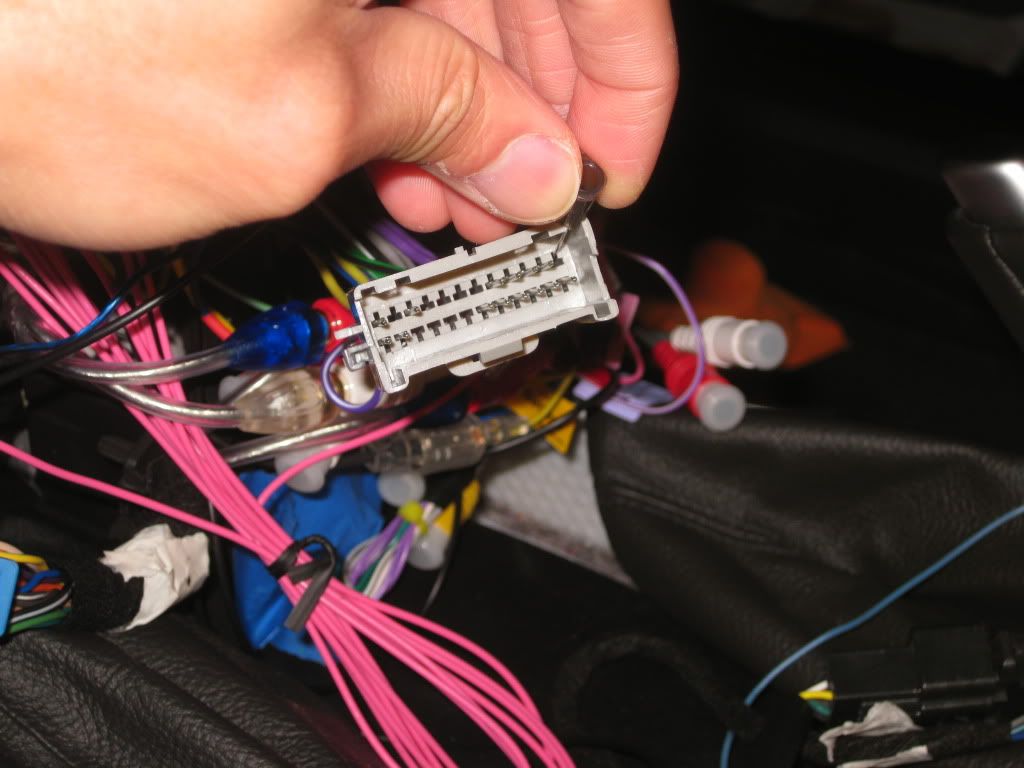
Once removed, you insert them into its new location at A6 and A7.
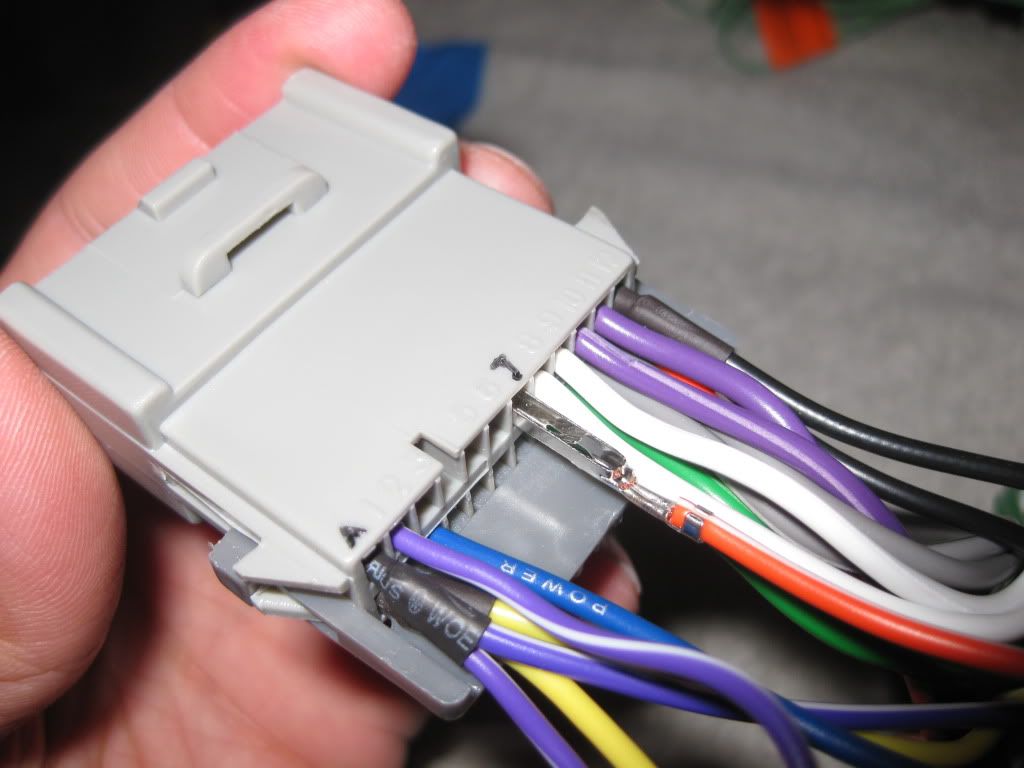
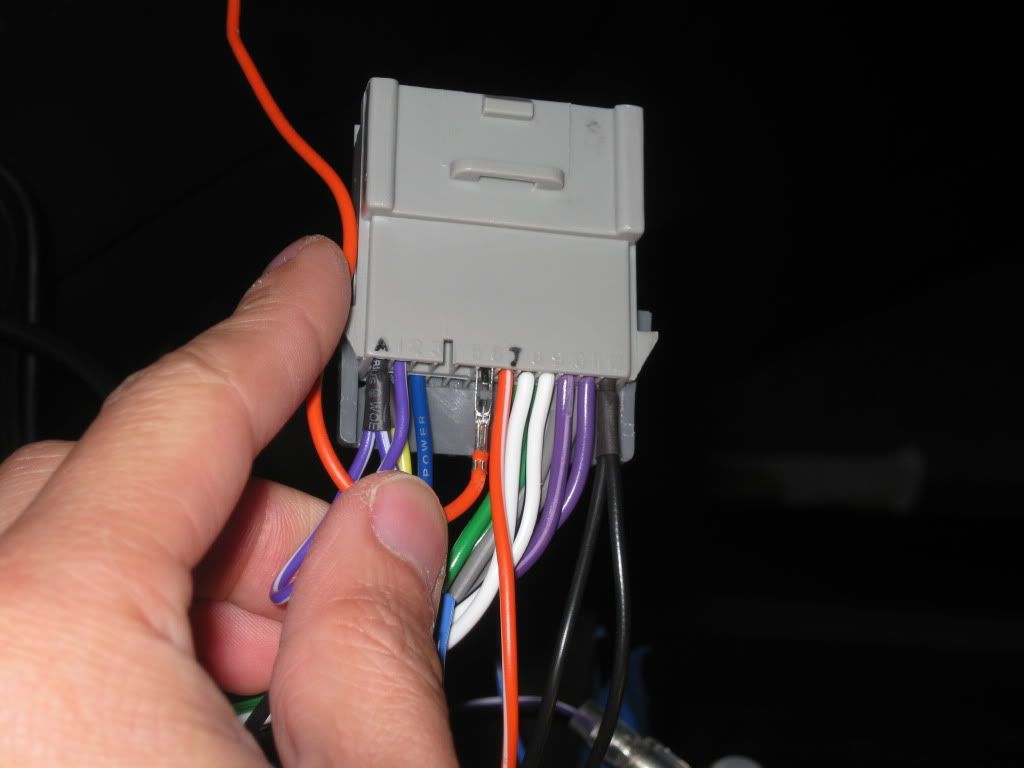
Two wires from the SWI-PS will connect to these wires at their new locations. A6 provide power from the HU to the SWI-PS while A7 sends info from the SWI-PS toward the buttons. Once you're done your harness should look something like this (not exactly yet since I haven't connected all the wires yet but you get the idea).

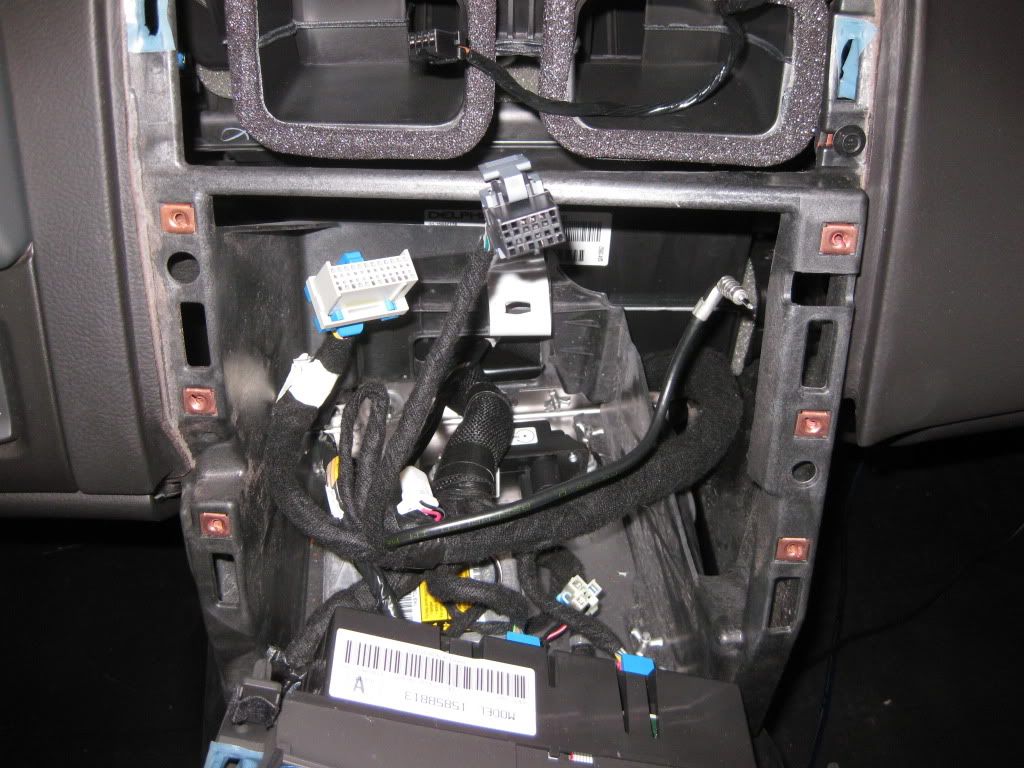
Next I access the reverse signal wire near the car's fuse box as shown here. I didn't want to unwrap the electrical tape bundle of wires so I just removed a cover to get access to the light green reverse signal wire.
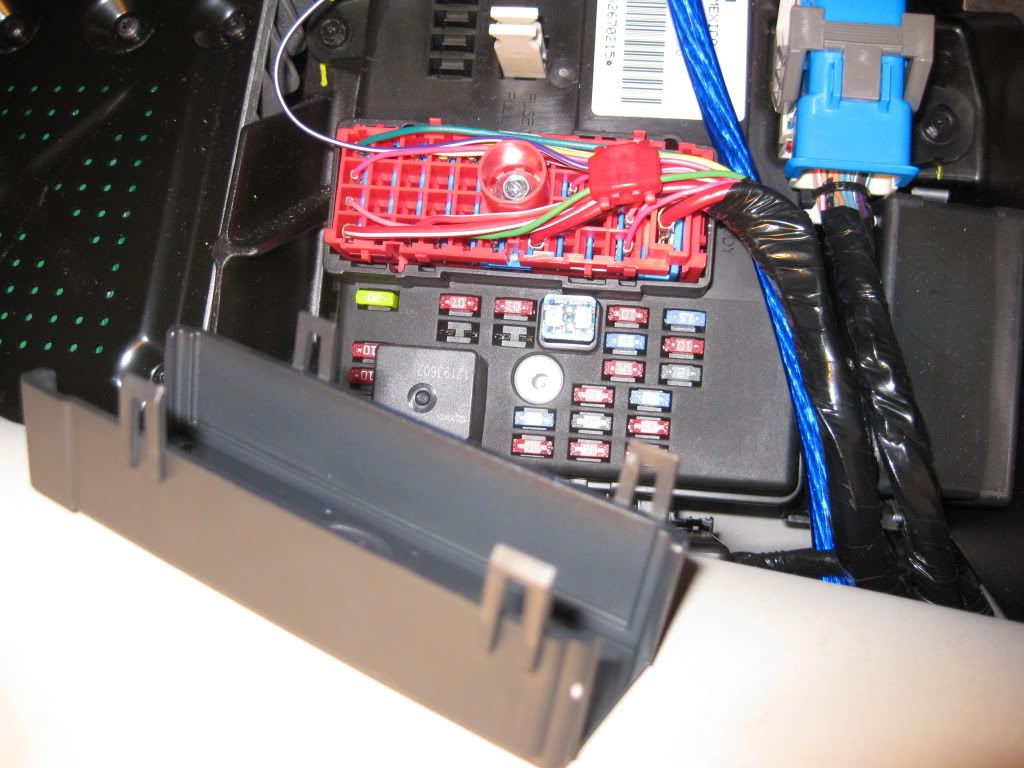
Then I got access to the VSS speed wire via the black harness near the old HU.
Now you are ready to move to the 110BT PowerCord and make the appropriate connections. If you're interested in doing the bypass on the Z110BT. Here's how it's done:
This is what your harness looks like from the box (not my pic). Notice the position of the yellow (MUTE) wire on the top right side of the harness.
Start by lifting up a white locking mechanism on the harness. Then get a standard staple on your desk and straighten one of the end so it looks like this.
Insert the staple into the top middle smaller hole and again slightly depress downward to release a locking mechanism within the pin so you can pull the yellow pin out the back of the harness. You will move the yellow pin over one position and reinsert in another position so it looks like this.

Finally the bypass is completed by connecting this MUTE yellow wire along with the GREEN parking wire to your BLACK ground wire on the GMCO. Done, that's the Z110BT bypass!
If you plan on a rearview mirror, now is the time to route the wires to the back of the unit. I'm planning to provide ACC power to the camera at the HU end. I want continuous power so I can a use the rear view camera even when the car is going forward just for kicks. Be sure to connect the camera RCA plug to the BROWN rearview camera input. The first time I connect it it to the yellow video input and didn�t get any pictures. That took me a couple hours to diagnose that.
I couldn't decide between these two cameras but I decided to keep the squarish one.
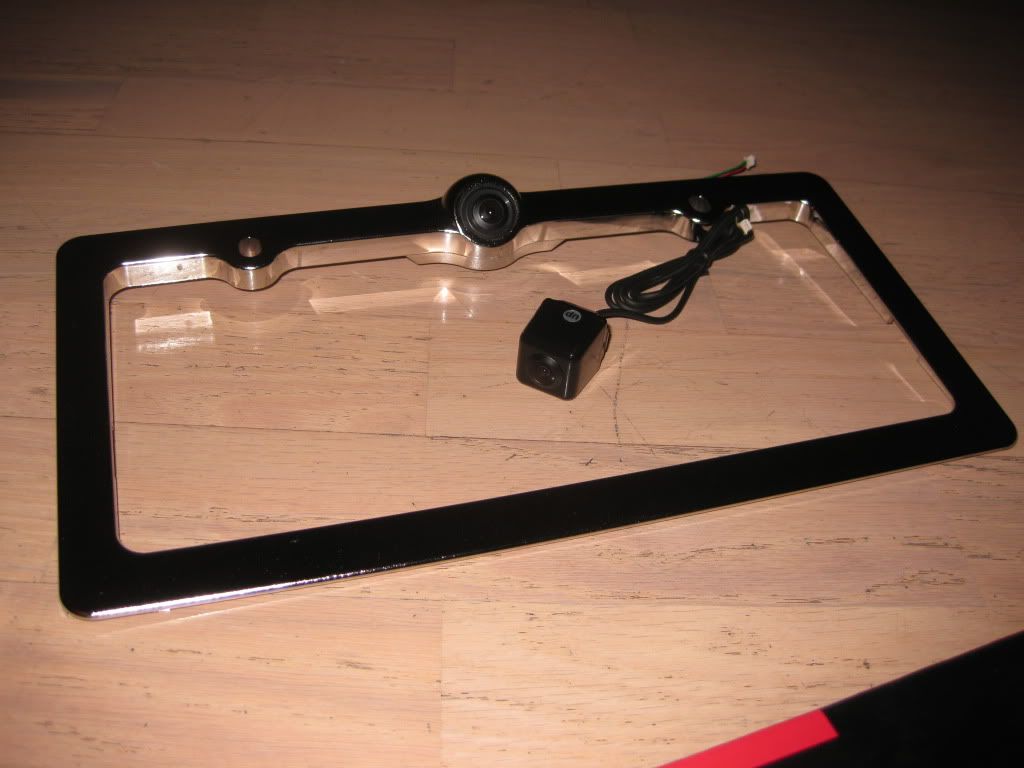
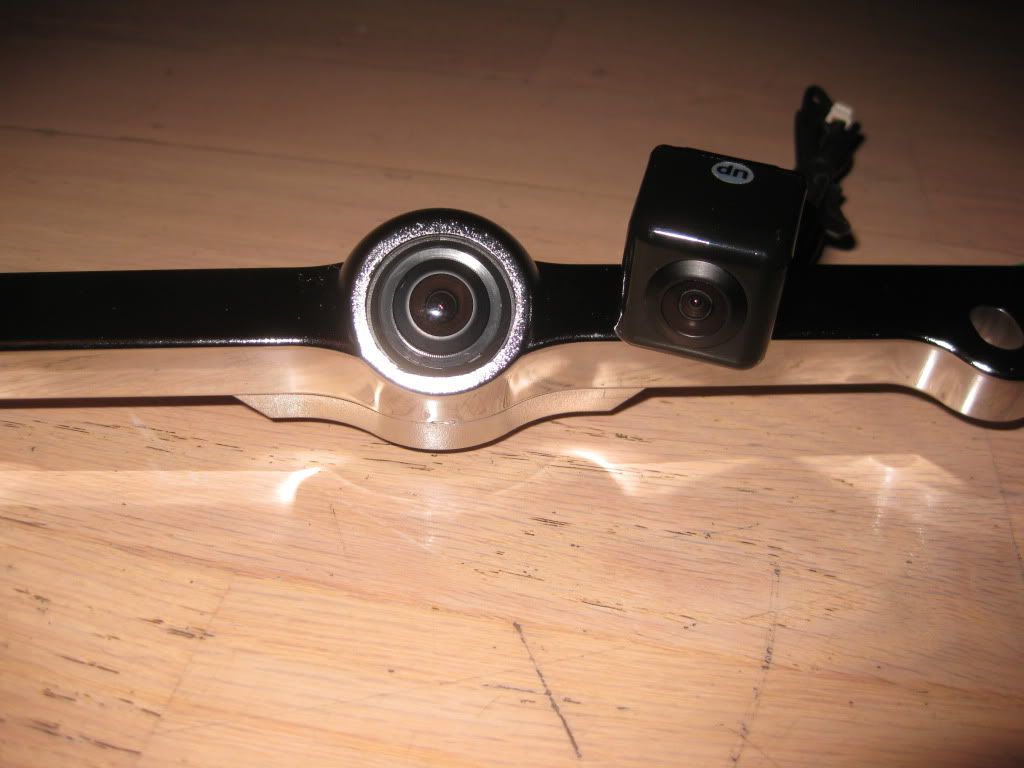
Both are solidly build and made in Korea. They have very similar specs as well.
Do not forget to connect the mic to the HU. Then hook up the antenna with the adapter.
As for the GPS antenna, I removed the center dash speaker and made a special basket to house the magnetic plate. The antenna goes on top of this plate.
Now do a preliminary hookup and check out all the functions making sure everything works. Also now is a good time to program the SWI-PS module. I can tell you the SWI-PS works extremely well and there was no delay. Again, be sure to get the newest version (as of 1/17/10 that would be 1.6.8.)
So far everything works. I love the new HU. Haven't mounted the rear view camera yet but it works when going into reverse and I can view the rear even when not in reverse via a function in the Pioneer HU. Looking forward to putting everything back and go for a ride. Also, I have no clue how to tune this system so any advice would be appreciated.
Basically the harness (PAC C2R-GM24, also known as GMCO) allows you to connect your OEM harness to your new HU without cutting up the factory wires. In addition you retain things like chimes and status update of the car computer. I used this opportunity to do some hacking of the HU as well as making the necessary connections so the OEM steering wheel buttons will work with the new HU via the SWI-PS module.
Use whatever wire connection you are familiar with. I choose to solder the wires and shrink wrap the connections afterward. Certain connections contain more than one wire. For example, the BLACK ground wire from the GMCO connects to 4 other wires (black ground from HU PowerCord, green from HU parking hack, black ground from SWI-PS, and the MUTE wire).
There were 2 unused wires on the GMCO (orange and orange/white). I moved those two wires to 2 new positions on the GMCO (A6 and A7) and used them to wire the SWI-PS.
Start with the GMCO harness, remove the dark tan retaining clip.
Then use a small pin or needle and insert the pin like this with a slight pressure downward. What you are doing is pushing on a �spring� locking mechanism that allows you to withdraw the pin from the harness.
Once removed, you insert them into its new location at A6 and A7.
Two wires from the SWI-PS will connect to these wires at their new locations. A6 provide power from the HU to the SWI-PS while A7 sends info from the SWI-PS toward the buttons. Once you're done your harness should look something like this (not exactly yet since I haven't connected all the wires yet but you get the idea).
Next I access the reverse signal wire near the car's fuse box as shown here. I didn't want to unwrap the electrical tape bundle of wires so I just removed a cover to get access to the light green reverse signal wire.
Then I got access to the VSS speed wire via the black harness near the old HU.
Now you are ready to move to the 110BT PowerCord and make the appropriate connections. If you're interested in doing the bypass on the Z110BT. Here's how it's done:
This is what your harness looks like from the box (not my pic). Notice the position of the yellow (MUTE) wire on the top right side of the harness.
Start by lifting up a white locking mechanism on the harness. Then get a standard staple on your desk and straighten one of the end so it looks like this.
Insert the staple into the top middle smaller hole and again slightly depress downward to release a locking mechanism within the pin so you can pull the yellow pin out the back of the harness. You will move the yellow pin over one position and reinsert in another position so it looks like this.
Finally the bypass is completed by connecting this MUTE yellow wire along with the GREEN parking wire to your BLACK ground wire on the GMCO. Done, that's the Z110BT bypass!
If you plan on a rearview mirror, now is the time to route the wires to the back of the unit. I'm planning to provide ACC power to the camera at the HU end. I want continuous power so I can a use the rear view camera even when the car is going forward just for kicks. Be sure to connect the camera RCA plug to the BROWN rearview camera input. The first time I connect it it to the yellow video input and didn�t get any pictures. That took me a couple hours to diagnose that.
I couldn't decide between these two cameras but I decided to keep the squarish one.
Both are solidly build and made in Korea. They have very similar specs as well.
Do not forget to connect the mic to the HU. Then hook up the antenna with the adapter.
As for the GPS antenna, I removed the center dash speaker and made a special basket to house the magnetic plate. The antenna goes on top of this plate.
Now do a preliminary hookup and check out all the functions making sure everything works. Also now is a good time to program the SWI-PS module. I can tell you the SWI-PS works extremely well and there was no delay. Again, be sure to get the newest version (as of 1/17/10 that would be 1.6.8.)
So far everything works. I love the new HU. Haven't mounted the rear view camera yet but it works when going into reverse and I can view the rear even when not in reverse via a function in the Pioneer HU. Looking forward to putting everything back and go for a ride. Also, I have no clue how to tune this system so any advice would be appreciated.
Last edited by MSO4; 01-17-2010 at 08:44 PM.
01-17-2010, 05:05 PM
#39
Tech Contributor
Good call on moving the unused GMCO wires to the steering wheel wire pins. I do stuff like that at work all the time, but never thought of it for the SWI
Since you still use the OEM amp the only tuning you can do is adjusting the staging and equalizer settings on the HU.
I'm not sure what you did with the mute wire, I didn't think it was needed.
If you haven't already put the dash back together, prior to tightening the 6 OEM screws that hold in the radio and HVAC, give the HVAC unit a push upward towards the vents. My ashtray door had a habit of catching and not opening if I didn't do that.
01-17-2010, 08:50 PM
#40
Racer
Thread Starter
Good call on moving the unused GMCO wires to the steering wheel wire pins. I do stuff like that at work all the time, but never thought of it for the SWI
Since you still use the OEM amp the only tuning you can do is adjusting the staging and equalizer settings on the HU.
I'm not sure what you did with the mute wire, I didn't think it was needed.
If you haven't already put the dash back together, prior to tightening the 6 OEM screws that hold in the radio and HVAC, give the HVAC unit a push upward towards the vents. My ashtray door had a habit of catching and not opening if I didn't do that.
Since you still use the OEM amp the only tuning you can do is adjusting the staging and equalizer settings on the HU.
I'm not sure what you did with the mute wire, I didn't think it was needed.
If you haven't already put the dash back together, prior to tightening the 6 OEM screws that hold in the radio and HVAC, give the HVAC unit a push upward towards the vents. My ashtray door had a habit of catching and not opening if I didn't do that.
I do have an amp, Arc Audio 300.4. I'm not keeping anything OEM.
Thanks for the tip regarding the ashtray door. I'll be sure to do that. As a matter of fact, I'm going for a test drive to make sure everything works before I tighten up the dash.