pics and info on wiring a roem-vet1
 09-30-2010, 01:06 PM
#1
Former Vendor

Thread Starter
I had to take a few minutes this morning to wire up a X920bt for a customer install.
So I figured now was the time to take some pics and makes some notes for everyone who has questions when it comes to doing this while installing you aftermarket radio in your C5
OK
First
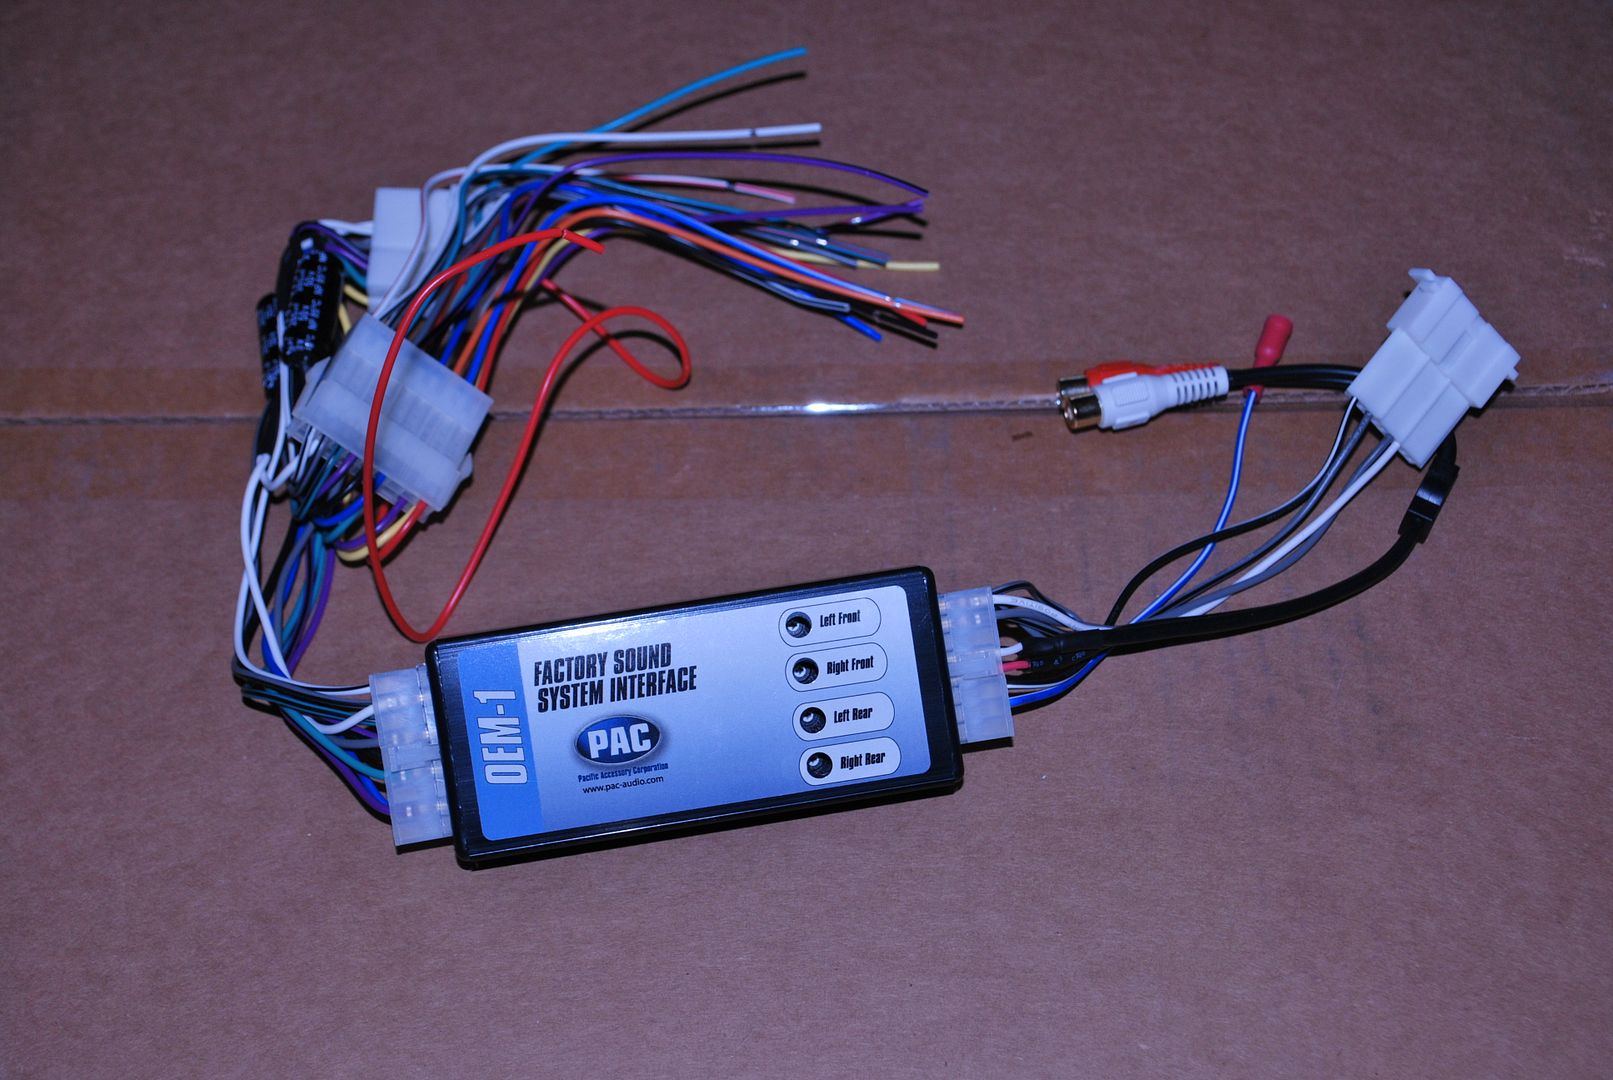
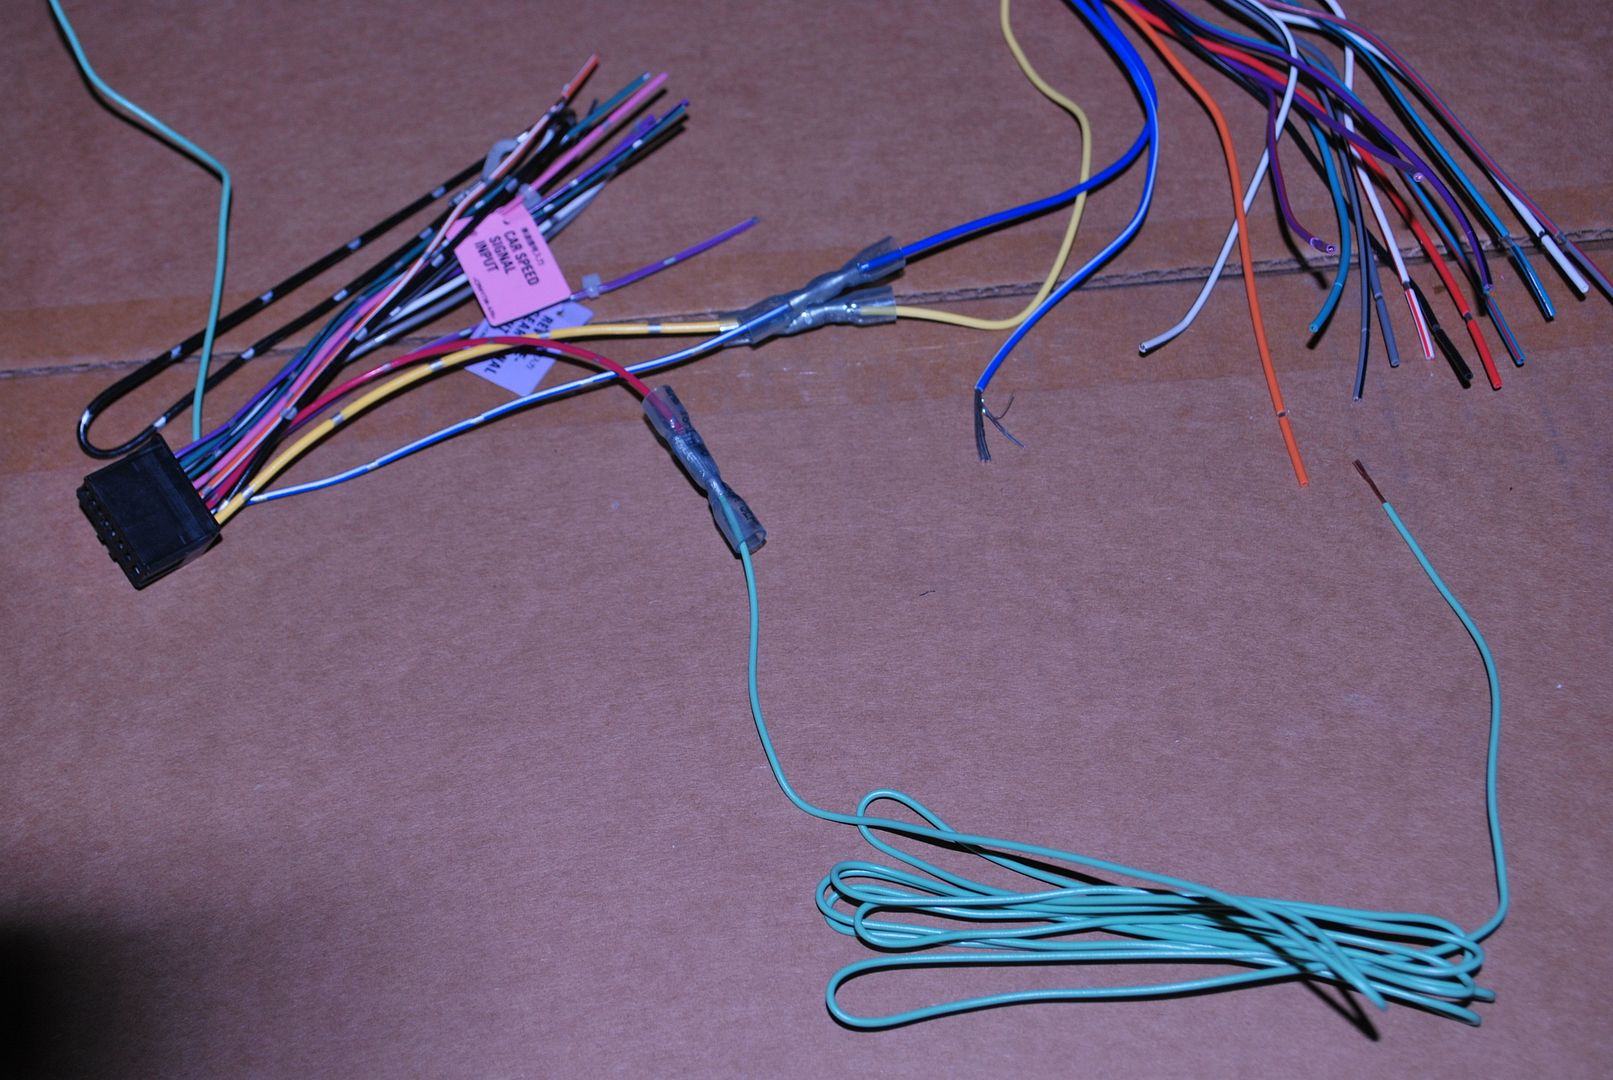
we start with the roem-vet1 harness
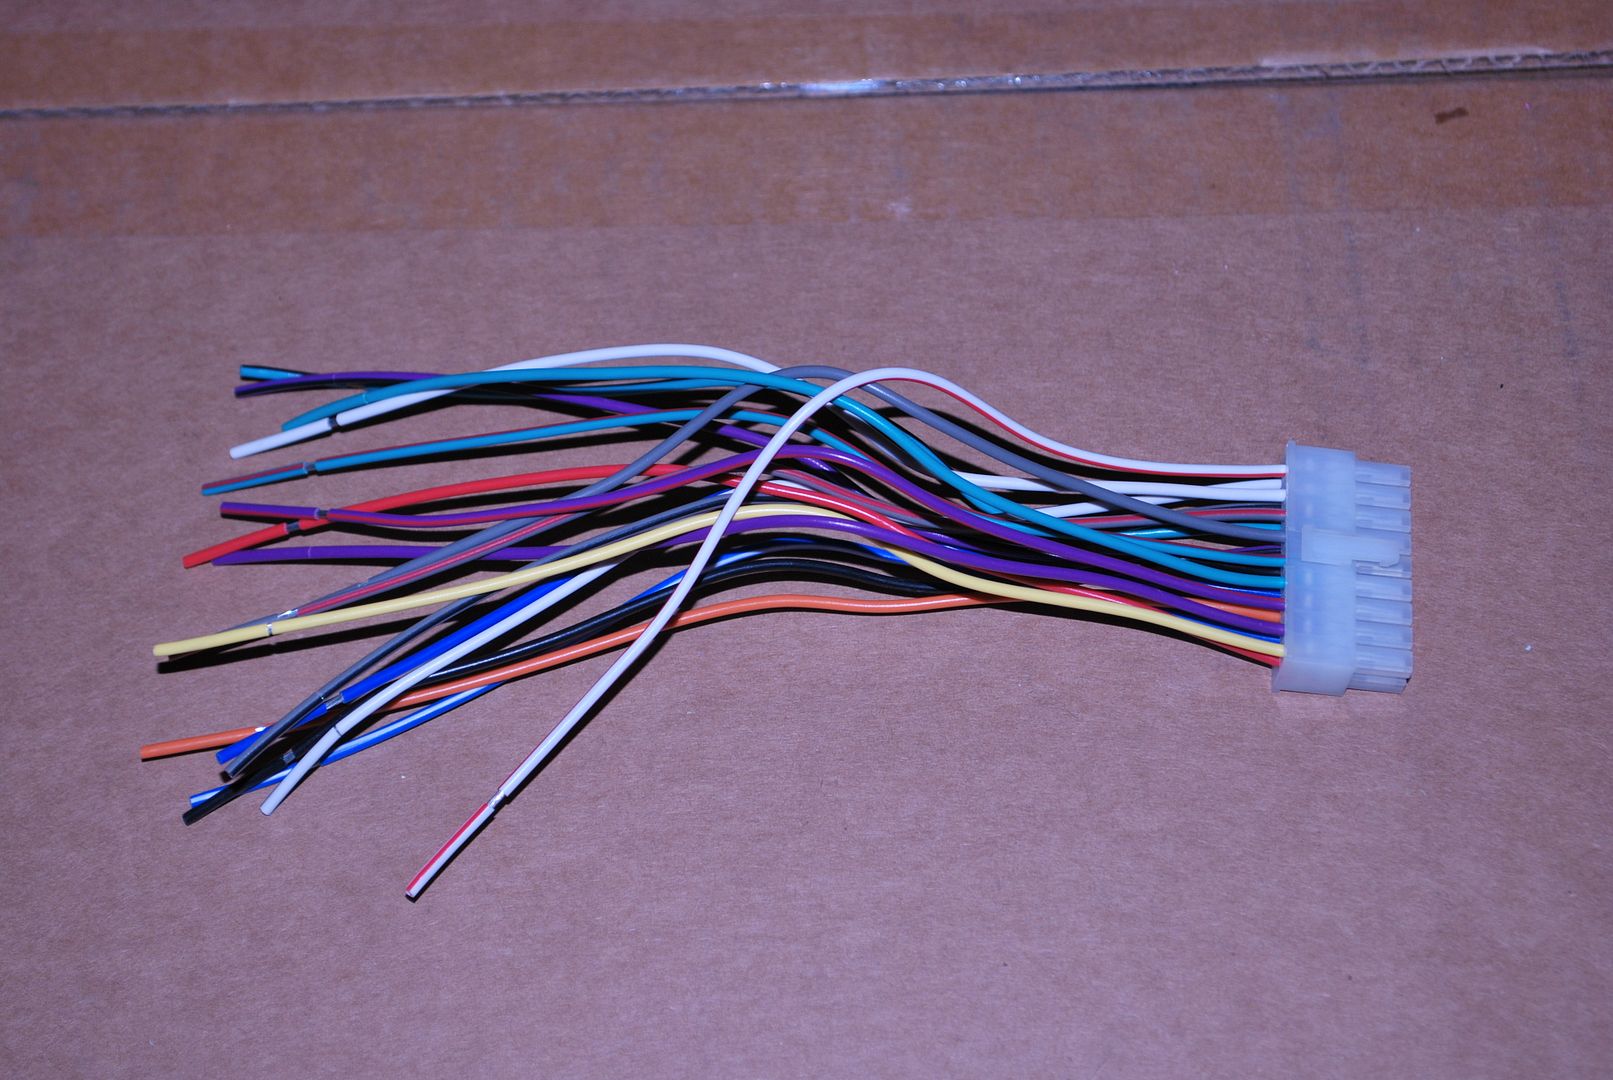
next we take the section of the harness we are going to wire and unplug it from the roem-vet1. This is just an easier way of working on the wiring.
First thing I did and this is the most important part of the process.
The BLUE/WHITE from the radio will connect to the BLUE on the roem-vet1. If you connect blue/white to blue/white then your front door speakers will not work and you will be calling me saying this system sounds like crap! So do this step first!
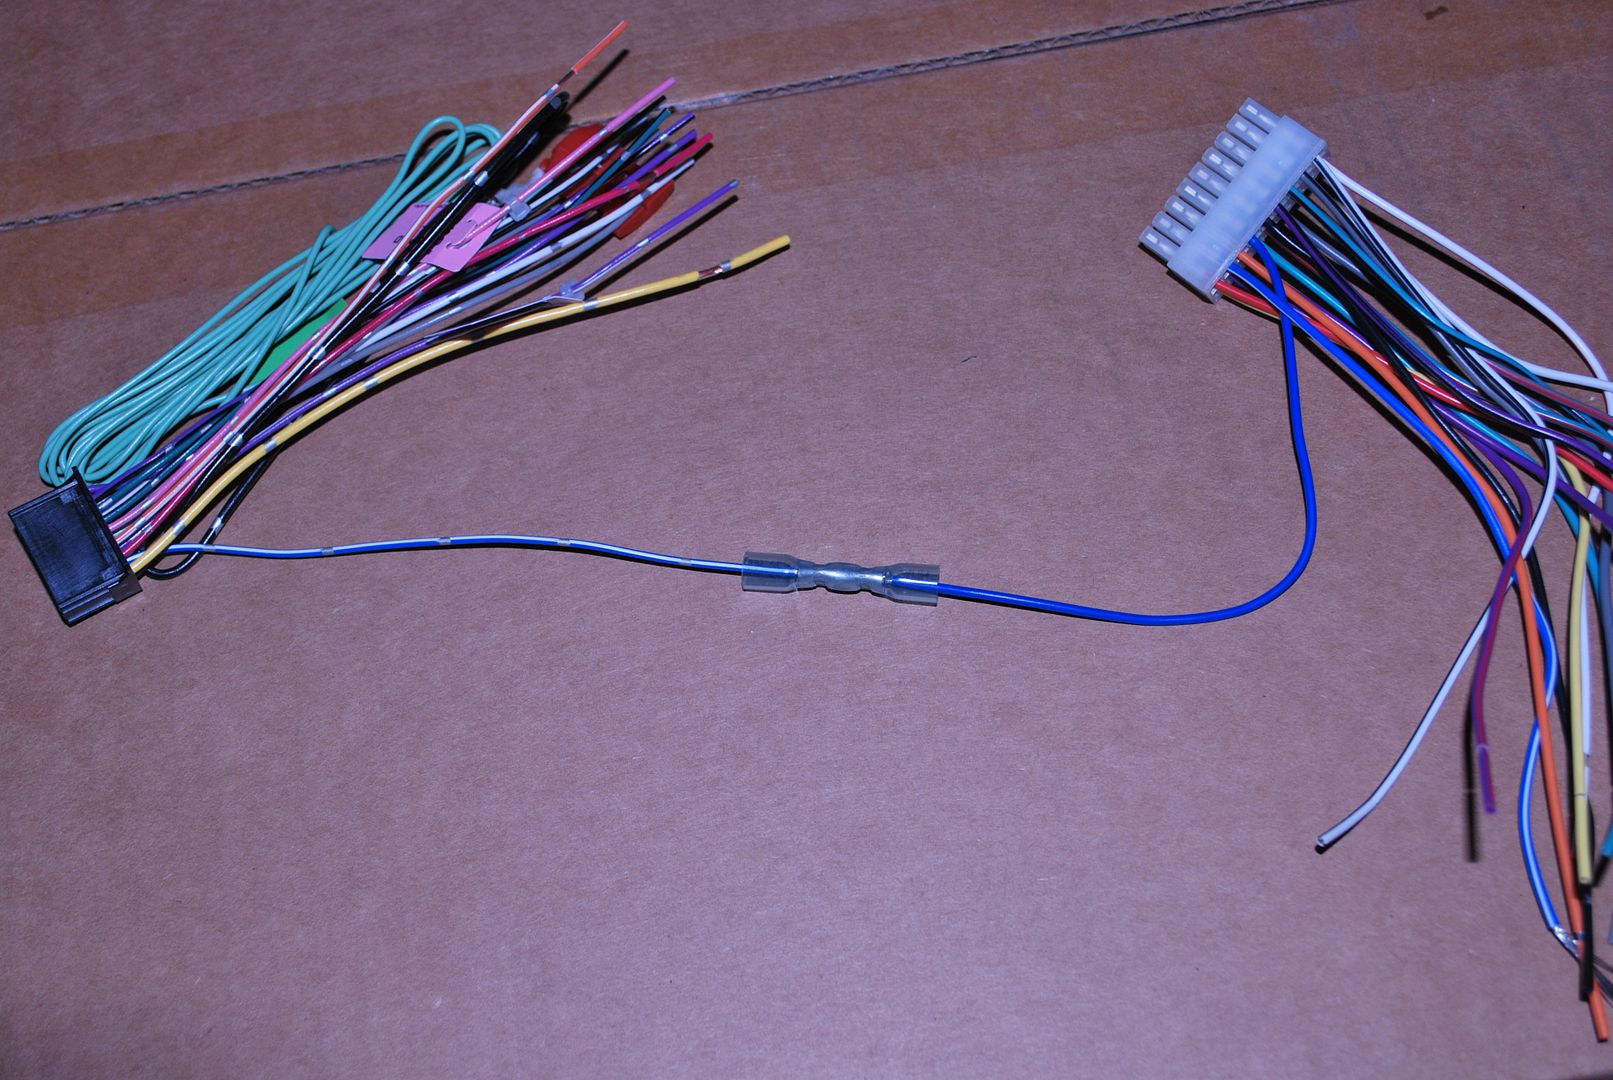
Next step i did was to connect the yellow from the radio to the yellow in the roem-vet1
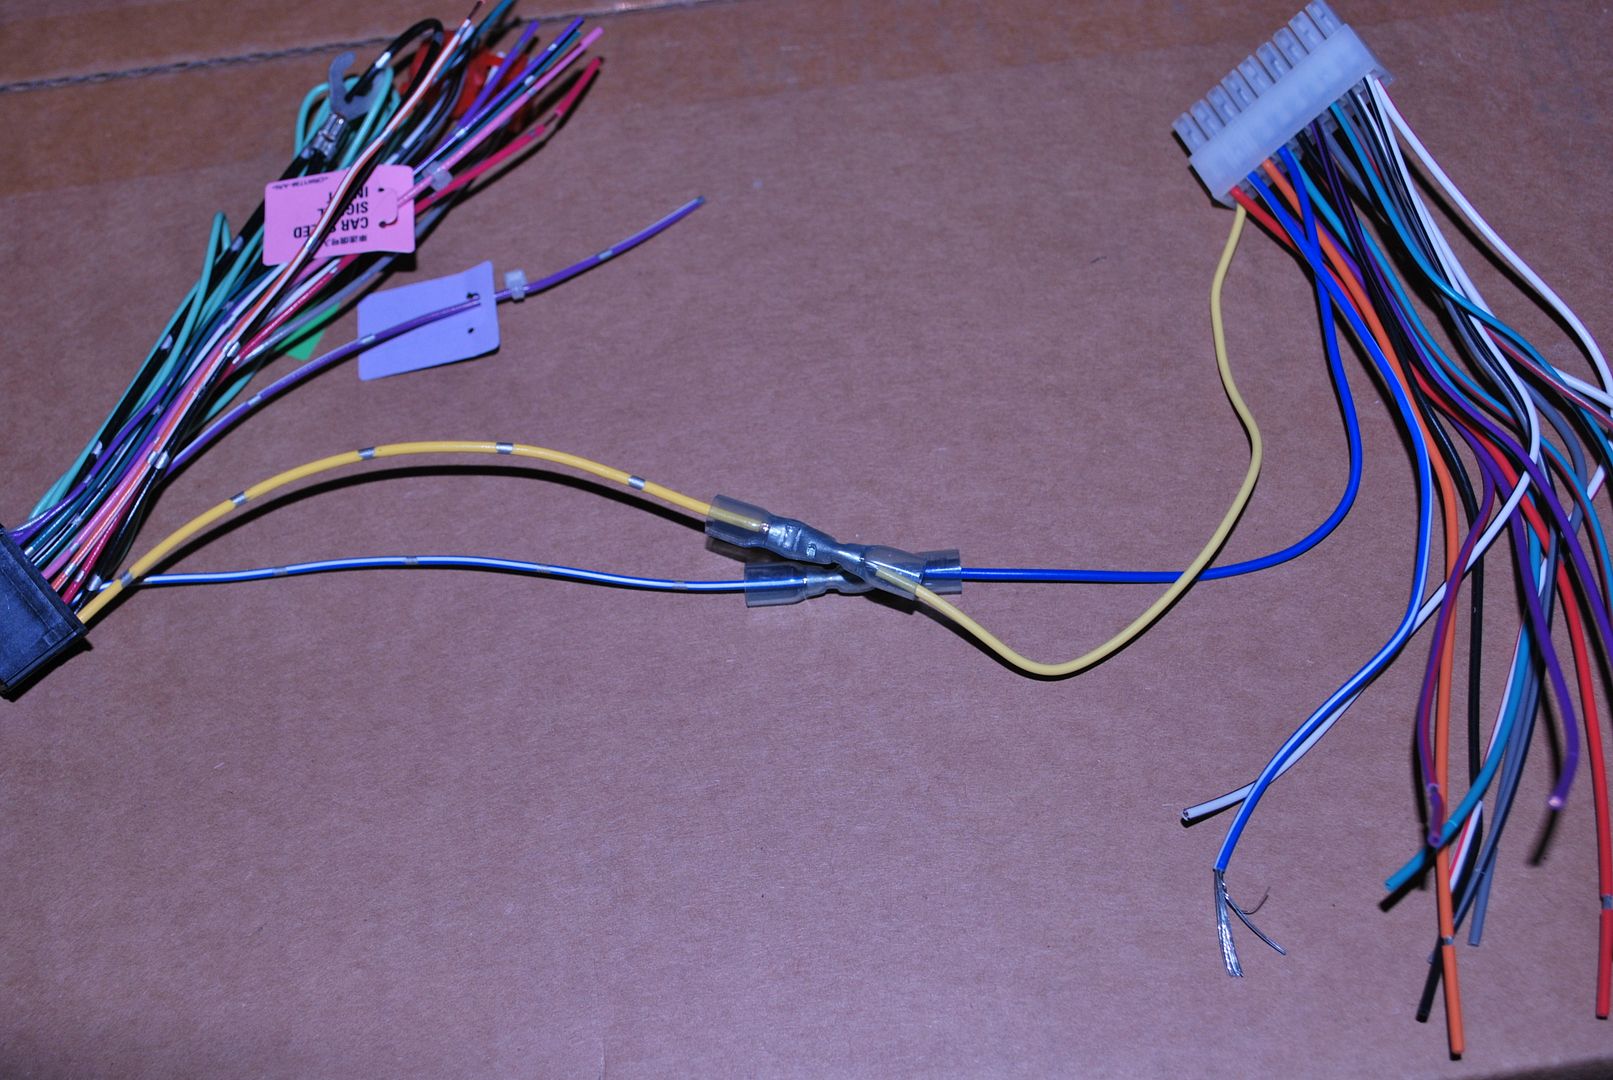
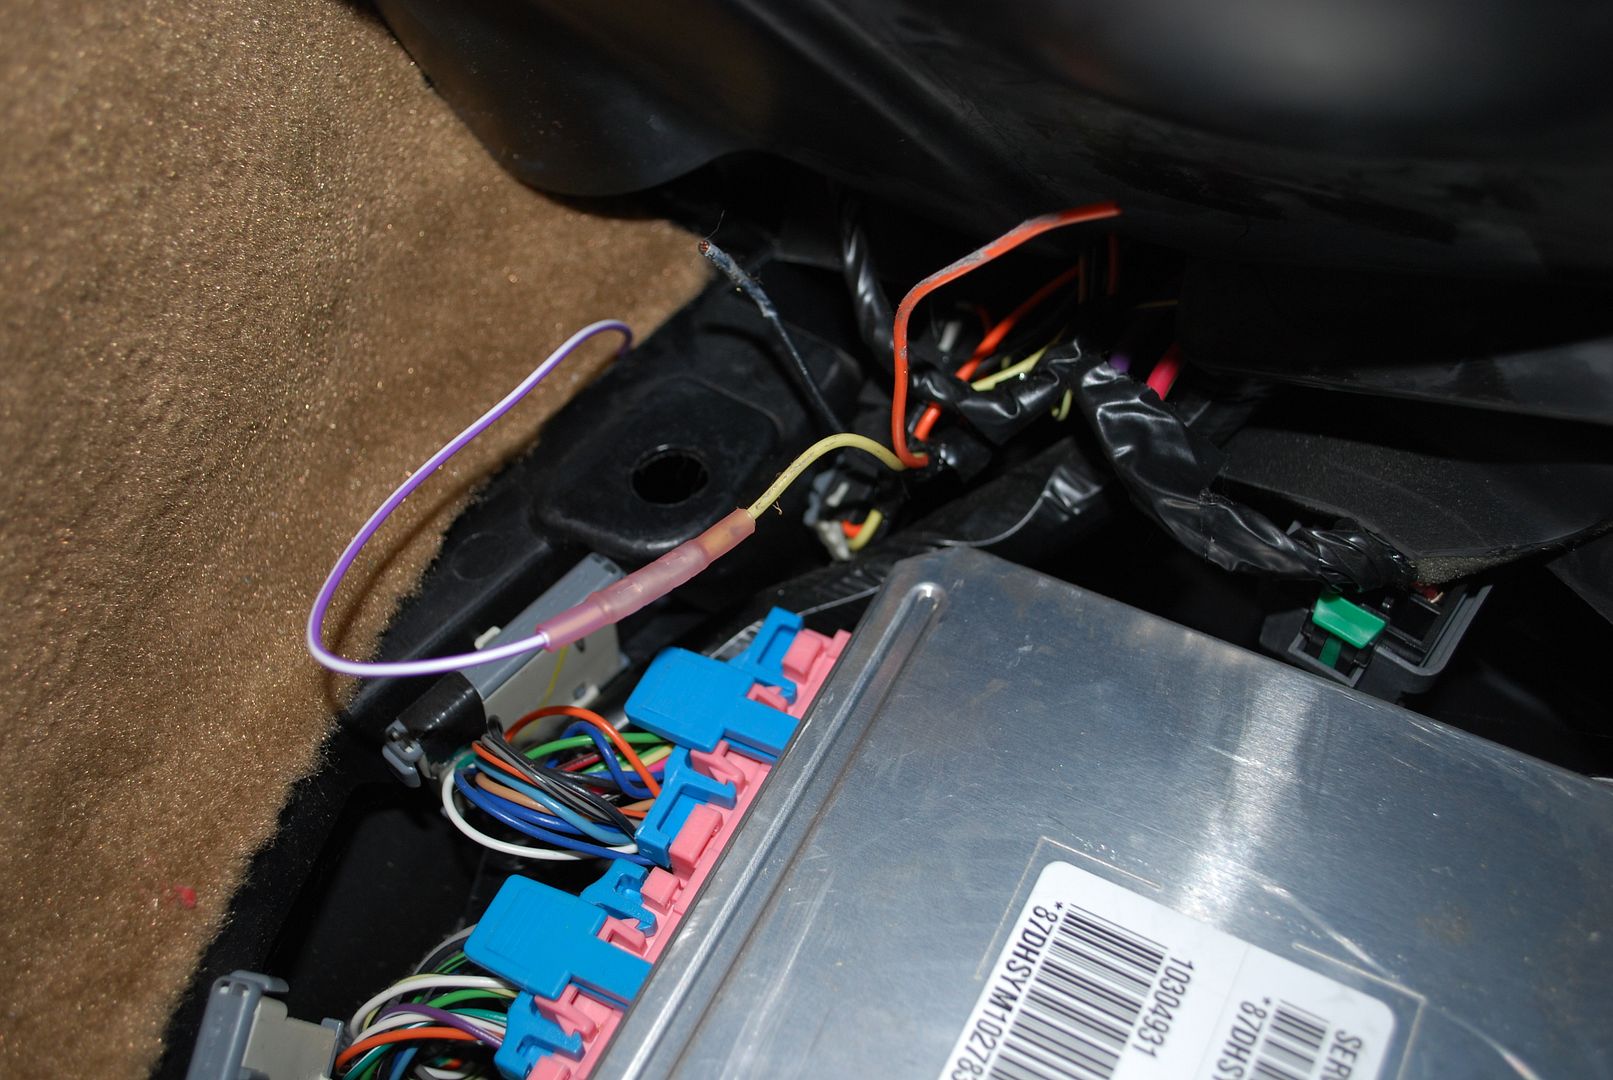
since everyone wants the bypass performed and your not hooking up the green parking wire. I like to cut off the extra wire and use this as an extension for the red ignition wire on the radio harness. As you can see i connected these two together as this will allow you to run to the ignition source which in most cases(97-03) you can run to passenger footwell to the yellow wire that is taped off. (there is also a black and orange wire there as well)
pic of harness
pic of wire instsalled in footwell
note this pic is from a prior install so the wire used to extend is purple just note that above for current install i used a green extension
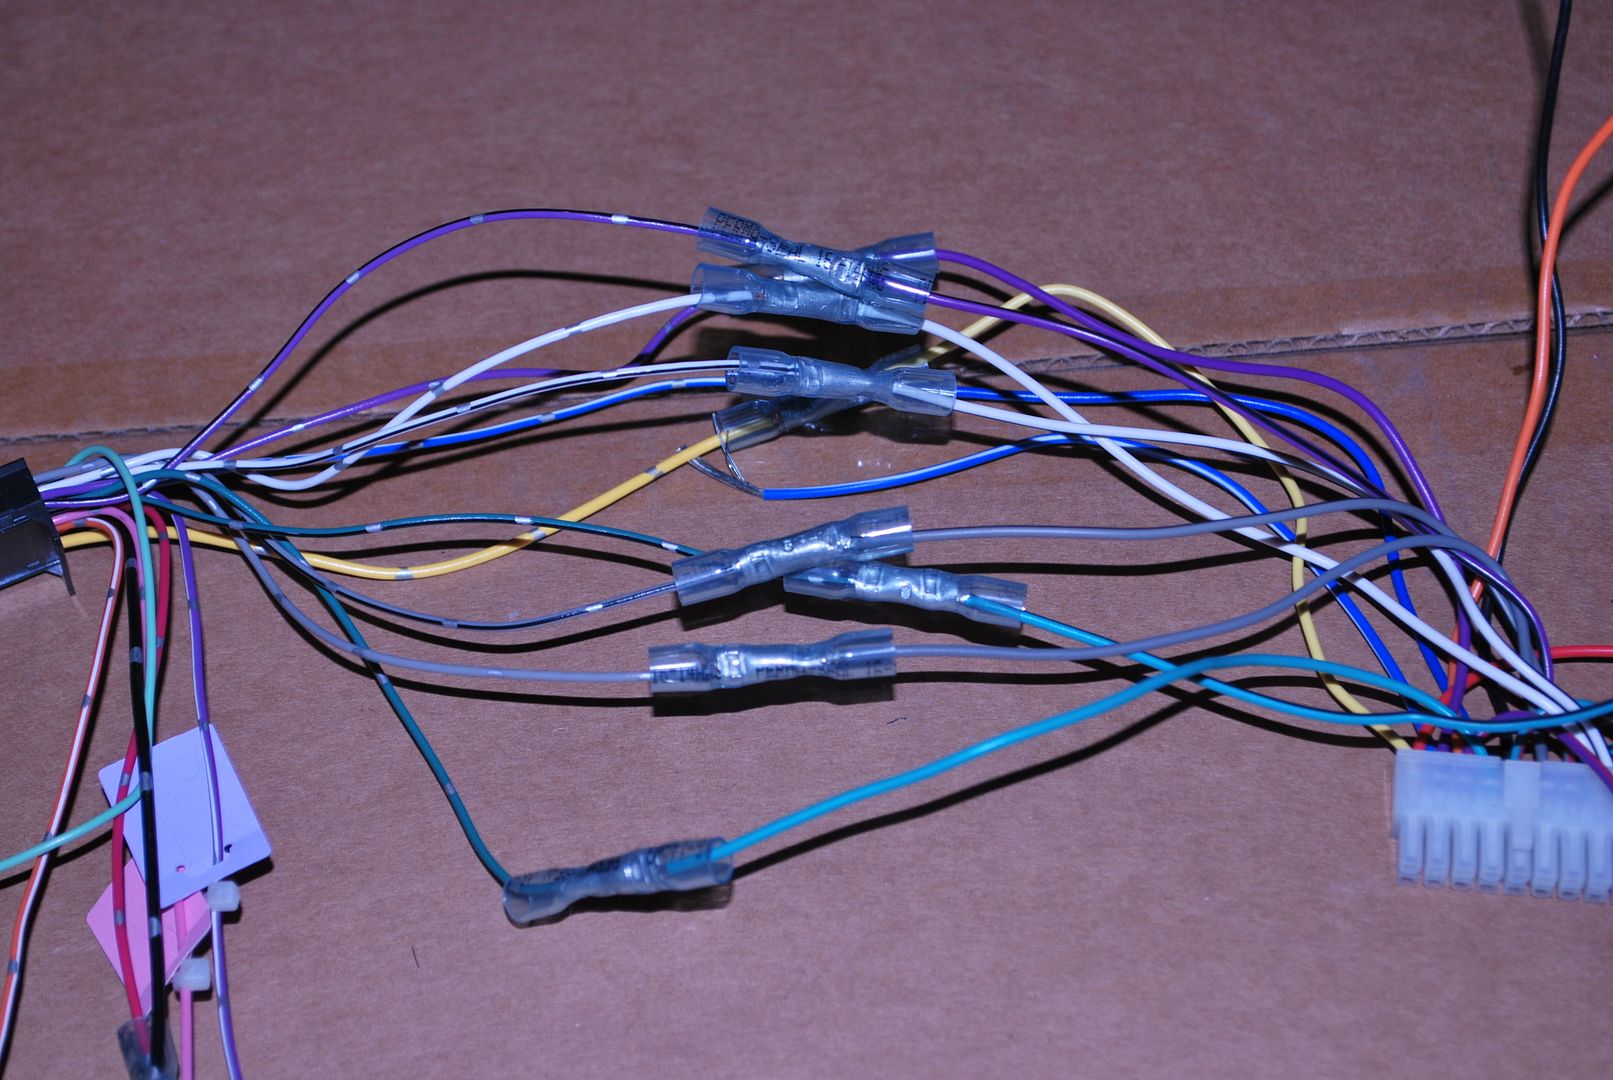
next step is to connect the speaker wires.
This is a matter of matching color to color. NOTE the roem-vet1 has three wires for each speaker. YOU WILL NOT BE USING THE LOW LEVEL SPEAKER WIRE, ONLY THE HIGH LEVEL.
for the most part after this your pretty much done.
Your wondering about the ground wire. In this install we did the bypass on the x920bt which was moving the one yellow/black wire over one notch in the connector. We then took the yellow/black wire we moved, the parking wire and the black ground all form the radio and conencted them to the black ground in the roem-vet1

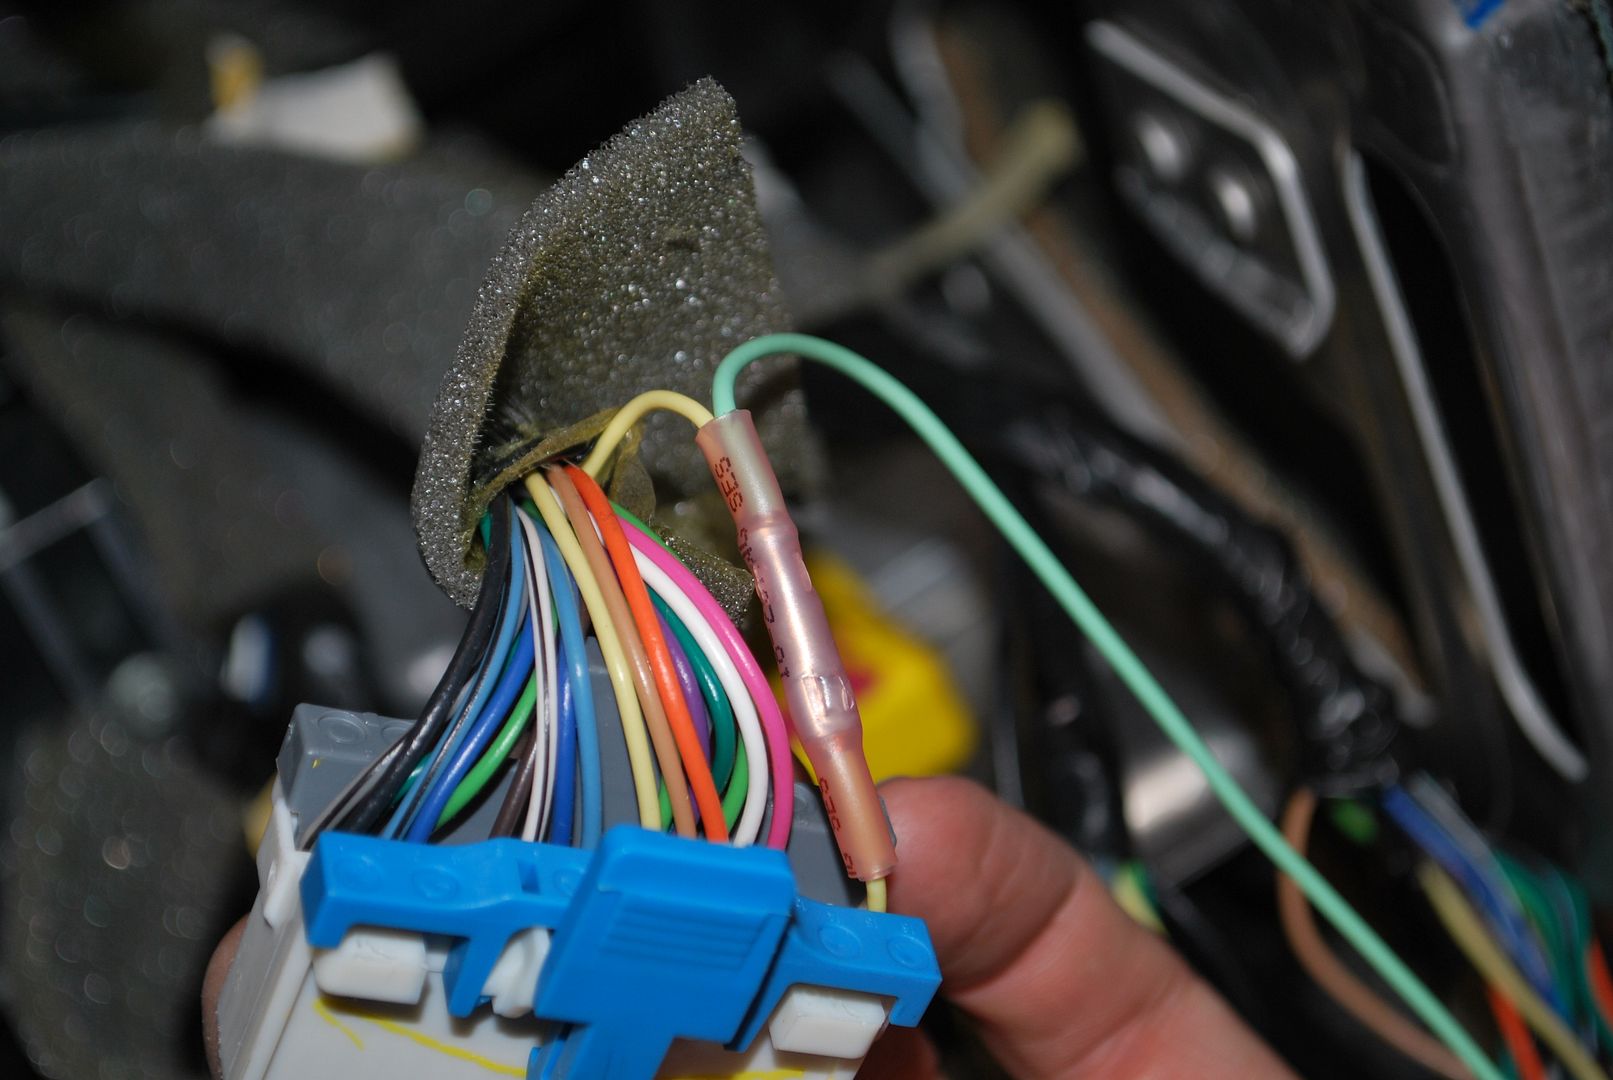
only other wire you will need to worry about is the dimmer wire
to connect the dimmer wire we spliced inth the hvac control harness.
The orange white wire from the radio harness was extended using a left over piece of green and then connected to the cream/yellow colored wire on the far right of the blue side on the hvac connector
I hope this helps everyone out.
If not you know I am always a phone call or email away form helping out as well.
So I figured now was the time to take some pics and makes some notes for everyone who has questions when it comes to doing this while installing you aftermarket radio in your C5
OK
First
we start with the roem-vet1 harness
next we take the section of the harness we are going to wire and unplug it from the roem-vet1. This is just an easier way of working on the wiring.
First thing I did and this is the most important part of the process.
The BLUE/WHITE from the radio will connect to the BLUE on the roem-vet1. If you connect blue/white to blue/white then your front door speakers will not work and you will be calling me saying this system sounds like crap! So do this step first!
Next step i did was to connect the yellow from the radio to the yellow in the roem-vet1
since everyone wants the bypass performed and your not hooking up the green parking wire. I like to cut off the extra wire and use this as an extension for the red ignition wire on the radio harness. As you can see i connected these two together as this will allow you to run to the ignition source which in most cases(97-03) you can run to passenger footwell to the yellow wire that is taped off. (there is also a black and orange wire there as well)
pic of harness
pic of wire instsalled in footwell
note this pic is from a prior install so the wire used to extend is purple just note that above for current install i used a green extension
next step is to connect the speaker wires.
This is a matter of matching color to color. NOTE the roem-vet1 has three wires for each speaker. YOU WILL NOT BE USING THE LOW LEVEL SPEAKER WIRE, ONLY THE HIGH LEVEL.
for the most part after this your pretty much done.
Your wondering about the ground wire. In this install we did the bypass on the x920bt which was moving the one yellow/black wire over one notch in the connector. We then took the yellow/black wire we moved, the parking wire and the black ground all form the radio and conencted them to the black ground in the roem-vet1
only other wire you will need to worry about is the dimmer wire
to connect the dimmer wire we spliced inth the hvac control harness.
The orange white wire from the radio harness was extended using a left over piece of green and then connected to the cream/yellow colored wire on the far right of the blue side on the hvac connector
I hope this helps everyone out.
If not you know I am always a phone call or email away form helping out as well.

 10-11-2010, 02:33 AM
#3
Instructor

Member Since: Aug 2010
Location: Las Vegas NV
Posts: 186
Likes: 0
Received 0 Likes
on
0 Posts
This post saved me today.
DD mods is awesome. Got all of my stuff quickly and looked excellent. Installed it all today, big help to this post.
For those with an 04 vette, look at the FAQ in this forum, around page 7 shows an alternative for the ignition power (yellow wire) - its under the steering wheel. Not terribly difficult to get to.
I also just shoved wire down into the HVAC pin slot. Seemed easier than cutting into it, I just taped the 2 wires together and a little over it.
Thanks again!!

 10-24-2010, 12:04 PM
#6
Team Owner


Tagging this!! Thanks!
10-24-2010, 08:58 PM
#7
Former Vendor
Thread Starter
This post saved me today.
DD mods is awesome. Got all of my stuff quickly and looked excellent. Installed it all today, big help to this post.
For those with an 04 vette, look at the FAQ in this forum, around page 7 shows an alternative for the ignition power (yellow wire) - its under the steering wheel. Not terribly difficult to get to.
I also just shoved wire down into the HVAC pin slot. Seemed easier than cutting into it, I just taped the 2 wires together and a little over it.
Thanks again!!
DD mods is awesome. Got all of my stuff quickly and looked excellent. Installed it all today, big help to this post.
For those with an 04 vette, look at the FAQ in this forum, around page 7 shows an alternative for the ignition power (yellow wire) - its under the steering wheel. Not terribly difficult to get to.
I also just shoved wire down into the HVAC pin slot. Seemed easier than cutting into it, I just taped the 2 wires together and a little over it.
Thanks again!!
Glad it helped Russ!
Post up or send me some installed pics.


Thanks again
Dennis
10-24-2010, 08:59 PM
#8
Former Vendor
Thread Starter
10-24-2010, 09:02 PM
#9
Pro


Member Since: Oct 2009
Location: Waterloo, IA
Posts: 587
Likes: 0
Received 0 Likes
on
0 Posts

So if I understand correctly, the orange and red wires from the ROEM-VET1 will not be used? Instead the leads from the radio will be extended to the spots shown above??
10-24-2010, 09:09 PM
#10
Former Vendor
Thread Starter
10-27-2010, 06:06 PM
#13
Former Vendor
Thread Starter

yep
only difference is the amp wire fromt he radio is a different color than the pioneer and the kenwood blue white.
I dont recall what color it is but your diagram shold tell you
12-08-2010, 03:56 PM
#15
Intermediate
Member Since: Oct 2010
Location: nyack ny
Posts: 42
Likes: 0
Received 0 Likes
on
0 Posts
So I went to wire mine up today and the door amps are not firing. I thought I had picked out the wrong lead on my radio harness, but it's clearly labeled amp on. I did notice double checking the roem paper work that they label blue/white as the amp trigger, not solid blue. Swap and try again?
12-08-2010, 06:16 PM
#16
Le Mans Master


This is C6 not C5 (although I did manage to use the C5 logo as my splash screen, corrected now) but have to put in a plug for Dennis, working and purchasing from him was great, I had a few minor problems and Dennis was right there every time I called and now its in and sounds and works great. Here are a few pics


01-29-2011, 12:12 AM
#17
Instructor
this thread was a HUGE help! Pac's instructions are next to useless.
however, i am left with two questions before i dig in:
-NONE of the red wires on the Pac get connected? just wire the red wire on the radio to 12V ACC and call it good?
-is the PAC harness with the RCA's used or can it be added to my junk drawer?
seriously... thanks a million for this thread! i read those damn directions 20X and got more confused by the minute.
01-29-2011, 11:54 AM
#18
Former Vendor
Thread Starter
this thread was a HUGE help! Pac's instructions are next to useless.
however, i am left with two questions before i dig in:
-NONE of the red wires on the Pac get connected? just wire the red wire on the radio to 12V ACC and call it good?
-is the PAC harness with the RCA's used or can it be added to my junk drawer?
seriously... thanks a million for this thread! i read those damn directions 20X and got more confused by the minute.
however, i am left with two questions before i dig in:
-NONE of the red wires on the Pac get connected? just wire the red wire on the radio to 12V ACC and call it good?
-is the PAC harness with the RCA's used or can it be added to my junk drawer?
seriously... thanks a million for this thread! i read those damn directions 20X and got more confused by the minute.
no red in roem-vet1 used
the rca's are not used either
glad to have been able to help you out with this
Dennis
03-21-2011, 01:11 PM
#19
Intermediate

Member Since: Mar 2010
Location: Orange County California
Posts: 49
Likes: 0
Received 0 Likes
on
0 Posts
Make sure to adjust the 2 front speaker potentiometers on the ROEM-VET1 unit to balace the front speakers and the Bose amps. The factory setting is way too high. You'll get booming sound with no high freq output.
If you system sounds crappy after replacing the HU with PAC ROEM-VET1. Adjuest the potentiometers. I changed my setting from 2 o'clock position to 9 o'clock and it sounds great now.
If you system sounds crappy after replacing the HU with PAC ROEM-VET1. Adjuest the potentiometers. I changed my setting from 2 o'clock position to 9 o'clock and it sounds great now.
Last edited by blackz405; 03-21-2011 at 01:22 PM.
03-21-2011, 04:04 PM
#20
Racer

Member Since: Aug 2009
Location: WA
Posts: 265
Likes: 0
Received 0 Likes
on
0 Posts
Can you recommend a good crimper Dennis? I notice your connections have the middle dimple that cheap crimpers can't do.
Also, is the procedure on a C6 any different? Why can't the red wire on the PAC be used?
Also, is the procedure on a C6 any different? Why can't the red wire on the PAC be used?
Last edited by Thrillhouse; 03-21-2011 at 04:08 PM.

