replaced positive battery terminal in C6
 01-07-2012, 10:40 AM
#1
Drifting

Thread Starter
Member Since: Jun 2006
Location: Chicago Illinois
Posts: 1,294
Likes: 0
Received 17 Likes
on
16 Posts
St. Jude Donor '12

Problem: The GM positive battery post terminal is over-designed and does not lend itself to a very firm connection with the battery post. The stock terminal also does not lend itself to readily adding additional power leads. As a result, to power my amps, I used the remote positive power location at the fuse box, but this is fed by a six gauge wire. I did not feel comfortable running 4 gauge wire from the remove location.
Solution: Replace the stock battery post terminal with an aftermarket unit. I cut the positive wires as close to the terminal as possible and screwed both positive wires (there are two wires under the wire loom) into the 0 gauge output on a Stinger HPM battery post terminal (could not squeeze them into the 4 gauge hole). The other output on the terminal accepts the 4 gauge power wire that powers my amps. The Stinger HPM battery terminal has two outputs and they can be converted between 0 or 4 gauge. The allen screws for the wires are on the bottom of the terminal and on top of the terminal there are two allen screws to tighten the terminal to the battery post. This battery terminal has a strong grip on the battery post. Very firm connection.
The Stinger HPM terminal comes with an adapter so that it can be used on the negative battery post (positive and negative battery posts are different sizes). I am considering cutting off the negative battery post and replacing it with the Stinger unit, but there is very little slack in the negative cable and I am therefore reluctant to mess with something that seems to be working.
Before switching to the Stinger terminal, I tried a Tsunami battery terminal (2 pack that comes with positive and negative terminals). The Tsunami battery terminal is not recommended. I could not get a firm connection between the terminal and the post. The location of the allen screw on the side made it very difficult to tighten the terminal to the post. This battery terminal also chewed up the battery post when trying to get it tight on the battery post. It is also fairly clunky. It may work better in another car and with another battery. In the vette, it is too clunky for the stock battery and there is little clearance to work the allen wrench to get the terminal tight. Not recommended.
Here is a pic of my current setup with the Stinger HPM battery terminal:
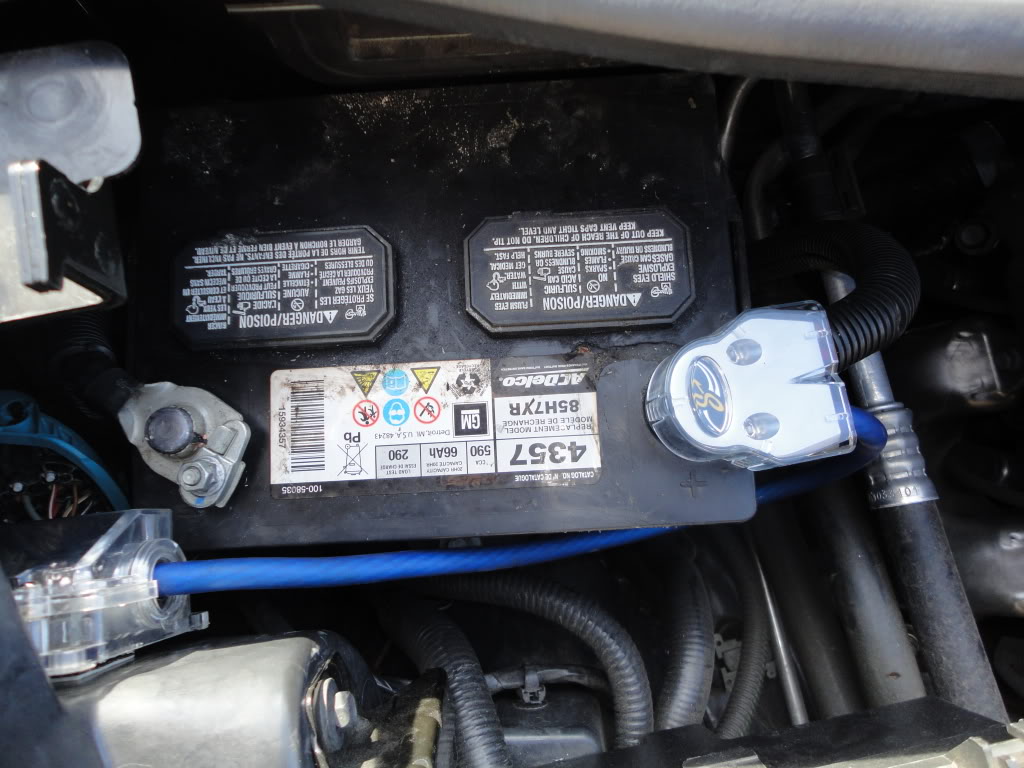
Last edited by kedar; 01-07-2012 at 12:16 PM. Reason: Spelling
 01-07-2012, 11:40 AM
#2
Tech Contributor
I had a similar bad experience with the Tsunami terminals 
To get the - wires on my new terminal I found it was much easier to do the work while the car battery is removed, you'll have plenty of wire to play with
To get the - wires on my new terminal I found it was much easier to do the work while the car battery is removed, you'll have plenty of wire to play with
01-07-2012, 12:14 PM
#3
Drifting
Thread Starter
Member Since: Jun 2006
Location: Chicago Illinois
Posts: 1,294
Likes: 0
Received 17 Likes
on
16 Posts
St. Jude Donor '12
markcz: removing the battery may make it easier to install an aftermarket battery terminal. I just hope that if I remove the stock terminal that I will have enough slack to complete the connection. Let's see pics of your marine terminals.
01-07-2012, 01:00 PM
#4
Tech Contributor
I still haven't installed the - marine terminal, Tsunami seems to be doing fine over there. It will get installed with my next upgrade (hopefully soon  )
)
I wasn't planning on removing the battery when I did the Big-3 and replaced my terminals, but I ran into the same problem you noticed, no room to work on the - wires. With the battery out you can easily pull the oem wires out a bit and re-route them so they'll reach.
If you remove the battery just be sure the wires will reach your new terminal before cutting them off of the oem terminal.
On my + terminal, the blue wire and large fuse on the inside of the fuse box go to my high-output alternator, the red wire next to it goes to the + post on the other side of the fuse box (which is where my current amp power comes from), and the other two red wires are oem. Whenever I finally get around to installing my 3-way active setup I'll be adding an amp lead at the battery and moving the current one from the fuse box post to the battery (but keeping the current jumper).
For help in crimping the terminals on the ends of the larger wires I got one of THESE.


)I wasn't planning on removing the battery when I did the Big-3 and replaced my terminals, but I ran into the same problem you noticed, no room to work on the - wires. With the battery out you can easily pull the oem wires out a bit and re-route them so they'll reach.
If you remove the battery just be sure the wires will reach your new terminal before cutting them off of the oem terminal.
On my + terminal, the blue wire and large fuse on the inside of the fuse box go to my high-output alternator, the red wire next to it goes to the + post on the other side of the fuse box (which is where my current amp power comes from), and the other two red wires are oem. Whenever I finally get around to installing my 3-way active setup I'll be adding an amp lead at the battery and moving the current one from the fuse box post to the battery (but keeping the current jumper).
For help in crimping the terminals on the ends of the larger wires I got one of THESE.
 01-08-2012, 10:23 AM
#6
Melting Slicks

Is it my imagination, or is that battery toast? Look near the positive terminal, there appears to be a rip in the plastic about the width of a pencil there, parallel with the cap. Maybe it's just the picture, but it looks like it's been leaking, too? Might be a good time to pull the battery and inspect it, maybe clean it with baking soda/water.
01-08-2012, 11:45 AM
#7
Tech Contributor
Is it my imagination, or is that battery toast? Look near the positive terminal, there appears to be a rip in the plastic about the width of a pencil there, parallel with the cap. Maybe it's just the picture, but it looks like it's been leaking, too? Might be a good time to pull the battery and inspect it, maybe clean it with baking soda/water.
 I thought you were talking about mine
 Then I took another look at Kedar's pic
 That thing looks like it's had a rough life.
01-08-2012, 12:41 PM
That thing looks like it's had a rough life.
01-08-2012, 12:41 PM
#8
Drifting
Thread Starter
Member Since: Jun 2006
Location: Chicago Illinois
Posts: 1,294
Likes: 0
Received 17 Likes
on
16 Posts
St. Jude Donor '12
Is it my imagination, or is that battery toast? Look near the positive terminal, there appears to be a rip in the plastic about the width of a pencil there, parallel with the cap. Maybe it's just the picture, but it looks like it's been leaking, too? Might be a good time to pull the battery and inspect it, maybe clean it with baking soda/water.

the gunk you see is the remainder of the glue that gm uses to adhere the rubber boot to the battery. i cleaned some of the glue, but stopped short of making the battery pristine... maybe this summer i'll clean up the engine bay. the battery is fine.
01-09-2012, 02:20 PM
#9
Melting Slicks
Ummm.... yea, I was! Tell ya whut... I'll gladly 'recycle' that battery and those nice errr... "bad" cables for you, free of charge. Just pay shipping and handling to me, and I'll take care of the rest. 
No worries... me either. 
Ohhh... gotcha. I saw it and was like
Glad to hear that it's okay. Unfortunately, my battery died on me this morning... so I guess I'm the one with the crappy battery in this thread.
the gunk you see is the remainder of the glue that gm uses to adhere the rubber boot to the battery. i cleaned some of the glue, but stopped short of making the battery pristine... maybe this summer i'll clean up the engine bay. the battery is fine.
Glad to hear that it's okay. Unfortunately, my battery died on me this morning... so I guess I'm the one with the crappy battery in this thread.
01-16-2012, 10:50 AM
#10
Drifting
Thread Starter
Member Since: Jun 2006
Location: Chicago Illinois
Posts: 1,294
Likes: 0
Received 17 Likes
on
16 Posts
St. Jude Donor '12
Here is a comparison of several battery post terminals.
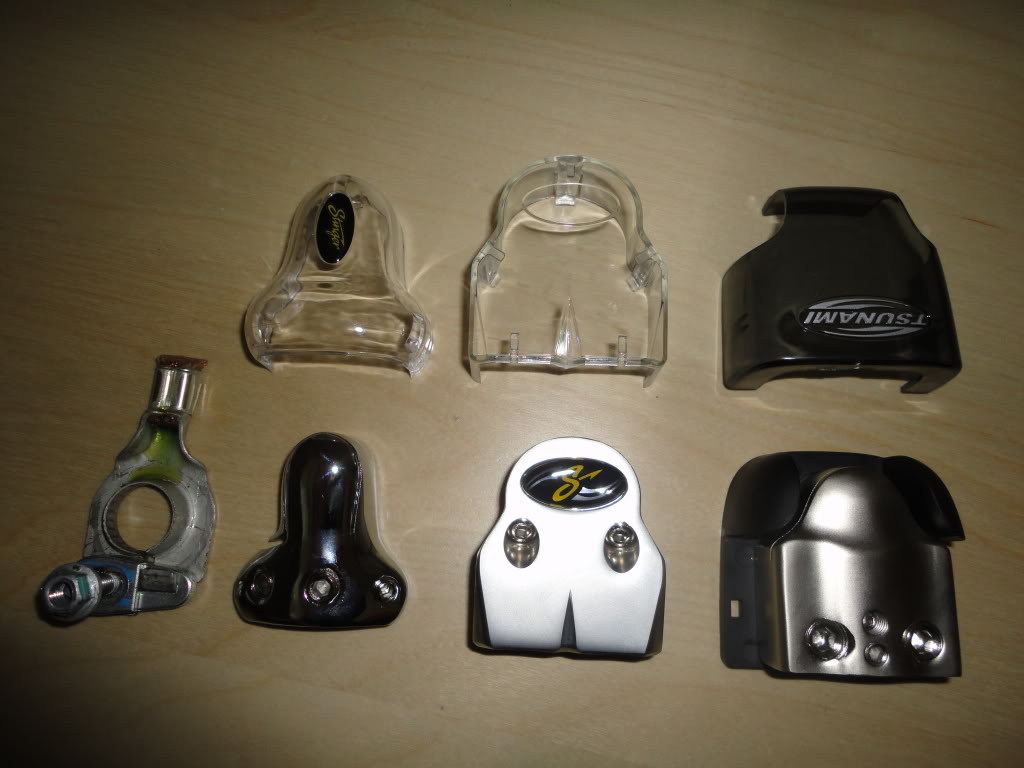
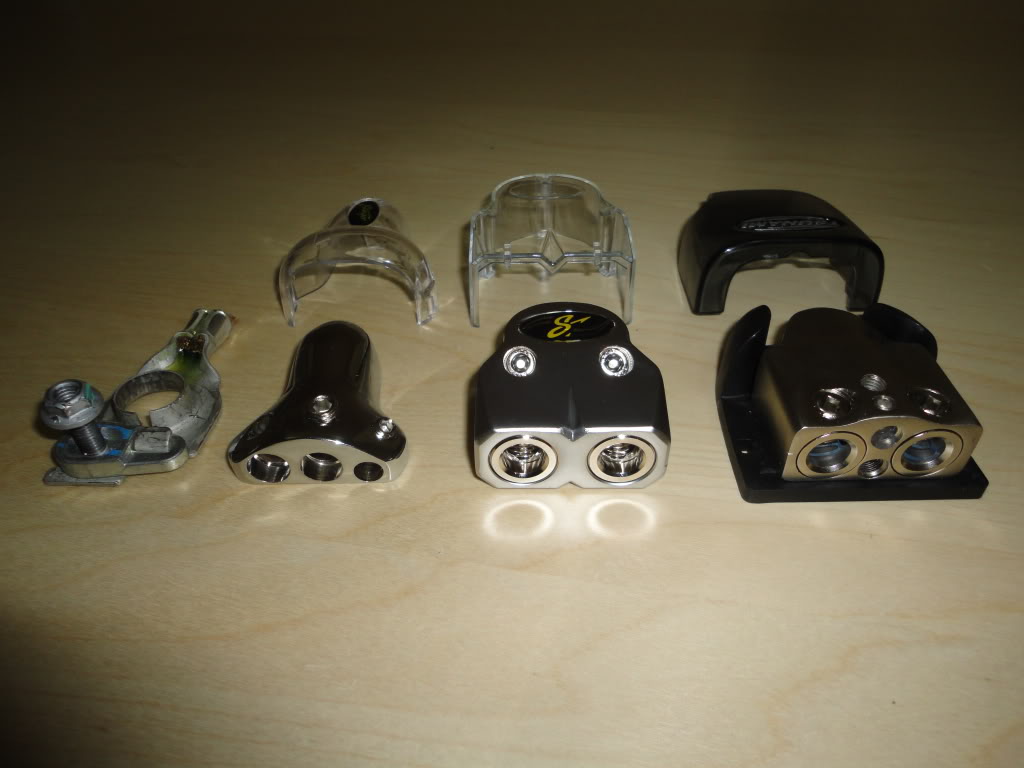
From left to right: stock positive battery terminal, Stinger Shoc-Krome battery terminal, Stinger HPM series battery terminal, Tsunami battery terminal.
Both Stinger battery terminals can be used on either the positive or negative battery post. They have a metal collar inside the terminal that can be removed for use on a positive battery post. The Tsunami terminals come in a two pack with one terminal for the positive battery post and one terminal for the negative batter post.
The Stinger Shoc-Krome terminal can accept two four gauge wires and one 8 gauge wire. The Stinger HPM terminal has two inputs for any combination of 0 or 4 gauge wire. The Tsunami battery terminal has two inputs for any combination of 0/1 gauge wire or 4 gauge wire plus two 8 gauge inputs.
I did not try the Stinger Shoc-Krome terminal, but it appears that it would fit my needs and is relatively inexpensive. There is only one allen screw to tighten the Stinger Scoc-Krome terminal to the post.
I am currently using the Stinger HPM terminal on the positive battery post. I am working up the courage to cut off the stock negative terminal and replace it with the Stinger HPM terminal. The main advantage of the Stinger HPM terminal is that it uses two allen head screws (on top) to clamp onto the battery post, which results in a very tight and secure fit.
I could not get a tight fit with the Tsunami terminal and therefore cannot recommend it, which is a shame because it is relatively inexpensive for both terminals, has plenty of outputs, and has an attractive appearance. Because of the poor fit on the batter post, the Tsunami terminal is not recommended.
01-16-2012, 10:08 PM
#13
Melting Slicks
 02-07-2012, 11:42 PM
#14
Burning Brakes

Member Since: May 2008
Location: Huntington Beach Ca
Posts: 933
Likes: 0
Received 2 Likes
on
2 Posts

Hi guys,
I am looking to replace my corroded cable end and want to go with the Streetwires terminal connector and interlock ring terminals. I am assuming the battery cable is 4 gauge, but from reading this post it seems as though there are two cables going into the OEM terminal. Can anyone confirm the gauges of the OEM cables?


I am looking to replace my corroded cable end and want to go with the Streetwires terminal connector and interlock ring terminals. I am assuming the battery cable is 4 gauge, but from reading this post it seems as though there are two cables going into the OEM terminal. Can anyone confirm the gauges of the OEM cables?
02-08-2012, 07:04 AM
#15
Drifting
Thread Starter
Member Since: Jun 2006
Location: Chicago Illinois
Posts: 1,294
Likes: 0
Received 17 Likes
on
16 Posts
St. Jude Donor '12
I cannot tell you the gauge of the stock wire, but I placed both into one 0 gauge opening on my terminal. The stock wires would have fit into the 4 gauge opening if they handn't been previously clamped down in the tsunami terminal.
Last edited by kedar; 02-08-2012 at 08:19 AM. Reason: Clarification
02-08-2012, 05:21 PM
#16
Tech Contributor
According to the 2007 prints: B+, B-
...and the conversion charts:
mm2 = AWG Size
0.22 = 24
0.35 = 22
0.5 = 20
0.8 = 18
1.0 = 16
2.0 = 14
3.0 = 12
5.0 = 10
8.0 = 8
13.0 = 6
19.0 = 4
32.0 = 2
50.0 = 1/0
A non-Z C6 has one 4 gauge and one 6 gauge connected to the battery. Which is exactly what my '07 has
...and the conversion charts:
mm2 = AWG Size
0.22 = 24
0.35 = 22
0.5 = 20
0.8 = 18
1.0 = 16
2.0 = 14
3.0 = 12
5.0 = 10
8.0 = 8
13.0 = 6
19.0 = 4
32.0 = 2
50.0 = 1/0
A non-Z C6 has one 4 gauge and one 6 gauge connected to the battery. Which is exactly what my '07 has
02-08-2012, 07:27 PM
#17
Burning Brakes
Member Since: May 2008
Location: Huntington Beach Ca
Posts: 933
Likes: 0
Received 2 Likes
on
2 Posts
According to the 2007 prints: B+, B-
...and the conversion charts:
mm2 = AWG Size
0.22 = 24
0.35 = 22
0.5 = 20
0.8 = 18
1.0 = 16
2.0 = 14
3.0 = 12
5.0 = 10
8.0 = 8
13.0 = 6
19.0 = 4
32.0 = 2
50.0 = 1/0
A non-Z C6 has one 4 gauge and one 6 gauge connected to the battery. Which is exactly what my '07 has
...and the conversion charts:
mm2 = AWG Size
0.22 = 24
0.35 = 22
0.5 = 20
0.8 = 18
1.0 = 16
2.0 = 14
3.0 = 12
5.0 = 10
8.0 = 8
13.0 = 6
19.0 = 4
32.0 = 2
50.0 = 1/0
A non-Z C6 has one 4 gauge and one 6 gauge connected to the battery. Which is exactly what my '07 has
03-27-2012, 08:32 PM
#18
Instructor


Member Since: Aug 2005
Posts: 177
Likes: 0
Received 0 Likes
on
0 Posts
Hey Everyone, I just found this post a couple of weeks ago and install one of the Stinger HPM terminals, thinking it would solve the cable problem like kedar. First night after I put it in the car wouldn't start. It wound up being a bad connection of the starter wire. I re-sat the cable when I got home and it's been fine for about 3 weeks. Well now it's giving me a ton of problems and won't start. I've had to disconnect the terminal several times today to get it started. I have the the two stock wires in one connection and the stereo wire in the other, just like kedar. Does anyone have any ideas what the problem is???
Thanks
Thanks
03-27-2012, 10:34 PM
#19
Melting Slicks
Seems you just need to re-seat ALL connects (make sure they are clean then really tight) and use dielectric grease on all contacts. Maybe do a Big-3 ...