
Having problems installing camber kit, help?
 05-25-2008, 06:17 PM
#1
Race Director

Thread Starter
Member Since: Oct 1999
Location: www.ncminsurance.com Bowling Green KY Home of the Corvette!
Posts: 14,109
Received 126 Likes
on
66 Posts
CI 1-2-3-4-5-6-7-8-9-10-11-12 Vet
St. Jude Donor '07-'08
NCM Sinkhole Donor

I got the Pfadt Camber Kit (awesome kit BTW!), and am attempting to install it.
First, I am not having any issues out of the kit, but out of my car.
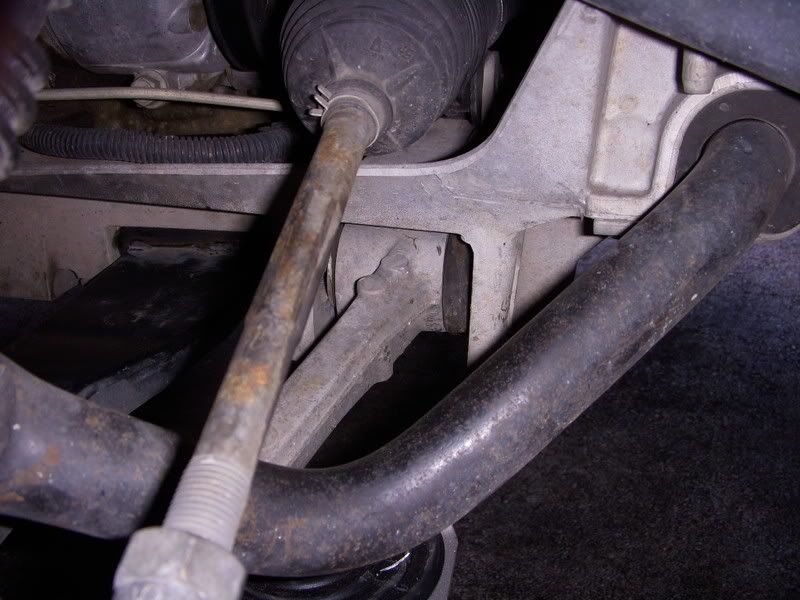
My lower control arms are no allowing the camber plates to slide into place. It is like my LCA's are pushed out from where the camber plates want them to be...How can I move my LCA's back just a hair?
Thanks!
Adam Boca
First, I am not having any issues out of the kit, but out of my car.
My lower control arms are no allowing the camber plates to slide into place. It is like my LCA's are pushed out from where the camber plates want them to be...How can I move my LCA's back just a hair?
Thanks!
Adam Boca
 05-25-2008, 06:30 PM
#2
Team Owner


I am totally lost 
I have Hardbars kit and the pieces fit in the sub frame, fore and aft of the LCA mounting point. How the LCA goes into the clevis would have no bearing on keeping the pieces in place.
Is the Pfadt kit different?
I have Hardbars kit and the pieces fit in the sub frame, fore and aft of the LCA mounting point. How the LCA goes into the clevis would have no bearing on keeping the pieces in place.
Is the Pfadt kit different?
05-25-2008, 06:56 PM
#3
Safety Car

You mean you can't slide the bolt through the plate, subframe, bushing, subframe, plate? It won't line up? I used a prybar or rubber mallet to get the LCA into a happy place to slide the bolt through easily.
Like NoOne, I used the Hardbar kit, so take it for what it's worth.
Love the Pfadt poly bushings, though!
Like NoOne, I used the Hardbar kit, so take it for what it's worth.
Love the Pfadt poly bushings, though!
05-25-2008, 06:57 PM
#4
Safety Car
PS- Don't forget to set the toe when you're done. Installing the camber plates probably left me with 1/2" toe change, easy... and be ready for some up, down, all around if you got the stud kit and spacers. Takes a while to get it where you want the camber and then re-set the toe again.
05-25-2008, 07:07 PM
#5
Race Director
Thread Starter
Member Since: Oct 1999
Location: www.ncminsurance.com Bowling Green KY Home of the Corvette!
Posts: 14,109
Received 126 Likes
on
66 Posts
CI 1-2-3-4-5-6-7-8-9-10-11-12 Vet
St. Jude Donor '07-'08
NCM Sinkhole Donor
I can get the bolts through the the plate, subframe, bushing, subframe, plate, but I can not get the plate in its happy place....
See this .pdf here:
http://www.pfadtracing.com/docs/camber-kit-install.pdf
Page 2 and the first photo shows one of these plates sitting inside the grove of the LCA, my LCA is pushed to far to the outside and I need it to move closer to the engine in order to the plate to rest inside of the grove...
Does this make sense?
Adam
05-25-2008, 07:22 PM
#6
Safety Car
Sure you've got the plate the right way? You want the LCA as far out as possible so you get max track width. When I did mine I had to pry the LCA out rather than shove it back in. You should be able just to put your body weight against it to move it back in, though. At worst, I'd use a dead blow hammer (rubber coated) or rubber mallet.
The grooves are in the subframe, not the control arm, that's some of the confusion.
The grooves are in the subframe, not the control arm, that's some of the confusion.
05-25-2008, 07:27 PM
#7
Melting Slicks

Adam, does the plate fit in between the grooves with the bolt out?? If so you you just need to push or pry the arm in to match up with the hole. Does that sound right?? JD
05-25-2008, 07:41 PM
#8
Race Director
Thread Starter
Member Since: Oct 1999
Location: www.ncminsurance.com Bowling Green KY Home of the Corvette!
Posts: 14,109
Received 126 Likes
on
66 Posts
CI 1-2-3-4-5-6-7-8-9-10-11-12 Vet
St. Jude Donor '07-'08
NCM Sinkhole Donor
Thanks all...that is what I was thinking as well....I will reverse the camber plate and pull the LCA out to see if that works...
Adam
Adam
05-25-2008, 08:33 PM
#9
Safety Car
If it doesn't, try to snap some pics of your car, it may help to see the problem. When I first did mine I fought with it and almost called Gary saying "these things don't fit!" That's when the prybar came out and everything slide together nicely.
05-25-2008, 08:39 PM
#10
Race Director
Thread Starter
Member Since: Oct 1999
Location: www.ncminsurance.com Bowling Green KY Home of the Corvette!
Posts: 14,109
Received 126 Likes
on
66 Posts
CI 1-2-3-4-5-6-7-8-9-10-11-12 Vet
St. Jude Donor '07-'08
NCM Sinkhole Donor
Ok, I got one side in after 45 minutes of struggling.....Now I am trying to pry the other side forward to fit and having tons of resistance....
Should it be this hard?
Adam
Should it be this hard?
Adam
05-25-2008, 08:47 PM
#11
Race Director
Thread Starter
Member Since: Oct 1999
Location: www.ncminsurance.com Bowling Green KY Home of the Corvette!
Posts: 14,109
Received 126 Likes
on
66 Posts
CI 1-2-3-4-5-6-7-8-9-10-11-12 Vet
St. Jude Donor '07-'08
NCM Sinkhole Donor
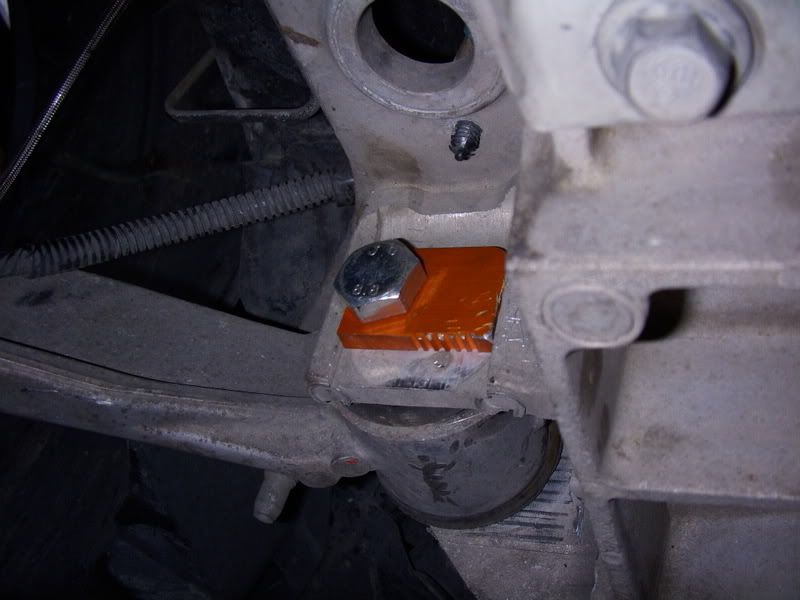
This part needs to move WAY forward, but how?
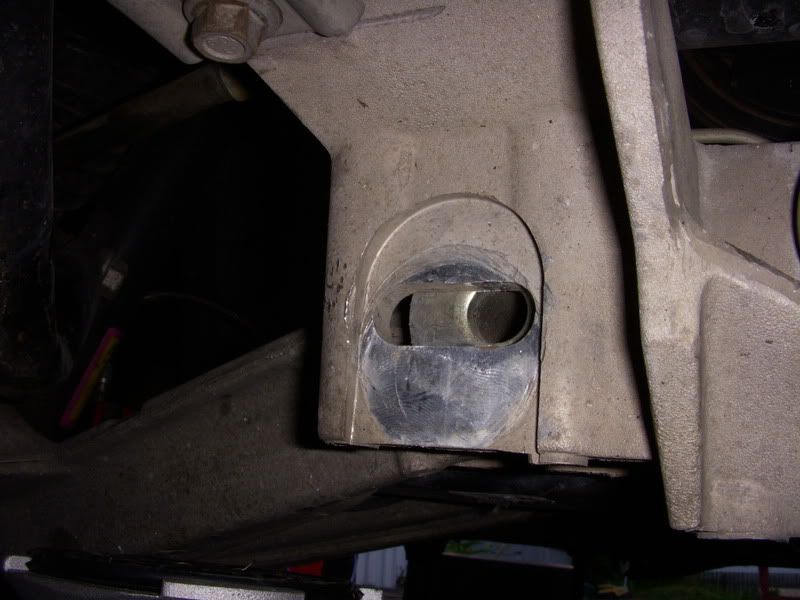
Completed one
 05-25-2008, 08:57 PM
#12
Race Director

looks like you got it, but usually a pry-bar (really long screwdriver) inserted up into the slot adjacent to the control arm will allow you to wedge it far enough out.
Adam, shouldn't you be using the GM Camber Kit????
Adam, shouldn't you be using the GM Camber Kit????
05-25-2008, 09:06 PM
#13
Race Director
Thread Starter
Member Since: Oct 1999
Location: www.ncminsurance.com Bowling Green KY Home of the Corvette!
Posts: 14,109
Received 126 Likes
on
66 Posts
CI 1-2-3-4-5-6-7-8-9-10-11-12 Vet
St. Jude Donor '07-'08
NCM Sinkhole Donor
thanks David, but should it be this hard? Been working on 1 side for 2 hours....
Why would I use the GM Camber kit over this one? As far as I know GM does not sponsor me! LOL.... so I am free to buy whatever right?
Adam
Why would I use the GM Camber kit over this one? As far as I know GM does not sponsor me! LOL.... so I am free to buy whatever right?
Adam
05-25-2008, 11:51 PM
#14
Drifting


Adam -
I had luck pulling the LCA completely out of the subframe and making sure all the grit/surface corrosion/etc was off the subframe (think emery cloth here) and some silicone spray. I did bushings at the same time, so no worries on the bushing bits for me - you may want to kiss the bushing "washers" on the end with some emery cloth and the same spray. That'll make it easy to go in. Then use the prybar to move it where it wants to be. Also, it may help to separate the LCA from the upright (drop the arm) as less mass on the arm will make it easier to move around. You could put a jack under the outside of the LCA to take the weight off if dropping the arm completely isn't an option.
I had luck pulling the LCA completely out of the subframe and making sure all the grit/surface corrosion/etc was off the subframe (think emery cloth here) and some silicone spray. I did bushings at the same time, so no worries on the bushing bits for me - you may want to kiss the bushing "washers" on the end with some emery cloth and the same spray. That'll make it easy to go in. Then use the prybar to move it where it wants to be. Also, it may help to separate the LCA from the upright (drop the arm) as less mass on the arm will make it easier to move around. You could put a jack under the outside of the LCA to take the weight off if dropping the arm completely isn't an option.
05-26-2008, 12:21 AM
#15
Team Owner
Pry bar as everyone else said.
I had a hard time understanding your problem. Mine popped right in but I've done stuff like this alot so I have my array of bottle jacks, pry bars, rubber mallets and the two extra hands to make it all pop together
What sometimes helps is using the old cam bolts, just kind of line it up and tap through the old bolt that'll line everything up, remove and use the bolt that came with it.
I've found its always easier to put it into the clevis, with a rubber mallet or something like that, then its easy to use the pry bar to back it out. Use the mallet to push the control arm all the way in. You'll find there is a sweet spot where the arm will move freely before binding, just have to push it past that spot.
Well placed bottle jacks provide a lot of precision control too.
It was literally a 20 minute job to put all 4 corners on the subframe side when I did mine. Using the cam bolt as a pilot will help you a lot. Also a screw driver through the hole to line things up a bit more before pushing the bolt through.
If your trying to push on those by hand well that might be tough/impossible.
05-26-2008, 07:57 AM
#16
Race Director
I've never had any trouble with them, and I've used GM, Hardbar and Pfadt. Like I said, it does take a lot of leverage to force the arm out to the extremem location (which is a good bit beyond what the OEM concentrics allow).
It was just a jab about the GM parts, not that they have anything to do with the Corvette production facility anyway....however, they are a great deal if you just need the extreme plates.
It was just a jab about the GM parts, not that they have anything to do with the Corvette production facility anyway....however, they are a great deal if you just need the extreme plates.
05-26-2008, 08:47 AM
#17
Safety Car
I may have used a jack under the lower ball joint to take some weight off while prying the control arm out... I would have used a regular floor jack if that were the case. (I don't own a bottle jack.)
05-27-2008, 02:22 AM
#18
Prybar is needed to get into place. Disconnecting the swaybar and either jacking up the control arm or the spring itself also helps. Otherwise the spring is pushing down the the control arm and with teh suspension at full droop the pivot want to go inward. Disconnecting the tie rod helps as well. Make sure both bolts are loose when doing this. It should not be difficult.
05-27-2008, 08:59 AM
#19
Race Director
they ARE supposed to be snug. The goal is not only to dial in the maximum camber, but to LOCK it solidly into place.
If you ever have a concentric come loose during a race, you'll never forget it. I had one work loose (due to a blown shock absorber) at Rd Atlanta, and the car would "steer itself" down the back straight at 170mph. The option was to either drive as hard as I could...or to quit and get no points, so I kept going. Fortunately, it never worked it's way all the way out.
If you ever have a concentric come loose during a race, you'll never forget it. I had one work loose (due to a blown shock absorber) at Rd Atlanta, and the car would "steer itself" down the back straight at 170mph. The option was to either drive as hard as I could...or to quit and get no points, so I kept going. Fortunately, it never worked it's way all the way out.
Last edited by davidfarmer; 05-27-2008 at 09:17 AM.