
C5: Need front control arm bushings - options?
 07-16-2009, 02:57 PM
#1
Burning Brakes

Thread Starter

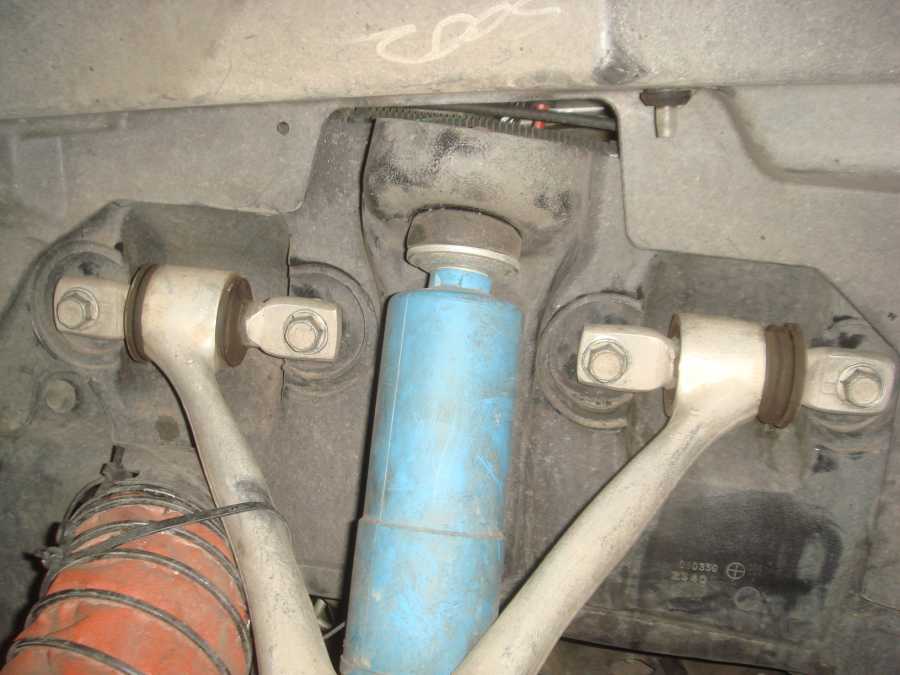
Below is a picture I "borrowed" from member dvandentop (hope thats ok  ) in one of his recent posts.
I have this exact same problem on my 99FRC. The bushing looks almost identical. Dvandentop solved this problem by installing the VBP kit.
I could do the same but before purchasing I wanted to research other options that are available.
I am aware of the kits from VBP and Pfadt. These are complete kits that contain front and rear bushings and do not use any of the stock parts (like the dogbones). At least I think thats true. They are quite pricey > $250.
But another option (possibly) is getting Energy Suspension part number 3.3176G Front Control Arm Bushing for ~$50. Ex: front bushing kit. Clearly this item does not contain all the parts that VBP and Pfadt do. It looks like you have to reuse some of the stock metal parts.
I can do all the work myself - have access to machine shop, presses, etc. And I think I'd install zerk fittings for grease. I don't care about NVH, primary purpose of car is track but it is street legal and I do drive it some on the street.
So my question is - is the Energy Suspension kit or similar a real option or am I fooling myself? Any issue changing front over to polly but still using rubber rear? Your thoughts.
Thanks, Brad
) in one of his recent posts.I have this exact same problem on my 99FRC. The bushing looks almost identical. Dvandentop solved this problem by installing the VBP kit.
I could do the same but before purchasing I wanted to research other options that are available.
I am aware of the kits from VBP and Pfadt. These are complete kits that contain front and rear bushings and do not use any of the stock parts (like the dogbones). At least I think thats true. They are quite pricey > $250.
But another option (possibly) is getting Energy Suspension part number 3.3176G Front Control Arm Bushing for ~$50. Ex: front bushing kit. Clearly this item does not contain all the parts that VBP and Pfadt do. It looks like you have to reuse some of the stock metal parts.
I can do all the work myself - have access to machine shop, presses, etc. And I think I'd install zerk fittings for grease. I don't care about NVH, primary purpose of car is track but it is street legal and I do drive it some on the street.
So my question is - is the Energy Suspension kit or similar a real option or am I fooling myself? Any issue changing front over to polly but still using rubber rear? Your thoughts.
Thanks, Brad

 07-16-2009, 04:06 PM
#3
Former Vendor

Member Since: Nov 2007
Location: Salt Lake City Utah
Posts: 214
Likes: 0
Received 0 Likes
on
0 Posts
St. Jude Donor '08
Autocross & Roadrace Forum Sponsor
The major issue is not the bushing. The major issue is the upper control arm is so compliant that it pulls its self off the bushing. The simple fix for this is to control the fore/aft movement of each pivot of the control arm, just as dcvee astutely pointed out. This is one new key components to our new poly bushing kit. We use a CNC machined upper pin that controls movement in one direction, then back this with a collar and a extreme duty snap ring.
Check it out!

Please let me know if there is anything that I can help with!
PS to dcvee,
The packaging space is really tight in the length direction. Machine one of those locking rings directly in the shaft, so you can eliminate the fasteners and make it thinner. You have 82mm between those bolt bosses on the frame, between where the lock rings fit.
Check it out!
Please let me know if there is anything that I can help with!
PS to dcvee,
The packaging space is really tight in the length direction. Machine one of those locking rings directly in the shaft, so you can eliminate the fasteners and make it thinner. You have 82mm between those bolt bosses on the frame, between where the lock rings fit.
07-16-2009, 04:31 PM
#4
Burning Brakes
Thread Starter
That is very helpful Josh - thank you. So I take it that in your opinion just changing out the bushings to poly (i.e. the $50 fix) is not going to fix this issue in the long run...?
I don't suppose I can buy just your front "kit" and do the rears later?
I don't suppose I can buy just your front "kit" and do the rears later?
07-16-2009, 05:17 PM
#5
Former Vendor
Member Since: Nov 2007
Location: Salt Lake City Utah
Posts: 214
Likes: 0
Received 0 Likes
on
0 Posts
St. Jude Donor '08
Autocross & Roadrace Forum Sponsor
Unfortunately, we currently we sell everything as a complete kit. I will make a request for component products like this one.
07-16-2009, 09:05 PM
#6
Instructor

Member Since: Apr 2009
Location: Mechanicsburg PA
Posts: 155
Likes: 0
Received 0 Likes
on
0 Posts
The major issue is not the bushing. The major issue is the upper control arm is so compliant that it pulls its self off the bushing. The simple fix for this is to control the fore/aft movement of each pivot of the control arm, just as dcvee astutely pointed out. This is one new key components to our new poly bushing kit. We use a CNC machined upper pin that controls movement in one direction, then back this with a collar and a extreme duty snap ring.
Check it out!
Please let me know if there is anything that I can help with!
PS to dcvee,
The packaging space is really tight in the length direction. Machine one of those locking rings directly in the shaft, so you can eliminate the fasteners and make it thinner. You have 82mm between those bolt bosses on the frame, between where the lock rings fit.

 I'd also prolly remove the shoulder off of the bushings and use Delrin spacers instead. But for the price of your entire kit, I don't think it's worth my time!!
Nice stuff there Josh
Hey, also, are you able to say what material durometer you are using? Just so I have a rough idea of the stiffness. And, is/are there grooves in the ID that allow a zerk fitting to provide lubrication to the bushing AND flow out to the retention washers as well?
Don
Last edited by dcvee; 07-16-2009 at 09:08 PM.
07-16-2009, 10:55 PM
#8
Safety Car

But another option (possibly) is getting Energy Suspension part number 3.3176G Front Control Arm Bushing for ~$50. Ex: front bushing kit. Clearly this item does not contain all the parts that VBP and Pfadt do. It looks like you have to reuse some of the stock metal parts.
http://www.prothane.com/make_model.php ... These guys have front & rear control arm bushings available separately.
Last edited by gkmccready; 07-17-2009 at 02:40 AM. Reason: Add prothane link
07-17-2009, 10:48 AM
#9
Former Vendor
Member Since: Nov 2007
Location: Salt Lake City Utah
Posts: 214
Likes: 0
Received 0 Likes
on
0 Posts
St. Jude Donor '08
Autocross & Roadrace Forum Sponsor
Thanks!! Obviously I did that drawing at work in 15 minutes without measuring anything or seeing that you already have the market covered!! So I'll try to invent something else.. I'd also prolly remove the shoulder off of the bushings and use Delrin spacers instead. But for the price of your entire kit, I don't think it's worth my time!!
Nice stuff there Josh
Hey, also, are you able to say what material durometer you are using? Just so I have a rough idea of the stiffness. And, is/are there grooves in the ID that allow a zerk fitting to provide lubrication to the bushing AND flow out to the retention washers as well?
Don
I'd also prolly remove the shoulder off of the bushings and use Delrin spacers instead. But for the price of your entire kit, I don't think it's worth my time!!Nice stuff there Josh
Hey, also, are you able to say what material durometer you are using? Just so I have a rough idea of the stiffness. And, is/are there grooves in the ID that allow a zerk fitting to provide lubrication to the bushing AND flow out to the retention washers as well?
Don
There are grooves in the ID of the bushing. If someone was so inclined to drill and tap the control arm you could install grease zerts.
I am still working on trying to make some of kits available for sale as separate components.
07-17-2009, 01:18 PM
#10
Drifting


Personally, having done the poly route, I'd not go down that path again for the uppers, especially considering you don't care about NVH.
Get the spherical bearing setup that someone makes in the upper arms, its a better solution overall. If you add a stud kit, you can then adjust the suspension alignment at the top instead of at the bottom. That'll let you kick the lower arms out as far as they'll go and get a wider track.
Now that I have a lathe I'm going to ditch the poly on the lower arms in favor of delrin, and put spherical bearings up top.
Oh, and I drove my car with poly in one end and rubber in the other for a few weeks with no issues (of course I didn't track it, so I'm not sure how that would have worked).
07-20-2009, 11:30 AM
#11
Former Vendor
Member Since: Nov 2007
Location: Salt Lake City Utah
Posts: 214
Likes: 0
Received 0 Likes
on
0 Posts
St. Jude Donor '08
Autocross & Roadrace Forum Sponsor
Personally, having done the poly route, I'd not go down that path again for the uppers, especially considering you don't care about NVH.
Get the spherical bearing setup that someone makes in the upper arms, its a better solution overall. If you add a stud kit, you can then adjust the suspension alignment at the top instead of at the bottom. That'll let you kick the lower arms out as far as they'll go and get a wider track.
Now that I have a lathe I'm going to ditch the poly on the lower arms in favor of delrin, and put spherical bearings up top.
Oh, and I drove my car with poly in one end and rubber in the other for a few weeks with no issues (of course I didn't track it, so I'm not sure how that would have worked).
Get the spherical bearing setup that someone makes in the upper arms, its a better solution overall. If you add a stud kit, you can then adjust the suspension alignment at the top instead of at the bottom. That'll let you kick the lower arms out as far as they'll go and get a wider track.
Now that I have a lathe I'm going to ditch the poly on the lower arms in favor of delrin, and put spherical bearings up top.
Oh, and I drove my car with poly in one end and rubber in the other for a few weeks with no issues (of course I didn't track it, so I'm not sure how that would have worked).

 07-20-2009, 11:52 AM
#12
Safety Car
Just for completeness, DRM, LGM and Blackdog Speed Shop all offer monoball solutions, too.
Delrin would be nice, but you just can't use it everywhere since not everything is square. It'd sure be nice to see a delrin+poly+camber plate+stud kit Happy Meal Deal. Especially if you could buy it in stages.
Delrin would be nice, but you just can't use it everywhere since not everything is square. It'd sure be nice to see a delrin+poly+camber plate+stud kit Happy Meal Deal. Especially if you could buy it in stages.
07-20-2009, 12:21 PM
#13
Instructor
Member Since: Apr 2009
Location: Mechanicsburg PA
Posts: 155
Likes: 0
Received 0 Likes
on
0 Posts
Just for completeness, DRM, LGM and Blackdog Speed Shop all offer monoball solutions, too.
Delrin would be nice, but you just can't use it everywhere since not everything is square. It'd sure be nice to see a delrin+poly+camber plate+stud kit Happy Meal Deal. Especially if you could buy it in stages.
Delrin would be nice, but you just can't use it everywhere since not everything is square. It'd sure be nice to see a delrin+poly+camber plate+stud kit Happy Meal Deal. Especially if you could buy it in stages.
I wouldn't mind using Delrin if my application was for racing...and would see frequent inspection/replacement. I don't trust it for a street/hpde car since I don't check it often. Delrin absorbs moisture and can deteriorate quickly. I'd use it to control lateral movement but I'm not comfortable with putting it in a situation that might have an articulating load and I can't keep an eye on it.
Help me with this. If the bottom A arm is limited in one plane(up, down or vertical)why does the top A arm need to articulate? I see some folks offering spherical solutions?? Granted, I haven't had ANY time to really look at the engineering behind the vette so my observation may be off.
If one limited the bottom Arm to one plane and the top the same, then the top could be moved forward and back to control caster. There appears to be room. I don't like using the shims on the top arms to "swing" the spindle into the correct caster range. I mean the top and bottom of the spindle have ball joints?
Also, I don't want to reinvent the wheel...so if this has been covered and is not of concern, just say so!!!
I have one vehicle to get off my plate(hopefully this wednesday)and then I can start looking at this car.
Don
07-20-2009, 12:21 PM
#14
Drifting
My solution to the stages: i bought a lathe, I'll build my own in bits and pieces. I've got poly in there now, and am definitely not happy with it. I've got to do something.
Of course, I won't be driving the car in the winter here, so I've got that whole rainy cold period to get it fixed up.
07-20-2009, 12:24 PM
#15
Burning Brakes
Thread Starter
I'd love to have the spearicals but at close to 2K they are way more than I need to be spending on this.
I'm still hoping Josh will come up with a way to get the Pfadt poly/aluminum bushings by the component (i.e. the front only)
I'm still hoping Josh will come up with a way to get the Pfadt poly/aluminum bushings by the component (i.e. the front only)
07-20-2009, 12:30 PM
#16
Safety Car
The short answer in the front is caster. And in the rear the answer is camber. Stock you adjust camber/caster with two eccentrics on the LCA in the front, and one in the rear for camber. You can lock the front lowers with camber plates, then adjust camber/caster on the uppers -- but that means the uppers wouldn't be square. In the rear, even with camber plates, the lowers aren't square.
On the C6Z you could get away with Delrin entirely in the rear since it matches the front-style mounts on the upper control arm but you don't need caster so (I assume!) you'd keep the upper square.
I'm been happy with my Pfadt poly bushings so long as I keep them lubed. Well, I would like the positive retainer on the front uppers!
07-20-2009, 01:21 PM
#17
during a pre-HPDE inspection I discovered I too need some new upper control arm bushings. Mine look almost identical to the ones in the first post. I'm not about to drop $1800 on the Pfadt set, although they look really nice, so it looks like I'll be going the energy suspension route.
07-20-2009, 04:40 PM
#18
Melting Slicks


But, ya'll are makin this way too hard.....
You don't need to spend a bundle or put in poly bushings the fix is simple and you have all the parts right on the car, right now..
All you need to do is:
1. Measure the distance between the control arm "ears" or the rearmost bolt on the front arm and the most forward bolt on the rear arm.
2. Put the upper rear ear in a vise and spin the control arm so that the bushing and ear pop out.
3. Put it back in from the other side so that both bushings have their flanges on the forward side of the arm. Make sure that the distance between the mounting flanges or ears are the same as they were when you took them out. Bottom out the back flange and put the forward bushing ear in the vise and back it out until the distance is correct.
4. Put the control arms back on and don't worry about it anymore...
What this does is give you an axial location flange on the pressure side of the rear arm. The way the stock arms are set up, the front leg of the arm has to do all of the work and it distorts over time and the bushing pops out. If you flip the rear bushing it solves it neatly. When the front bushing works its way forward, then you have both bushings sharing the load and it won't move anymore.. You don't have any issues with harshness and all it costs is an hour of so of your time....
Not a legal thing for a stock class autocross car, we need to just go buy new arms from time to time, but for a track day car do it and don't look back.... Did it for a friend and it works...
Last edited by Solofast; 07-20-2009 at 05:21 PM.
The following users liked this post:
chempowr (01-12-2021)
07-20-2009, 05:08 PM
#19
Burning Brakes
Thread Starter
Yes that is a fact jack...
But, ya'll are makin this way too hard.....
You don't need to spend a bundle or put in poly bushings the fix is simple and you have all the parts right on the car, right now..
All you need to do is:
1. Measure the distance between the control arm "ears" or the rearmost bolt on the front arm and the most forward bolt on the rear arm.
2. Put the upper rear ear in a vise and spin the control arm so that the bushing and ear pop out.
3. Put it back in from the other side so that both bushings have their flanges on the forward side of the arm. Make sure that the distance between the mounting flanges or ears are the same as they were when you took them out. Bottom out the back flange and put the forward bushing ear in the vise and back it out until the distance is correct.
4. Put the control arms back on and don't worry about it anymore...
What this does is give you an axial location flange on the pressure side of the rear arm. The way the stock arms are set up, the front leg of the arm has to do all of the work and it distorts over time and the bushing pops out. If you flip the rear bushing it solves it neatly. When the front bushing works its way forward, then you have both bushings sharing the load and it won't move anymore.. You don't have any issues with harshness and it works....
Not a legal thing for a stock class autocross car, we need to just go buy new arms from time to time, but for a track day car do it and don't look back.... Did it for a friend and it works...
07-20-2009, 07:30 PM
#20
Melting Slicks
Here is what a control arm looks like when it is done. This is the LF arm, and the front bushing is on the left side of the pic... This will also restore the caster that can be lost when the arm creeps forward. In time it should go back to the correct positon and then stop since the load will be shared between the front and rear arms. The earlier you do this the better it works....
