
DIY install Pfadt CA bushings on C5Z
 12-07-2009, 09:31 PM
#1
Cruising

Thread Starter

Member Since: May 2007
Posts: 13
Likes: 0
Received 0 Likes
on
0 Posts
This is a diy with hand tools of the latest C5 bushing set. This is not a how to R&R control arms, for that there are other posts, so we start with the arms off the car.
Tools you will need:
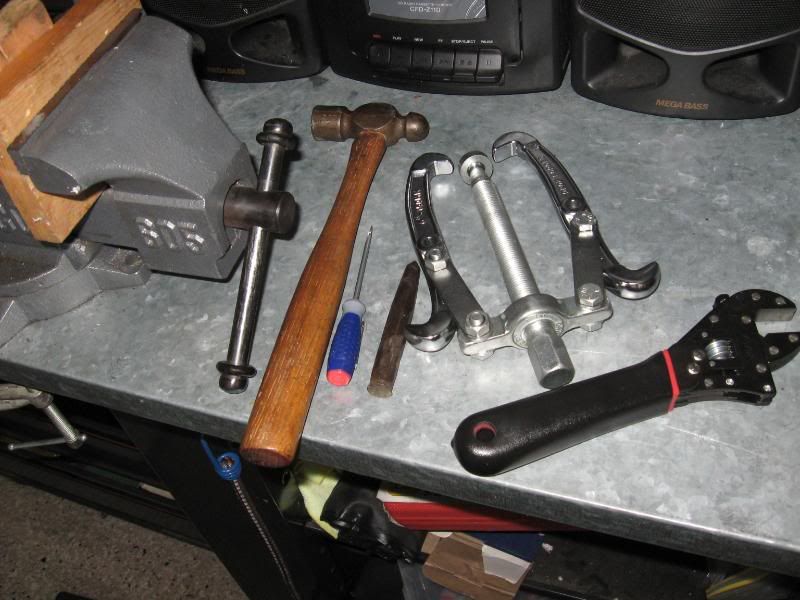
Also some tools below I made from HD purchases:
Threaded stock with nuts and flat washers and a cut piece of fence rail that fits just over the ca pin and inside the ca swivel point.
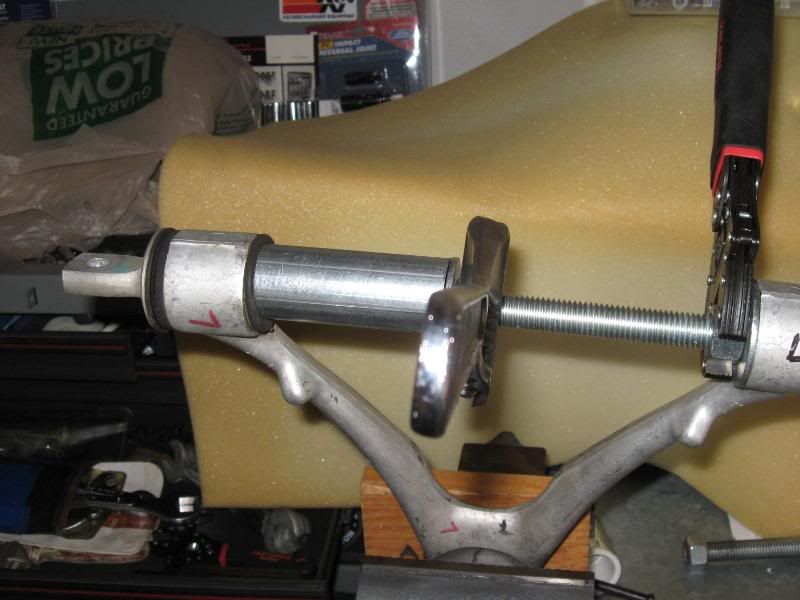
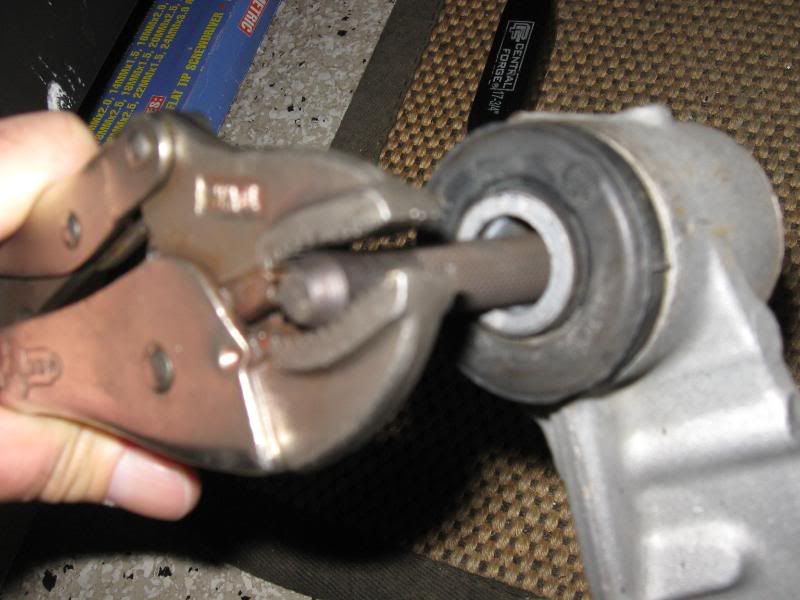
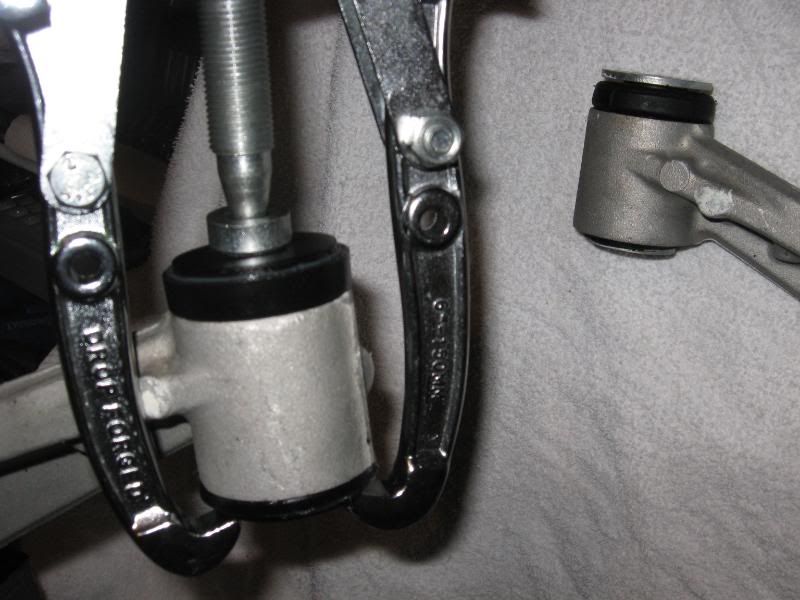
Cut the threaded bar long enough to fit inside the two pins. In the picture the right pin (and bushing) is already pushed out. I am working on the left pin (and bushing).
Turn the nut on the threaded rod to push the bushing out. Like a press only without the press.

Be careful not to get a bad angle on the fence post tubing as if you **** it into the ca metal you can spread the ca (pretty easily) into a bad dimension. I have no idea why GM made the upper ca so bendy (flimsy).
NO drilling/burning/cursing/beer drinking is required using this method. Well OK, you can drink a beer, be safe. There is considerable pressure on the bushing as you force it out. It is press fit into the hole. The rubber bushing does appear to be heat molded onto the pin.
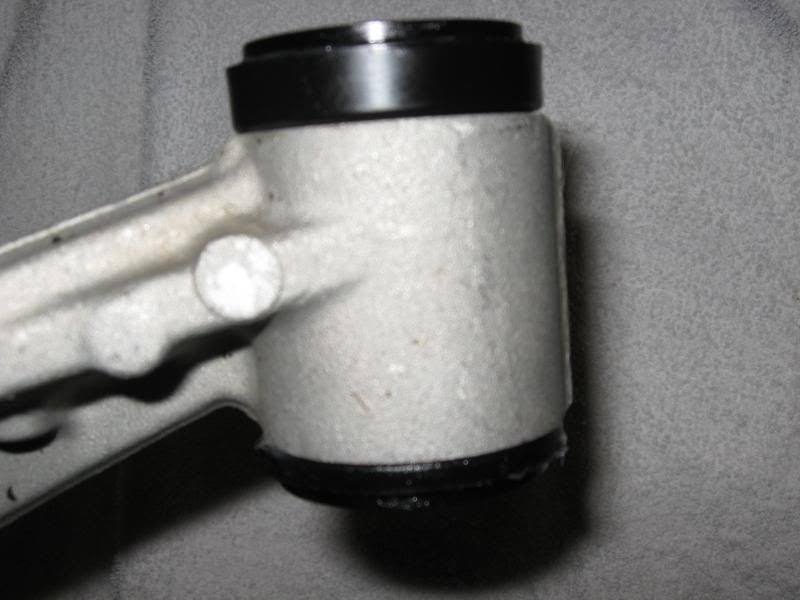
Right bushing almost out below:
The white stuff on the rubber bushing is probably some lube that is used on the inserting, but it's not grease as it is dry, like a soapy lube that dries up.

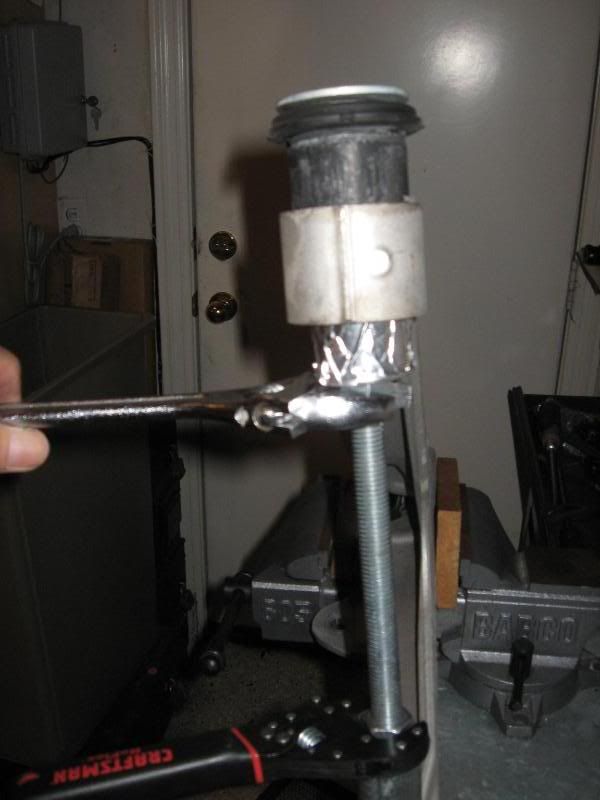
I tried a couple of different ways to put the Pfadt's in:
The Pfadt bushings are a perfect fit. The first half can be pressed in by hand (if you have been eating your Wheaties), or just draw it in using the threaded rod & washers & nuts.
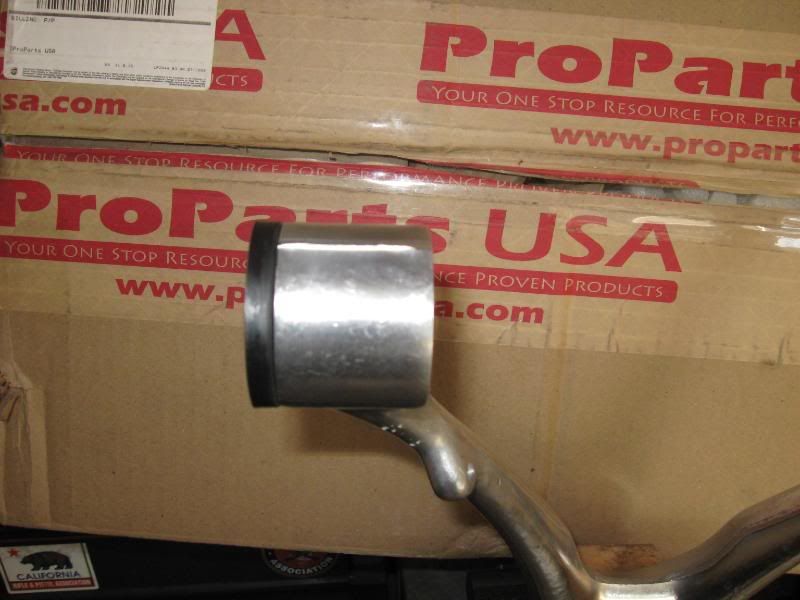
Then lube, lube, lube and insert the pin. It has a setting to gain more neg camber or not gain additional camber(like the stock pin). You simply twist the Pfadt pin so the deeper cut (where the bolts go, are toward the sub frame.
Then I tried two big sockets & bigger c clamp. It worked ok but was kind of tough to keep the c clamp from slipping away. The second half of the bushing is under the duct tape and the two big sockets are pushing the halves together & the pin is inside the sockets.
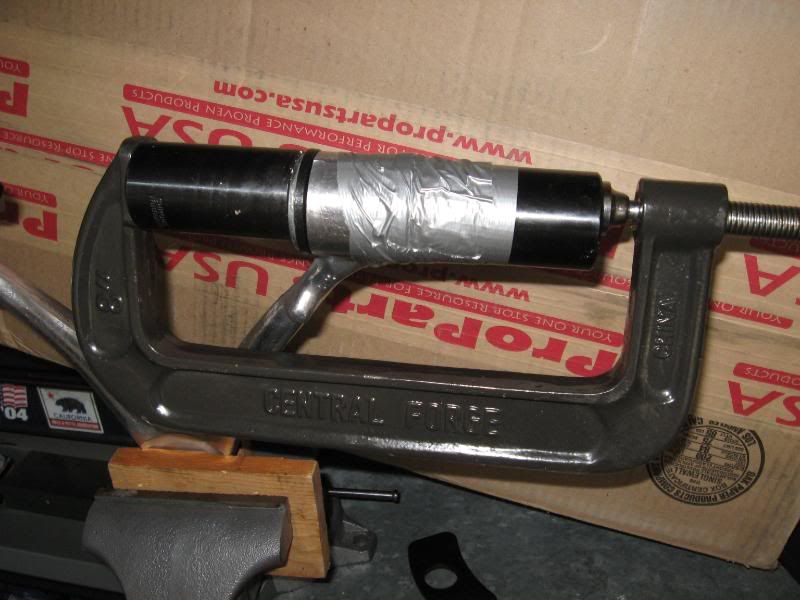
Also the c clamp method did not quite put the 2nd half of the poly bushing in tight enough to fully expose the machined groove for the locking ring. You can just barely get it there, but I figured out a better way.

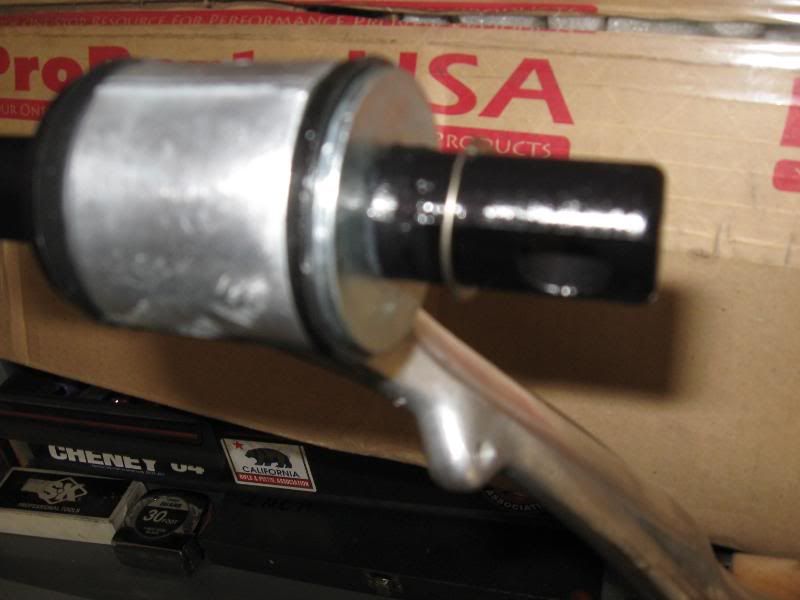
This shows the locking ring being slid towards the machined groove.
BETTER WAY:
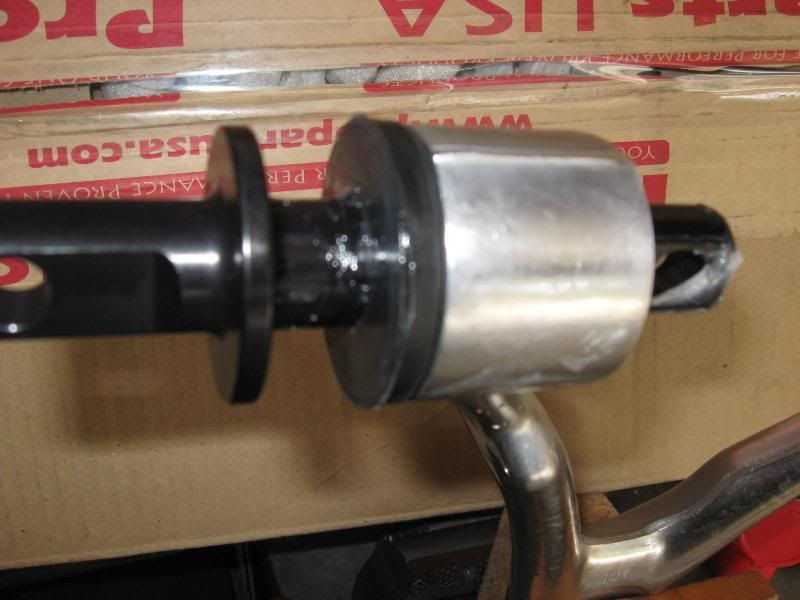
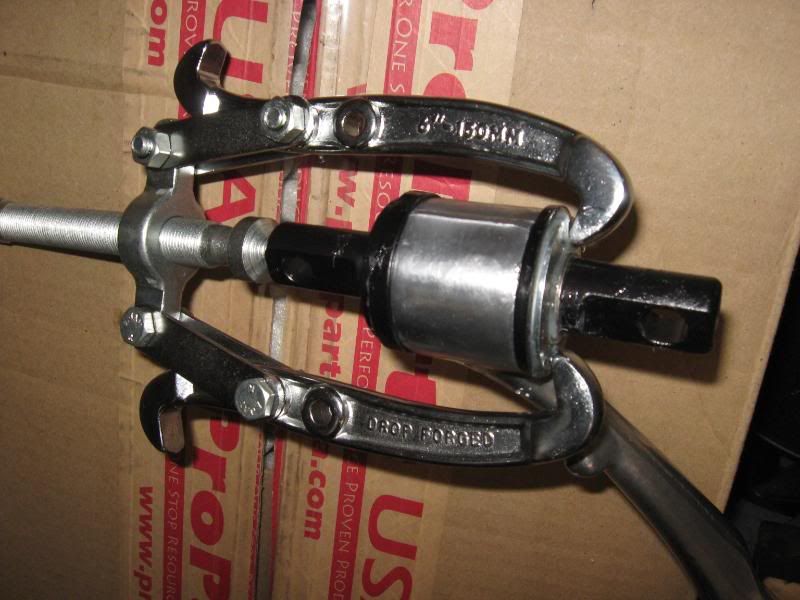
Use a two arm puller to compress the bushing using the provided washer. I took a ***** punch and put a dimple in the pin so that the puller would not walk off the pin end.
Compress so that you have totally exposed the machined groove (360 deg.) and the retaining clip will snap right on easy. Try to rotate the clip with a small screwdriver to make sure you have it completely in the grove, it should move around the groove pretty smoothly, otherwise it's not in right.
Polish the arms (optional):
Actually I polished them b4 I put the Pfadt bushings on.

I will follow up with the lowers as soon as I get to them:
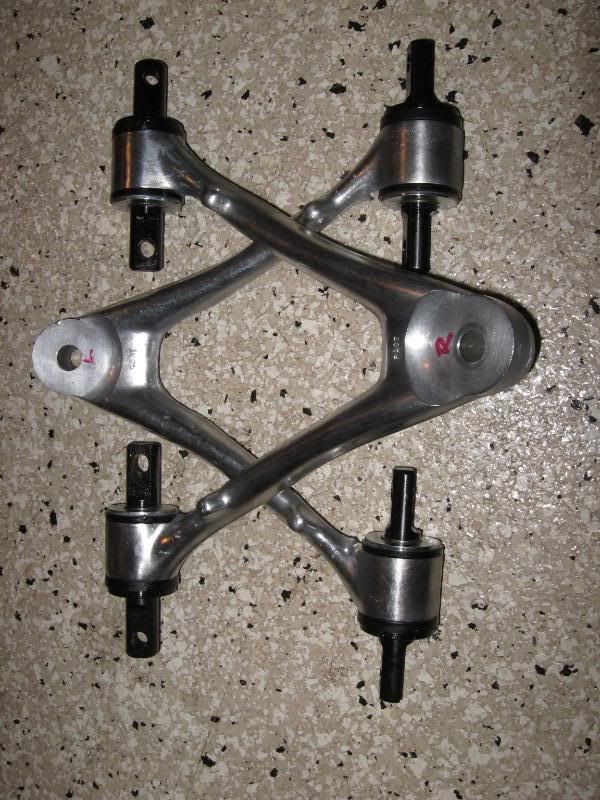
They will be easier than the uppers. You can see I already have the oem bushings out of one.
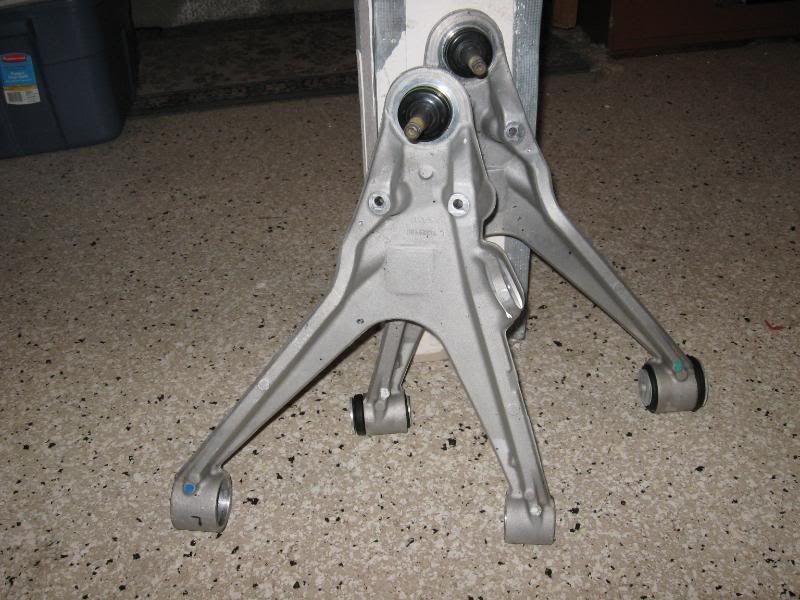

Now on to the front lower CA's
Hardest part is getting the old bushings out. Here's some tools I used.
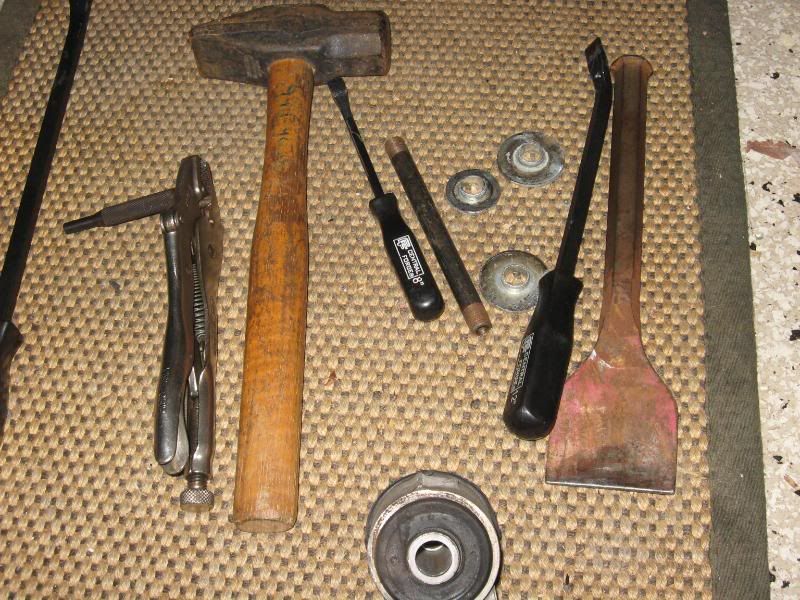
The best I found was the pin punch held by vice grips and a 2 lb. hammer. You are trying to knock off the end washer that is pressed into the sleeve that runs thru the bushing. You are hammering on something that is set in bouncy rubber, so it doesn't take the hammer blow impact very directly, the rubber absorbs a lot of the impact. I also tried various prying & chiseling, but the punch thru the sleeve worked the best for me. Put some good gloves on when you start swinging or locate a box of bandaids ahead of time. I did this on the floor rather than in the vice.
You only have to knock off the "inside" washers, the ouside ones can stay on the old bushing.
Now the familiar press out the bushings, used different bit on the bigger end, plastic water pipe splice piece, was the right size, same fence rail on the small end. I wrapped the PVC pipe in alum tape in case it shattered, but no problem occurred.
The install of the Pfadt parts is easy using the 2 arm puller again. Grease it up good. The parts fit is so precise that you end up compressing air in the middle that will push the bushings out when you take the tool off. Just leave it compressed for a few minutes and the air finds it's way out. Pic of old bushing in background, new one in front.
Here is one finished.
Gonna put these on the car next & then do rears, may be a while for the rears. I expect it'll be much like the front lowers but the rear lower has one bushing that's looks a little different in the Pfadt illustration, so when I do that I'll post anything I find.
BTW if at any point you find yourself trying to force or muscle the process, then look to your technique, none of this should be a brute force process. Post if you have any questions.
Tools you will need:
Also some tools below I made from HD purchases:
Threaded stock with nuts and flat washers and a cut piece of fence rail that fits just over the ca pin and inside the ca swivel point.
Cut the threaded bar long enough to fit inside the two pins. In the picture the right pin (and bushing) is already pushed out. I am working on the left pin (and bushing).
Turn the nut on the threaded rod to push the bushing out. Like a press only without the press.
Be careful not to get a bad angle on the fence post tubing as if you **** it into the ca metal you can spread the ca (pretty easily) into a bad dimension. I have no idea why GM made the upper ca so bendy (flimsy).
NO drilling/burning/cursing/beer drinking is required using this method. Well OK, you can drink a beer, be safe. There is considerable pressure on the bushing as you force it out. It is press fit into the hole. The rubber bushing does appear to be heat molded onto the pin.
Right bushing almost out below:
The white stuff on the rubber bushing is probably some lube that is used on the inserting, but it's not grease as it is dry, like a soapy lube that dries up.
I tried a couple of different ways to put the Pfadt's in:
The Pfadt bushings are a perfect fit. The first half can be pressed in by hand (if you have been eating your Wheaties), or just draw it in using the threaded rod & washers & nuts.
Then lube, lube, lube and insert the pin. It has a setting to gain more neg camber or not gain additional camber(like the stock pin). You simply twist the Pfadt pin so the deeper cut (where the bolts go, are toward the sub frame.
Then I tried two big sockets & bigger c clamp. It worked ok but was kind of tough to keep the c clamp from slipping away. The second half of the bushing is under the duct tape and the two big sockets are pushing the halves together & the pin is inside the sockets.
Also the c clamp method did not quite put the 2nd half of the poly bushing in tight enough to fully expose the machined groove for the locking ring. You can just barely get it there, but I figured out a better way.
This shows the locking ring being slid towards the machined groove.
BETTER WAY:
Use a two arm puller to compress the bushing using the provided washer. I took a ***** punch and put a dimple in the pin so that the puller would not walk off the pin end.
Compress so that you have totally exposed the machined groove (360 deg.) and the retaining clip will snap right on easy. Try to rotate the clip with a small screwdriver to make sure you have it completely in the grove, it should move around the groove pretty smoothly, otherwise it's not in right.
Polish the arms (optional):
Actually I polished them b4 I put the Pfadt bushings on.
I will follow up with the lowers as soon as I get to them:
They will be easier than the uppers. You can see I already have the oem bushings out of one.
Now on to the front lower CA's
Hardest part is getting the old bushings out. Here's some tools I used.
The best I found was the pin punch held by vice grips and a 2 lb. hammer. You are trying to knock off the end washer that is pressed into the sleeve that runs thru the bushing. You are hammering on something that is set in bouncy rubber, so it doesn't take the hammer blow impact very directly, the rubber absorbs a lot of the impact. I also tried various prying & chiseling, but the punch thru the sleeve worked the best for me. Put some good gloves on when you start swinging or locate a box of bandaids ahead of time. I did this on the floor rather than in the vice.
You only have to knock off the "inside" washers, the ouside ones can stay on the old bushing.
Now the familiar press out the bushings, used different bit on the bigger end, plastic water pipe splice piece, was the right size, same fence rail on the small end. I wrapped the PVC pipe in alum tape in case it shattered, but no problem occurred.
The install of the Pfadt parts is easy using the 2 arm puller again. Grease it up good. The parts fit is so precise that you end up compressing air in the middle that will push the bushings out when you take the tool off. Just leave it compressed for a few minutes and the air finds it's way out. Pic of old bushing in background, new one in front.
Here is one finished.
Gonna put these on the car next & then do rears, may be a while for the rears. I expect it'll be much like the front lowers but the rear lower has one bushing that's looks a little different in the Pfadt illustration, so when I do that I'll post anything I find.
BTW if at any point you find yourself trying to force or muscle the process, then look to your technique, none of this should be a brute force process. Post if you have any questions.
Last edited by ls6vette; 12-14-2009 at 05:38 PM.


 12-08-2009, 10:55 PM
#5
Pro

Member Since: Jan 2006
Location: Long Island N.Y.
Posts: 538
Likes: 0
Received 0 Likes
on
0 Posts
You know...you're install actually makes it look, well, not too bad. I think that's something I can do during a quiet weekend afternoon.
Thank you so much for taking the time to put this up.
Be good,
TomK
Thank you so much for taking the time to put this up.
Be good,
TomK
12-09-2009, 12:05 PM
#6
Cruising
Thread Starter
Member Since: May 2007
Posts: 13
Likes: 0
Received 0 Likes
on
0 Posts
It's not bad at all, I just could not bring myself to burn/melt them out. If anyone has ever dealt with burning rubber, kinda like napalm (I would guess) sticky & hard to put the fire out.
Really surprised nobody else has posted this method up b4.
And to use a shop press you need to fabricate a part that clears the press around one arm of the ca as you press the other arm. It needs to be a large shop press, not because of the "tons" but to get the clearance.
I could see some company selling this little setup as a kit to do ca bushings on many different cars, just need different size "fence rail" part. Maybe different lengths of threaded bar.
Last edited by ls6vette; 12-09-2009 at 12:09 PM.


