When you click on links to various merchants on this site and make a purchase, this can result in this site earning a commission. Affiliate programs and affiliations include, but are not limited to, the eBay Partner Network.
When I chose them, i was only thinking about the should belts. Didn't think that the lap belts would be effected as well. I have much to learn!
I got them through amazon prime, so i can easily swap them if needed. I started with one, thought I would figure it out and then order the passenger side parts when I know what i need.
I'd like to have mine set up like yours Bill. I'd like to be able to swap the street seats in when I'm done with the track for the year. Especially since I don't think my stock three point belts will fit in with the race seats.
Just an aside, I've got the same belts. There's some sets on ebay that come direct from G-Force that are a year old, for a good bit less. If you're doing HPDE or TT, the belts don't need to be current, so the loss of a year of rating isn't a big deal for the price break. Not sure if they have blue though, I think I got the last set of black ones.
Just an aside, I've got the same belts. There's some sets on ebay that come direct from G-Force that are a year old, for a good bit less. If you're doing HPDE or TT, the belts don't need to be current, so the loss of a year of rating isn't a big deal for the price break. Not sure if they have blue though, I think I got the last set of black ones.
Good advice,
I received the one set i bought today. Couple of immediate observations.
1. Manufactured date is May 2014
2. No FIA certification anywhere to be found. I've seen some amazon reviews where people didn't have the cert/rating and returned them. Seems the returns go back on the shelf and go to someone else.
If I only do HPDE's do I need this FIA rating? My guess is no, but you never know.....
I only bought one to make sure its what i want. I'll check ebay when i get the passenger belts for the deal
You won't need an FIA rating for DE.
My belts have a tag near the cam clip on every single belt that says "FIA 2018". I guess that means mine were manufactured in 2013. Either way, not a huge deal for me.
The date code is on the belts to remind you they need to be changed after prolonged exposure to the sun. FIA rated belts are rated for 5 years of sun exposure Vs SFI 2 year rating. When in constant sun light nylon belts lose over half their strength in 30 months. Poly belts hold up much better. How often you change them for HPDEs is up to you in most cases but I believe proper installation is more important than the date code. If they aren't installed correctly it doesn't matter whether or not they have proper date code.
Pull up belts work better from an adjustment stand point but they are more of a safety risk in not installed properly. Since you pull down on the lap belt release clip that means if that clip is located right where the belt passes through the seat that under a heavy force the clip could catch on the seat passthrough and releast the belt. The adjustment clips must be in board of the seat side of down low where they will not come in contact with the pass through edges. You don't have to worry about that with a pull down belt since you have to pull up on the clip to release the lap belt.
The adjustment clips must be in board of the seat side of down low where they will not come in contact with the pass through edges. You don't have to worry about that with a pull down belt since you have to pull up on the clip to release the lap belt.
Bill
Bill,
Thank you for your advice. I received a set of belts on Saturday and started laying out the belts to see where to mount them. I have it set up on a portable generator as my workspace. I did notice the lap belt adjuster was right next to the pass through. I will adjust this over the next couple nights. I should have some eye bolts being delivered today. With these I should be able to mock this up outside of the car and show the post here.
Here's where I am Dan: Feedback/ suggestions / critique welcomed!
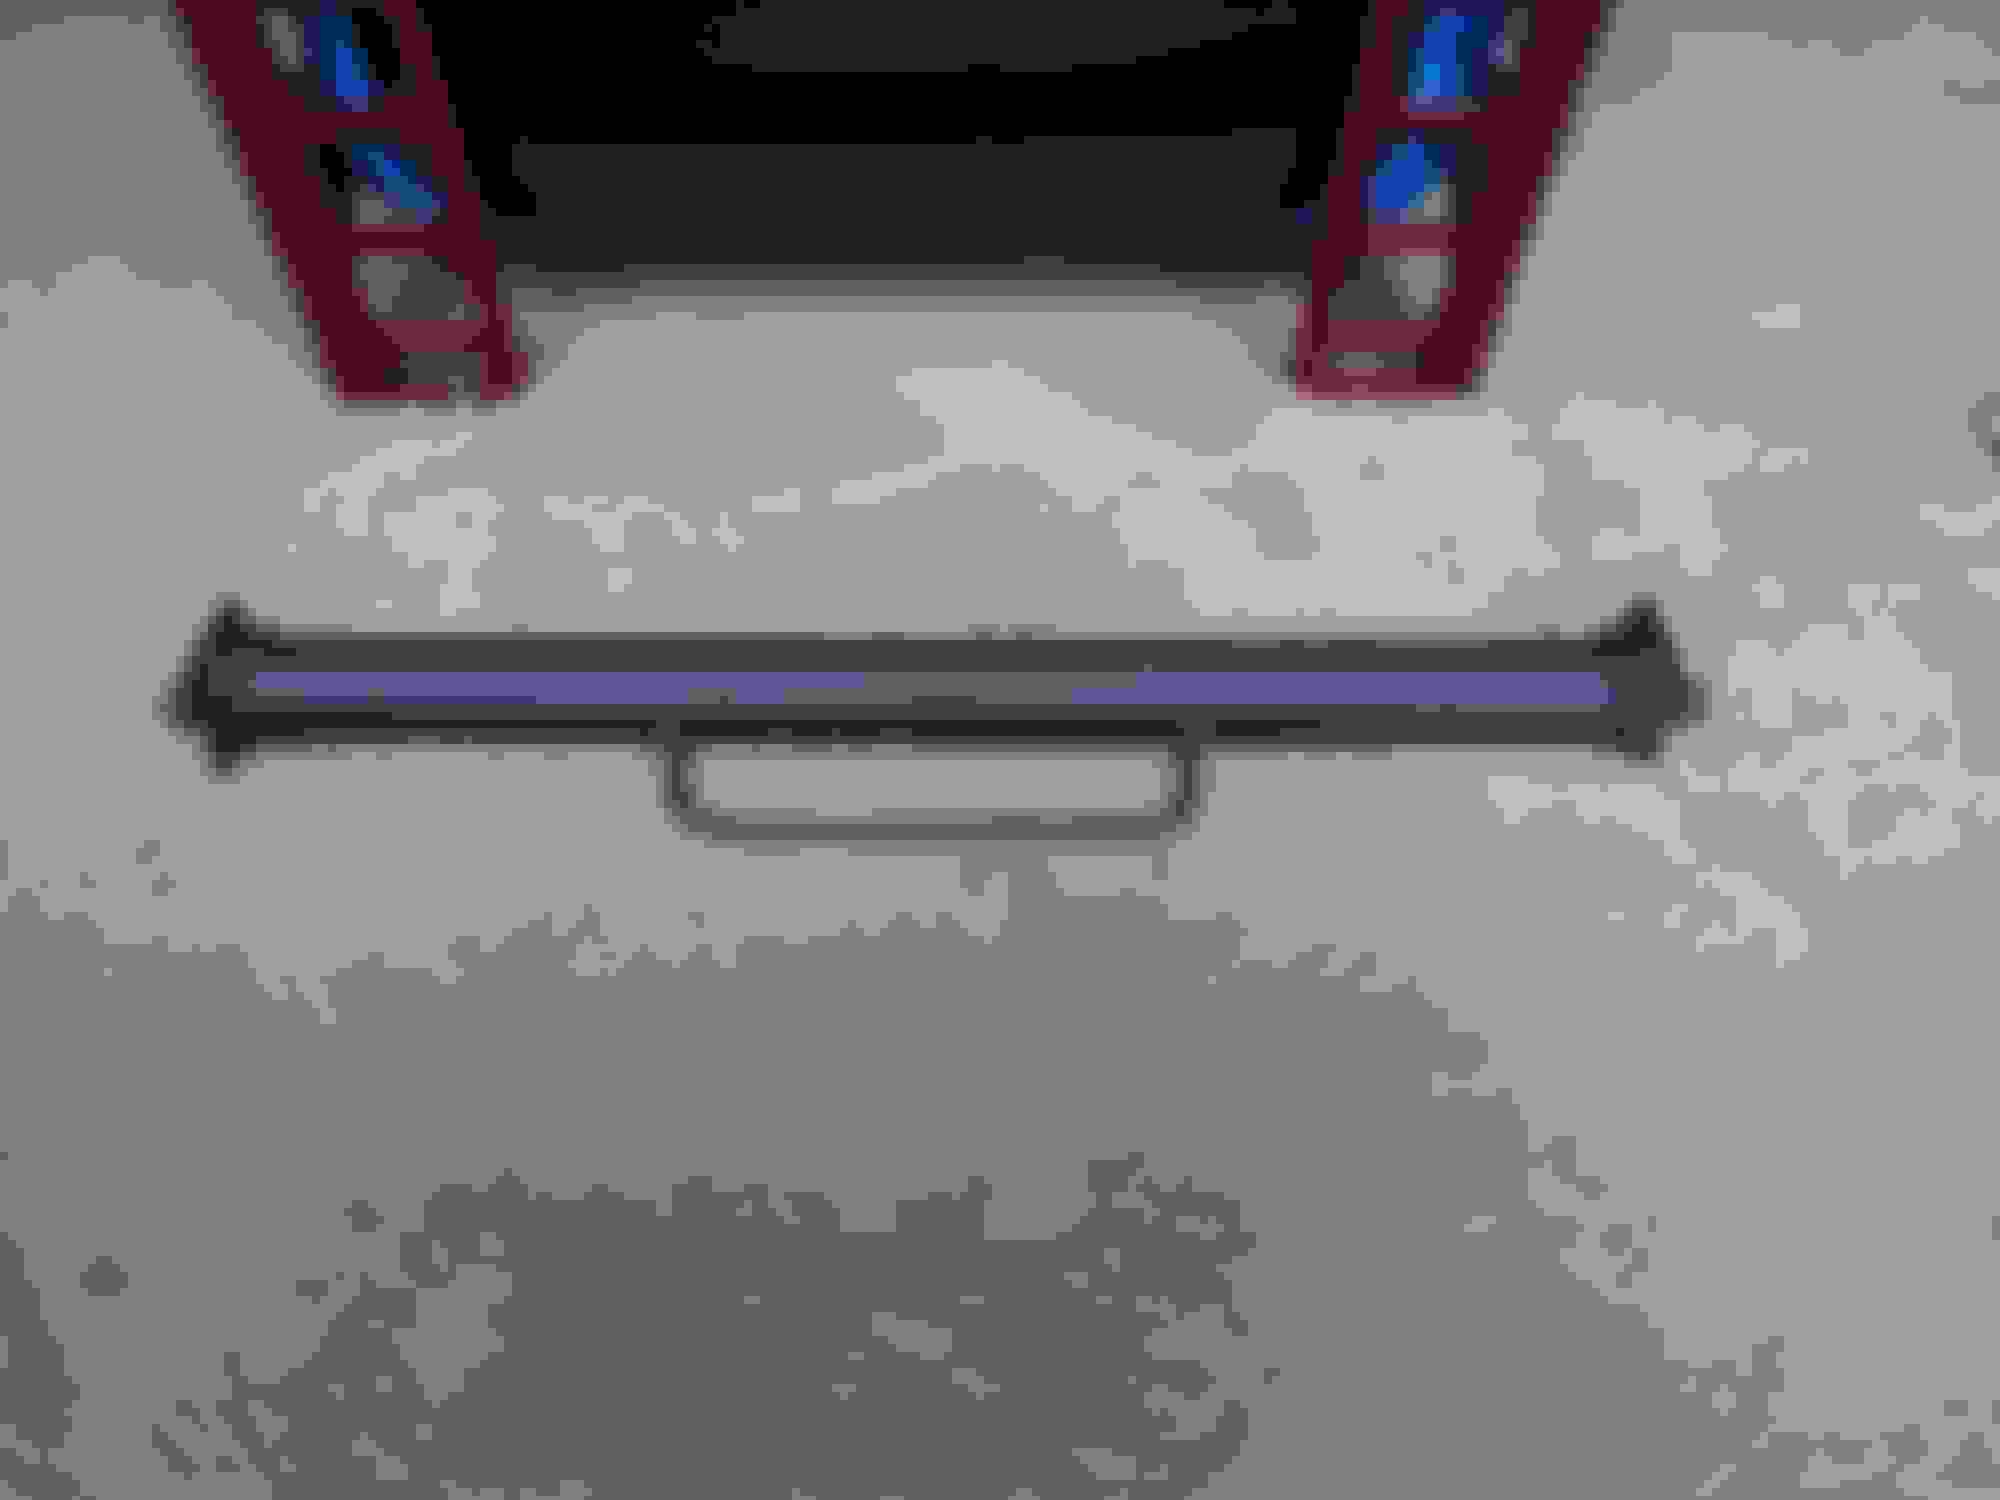
I made this bar to "wrap-in" the sub belts. Not enough room between the floor and the bottom of the seat for the "snap-in" fitting. I did not want to modify the floor to mount eye-bolts in the recommended location.
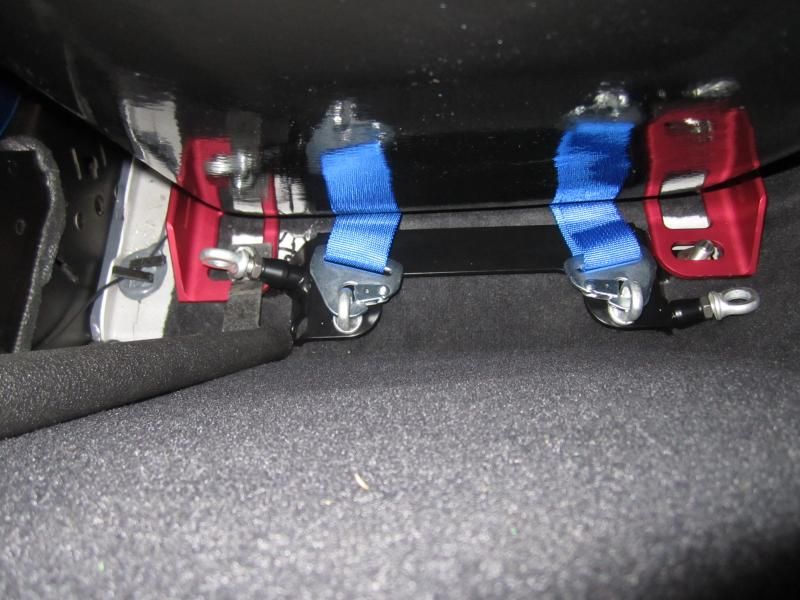
Installed the bar with sub belts (using the Schroth LV4 fitting). I'm not quite 5'-11" and my seat is not "all the way back" like the tall guys require. The bar is screwed in to the last hole of the MTI seat rail where I enlarged the hole to accommodate a M8, Gr 12.9 cap screw.
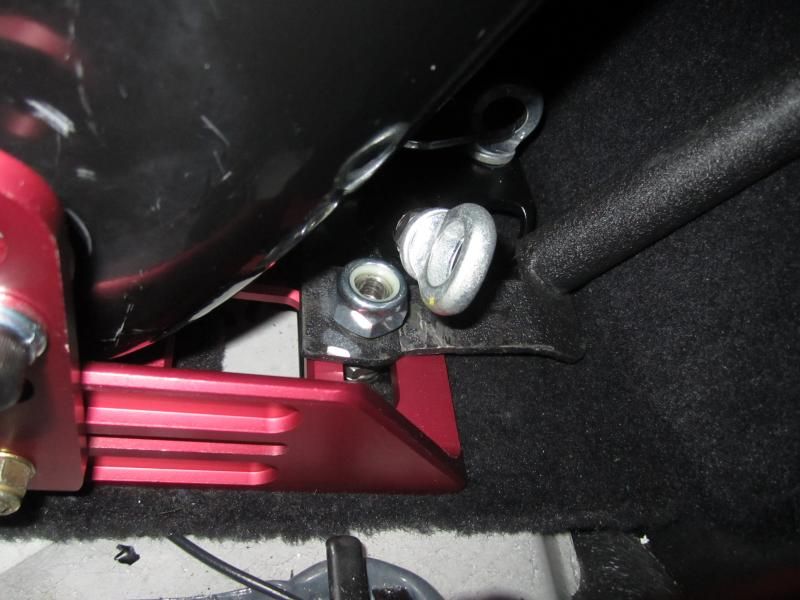
Here's how I plan to mount the Lap Belts with the exception that I will swap the "snap-in" fittings to the Schroth "Bolt-in" with bushing and washer to allow the belt to rotate. This is share the screw that mounts the rear of the seat to the upright on the MTI seat rail. My belts are in "pull up" configuration and the adjuster sits just inside the pass through hole in the seat.
Finally, In my thread about "passenger seat saftey" Bill Dearborn pointed out the final part to correctly wrap the shoulder belt...If I do it like the belt on the right, Do I pass Bill ????
Belt wrap looks correct. What size bolts are holding your sub belt bar to the rails? Are they strong enough? Otherwise the bar is a great way to do the sub belt mount. On my passenger side my race seat is mounted on a C5 manual seat track and the guy who modified the track to fit the seat welded a similar size bar between the two sides of the track.
One comment about belt date codes. I have heard that people going to NJMP need to have correctly dated belts since there is some sort of NJ regulation covering them even though the track is privately owned. If so, there could be other places where you could run into a date code issue.
Is it strong enough for this? (from the Schroth manual):
WHAT HAPPENS DURING A FRONTAL IMPACT:
This data is based on an optimised installation with an upright seating
position during dynamic testing. It simulates a 90� head on collision,
utilising a 75 kg [165 lb] mass dummy, an impact velocity of 50 kph
[31 mph] and a stopping distance of approximately 400 mm [16”] with a
maximum deceleration of 30 g [FIA Standard 8854/98 dynamic test
requirements]:
The pelvic load, expected to surpass 14 kN [3,100 lb] at each
side, will elongate the lap belt and compress the tissue on the
pelvis. The pelvis will slide forward by 80 to 100 mm [3”-4”]
The upper torso load is expected to surpass 7 kN [1,550 lb] on
each strap, will elongate the shoulder belts, the upper body will
roll in, the adjusters will move up the chest by approximately
200 mm [8”] and forward head trajectory will be up to 400 mm
[16”]
The pelvic movement combined with the shoulder belt forces will
load the anti-sub straps to more than 6 kN [1,320 lb] each in a 5-
or 6-point racing harness and can be intentionally higher in a
F-type model where the anti-sub straps are routed rearwards.
In more reclined seating positions, the pelvic load will be reduced to
approx. 9 kN [2,000 lb] since the seat pan, designed as a ramp, will take
some of the load. Therefore it is essential the seat or chassis
manufacturer ensure the seat pan is strong enough not to bend or even
collapse under extreme loads.
In any case, seats are a significant component of the safety system!
That lap belt needs at least a 3/8 bolt minimum. Along with the sub belt.
Well crap! I was following the Schroth Install guide and it has M8 listed in the lap belt bolt in section. I certainly agree that a larger bolt will provide more shear and tensile strength. I was hoping to use the side mount seat bolt to secure the lap belts (using bolt in brackets with shoulder bushing).
Changing the threads in the seat is not an option. Do folks drill out a new hole or use one of the open holes in the MTI/ hardbar seat rails and bolt in with a 3/8" or larger bolt?
This stuff is not plug and play...thanks for your input!
Tim
Prep for the worst and hope for the best.
Could you imagine betting your life on a 5/16 bolt when the car is about to hit the wall at 100+ or worse barrel rolling.....not me.
This stuff is not plug and play...thanks for your input!
Tim
It sure isn't! Hopefully this will help others when they attempt the same install. You'd think that a bolt that is strong enough to hold the seat in would be adequate for the belts as well. I get both sides, def not plug and play though.
I bit the bullet and bought the vetteworks lap and sub belt mount. Whats another $400, ugh......
When I get this done, I'm going to add it up for folks, not a cheap upgrade. I'll be well over 3g's by the time this is done.
Tim, Are the end plates on your anti-sub bar just drilled / tapped? If so, they don't look thick enough to me. I'd ask about the wall thickness of the pipe, but I don't know how strong it need to be! Also looks like you need a little more heat in your MIG welder.
How'd you decide on socket head cap screws? I don't like the reduced bearing area vs hex head.
Thanks Rob!
End Plates have a nut welded on the inside. The tubing is 1-1/4" DOM (0.12 wall). Schroth guide talks about the testing standard FIA they use and a 5 or 6 point belt takes 1320 lbs. Found an simple tubing stress calculator online and I think the bar is good for over twice that number.
Trying hard here to do this right and safe, but it seems you compromise in one area or another. I'm not opposed to buying the vetteworks lap/sub belt kit, but it looks like it is really meant for stock seats and compromises the angles of the belts when used with race seats. Which "evil" is safer ???
Swapping the screws is easy enough on the sub belt setup. I haven't used my engineering degree in many years and appreciate the input!
Hey all,
After a small hiatus, I made some progress this weekend.
I picked up with vetteworks lap and sub belt anchors. These were expensive pieces and they took a month to receive them after ordering. The good is that they appear to work alright. Nothing with putting these in is straightforward. All these vendors set these parts up to work with stock seats. Anyone going through these steps knows that instructions with stock seats aren't worth the paper they are printed on. Important to note, I do not see any way to keep my stock 3pt belts. I will be taking them out as part of this. Sooooo, here we go.
This is the harness anchor before install. You'll see the bag of adapter bolts that vetteworks claims you'll need if you are installing this with a BK harness bar. If you're like me, and are installing seats and rails, save yourself the $70 because you won't need these. I'll find out whether I will be able to return these or not.
Here is a pic taken from around the headrest of the driver seat. Everything is loose fitted in. The big challenge is the BK bar, seat mount rail, and the outboard lap belt anchor.
Heres a pic right at the outboard rear seat mount. The lap belt anchor doesn't let you get the MTI rail onto the stud because there is not enough room to slip it on. I had to put the MTI bolt adapter into the seat rail slot first and then get the seat in place onto the chassis bolt. I then turned it by hand under the rail which is a PITA. I'm going to try a crow foot wrench to tighten it up. I put the BK bar anchor above the rail. This required opening up the hole significantly. Largest drill bit I had was 1/2". I drilled it with that, then had to use a rat tail file to open it more.
Heres just another angle
So far I'm into this project for
$1600 Sparco Evo II US seats
$750 MTI Seat Rails
$350 Used Brey Krause Harness Bar
$420 Vetteworks Lap/Sub belt anchors
$320 G-Force 6Pt harnesses
$50 Random Bolts, washers, eye bolts that I may or may not use
I find it amazing that for spending $3500 (I consider this a lot of money) there is no instructions or standard way of doing this job!
Next steps will be to tighten everything down and getting everything solid. I will then start the passenger side. I got in and fit well with a helmet on (I am 6'1" and 230 pounds)
Knowing what you guys know, what would you do next? I bought Racequip FIA/SFI 6pt pull up harnesses, a Brey-Krause bar, Sparco Evo2 seats, and Sparco steel side mounts, and Wedge adjustable seat brackets for both sides. Wedge has you measure your side brackets and then they make the seat sliders to match, so don't have them yet, but soon. The car is going to the track April 27th. Should I immediately order the Vetteworks sub-belt anchor bar? Would you dare start this with the parts thus far? Thanks, this is great help!
Apex26,
The big thing is does your seat mounts have a place to mount eye bolts to connect your harnesses to? My MTI rails did not, Or I was not able to based on how low I mounted the seat. If the answer is that you do not, I would not start this until after your first event. Reason being my vetteworks sub belt anchor took about a month to deliver from the time I ordered it. I had to do a lot of test fitting and trial and error to get everything where I wanted it. I probably had the driver seat in and out no less than a dozen times.
Once they are in where you want them the feel is completely different, I'm looking forward to my first event in May with the new setup.
That's a good question. I'll know for sure when the sliders come. I'm 6'1" so probably have to mount the seat pretty low. The Sparco side mounts have a series of holes down the side, maybe enlarging one would be just right. If not, ut-oh...

 01-02-2015, 06:45 PM