When you click on links to various merchants on this site and make a purchase, this can result in this site earning a commission. Affiliate programs and affiliations include, but are not limited to, the eBay Partner Network.
Post Reviews of Dewitts Rad/EOC Combo with Modified C6 Hard Line Kit Here
I'm looking for here are reviews of this setup in regards to track and DD duties. I want to make sure it has the cooling capacity for the track, but I'm also curious about how quickly the oil warms up during DD duties. Please post first hand experience only, not "get a standalone oil cooler because they're better and I heard the radiator w/ integrated EOC won't cool enough on the track"
I was initially going to go with a standalone air-to-air EOC and the Improved Racing block adapter w/thermostat, as the car is my DD and I need the oil to warm-up quickly. However, now I'm leaning towards the Dewitts radiator with integrated EOC with the modified C6 oil cooler line kit (kit 898). I decided this for a couple reasons:
1) I live in FL and would probably need to upgrade the radiator anyway, so it's nice to get both done at once and save a little $$$.
2) I really like the idea of the C6 lines with the pressure bypass to reduce oil pressure drop at high engine speed.
I got one PM about this setup with a lot of positive feedback.....low pressure drop, adequate cooling at the track, with some penalty on street warm-up time and operating temperature (around 200 deg. F on the street).
Unless anyone chimes in with some bad reviews, I'm probably going to order this in the next day or two.
I earned my "898" badge. The ehaust manifold must be removed to install this line. I happened to be installing ARH headers so this was not an issue for me. I did not have to jack the motor to install the oil line, begin by installing the line with the aluminum block upside down. When the black bracket hits the motor mount carefully rotate the line and block up and push at the same time. Wish I took some picks, but was so excited the line went in I just kept going.
Here are a couple of posts to reference regarding the install:
I earned my "898" badge. The ehaust manifold must be removed to install this line.
Ugggh, that's what I was afraid of. I have the original exhaust on my 2002 C5 Z06 and was really hoping to not have to remove any of it. Don't want to deal with breaking off the old rusted manifold bolts, etc. I thought I've read some people with stock exhaust didn't need to remove the manifold, but those that had headers had to remove them, but I can't remember for sure.
Oh well, The cooler and lines should be here in the next couple days, so I'm going to try to install it all this weekend. Thanks for the tips.
Well, the install was miserable. I tried to coerce the oil cooler lines to go in with just the driver's side engine mount disconnected, but had to remove the exhaust manifold to make it work. I figured I would have to do this, so I had been soaking all the manifold bolts in PB blaster each night after work for a few nights before the install. All the bolts to the head came out without issues, but I broke one stud on the downstream connection. Thankfully, when I disconnected the exhaust from the passenger side manifold I didn't brake any studs, so I didn't have to remove that one.
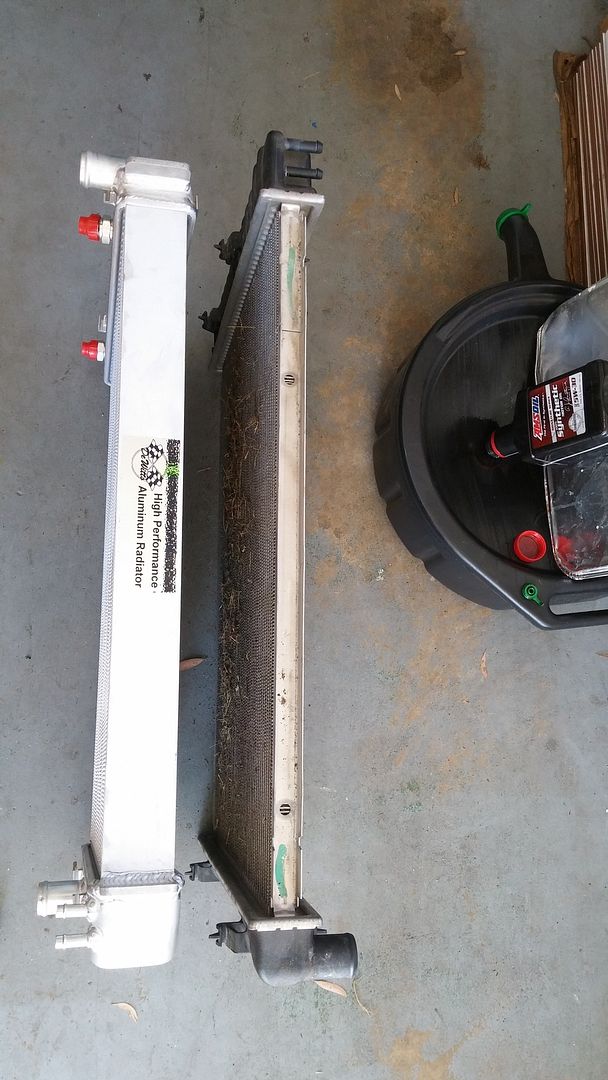
Anyway, after a lot of cursing and some blood spilled, everything is in. I also put some heater hose over some of the soft line sections of the oil cooler lines to protect them from rubbing. Here's a pic to highlight just how much thicker the core of the Dewitts unit is compared to the stocker:
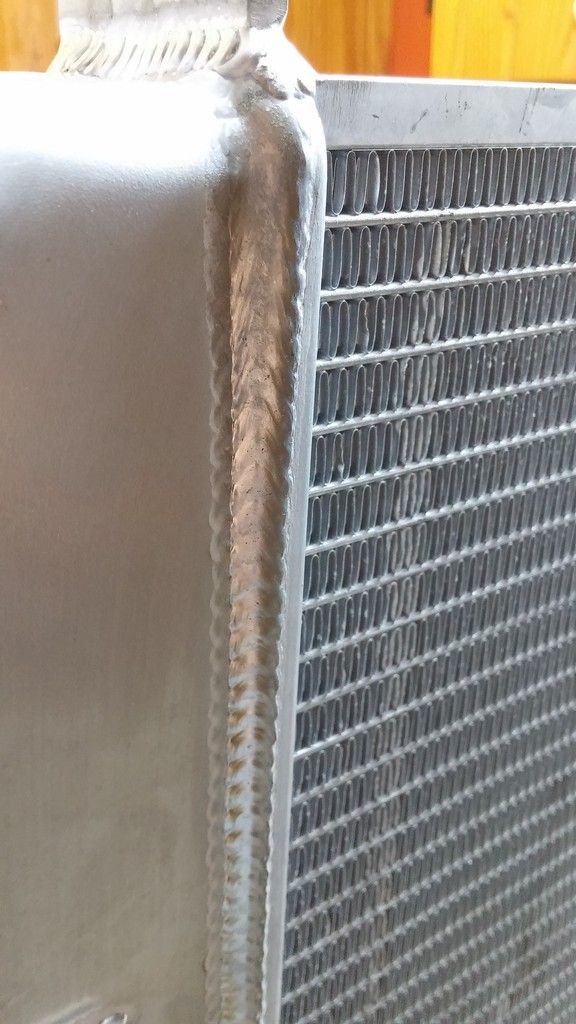
One thing I thought was kinda interesting was that while the radiator looked good and all, with only a few bent fins from shipping from Summit, I noticed that not all of the welds on it were TIG welds. On the Dewitts website it says "Press formed end tanks are manually tig welded by expert craftsmen, providing the ultimate in strength and appearance." This is true, as the end tanks do have TIG welds on them, but the end tanks are actually MIG welded to the core. The parts that are TIG welded are the various tabs and inlet and outlet fittings. Here's a close-up of one of the MIG welds on the end tank:
At the end of the day, the welds still look fine and I'm sure the performance will be fine, but I guess I felt a little deceived by the claims on the website. I get that it's tough to make these things in America and sell them for a reasonable price, but for a $600+ radiator, I was hoping that when the website said the end tanks were TIG welded that all of the welds were TIG.
Also, I've been making notes on the warm-up times for coolant and oil on my drive to work every morning before and after the radiator install and so I'll post those soon. More importantly, I'm registered for a HPDE at Sebring on May 16th, so that's when the new cooler will be put to the real test.
Interesting...I have the same radiator installed by haven't tackled the oil cooler lines yet. Subscribed...
I have done 2 installs in the last 2 weekends one with engine in the car and one with the cradle out of the car. Cradle out it is a no brainer.
cleared my LG long tubes just fine.
With the engine in the car you need to pull the exhaust manifiold (the car I was working on was an 04 with 85k miles the manifold bolts all came out no issues use PB blaster and heat on the studs at the mid pipe) I had to do a rack and a pump so they were out of the way it was easier to undo the motor mount when routing the lines. the lines go under the rack I used the black wire loom to give the flex lines some abrasion protection. The install with the radiator, rack and pump was about 3-4 hrs. using a 2 post lift.
OK so explain why by passing some oil not all from the cooler is a bad idea???
If the restriction in the cooler is too high the engine bearings still see full oil flow and a large amount of oil is still going to the cooler
this by pass just removes the pressure drop at high RPM therefore maitaining full oil flow to the bearings instead of reducing the amount thru rectriction.
I have installed these lines using a stand alone cooler and the radiator mounted to see what the the pressures look like and at 6 k the pressure on the gauge is the same using the Dewitt lines with the radiator or the Lingenfelter stand alone cooler, also got the same pressure using either full kit.
So just for fun I have hooked the 2 up with the stand alone first then the rad. in series to see if I can get the best of both worlds. The thought being that the bypass would take care of the pressure drop that may occur. the only draw back is the slight delay to the pressure rise with rpm due to the increased length of the cooler oil paths that said even the hot 2 krpm oil pressure of 50 meets the meets the rule of thumb 10 psi per k of 5k rpm then build to the same max pressure of either cooler running alone.
Thanks, I have read that thread. For me, the integrated oil cooler with bypass made the most sense because:
1)I'm just getting started in HPDE and don't plan to go all out with slicks, aero, etc. anytime soon and I usually shift at 6k or a little below anyway to go easy on the engine, so I don't see the need for a monster standalone EOC.
2)This car is my DD and warm-up time/proper oil temperature while cruising is important to me. The standalone approach requires a thermostat to achieve this, which introduces more cost, complexity, and pressure drop.
3)Cost. I knew I needed to upgrade the radiator anyway, so getting the Dewitts radiator+Setrab oil cooler+oil cooler adapter with thermostat+oil cooler plumbing was going to be ~$1000+. I only paid ~$800 for the combo cooler+modified C6 oil cooler lines. The standalone approach would also rely on me to cut and assemble the oil cooler lines and fab up the oil cooler mount.
There are definitely more than one ways to skin this cat, but this one made the most sense to me, given my usage (my DD + a few HPDEs per year). Worst case scenario is when I get faster it doesn't provide enough cooling and I just plug the integrated oil cooler lines and install the standalone unit and I'll still at least have the upgraded radiator.
Here's a close-up of one of the MIG welds on the end tank:
That weld looks like TIG to me. The end by corner looks like the welder may have just dragged the cup and just used a good amount of filler rod, maybe filling a gap.
I asked a friend of mine who is an excellent welder and he reminded me that a good MIG weld can be made to look like it was TIG, but he was leaning towards the end tank being TIG with high amp, lots of filler rod done more quickly at the end to get the job finished. And of course looking at it in person can always be different than trying to interpret a picture.
I have the same radiator and oil lines. I put the radiator in last year and ran some events; I saw a drop in oil temps slightly even without the oil lines hooked up. The lines are planned to go in soon with the headers. I also tried to snake them in with the exhaust manifold in place and it wouldn't work. I had the mid-pipe dropped to weld in O2 and EGT bungs and that wasn't enough extra room for me. Just snaking the lines through the accessories was bad enough, but then everything was at an angle that I couldn't pivot back to the block. I'm expecting more cuts and scrapes getting this in.
I agree that for a dual duty car the radiator/EOC combo is a great way to go. I just picked up a C4 that is on the project list for track only duty, and that will get a dedicated oil cooler. Each application needs it's own build.
I earned my "898" badge. The ehaust manifold must be removed to install this line. I happened to be installing ARH headers so this was not an issue for me. I did not have to jack the motor to install the oil line, begin by installing the line with the aluminum block upside down. When the black bracket hits the motor mount carefully rotate the line and block up and push at the same time. Wish I took some picks, but was so excited the line went in I just kept going.
Here are a couple of posts to reference regarding the install:
FYI The Dewitts 898 oil line did require some bending to clear ARH headers.
Made up a jig prior to bending for ARH header just to make sure the block and the black attachment bracket stayed in thier proper positions.
About 1/2" clearance now.
Still waiting on the headers back from ceramic coating.
Good luck with the install!
Well... I got the headers back. The ARH headers are still touching the oil line. I pulled the oil lines and gave it another shot at bending to fit but trashed the fittings at the adapter block.I ended up using the Dewitts 948c Lingenfelter adapter block and AN lines to my Dewitts Rad with EOC left side.
I am not sure if the ARH headers I have had a odd angle or bend in manufactuing that resultied in a tight clearence at the oil line location. The Dewitts 948c kit I did install just barely cleared (1/2 inch) the header. Not so much the angle of the oil lines, but the increased diameter of the oil lines.
Just did my first track day this year with this combo in my C5Z and I'm thoroughly impressed. I dont really drive the car on the street but oil does get up to temp fairly easily. Last year I reached 280 oil temps in mid summer at Grattan real quick, so I needed the upgrade. At Gingerman last week oil temp never went higher then 245...granted outside temp was 60-65 but I'm seeing 25-30 degree cooler temps in general. Plus I didn't want the fuss in having an external oil cooler when in reality a built in cooler to this giant radiator is plenty...plus factory style plumbing kept things neat and tidy.
Just did my first track day this year with this combo in my C5Z and I'm thoroughly impressed. I dont really drive the car on the street but oil does get up to temp fairly easily. Last year I reached 280 oil temps in mid summer at Grattan real quick, so I needed the upgrade. At Gingerman last week oil temp never went higher then 245...granted outside temp was 60-65 but I'm seeing 25-30 degree cooler temps in general. Plus I didn't want the fuss in having an external oil cooler when in reality a built in cooler to this giant radiator is plenty...plus factory style plumbing kept things neat and tidy.
Glad to hear the 245 max oil temp. I just installed mine this week with hopes of a similar outcome. Currently with the stock EOC I can get about 4 laps in before the temp gets to 270ish range.
I took it out yesterday to try to simulate track conditions. I would accelerate to 80 or 90 then brake hard to 40 and kept doing that. Worst I saw was 240. For a couple of reasons I don't think this is accurate though. First off, I was doing this at 7000 ft, so I would be lucky to be making 300 crank HP, so there won't be as much heat to take out of the oil. Then of course the air is thinner than at the track I run. And there is no way on public roads I can run it as hard as on the track.
So I will see what happens next track day, but if I only see 245 oil temps, then I will be happy enough.
The radiator did run cooler than stock. Usually between 200 and 210. It was funny, it seemed the harder I ran it, the cooler the water temp.
Also the stock radiator hoses fit slightly loose on the radiator. One to the point that the stock hose clamp couldn't hold the pressure. Had to add a screw type hose clamp to get that one to seal. In hindsight I should have replaced the hoses anyway. Looks like I get to now.
Just did my first track day this year with this combo in my C5Z and I'm thoroughly impressed. I dont really drive the car on the street but oil does get up to temp fairly easily. Last year I reached 280 oil temps in mid summer at Grattan real quick, so I needed the upgrade. At Gingerman last week oil temp never went higher then 245...granted outside temp was 60-65 but I'm seeing 25-30 degree cooler temps in general. Plus I didn't want the fuss in having an external oil cooler when in reality a built in cooler to this giant radiator is plenty...plus factory style plumbing kept things neat and tidy.
Wow this is exciting. If i can drop even 20 degrees I believe it will buy me the time I need to run 20-25 minute sessions without worrying about oil temp and pressure drop. Seems like its viable. I guess i have to get in gear and get mine installed, haha.
I had this combo installed at the same time as a cam and headers and it made a big difference. Was seeing 290's before and 260's after under same track conditions. Warm up on the street was no issue above freezing. The fans don't need to work so hard in the heat in traffic.
Next failure point was the PS pump and rack after boiling the fluid over so it would be a good time to install a Turn One pump, cooler and Redline fluid when the radiator is out.
Wow this is exciting. If i can drop even 20 degrees I believe it will buy me the time I need to run 20-25 minute sessions without worrying about oil temp and pressure drop. Seems like its viable. I guess i have to get in gear and get mine installed, haha.
Precisely, I would hit 280 temps halfway into my session which would force me to take 1-2 cool down laps before getting on it hard again. Now I feel I'm getting my moneys worth going the full 20 minute session with out having to slow down.
I had this combo installed at the same time as a cam and headers and it made a big difference. Was seeing 290's before and 260's after under same track conditions. Warm up on the street was no issue above freezing. The fans don't need to work so hard in the heat in traffic.
Next failure point was the PS pump and rack after boiling the fluid over so it would be a good time to install a Turn One pump, cooler and Redline fluid when the radiator is out.
Interesting. I assume this was with the C6 in your profile picture? I already have a factory PS cooler in my C5 Z06 and put Amsoil synthetic PS fluid in. I'll keep an eye on it though.

 03-22-2015, 11:01 PM