
Kognition wing installed - with tips
 08-29-2015, 07:10 AM
#1
Pro

Thread Starter

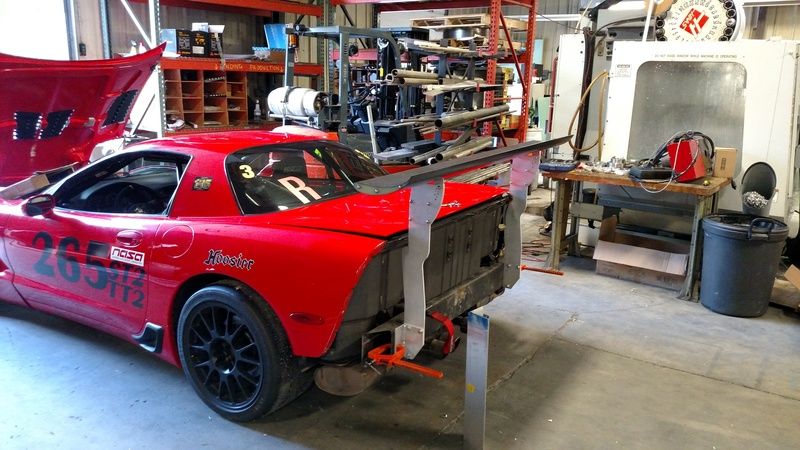
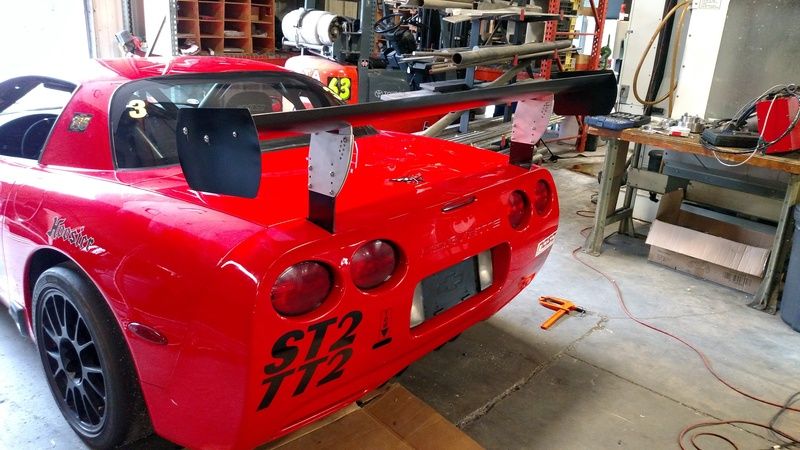
Folks,
Slapped on a 72'' Kognition wing yesterday. UPS man dropped it off at 11 and I was on my way home by 4:30. However I did have the rear bumper off in anticipation. Wing is beautiful, but I thought the mounting brackets were going to be black anodized, but they were not. Nothing a little black paint can't fix. Also 3/8-16 bolts were not included (I'm sure by accident, since the other 3/8s hardware was included) and I had to drill out the 3/8'' holes since they were all undersized and would not accept the bolts. Minor oversights, but if I didn't own a machine shop then I'd be a little more miffed at having to remedy these short comings.
Here's a couple of pics and notes in case anyone does this in the future and needs install help:
I assembled the wing completely, and then just clamped it to the back bumper. I measured the distance on the sides of the bumper, adjusted the side to side angle with a level on my phone, and drilled the holes right in place. You'll need a friend to do this, but I liked it better than taking a bunch of measurements and marking holes and drilling.
The mounting brackets they included were quite beefy and nicely welded. I bought 4'' aluminum angle .375'' thick because I didn't think they came with brackets and I'd have to make my own, so that was nice that I didn't have to.
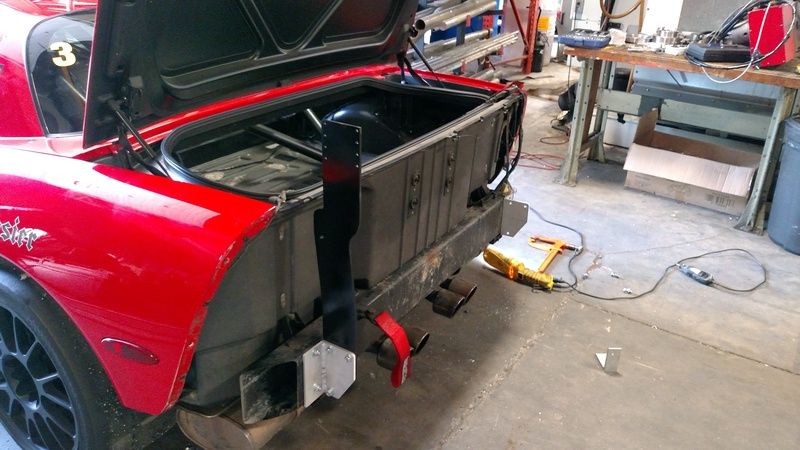
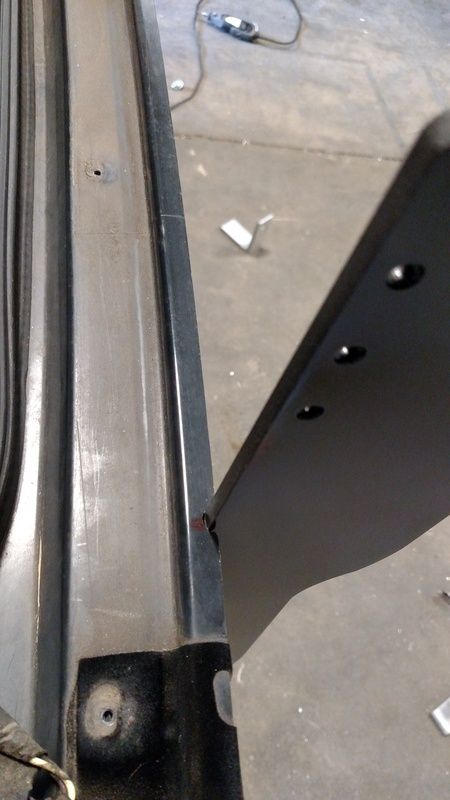
When you bolt the wing on the frame, it presses up against the back of the trunk. I wanted to make sure there was full contact on the bumper and not putting any unneeded stress into the uprights, so I notched out the back of the trunk with a dremel.
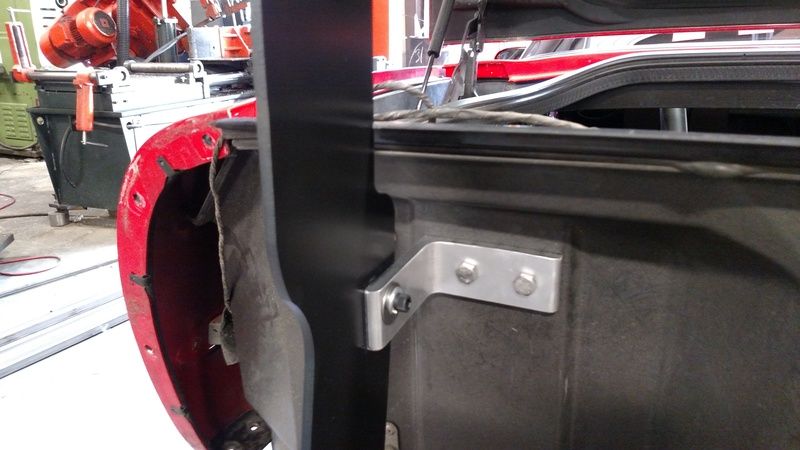
Everyone talks about the lateral movement of the wing, but with the brackets he included, I didn't think it was bad at all. So I just chopped up a couple strips of the aluminum angle I bought, and bolted it through the fiberglass with big washers sandwiching it all together. It's solid as a rock, and at least if it's not quite enough, I'll see the fiberglass cracking in the trunk or something. I'm not at all worried about that.
Still need to paint the adjuster plate things, raise the wing one more notch, and I'm also gonna make carbon endplates, but it's ready to go. Shaking down at Palmer in 2 weeks which has some aero-friendly turns so I'm looking forward to figuring this whole aero thing out!
Slapped on a 72'' Kognition wing yesterday. UPS man dropped it off at 11 and I was on my way home by 4:30. However I did have the rear bumper off in anticipation. Wing is beautiful, but I thought the mounting brackets were going to be black anodized, but they were not. Nothing a little black paint can't fix. Also 3/8-16 bolts were not included (I'm sure by accident, since the other 3/8s hardware was included) and I had to drill out the 3/8'' holes since they were all undersized and would not accept the bolts. Minor oversights, but if I didn't own a machine shop then I'd be a little more miffed at having to remedy these short comings.
Here's a couple of pics and notes in case anyone does this in the future and needs install help:
I assembled the wing completely, and then just clamped it to the back bumper. I measured the distance on the sides of the bumper, adjusted the side to side angle with a level on my phone, and drilled the holes right in place. You'll need a friend to do this, but I liked it better than taking a bunch of measurements and marking holes and drilling.

The mounting brackets they included were quite beefy and nicely welded. I bought 4'' aluminum angle .375'' thick because I didn't think they came with brackets and I'd have to make my own, so that was nice that I didn't have to.

When you bolt the wing on the frame, it presses up against the back of the trunk. I wanted to make sure there was full contact on the bumper and not putting any unneeded stress into the uprights, so I notched out the back of the trunk with a dremel.

Everyone talks about the lateral movement of the wing, but with the brackets he included, I didn't think it was bad at all. So I just chopped up a couple strips of the aluminum angle I bought, and bolted it through the fiberglass with big washers sandwiching it all together. It's solid as a rock, and at least if it's not quite enough, I'll see the fiberglass cracking in the trunk or something. I'm not at all worried about that.

Still need to paint the adjuster plate things, raise the wing one more notch, and I'm also gonna make carbon endplates, but it's ready to go. Shaking down at Palmer in 2 weeks which has some aero-friendly turns so I'm looking forward to figuring this whole aero thing out!

Last edited by StreetSpeed; 08-29-2015 at 10:56 AM.

 08-29-2015, 09:42 AM
#3
Pro
Thread Starter
I heard the quality of Kognition was very good, and $1500 is hard to beat. I looked at the Good Aero but didn't immediately see pricing, but it looks expensive.


 08-29-2015, 08:44 PM
#5
Pro
Thread Starter
 08-30-2015, 06:30 AM
#7
Pro
Thread Starter
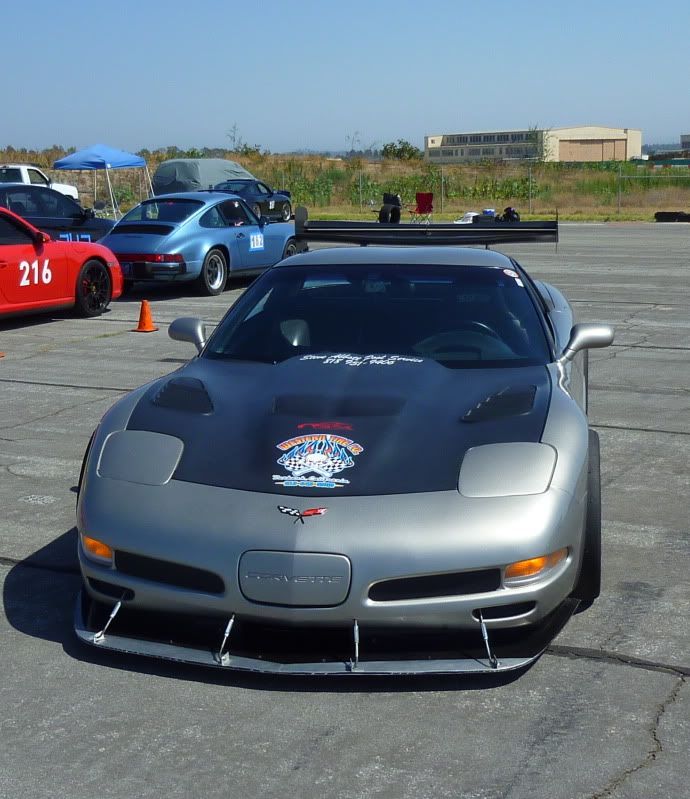
I'm making a 4" ABS splitter to use in conjunction with the ACI chin spoiler thing. I bolted on the ACI last week, gonna make the splitter this week. Also have AJ Hartman canards for the front.
 09-01-2015, 09:16 PM
#9
Pro

I am very happy with the package and at $1500 it's at least $1,000 less than other comparable units.
I also built the 4" ABS splitter below and ACI chin spoiler as outlined on the DIY section of this forum.
Vented hood (also from this forum) coming up in the next week or two.
GREAT STUFF !!
09-02-2015, 08:24 AM
#10
Pro
Thread Starter
I also installed a 72" Kognition on my C5 last month.
I am very happy with the package and at $1500 it's at least $1,000 less than other comparable units.
I also built the 4" ABS splitter below and ACI chin spoiler as outlined on the DIY section of this forum.
Vented hood (also from this forum) coming up in the next week or two.
GREAT STUFF !!
I am very happy with the package and at $1500 it's at least $1,000 less than other comparable units.
I also built the 4" ABS splitter below and ACI chin spoiler as outlined on the DIY section of this forum.
Vented hood (also from this forum) coming up in the next week or two.
GREAT STUFF !!
Also added AJ Hartman canards today:

Last edited by StreetSpeed; 09-02-2015 at 06:07 PM.


 09-04-2015, 12:19 PM
#14
Pro
Thread Starter
Why do you have to? I planned on it, but it seemed to me if I didn't box it in, head out on track, and my temps were good, then I'm good to go. Do you have to box it in simply because there is no way that it will operate at an OK temp or does it have more to do with airflow under the car making the splitter work more effective?
Also, you can get those canards from AJ Hartman racing.
Also, you can get those canards from AJ Hartman racing.
09-04-2015, 08:38 PM
#15
Melting Slicks

Why do you have to? I planned on it, but it seemed to me if I didn't box it in, head out on track, and my temps were good, then I'm good to go. Do you have to box it in simply because there is no way that it will operate at an OK temp or does it have more to do with airflow under the car making the splitter work more effective?
.
.
 09-04-2015, 08:57 PM
#16
Pro
Did you bolt the chin spoiler and splitter to anything substantial? I was actually thinking about taking the front bumper off and fabbing up some hard points to mount the turnbuckles and whatnot, but I'm not positive it's needed. Can you stand on your splitter? Also did you do anything different for flow to the radiator?
Also added AJ Hartman canards today:
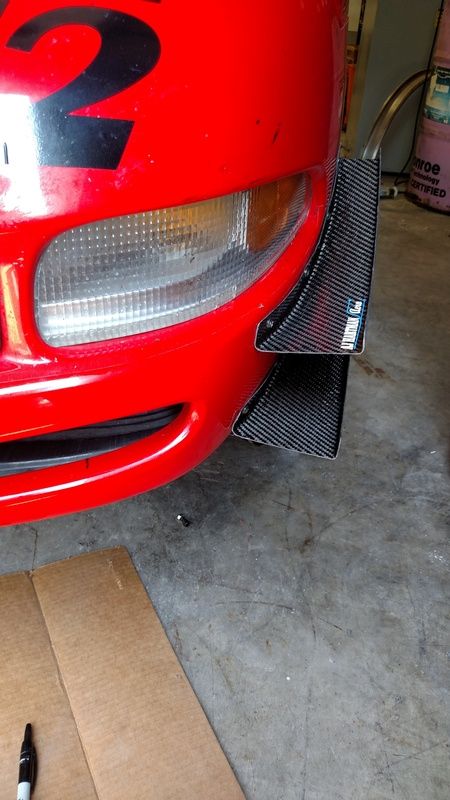
Also added AJ Hartman canards today:
I bought 4 "JOES " struts to support the splitter to the bumper. The bumper was removed for this project. I also did the vented front plate and gutted the foam impact absorber behind the plate to get a better air flow to the rad.
bad news is that I did have some overheating at Mid Ohio...thus the Trackspec hood vents that are going in soon.
I'm too technically challenged to post pics here but will be glad to send them if you pm me your e-mail
Can't say that I would willingly stand on this setup...however, my last track car had a RAFT RACING designed front splitter that was strong enough to stand on......but thats an entirely different set-up and alot more $$$
09-04-2015, 09:59 PM
#17
Pro
Thread Starter
Thanks for the tips. I bolted the back of the splitter right to frame behind the radiator support. The damn thing is mostly sealed as of right now, but I bought some .025'' aluminum to fab in to get it sealed up tighter.
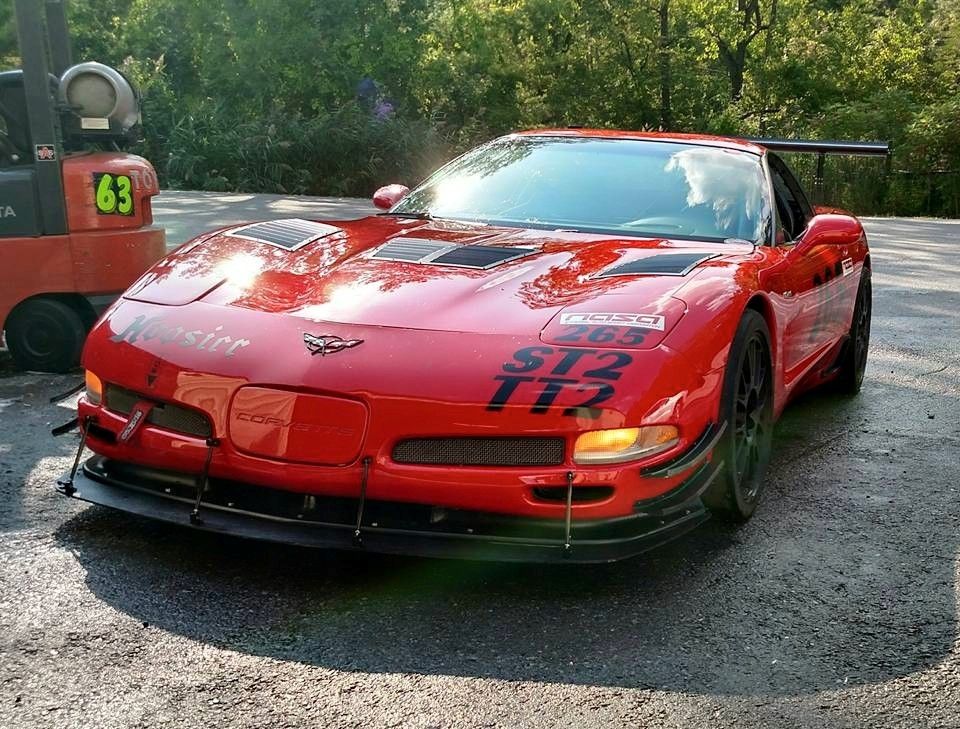
Here's a shot of the front end now:
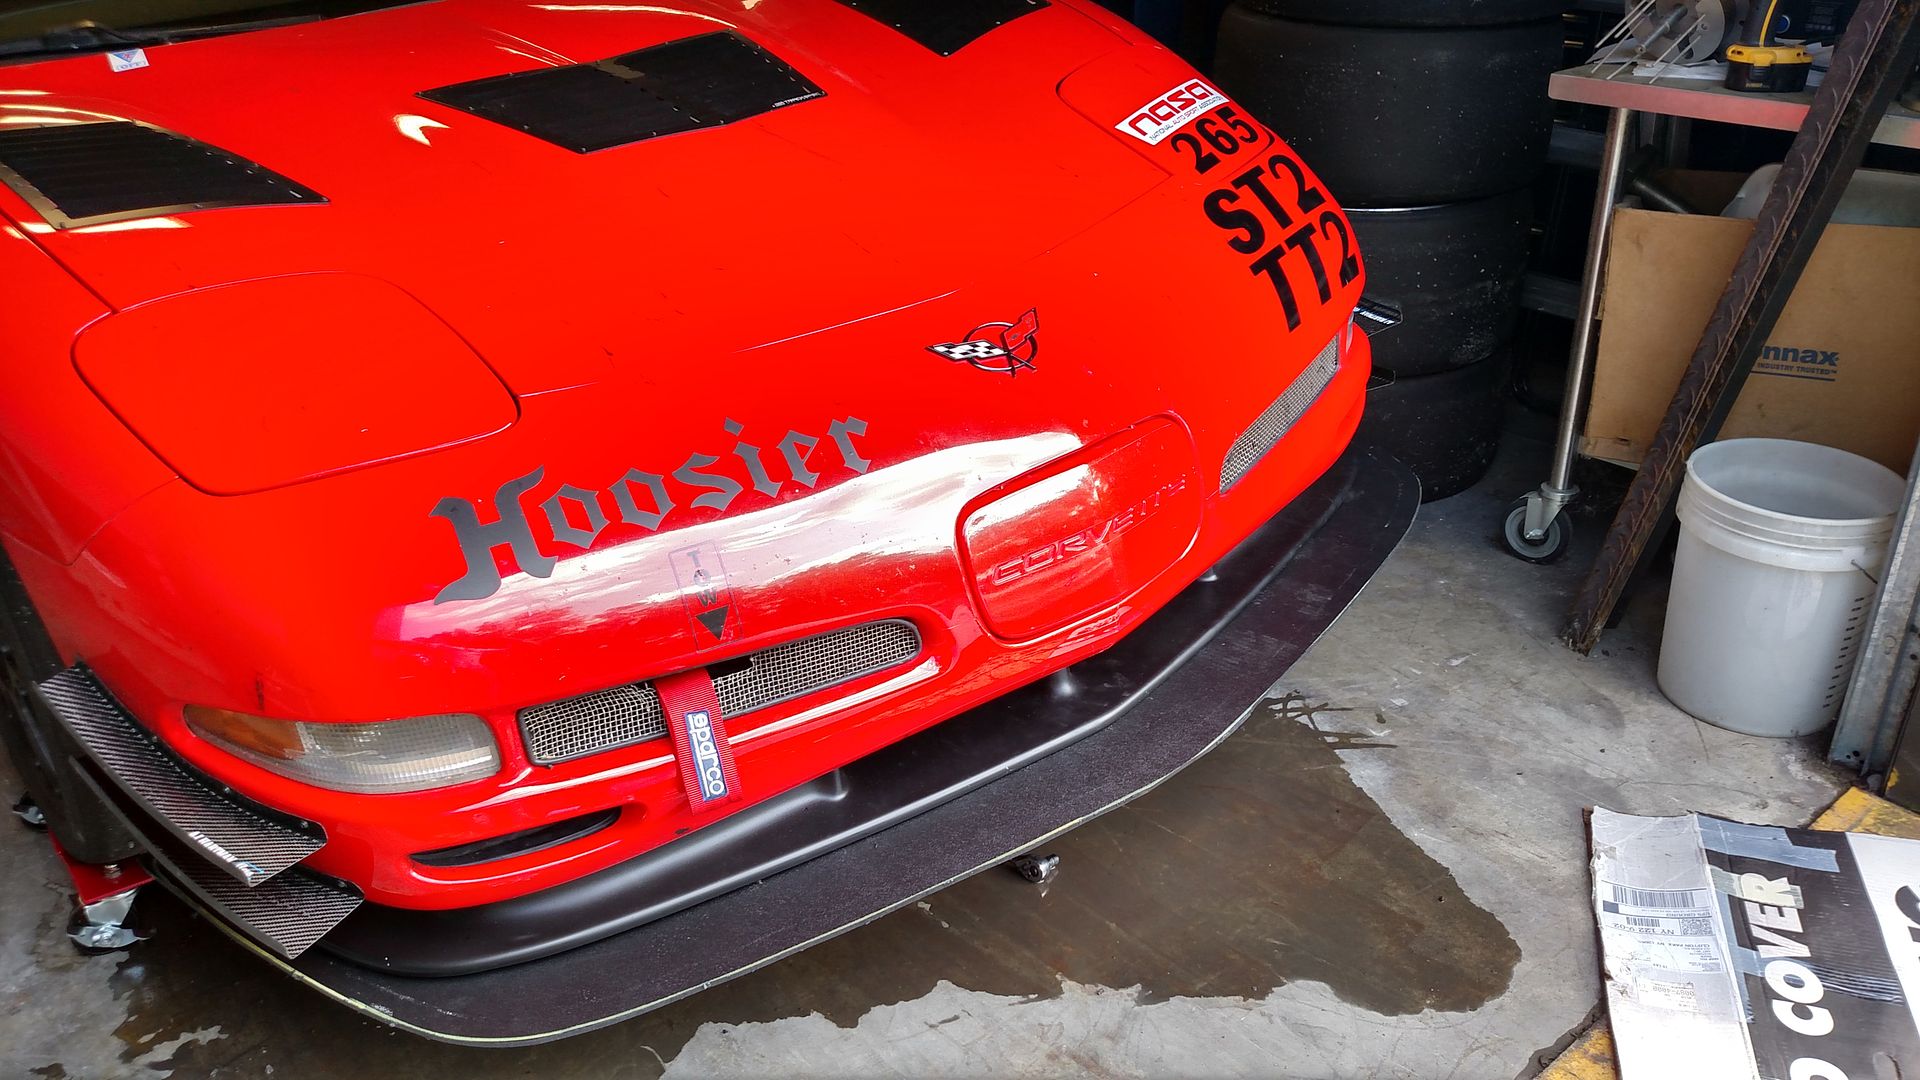
Gonna use aircraft cable instead of strut type supports. I want the splitter to be able to flex up should I need to climb over uneven pavement or have trailer loading issues without the solid struts wanting to push themselves back through the bumper. Gotta spend a couple more hours this weekend getting the splitter solid and bolted up, and then I say I'm ready to go.
Last edited by StreetSpeed; 09-04-2015 at 10:06 PM.
09-09-2015, 06:46 PM
#18
Pro
Thread Starter
Finished product. Ended up going with Longacre supports since I ran out of time. I'm not in love with my work on the front end. Really need to fab in something to the frame to hold the supports going into the bumper. You would definitely not want to stand on this thing! But, as long as it doesn't get ripped off this year and seems to be effective, I'll make it more secure over the winter.
Also let it idle for 15 minutes in the 95 degree heat and it never got over 185. I thought that was encouraging, but I'll bring the Sawzall when I hit the track on Monday just in case.
Looks good from 10 feet away!
Also let it idle for 15 minutes in the 95 degree heat and it never got over 185. I thought that was encouraging, but I'll bring the Sawzall when I hit the track on Monday just in case.
Looks good from 10 feet away!

