Winter Project: '66 Convertible
 12-12-2005, 10:17 AM
#1
Advanced

Thread Starter
Member Since: Apr 2005
Location: League City TX
Posts: 76
Likes: 0
Received 0 Likes
on
0 Posts

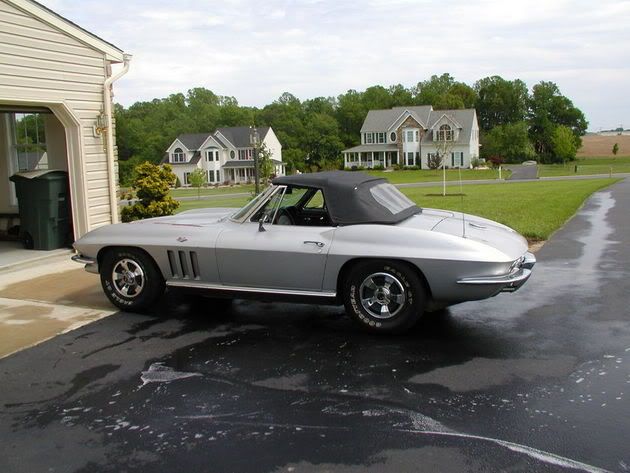
I first saw this ‘66 vette in a power point presentation given by the owner at work. The photo in the presentation showed the vette in his garage serving as a shelf for an assortment of boxes, house plants and non-perishable foodstuffs. Horrified, I threatened to find his house and perform a corvette rescue if life didn’t improve for this poor abused vette.
After over a year of torturing me with that photo, he finally cleared it off this summer and washed it.
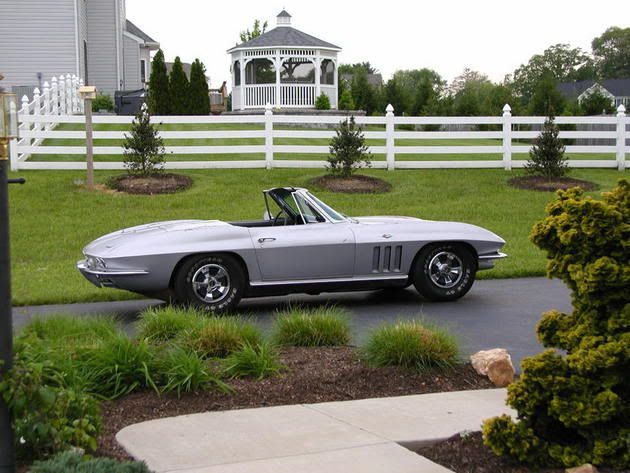
Seeing an opening, I began nagging him to fix it up, as the car has had virtually nothing done to it in over 30 years. Finally, last month he broke down, and we started tearing it down last Sunday.
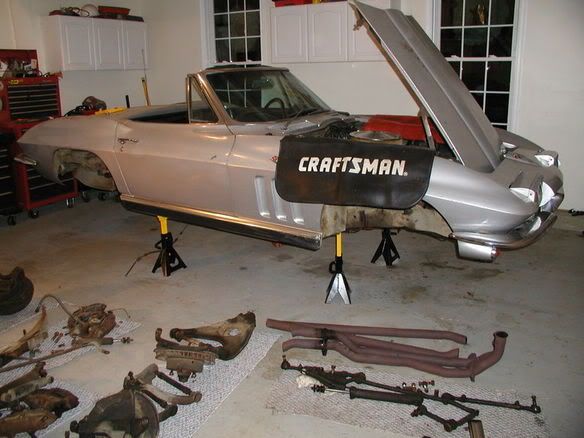
Day 1 – The owner and his son put the car up on jackstands and removed the wheels and front shocks.
http://i27.photobucket.com/albums/c1...Jackstands.jpg
http://i27.photobucket.com/albums/c1...ompartment.jpg
Day 2 – The owner removed all the brake calipers and hoses.
http://i27.photobucket.com/albums/c1...Suspension.jpg
http://i27.photobucket.com/albums/c1...Suspension.jpg
Day 3 – I removed the steering gear while the owner cut off the spring-to-trailing arm bolts. The steering gear was pretty nasty but it actually came off pretty easily as an assembly. All the rubber bushings and tie-rod ends were completely shot—all original pieces. Also, one sway bar end link had been replaced by a too-long bolt and some spacers.
http://i27.photobucket.com/albums/c1...eeringGear.jpg
http://i27.photobucket.com/albums/c1...eeringGear.jpg
Day 4 – The owner and I worked together removing the a-arms and spindles. All the mounting bolts/nuts came loose pretty easily, but the ball joints we a @#$%! I had to finish with a pitman arm puller for the fourth joint because I couldn’t lift the hammer anymore. Anyway, its all apart now, so we won in the end.
http://i27.photobucket.com/albums/c1...ionRemoved.jpg
Day 5 – While the owner removed the half-shafts, I got the radiator ready to come out (needs to be re-cored). With the half shafts out, we started on the trailing arms. I used an air hammer to drive out the shock mount, but it wouldn’t budge the trailing arm bolt (no real surprise there), so we got out my sawzall. Cutting between the trailing arm and the outside shims went pretty quick thanks in part to a Milwaukee “Torch” brand 9” blade. As an aside, these are awesome blades, very resistant to bending and tooth wear. The blade even looked pretty good after the first cut. The second cut against the inside shims was harder due to a tendency of the top of the trailing arm to want to rotate in causing a binding of the blade. It’s so hard to see in there, that I couldn’t tell it was binding, so I burned through three blades before we realized the problem and corrected it. Man, we held a little celebration when that baby came loose with the last blade.
http://i27.photobucket.com/albums/c1...torRemoved.jpg
http://i27.photobucket.com/albums/c1...ingArmGone.jpg
http://i27.photobucket.com/albums/c1...gArmTrophy.jpg
http://i27.photobucket.com/albums/c1...ThisOneOut.jpg
Day 6 – With a slight amount of dread, we started on the other trailing arm. We fully expected to have to break out the sawzall again, but just for the heck of it tried the air hammer anyway and, to our total amazement, the bolt broke loose and was able to be driven out. Guess our determination on the first arm had it running scared.
http://i27.photobucket.com/albums/c1...outCutting.jpg
http://i27.photobucket.com/albums/c1...ailingArms.jpg
With the trailing arms out of the way, we turned to the leaf spring. Unfortunately, our luck then decided to balance out, and we ended up breaking off two of the four bolts in the differential. Guess I should have asked for advice here first, but it just seemed so simple in comparison to the trailing arms that everyone knows going in is going to be a major hassle. So, any advice on getting the bolt remains out of the diff?
We finished the night by removing the exhaust, which came off easily, thanks to brass manifold nuts and again to the sawzall.
http://i27.photobucket.com/albums/c1...xhaustGone.jpg
http://i27.photobucket.com/albums/c1...astedParts.jpg
Well that’s where the Winter project stands. The story continues as we send stuff out, clean stuff up, order new parts and put it all back together.
Peter (corvette crusader) and Jerry (owner)
After over a year of torturing me with that photo, he finally cleared it off this summer and washed it.
Seeing an opening, I began nagging him to fix it up, as the car has had virtually nothing done to it in over 30 years. Finally, last month he broke down, and we started tearing it down last Sunday.
Day 1 – The owner and his son put the car up on jackstands and removed the wheels and front shocks.
http://i27.photobucket.com/albums/c1...Jackstands.jpg
http://i27.photobucket.com/albums/c1...ompartment.jpg
Day 2 – The owner removed all the brake calipers and hoses.
http://i27.photobucket.com/albums/c1...Suspension.jpg
http://i27.photobucket.com/albums/c1...Suspension.jpg
Day 3 – I removed the steering gear while the owner cut off the spring-to-trailing arm bolts. The steering gear was pretty nasty but it actually came off pretty easily as an assembly. All the rubber bushings and tie-rod ends were completely shot—all original pieces. Also, one sway bar end link had been replaced by a too-long bolt and some spacers.
http://i27.photobucket.com/albums/c1...eeringGear.jpg
http://i27.photobucket.com/albums/c1...eeringGear.jpg
Day 4 – The owner and I worked together removing the a-arms and spindles. All the mounting bolts/nuts came loose pretty easily, but the ball joints we a @#$%! I had to finish with a pitman arm puller for the fourth joint because I couldn’t lift the hammer anymore. Anyway, its all apart now, so we won in the end.
http://i27.photobucket.com/albums/c1...ionRemoved.jpg
Day 5 – While the owner removed the half-shafts, I got the radiator ready to come out (needs to be re-cored). With the half shafts out, we started on the trailing arms. I used an air hammer to drive out the shock mount, but it wouldn’t budge the trailing arm bolt (no real surprise there), so we got out my sawzall. Cutting between the trailing arm and the outside shims went pretty quick thanks in part to a Milwaukee “Torch” brand 9” blade. As an aside, these are awesome blades, very resistant to bending and tooth wear. The blade even looked pretty good after the first cut. The second cut against the inside shims was harder due to a tendency of the top of the trailing arm to want to rotate in causing a binding of the blade. It’s so hard to see in there, that I couldn’t tell it was binding, so I burned through three blades before we realized the problem and corrected it. Man, we held a little celebration when that baby came loose with the last blade.
http://i27.photobucket.com/albums/c1...torRemoved.jpg
http://i27.photobucket.com/albums/c1...ingArmGone.jpg
http://i27.photobucket.com/albums/c1...gArmTrophy.jpg
http://i27.photobucket.com/albums/c1...ThisOneOut.jpg
Day 6 – With a slight amount of dread, we started on the other trailing arm. We fully expected to have to break out the sawzall again, but just for the heck of it tried the air hammer anyway and, to our total amazement, the bolt broke loose and was able to be driven out. Guess our determination on the first arm had it running scared.
http://i27.photobucket.com/albums/c1...outCutting.jpg
http://i27.photobucket.com/albums/c1...ailingArms.jpg
With the trailing arms out of the way, we turned to the leaf spring. Unfortunately, our luck then decided to balance out, and we ended up breaking off two of the four bolts in the differential. Guess I should have asked for advice here first, but it just seemed so simple in comparison to the trailing arms that everyone knows going in is going to be a major hassle. So, any advice on getting the bolt remains out of the diff?
We finished the night by removing the exhaust, which came off easily, thanks to brass manifold nuts and again to the sawzall.
http://i27.photobucket.com/albums/c1...xhaustGone.jpg
http://i27.photobucket.com/albums/c1...astedParts.jpg
Well that’s where the Winter project stands. The story continues as we send stuff out, clean stuff up, order new parts and put it all back together.
Peter (corvette crusader) and Jerry (owner)
Last edited by zcorvette; 01-17-2006 at 12:44 PM.
 12-12-2005, 12:01 PM
#2
Team Owner


Member Since: Oct 2000
Location: Washington Michigan
Posts: 38,899
Received 1,858 Likes
on
1,101 Posts

Looks like the beginning of a fun project  . The radiator can't be re-cored unless it's a copper/brass look-alike replacement; the original aluminum radiators aren't repairable - you have to replace them (Tom DeWitt)
. The radiator can't be re-cored unless it's a copper/brass look-alike replacement; the original aluminum radiators aren't repairable - you have to replace them (Tom DeWitt)
12-12-2005, 12:43 PM
#3
Le Mans Master


I'm a few months ahead of you guys. Sounds all too familiar, right down to the sawsall and blades. I could not lift my arms after banging a pickle fork with a five pound hammer for about 10 minutes on the ball joints. Don't you love those guys on TV that show how you can lightly tap the side of a fitting and the ball joint or tie rod falls out? Next time I'm going to give my car to one of the TV mechanics and have it completed in a week or two. As far as the broken spring bolts, at the very least, the cover has to come off. I would soak the bolts in Liquid Wrench or Blaster for a few days and try a large set of easy outs. Usually once the tension is off the bolt and the area is thoroughly soaked, the bolts may come out without much difficulty. There was a great article on getting bolts out in the archives. Good Luck. Jerry
12-12-2005, 09:25 PM
#4
Instructor
Member Since: Sep 2002
Location: Marysville WA
Posts: 227
Likes: 0
Received 0 Likes
on
0 Posts
It looks like that garage is seeing its first real project and it is fairly serious. Because "sending stuff out" has rarely been an option for me I was counting up the cash (uff-da) that will change hands to rebuild or buy all the things on the floor. The documentation is great so far and it would be eye opening to continue that as the parts come back and all the invoices get added up....right down to the four wheel alignment. Good luck on a rewarding project.....and looks like there are more projects there for another winter. Once you get going it's hard to stop.
12-12-2005, 09:46 PM
#5

AWESOME!!!! Wish Peter COrvette Crusader lived next store to me!!!!'
p.s. the house across the street is for sale
p.s. the house across the street is for sale
12-12-2005, 11:04 PM
#6
Safety Car

http://www.bairs.com/
Not to far from you is BAIR'S Corvette suspension repair. Nice people.........been in business for many years, and are very good at the "REBUILD" part of your story. They will redo your parts......or exchange. Nice to see the old girl coming back for for a fun driving summer.
Not to far from you is BAIR'S Corvette suspension repair. Nice people.........been in business for many years, and are very good at the "REBUILD" part of your story. They will redo your parts......or exchange. Nice to see the old girl coming back for for a fun driving summer.
12-13-2005, 08:17 AM
#7
Advanced
Thread Starter
Member Since: Apr 2005
Location: League City TX
Posts: 76
Likes: 0
Received 0 Likes
on
0 Posts
After taking the weekend off, we got back on the project last night with those broken spring bolts staring us in the face.
Day 7 - Got one of the two broken spring bolts out using a combination of nearly every tool in the chest. After two hrs of filing, drilling, torching, hammering and cussing, we drove the remnants out with a small punch. The threads actually look pretty good after all that. We also drilled out bolt number 2, and once again, no luck with extraction, so it's back to the tool chest .
.
Peter
Day 7 - Got one of the two broken spring bolts out using a combination of nearly every tool in the chest. After two hrs of filing, drilling, torching, hammering and cussing, we drove the remnants out with a small punch. The threads actually look pretty good after all that. We also drilled out bolt number 2, and once again, no luck with extraction, so it's back to the tool chest
.Peter
 12-14-2005, 11:18 AM
#9
Advanced
Thread Starter
Member Since: Apr 2005
Location: League City TX
Posts: 76
Likes: 0
Received 0 Likes
on
0 Posts
Day 8 – The owner, Jerry, working unsupervised mind you, managed to get the remnants of the last spring bolt out last night. He used a center punch and hammer to collapse the drilled-out bolt into the center of the hole where he was able to grip it with pliers and thread the remnants out. There may be hope for him yet!
Photo of bolt remnants:
http://i27.photobucket.com/albums/c1...ltRemnants.jpg
By the way, he insisted that I post a picture of my attempt at center-punching the first bolt we got out Monday.
http://i27.photobucket.com/albums/c1...enterPunch.jpg
As you can see, I could probably have done better with my eyes closed. Oh, well. I also assure you that I did better on the one he got out last night.
The trailing arms are now on their way to Van Steel, cause they’re the best…

…and they’re a supporting vendor of the finest corvette forum around.
[/sucking up]
orono64: Wow, you’re good. Hit that nail right on the head.
livin: I’d love to bring the crusade up to WA but there’s a bit too much winter to do projects in for my taste.
67L36Driver: Amen, brother!
More later
Peter
Photo of bolt remnants:
http://i27.photobucket.com/albums/c1...ltRemnants.jpg
By the way, he insisted that I post a picture of my attempt at center-punching the first bolt we got out Monday.
http://i27.photobucket.com/albums/c1...enterPunch.jpg
As you can see, I could probably have done better with my eyes closed. Oh, well. I also assure you that I did better on the one he got out last night.
The trailing arms are now on their way to Van Steel, cause they’re the best…
…and they’re a supporting vendor of the finest corvette forum around.
[/sucking up]
orono64: Wow, you’re good. Hit that nail right on the head.
livin: I’d love to bring the crusade up to WA but there’s a bit too much winter to do projects in for my taste.
67L36Driver: Amen, brother!
More later
Peter
Last edited by zcorvette; 12-14-2005 at 11:55 AM.
12-15-2005, 03:53 PM
#10
Advanced
Thread Starter
Member Since: Apr 2005
Location: League City TX
Posts: 76
Likes: 0
Received 0 Likes
on
0 Posts
With the broken bolts out of the differential, Jerry and I continued on with the disassembly process. I was originally going to pull the strut rod assembly, while Jerry pulled the exhaust manifolds, but he decided to do the strut rods and the exhaust manifolds as proof that he’s more than just an “owner”. Seems he feels I’ve been giving you all the impression that he doesn’t know what he’s doing, when, in fact (and I quote), he’s “been working on this corvette since my punk butt was in diapers!” Okay, maybe that’s not an exact quote but you get the idea. He does in fact know what he’s doing, he just lacked a bit of motivation to get started, that’s all. 
So, while Jerry removed the strut rod assembly, I removed the coolant expansion tank and battery tray, which both need a good clean-up. With the tank and tray out of the way, Jerry pulled the exhaust manifolds, which came off easy as pie thanks to his genius decision to use neverseize on the bolts, when he last had them off.
http://i27.photobucket.com/albums/c1...odAssembly.jpg
http://i27.photobucket.com/albums/c1...ldsRemoved.jpg
http://i27.photobucket.com/albums/c1...tManifolds.jpg
We then pulled the alternator, which was wrong for the car, and the power steering pump, leaving the engine and engine bay ready for cleaning and paint touch-up.
One problem we are still facing is that three of four half-shaft U-bolts are seized into the differential axle shafts. Any suggestions?
Other than that, I think the disassembly phase of this project is complete. I see a lot of degreaser in my future.
Okay, maybe that’s not an exact quote but you get the idea. He does in fact know what he’s doing, he just lacked a bit of motivation to get started, that’s all. So, while Jerry removed the strut rod assembly, I removed the coolant expansion tank and battery tray, which both need a good clean-up. With the tank and tray out of the way, Jerry pulled the exhaust manifolds, which came off easy as pie thanks to his genius decision to use neverseize on the bolts, when he last had them off.
http://i27.photobucket.com/albums/c1...odAssembly.jpg
http://i27.photobucket.com/albums/c1...ldsRemoved.jpg
http://i27.photobucket.com/albums/c1...tManifolds.jpg
We then pulled the alternator, which was wrong for the car, and the power steering pump, leaving the engine and engine bay ready for cleaning and paint touch-up.
One problem we are still facing is that three of four half-shaft U-bolts are seized into the differential axle shafts. Any suggestions?
Other than that, I think the disassembly phase of this project is complete. I see a lot of degreaser in my future.
Last edited by zcorvette; 12-20-2005 at 12:44 PM.
12-16-2005, 02:00 PM
#11
Safety Car
Nice disassembly pics, Peter. You can sure see the effects of 40 years of grime, rust, etc. .. Mine looked the same way, too. Once the parts are degreased, rebuilt, wire brushed/sanded and repainted it looks really nice going back on the car. Will the frame get a makeover too?. .
12-20-2005, 01:01 PM
#12
Advanced
Thread Starter
Member Since: Apr 2005
Location: League City TX
Posts: 76
Likes: 0
Received 0 Likes
on
0 Posts
The control arms and spindles were packed up and shipped off today to join the trailing arms already at Van Steel. In the mean time, Jerry has begun the process of cleaning the wheel wells, frame and steering gear so the fresh suspension pieces have a nice place to live when they get back. We also have brakes, springs and steering components to order. Other major project work has been put on hold until after the holidays to avoid over-stressing the Charming Mrs. Jerry as she prepares to receive guests.
Happy Holidays to all, and see you on the flip side.
Peter
Happy Holidays to all, and see you on the flip side.
Peter
12-21-2005, 12:21 AM
#13
Racer
Member Since: Sep 2004
Location: Conroe TX
Posts: 327
Likes: 0
Received 0 Likes
on
0 Posts
Great step by step pictures. I love it.
I gotta do the same thing this winter, but winter doesnt start till Jan in Texas.
How do you know if the ball joints are bad? Or are you just replacing them based on the 40 year old rule? What about the coil springs are you going to replace those?
I gotta do the same thing this winter, but winter doesnt start till Jan in Texas.
How do you know if the ball joints are bad? Or are you just replacing them based on the 40 year old rule? What about the coil springs are you going to replace those?

 12-21-2005, 10:48 AM
#15
Advanced
Thread Starter
Member Since: Apr 2005
Location: League City TX
Posts: 76
Likes: 0
Received 0 Likes
on
0 Posts
Originally Posted by vref
How do you know if the ball joints are bad? Or are you just replacing them based on the 40 year old rule? What about the coil springs are you going to replace those?
12-21-2005, 10:53 AM
#16
Advanced
Thread Starter
Member Since: Apr 2005
Location: League City TX
Posts: 76
Likes: 0
Received 0 Likes
on
0 Posts
Originally Posted by 66-NDM
need an original radiator for her??
Peter
12-22-2005, 09:05 PM
#17
Heel & Toe

Member Since: Dec 2002
Posts: 16
Likes: 0
Received 0 Likes
on
0 Posts
Here is something that has worked many times for me:
Try heating the thread/bolt area with a propane torch - do not get it red hot, as you could turn gear fluid into charcoal/coke - heat it until it's almost too hot to touch.......then douse the area with penetrating oil. Let it cool down, and then repeat this process. After it cools again, try it.
One problem we are still facing is that three of four half-shaft U-bolts are seized into the differential axle shafts. Any suggestions?
Other than that, I think the disassembly phase of this project is complete. I see a lot of degreaser in my future.[/QUOTE]
Try heating the thread/bolt area with a propane torch - do not get it red hot, as you could turn gear fluid into charcoal/coke - heat it until it's almost too hot to touch.......then douse the area with penetrating oil. Let it cool down, and then repeat this process. After it cools again, try it.
One problem we are still facing is that three of four half-shaft U-bolts are seized into the differential axle shafts. Any suggestions?
Other than that, I think the disassembly phase of this project is complete. I see a lot of degreaser in my future.
[/QUOTE]
12-22-2005, 09:26 PM
#18
Melting Slicks

Member Since: Oct 2005
Location: New Jersey. The deer ate my Garden State.
Posts: 3,073
Likes: 0
Received 3 Likes
on
3 Posts
I used a hammer and an old regular screw driver and pounded the u bolts on the half shafts until they came out. It took a long time. I felt like I played nine innings in a major league baseball game. It was the only thing that worked on my '66.
01-17-2006, 01:03 PM
#19
Advanced
Thread Starter
Member Since: Apr 2005
Location: League City TX
Posts: 76
Likes: 0
Received 0 Likes
on
0 Posts
Well, despite the project being “on hold” for the holidays, Jerry managed to sneak into the garage and spend a decent amount of time to the clean-up phase of the project. The worst areas so far were the steering gear and the wheel wells. The steering gear was covered in a layer of oily grime so thick it looked like one part, and Jerry reported having to use a torch to burn the wire brush clean. The clean gear is shown below.
http://i27.photobucket.com/albums/c1...eeringGear.jpg
The wheel wells were coated with lumps of what looked like asphalt that required hours of delicate chipping and scraping to remove with out damaging the fiberglass. I was pretty impressed by how well this area looked when cleaned and painted. It’s tough to see from the photos, but the wheel areas are in awesome shape.
http://i27.photobucket.com/albums/c1...mWheelWell.jpg
http://i27.photobucket.com/albums/c1...AndPainted.jpg
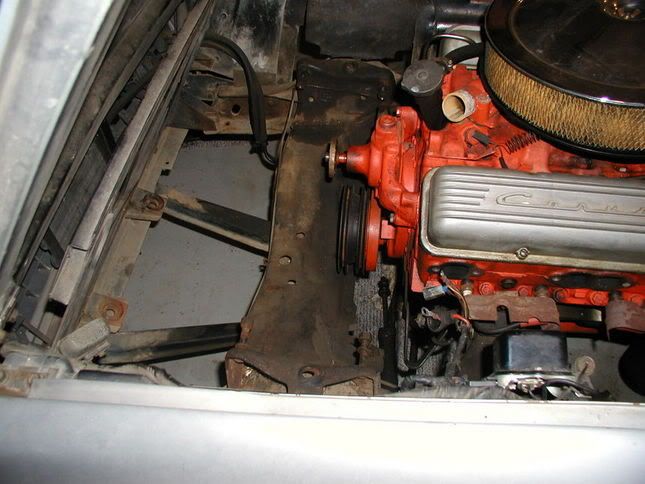
In the engine compartment, Jerry pulled the hood and enough front end bracing that he could access the cross member and frame for cleaning. The results are once again impressive. This car is really cleaning up nice.
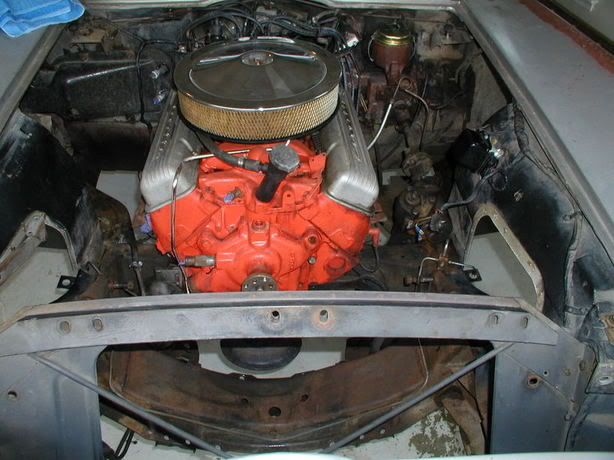
Other views:
http://i27.photobucket.com/albums/c1...leanFrame2.jpg
http://i27.photobucket.com/albums/c1...leanFrame3.jpg
http://i27.photobucket.com/albums/c1...leanFrame4.jpg
In the rear, Jerry removed the spare carrier for cleaning and some repair work, then degreased and wire brushed the body and frame back there in preparation for some paint.
http://i27.photobucket.com/albums/c1...AndPaintin.jpg
Oh, and he also finished removing the half-shaft u-bolts by cutting of the U’s and drilling out the bolts he couldn’t twist or pound out.
All-in-all, a pretty impressive amount of work for a guy that headed into this project dragging his feet like they were encased in some of that asphalt from the wheel wells, eh?
Looking to the future, the parts from Van Steel should be back any day now, and the new springs, sway bars and shocks have been ordered, so hopefully reassembly can begin before the end of the month.
Peter
http://i27.photobucket.com/albums/c1...eeringGear.jpg
The wheel wells were coated with lumps of what looked like asphalt that required hours of delicate chipping and scraping to remove with out damaging the fiberglass. I was pretty impressed by how well this area looked when cleaned and painted. It’s tough to see from the photos, but the wheel areas are in awesome shape.
http://i27.photobucket.com/albums/c1...mWheelWell.jpg
http://i27.photobucket.com/albums/c1...AndPainted.jpg
In the engine compartment, Jerry pulled the hood and enough front end bracing that he could access the cross member and frame for cleaning. The results are once again impressive. This car is really cleaning up nice.
Other views:
http://i27.photobucket.com/albums/c1...leanFrame2.jpg
http://i27.photobucket.com/albums/c1...leanFrame3.jpg
http://i27.photobucket.com/albums/c1...leanFrame4.jpg
In the rear, Jerry removed the spare carrier for cleaning and some repair work, then degreased and wire brushed the body and frame back there in preparation for some paint.
http://i27.photobucket.com/albums/c1...AndPaintin.jpg
Oh, and he also finished removing the half-shaft u-bolts by cutting of the U’s and drilling out the bolts he couldn’t twist or pound out.
All-in-all, a pretty impressive amount of work for a guy that headed into this project dragging his feet like they were encased in some of that asphalt from the wheel wells, eh?
Looking to the future, the parts from Van Steel should be back any day now, and the new springs, sway bars and shocks have been ordered, so hopefully reassembly can begin before the end of the month.
Peter