Winter Project: '66 Vert - Reassembly!
 01-23-2006, 12:28 PM
#1
Advanced

Thread Starter
Member Since: Apr 2005
Location: League City TX
Posts: 76
Likes: 0
Received 0 Likes
on
0 Posts

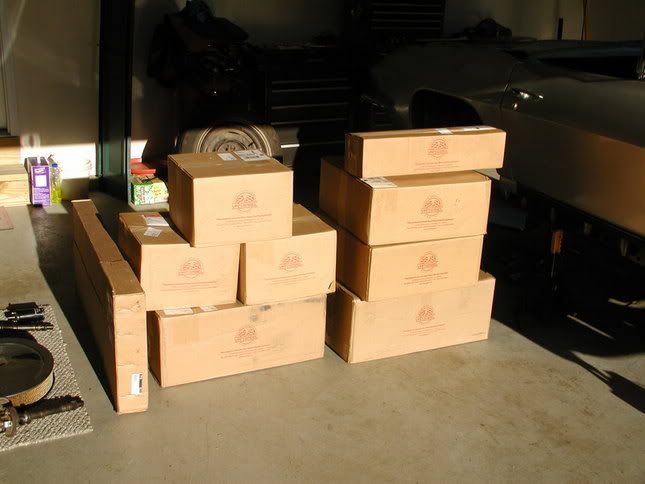
Christmas for the ’66 convertible winter project arrived on Jan 19, 2006 with the first boxes of fresh parts from Van Steel  .
.
This means disassembly is over and reassembly begins. If interested, the disassembly thread is here:
http://forums.corvetteforum.com/show....php?t=1255186
I must say that the parts inside the boxes from Van Steel were truly amazing. The owner, Jerry, and I couldn’t believe that these were the same grimy, rusty parts we sent down there. Those guys at Van Steel deserve every bit of their stellar reputation. I mean, you’ll swear they threw your stuff out and sent you new . That’s how good a job they do. Just look at the before/after photos below:
http://i27.photobucket.com/albums/c1...astedParts.jpg
http://i27.photobucket.com/albums/c1...FreshParts.jpg
Thanks

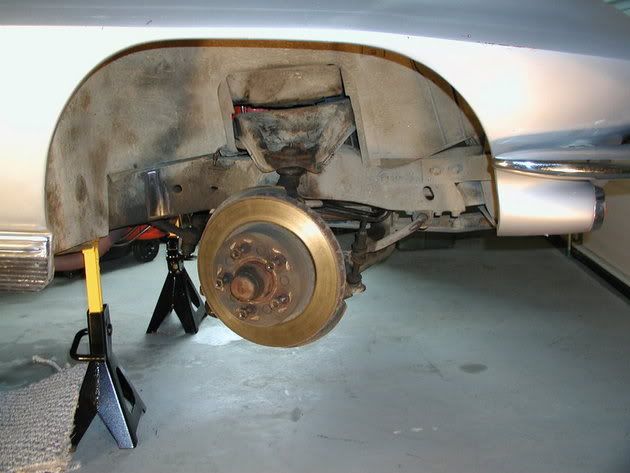
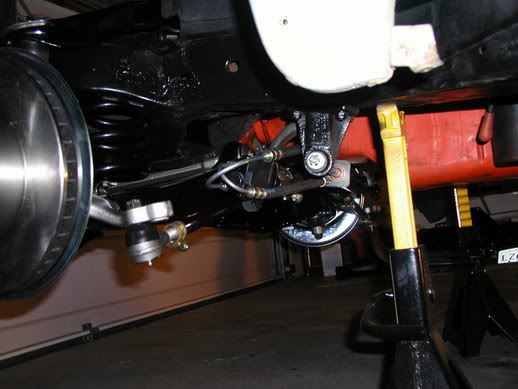
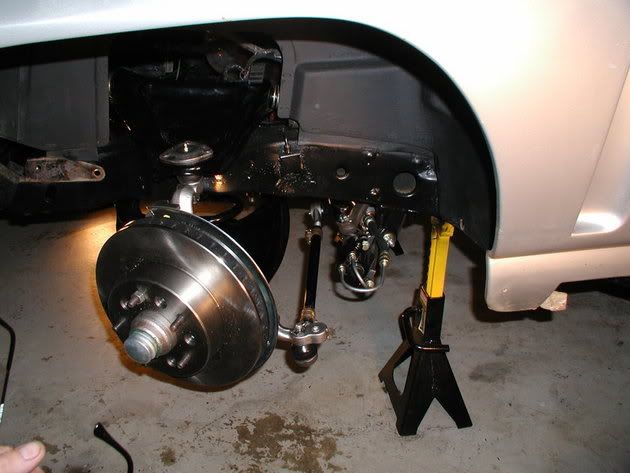
After ohing and ahing over the fresh parts for a sufficient period of time, we decided to re-assemble the front suspension, since we had all the parts to do so. With a clean frame and clean parts things went pretty smoothly. We went back with new grade 8 bolts and never-seized everything so the next guy or gal that follows in our footsteps can hopefully have an easier time of disassembly than we did.
The new suspension looks pretty sweet, especially in comparison to what we started with.

Other views of the new stuff:
http://i27.photobucket.com/albums/c1...Suspension.jpg
http://i27.photobucket.com/albums/c1...Suspension.jpg
http://i27.photobucket.com/albums/c1...ionCloseUp.jpg
http://i27.photobucket.com/albums/c1...ionCloseUp.jpg
We’re at it again tonight, so I’ll post updates as things progress.
Peter
. This means disassembly is over and reassembly begins. If interested, the disassembly thread is here:
http://forums.corvetteforum.com/show....php?t=1255186
I must say that the parts inside the boxes from Van Steel were truly amazing. The owner, Jerry, and I couldn’t believe that these were the same grimy, rusty parts we sent down there. Those guys at Van Steel deserve every bit of their stellar reputation. I mean, you’ll swear they threw your stuff out and sent you new
. That’s how good a job they do. Just look at the before/after photos below:http://i27.photobucket.com/albums/c1...astedParts.jpg
http://i27.photobucket.com/albums/c1...FreshParts.jpg
Thanks
After ohing and ahing over the fresh parts for a sufficient period of time, we decided to re-assemble the front suspension, since we had all the parts to do so. With a clean frame and clean parts things went pretty smoothly. We went back with new grade 8 bolts and never-seized everything so the next guy or gal that follows in our footsteps can hopefully have an easier time of disassembly than we did.
The new suspension looks pretty sweet, especially in comparison to what we started with.
Other views of the new stuff:
http://i27.photobucket.com/albums/c1...Suspension.jpg
http://i27.photobucket.com/albums/c1...Suspension.jpg
http://i27.photobucket.com/albums/c1...ionCloseUp.jpg
http://i27.photobucket.com/albums/c1...ionCloseUp.jpg
We’re at it again tonight, so I’ll post updates as things progress.
Peter
Last edited by zcorvette; 03-15-2006 at 12:55 PM. Reason: Update
 01-23-2006, 01:19 PM
#2
Le Mans Master


Keep up the good work. Looks like you have plenty of it to do.
AND keep up the pictures. I think we all like to see progress.
Rich
AND keep up the pictures. I think we all like to see progress.
Rich
01-24-2006, 04:08 PM
#3
Advanced
Thread Starter
Member Since: Apr 2005
Location: League City TX
Posts: 76
Likes: 0
Received 0 Likes
on
0 Posts
Jerry and I spent last night putting the steering gear back together and back on the car. Man we’re talking all the king’s horses and all the king’s men plus one assembly manual. Sure would have been nice if we hadn’t had to take it apart to clean and paint it. Oh, well. Here are the before/after shots off the car…
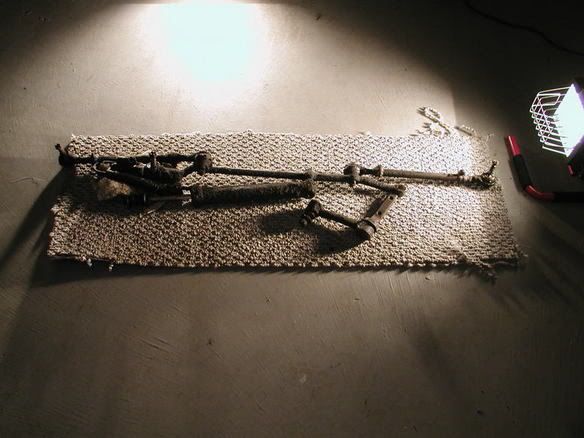
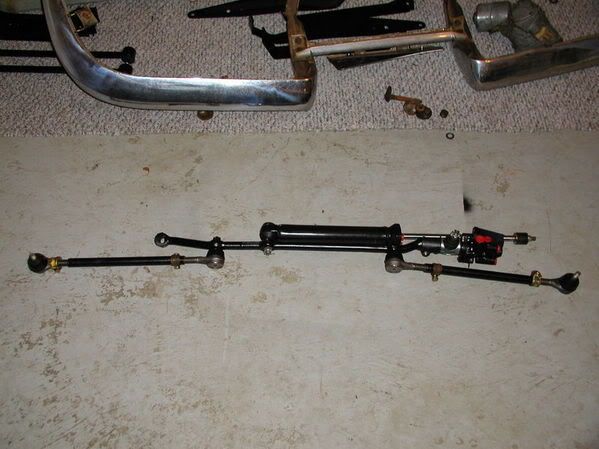
…and here it is on the car.
At least we’ll have a few photos of what it looked like clean. The front end does look nice. In fact, if I wasn’t already married, I might be inclined to ask it out .
.
Peter
…and here it is on the car.
At least we’ll have a few photos of what it looked like clean. The front end does look nice. In fact, if I wasn’t already married, I might be inclined to ask it out
.Peter
01-24-2006, 09:16 PM
#4
Le Mans Master

nice job!
that front end looks brand new.
He must be one happy owner with a huge change like that.
bet he can't wait for summer to get that thing out on the road again after all this work.
keep posting up progess pics for us to enjoy.
that front end looks brand new.
He must be one happy owner with a huge change like that.
bet he can't wait for summer to get that thing out on the road again after all this work.
keep posting up progess pics for us to enjoy.
01-24-2006, 09:46 PM
#5
Advanced
Thread Starter
Member Since: Apr 2005
Location: League City TX
Posts: 76
Likes: 0
Received 0 Likes
on
0 Posts
Tonight Jerry and I reassembled the bumper, brackets and grille. Here are the before/after shots of the front frame area.
Pretty dramatic, huh?
Peter
Pretty dramatic, huh?
Peter
 03-08-2006, 05:14 PM
#7
Advanced
Thread Starter
Member Since: Apr 2005
Location: League City TX
Posts: 76
Likes: 0
Received 0 Likes
on
0 Posts
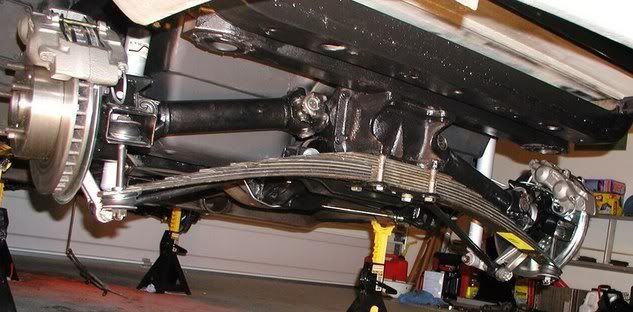
Well it’s been a while since I’ve posted any progress updates, but fortunately that is more a symptom of time available to write the post than it is a real lack of progress. In fact, since I last posted, Jerry and I have hung the new trailing arms, assembled and installed the rebuilt strut rod assembly, installed the new spring, finished the brake system, re-installed the half-shafts, put everything back on the engine, installed the new wiring harness, repaired the grille, reinstalled the trans cooler and hung the new stainless exhaust. Whew!
Now, in detail with photos:
The trailing arms went in pretty easily, with the exception of the shims. It was really difficult to get what I felt was a nice tight shimming of the trailing arm in the frame pocket. In the end I did the best I could and we’ll leave the final adjustment to the alignment shop. Also, the bolts we got seemed a bit long. With the castle nut tight, the hole for the cotter pin is about Ľ in from the top of the nut. Guess we’ll just add washers to shim out the nut.
Putting the strut rod assembly back together was the toughest part of the back end rebuild. Those poly bushings we got just wouldn’t fit between the sides of the bracket or the trailing arms. It took a vice, a clamp, a jack and some trimming to get it all back together, so if you’re going poly, be prepared for a fight.
The spring probably would have been a fight if not for the fact that a pre-installation search of the forum turned up an excellent write-up on this exact job. Following the instructions in the aforementioned post resulted in this job being nothing but a thang. Thanks Corvette Forum. My only adder to the procedure is to make sure your front jack stands are as far forward on the frame as possible, so that the maximum of vehicle weight is available over the spring when you’re jacking the ends up.
I had no problems with the half-shafts…because Jerry put them on. He just left it to me to torque them up, so that if a bolt got broken, it would be all my fault.
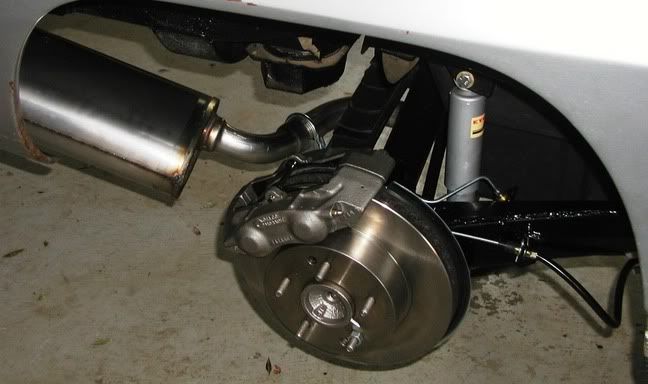
The brakes went on easy, as did the lines and e-brake cable. Then again, it seems like I’ve done a million brake projects in my life, so what may seem routine to me…
None of the following, however in anyway diminishes the fact that the rear suspension looks darn sexy, all rebuilt and everything.
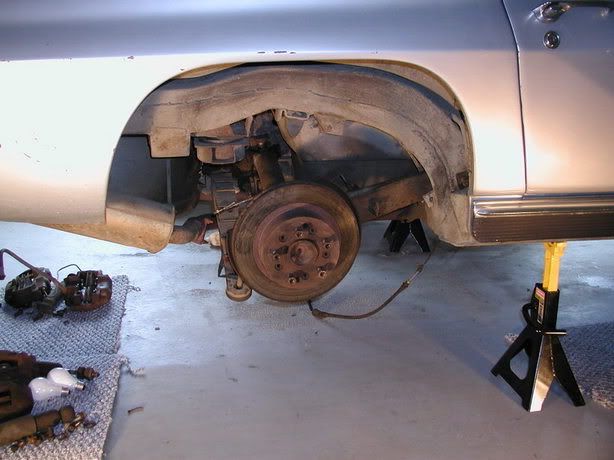
…and for comparison, the before:
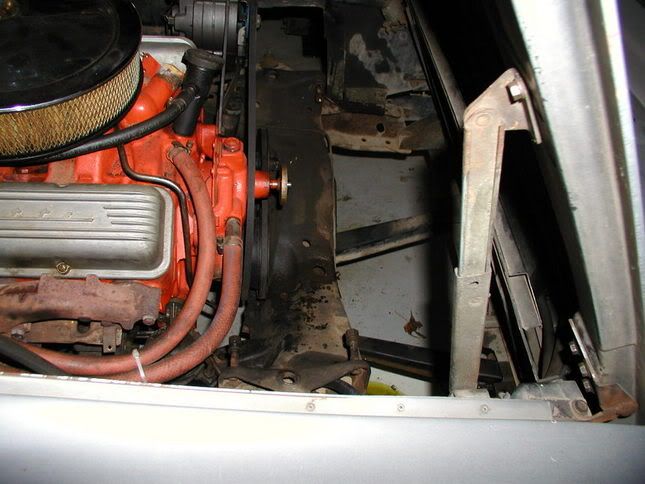
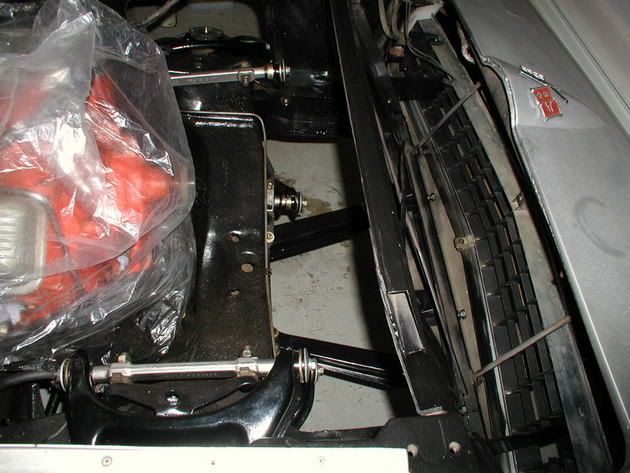
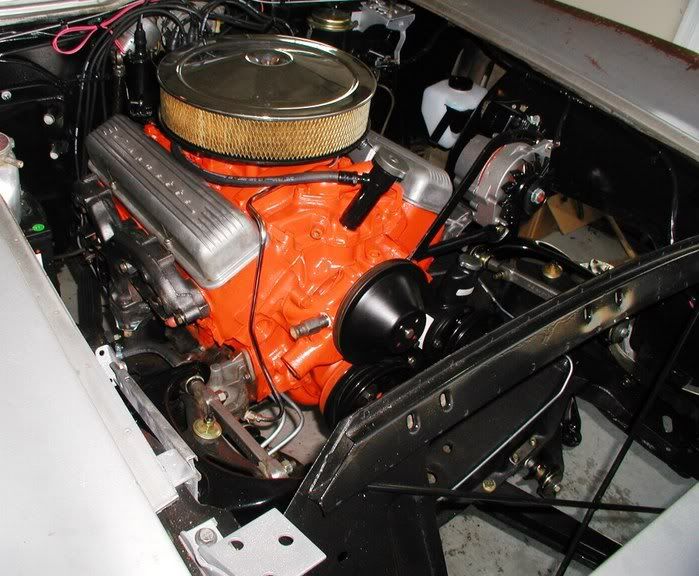
Up front, we stripped the engine clean so Jerry could spray some fresh Chevy Orange on it, then went back with repainted pulleys and brackets, a new alternator and PS pump, new plug wires, etc.
Jerry had also sand blasted the exh manifolds and put some of that manifold dressing on them. Makes ‘em look really nice and doesn’t even come off on your hands like I thought it would.
http://i27.photobucket.com/albums/c1...hManifolds.jpg
The PS pump pulley gave a little fight until we put a little never-seize on the shaft. The pulley just slipped right on. Figured if it has a key anyway, what’s the difference? New pump looks nice.
Also up front, we ran the new wiring harness. Getting the routing right takes time, but it wasn’t bad at all. The hardest part was hooking it to the headlight motors with them in the car. I was glad we decided to replace the harness, as it made a big difference.
Here’s the overall look after it was all done:
Don’t have pics of the grille, because it’s hard to tell the difference, but you really don’t want to know how it was held in there. Anyway, we got some new brackets to replace the broken ones and now it’s in there right. As and aside, I was amazed you could get these brackets. I know I shouldn’t have been, but I was.
Finally, this week, I finished fabing up some new trans cooler lines, while Jerry changed out the sections of rubber fuel hose and hooked up the throttle linkage. I’d give the advice to buy pre-made trans cooler lines, but then everybody probably already knew that one. After that we routed the new stainless exhaust we got from Allen’s. The Allen’s exhaust is a very nice piece of work that was justifiably recommended by several Forum members. It fit perfectly and looks great. As for sound, we’ll see.
http://i27.photobucket.com/albums/c1...essExhaust.jpg
Now all that’s left is the front sway bar; the radiator, shroud, fan, hoses and belts; bleeding the brakes; and replacing the power antennae. Then we can slap on the wheels and set it on the ground. Not long now.
Last but not least, I’d like to put in a plug for Volunteer Vette. Many of the parts mentioned in this post, and most of the hundreds of small detail pieces not mentioned, came from them, and they provided excellent service. Parts arrived lightning fast, quality was excellent, and their prices are super low.
You’re caught up, and I’m done.
See you on the road,
Peter
Now, in detail with photos:
The trailing arms went in pretty easily, with the exception of the shims. It was really difficult to get what I felt was a nice tight shimming of the trailing arm in the frame pocket. In the end I did the best I could and we’ll leave the final adjustment to the alignment shop. Also, the bolts we got seemed a bit long. With the castle nut tight, the hole for the cotter pin is about Ľ in from the top of the nut. Guess we’ll just add washers to shim out the nut.
Putting the strut rod assembly back together was the toughest part of the back end rebuild. Those poly bushings we got just wouldn’t fit between the sides of the bracket or the trailing arms. It took a vice, a clamp, a jack and some trimming to get it all back together, so if you’re going poly, be prepared for a fight.
The spring probably would have been a fight if not for the fact that a pre-installation search of the forum turned up an excellent write-up on this exact job. Following the instructions in the aforementioned post resulted in this job being nothing but a thang. Thanks Corvette Forum. My only adder to the procedure is to make sure your front jack stands are as far forward on the frame as possible, so that the maximum of vehicle weight is available over the spring when you’re jacking the ends up.
I had no problems with the half-shafts…because Jerry put them on. He just left it to me to torque them up, so that if a bolt got broken, it would be all my fault.
The brakes went on easy, as did the lines and e-brake cable. Then again, it seems like I’ve done a million brake projects in my life, so what may seem routine to me…
None of the following, however in anyway diminishes the fact that the rear suspension looks darn sexy, all rebuilt and everything.
…and for comparison, the before:
Up front, we stripped the engine clean so Jerry could spray some fresh Chevy Orange on it, then went back with repainted pulleys and brackets, a new alternator and PS pump, new plug wires, etc.
Jerry had also sand blasted the exh manifolds and put some of that manifold dressing on them. Makes ‘em look really nice and doesn’t even come off on your hands like I thought it would.
http://i27.photobucket.com/albums/c1...hManifolds.jpg
The PS pump pulley gave a little fight until we put a little never-seize on the shaft. The pulley just slipped right on. Figured if it has a key anyway, what’s the difference? New pump looks nice.
Also up front, we ran the new wiring harness. Getting the routing right takes time, but it wasn’t bad at all. The hardest part was hooking it to the headlight motors with them in the car. I was glad we decided to replace the harness, as it made a big difference.
Here’s the overall look after it was all done:
Don’t have pics of the grille, because it’s hard to tell the difference, but you really don’t want to know how it was held in there. Anyway, we got some new brackets to replace the broken ones and now it’s in there right. As and aside, I was amazed you could get these brackets. I know I shouldn’t have been, but I was.
Finally, this week, I finished fabing up some new trans cooler lines, while Jerry changed out the sections of rubber fuel hose and hooked up the throttle linkage. I’d give the advice to buy pre-made trans cooler lines, but then everybody probably already knew that one. After that we routed the new stainless exhaust we got from Allen’s. The Allen’s exhaust is a very nice piece of work that was justifiably recommended by several Forum members. It fit perfectly and looks great. As for sound, we’ll see.
http://i27.photobucket.com/albums/c1...essExhaust.jpg
Now all that’s left is the front sway bar; the radiator, shroud, fan, hoses and belts; bleeding the brakes; and replacing the power antennae. Then we can slap on the wheels and set it on the ground. Not long now.
Last but not least, I’d like to put in a plug for Volunteer Vette. Many of the parts mentioned in this post, and most of the hundreds of small detail pieces not mentioned, came from them, and they provided excellent service. Parts arrived lightning fast, quality was excellent, and their prices are super low.
You’re caught up, and I’m done.
See you on the road,
Peter
03-08-2006, 06:19 PM
#8

Great work!!!! 


 03-08-2006, 08:39 PM
#10

You're going to really enjoy those new front touring springs over the factory originals. That was by far the biggest difference that i have noticed in handling out of all the things i have done to my car. Now, thanks to the new touring springs, when i hit a corner going fast i dont feel like i am going to die anymore.
03-15-2006, 12:53 PM
#11
Advanced
Thread Starter
Member Since: Apr 2005
Location: League City TX
Posts: 76
Likes: 0
Received 0 Likes
on
0 Posts
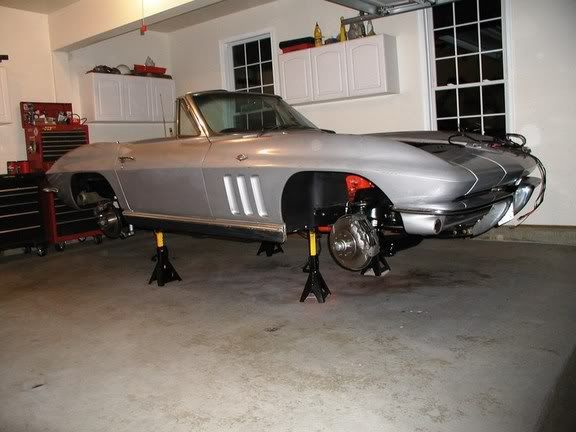
OK, after what Jerry tells me was 114 days, the vette is off the jackstands and back on the floor, sitting on its own four wheels. It was a major moment in this winter project, and man was it nice. It definitely sits higher with new springs all around, but the look is not unpleasant. We’re still waiting on the radiator (and front sway bar) to arrive so we can fire it up and drive around, but after finishing the electrical, exhaust and brake bleeding last night, we just had to set it down and see how it looked.
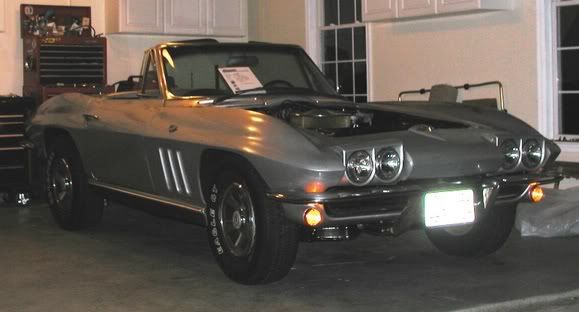
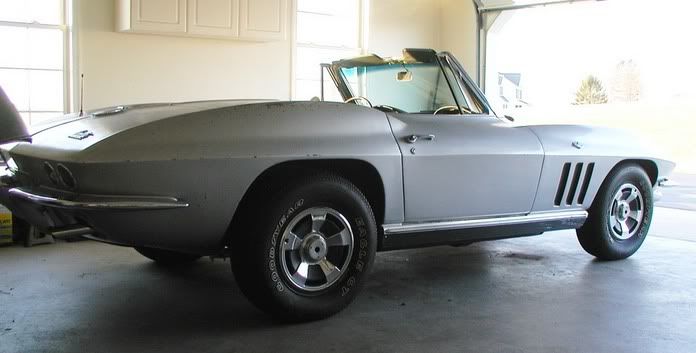
I like the results, even if most of the work we did can’t be seen in either of the photos above. We’ll have to force people to look at it from the creeper to appreciate our work.
Now, if only that radiator would show up…
Peter
I like the results, even if most of the work we did can’t be seen in either of the photos above. We’ll have to force people to look at it from the creeper to appreciate our work.
Now, if only that radiator would show up…
Peter
03-19-2006, 10:03 PM
#12
Heel & Toe

Member Since: Mar 2006
Posts: 21
Likes: 0
Received 0 Likes
on
0 Posts
zcorvette,
Great thread, very informative for the novice like myself. I was wondering if you could post your shopping list? I can go through the thread and determine the big items but the additional items such as supension kits are a little more difficult.
I would like to do a similar project to a 63 and the list certainly would help.
Thanks in advance.
KB