SBC Tripower with nitrous
 09-03-2006, 11:32 PM
#1
Race Director

Thread Starter

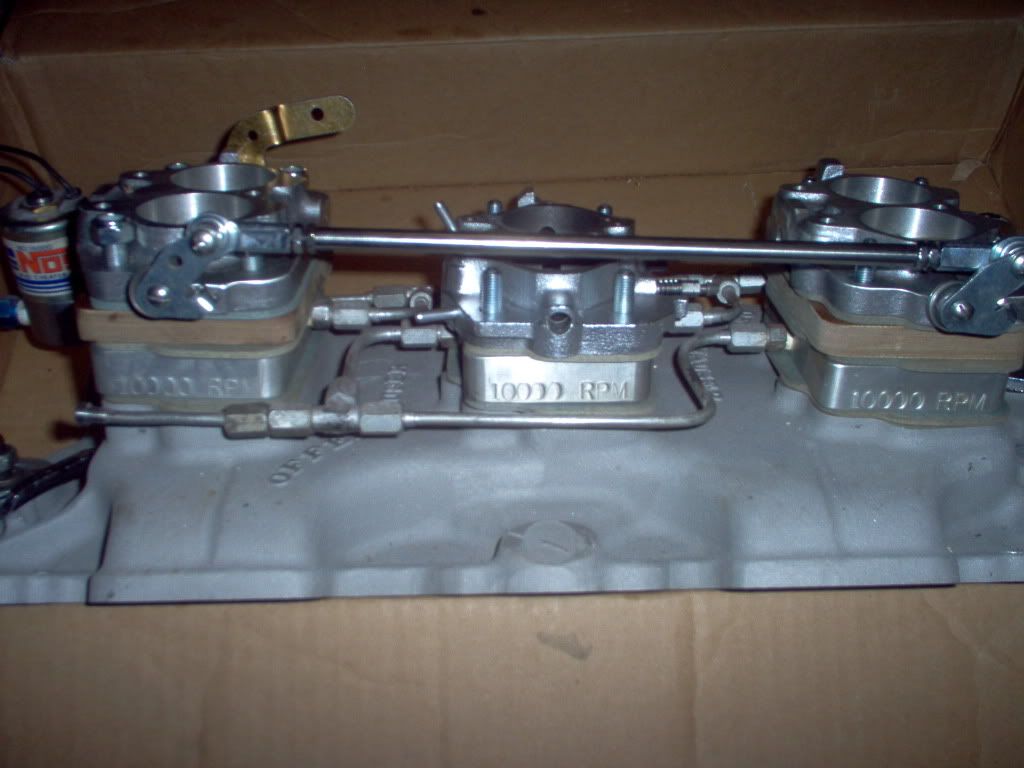
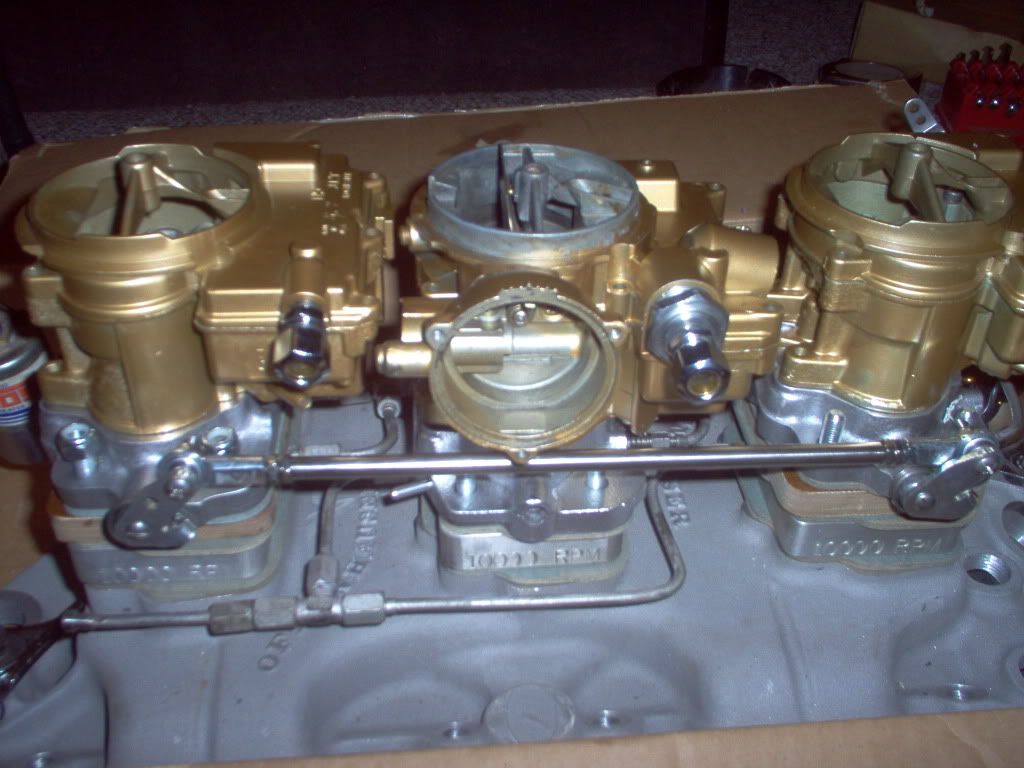
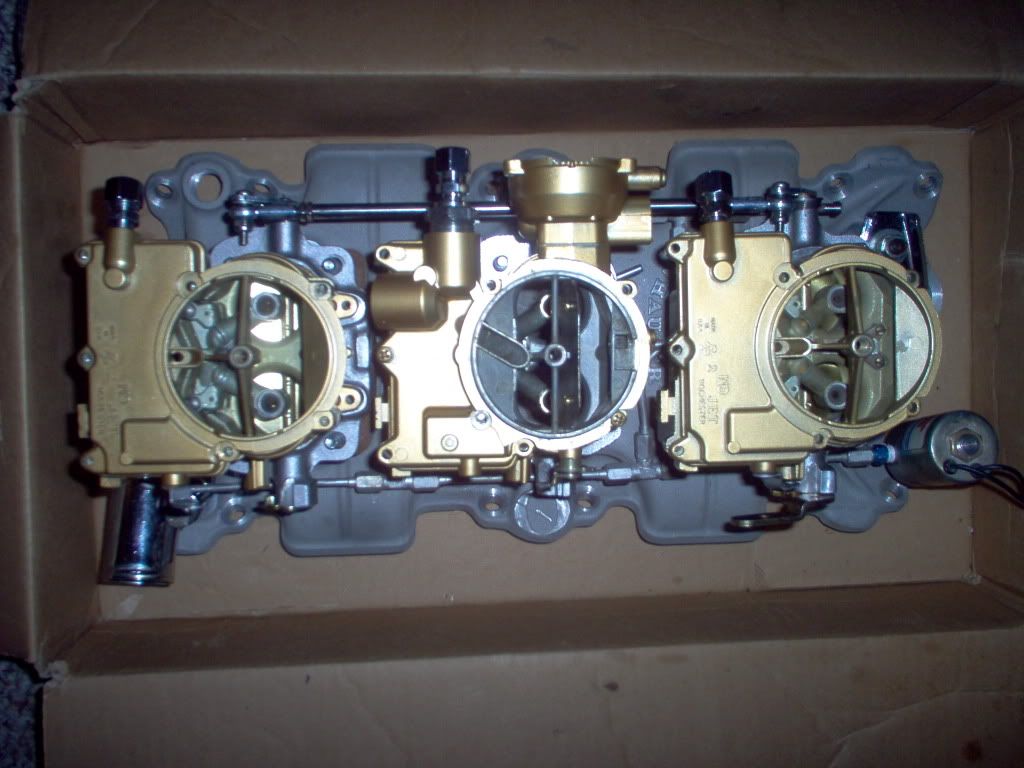
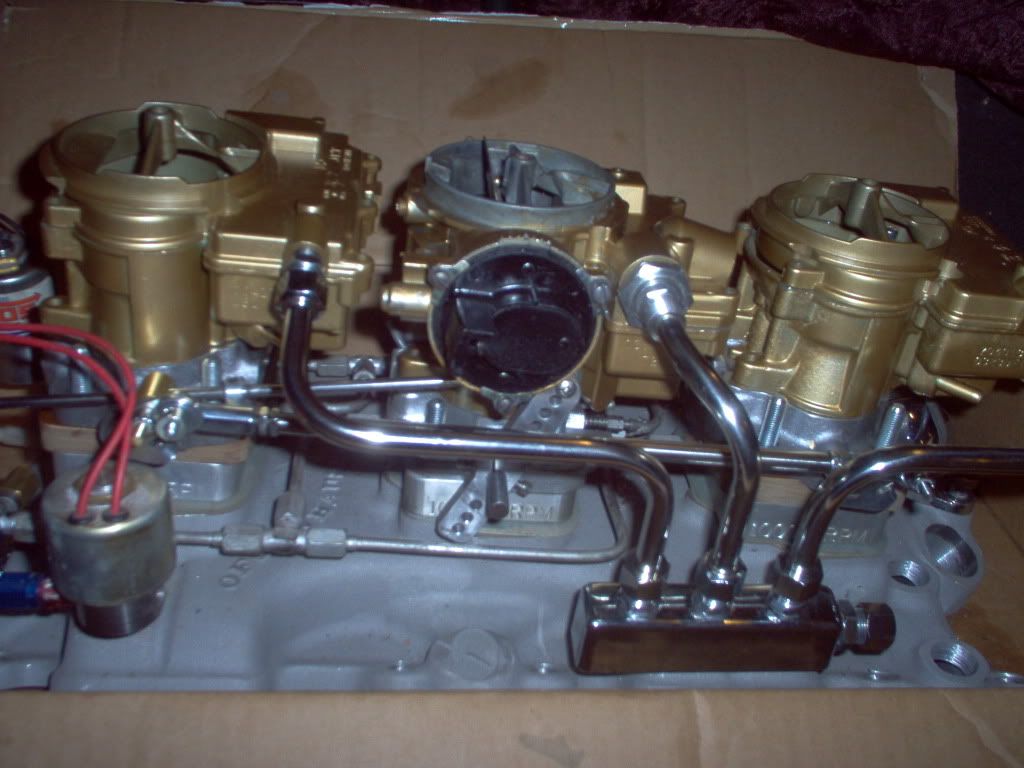
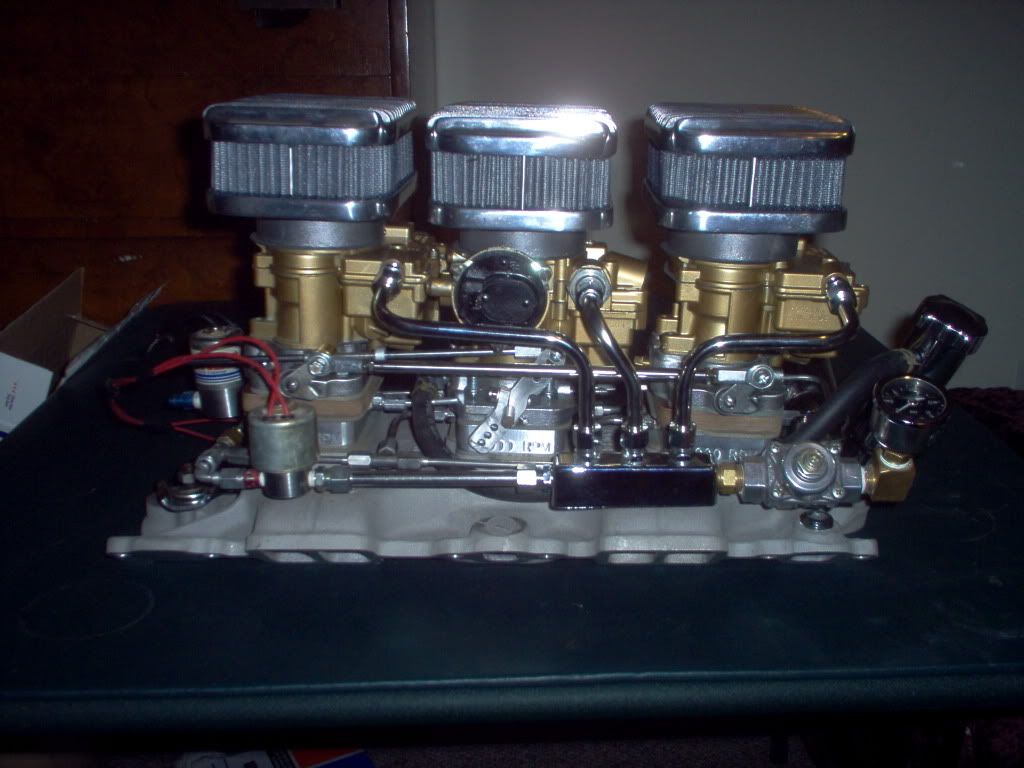
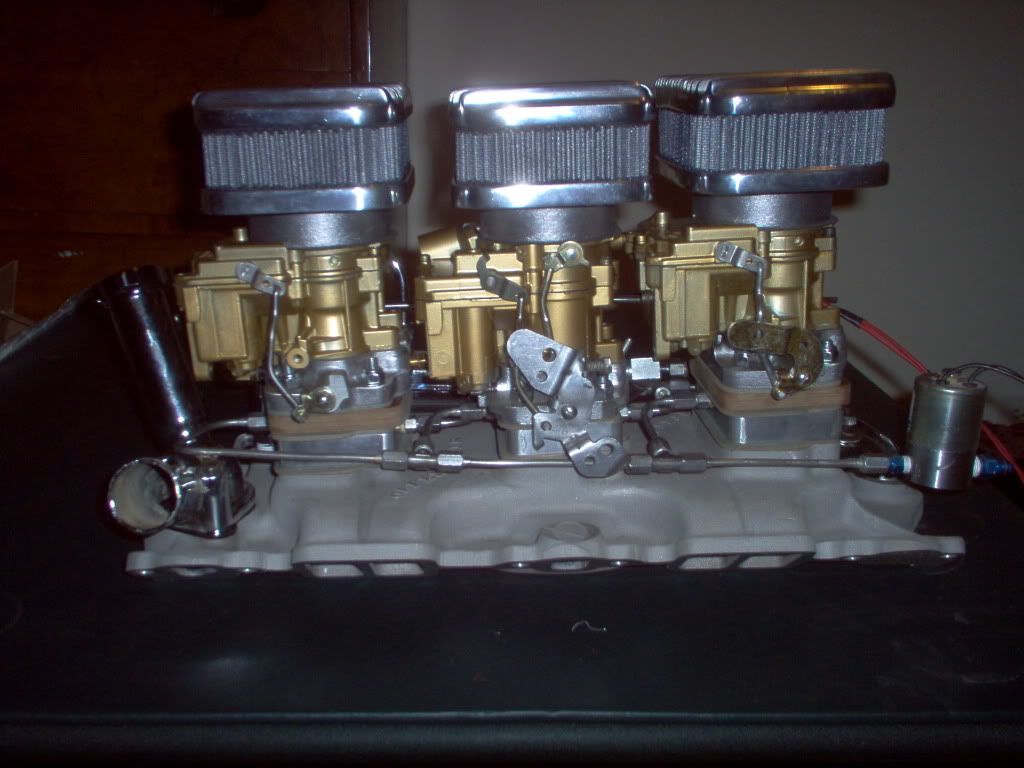
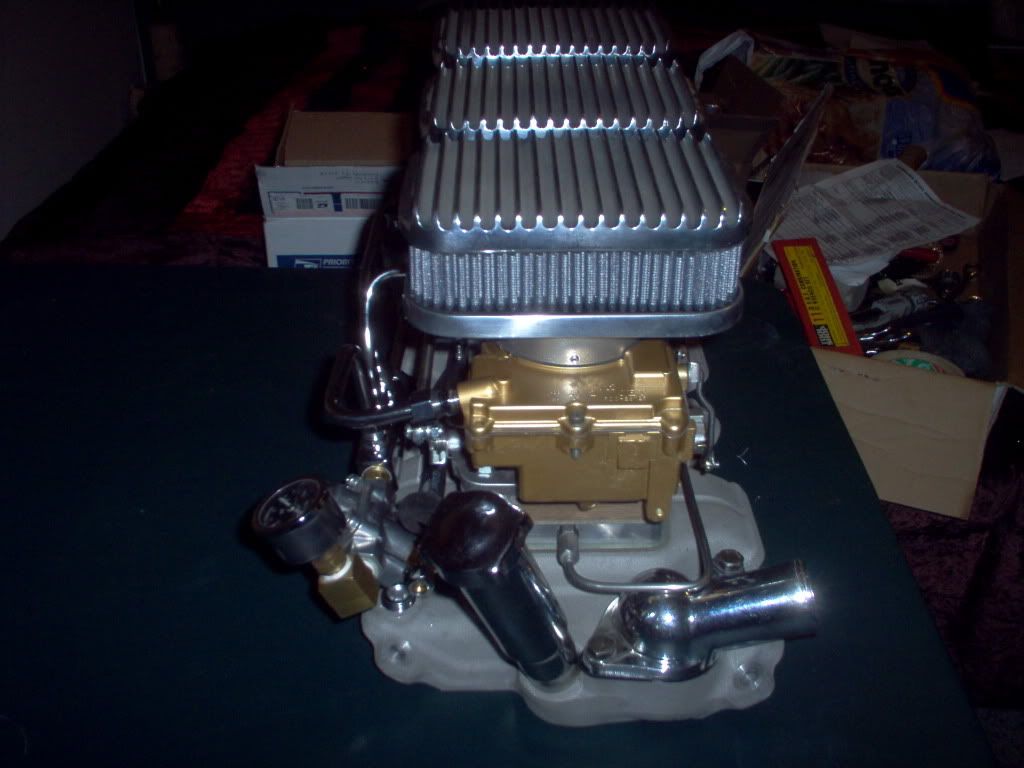
Thought I would post here too. My car is a 63 custom but I am usually on the C3 Tech and performance forum. The carbs are Large Base Rochester 2 bbls. Front and rear carbs are 1970 Chevy 350, 400 carburetors. They are front inlet, pre emission carbs. The center is a mid 70's Mercruiser Marine 350 Chevy carb. To be Coast Guard approved need side inlet and boats need electric choke. The front and rear base plates are 1966 Pontiac GTO Tripower cnc'ed aluminum reproduction base plates with lapped in brass throttle plate for an airtight seal when not in use. It also eliminates the idle circuit. The power valves were also eliminated in the front and rear carbs, not needed as they are just dumpers, they work exactly like a big secondary on a 4 bbl. The front and rear tops are 1966 Pontiac tripower reproduction tops. The Center carb base plate is 1970 base plate off one of the end carbs. The center throttle rod is a 66 GTO tripower throttle rod that was drilled and tapped. inserted a #10 stud and drilled and tapped a piece of the 1970 throttle rod and threaded it on to the end to extend it to accept the pass side linkage to activate the front and rear. The linkage is a modified tripower linkage for a small base setup. Had to shorten the center arm and grind the bottom of the choke housing for clearance The fuel lines are stainless steel, I bought a fuel block, Stainless line, fittings, and a 3/8 pipe bender. Had to move the fuel block forward to clear the manifold with the regulator and inlet so the center line looks a little funny but that is all I could do. The plate nitrous system is from the 60's. It was originally a custom 75 HP shot built by 10,000 RPM for a GTO but I drilled the spray bars to the correct size for a 150 HP shot and added NOS Cheater solenoids. It is jetted at the solenoids and the lines were modified to fit my Chevy. The rebuild kits were from pontiactripower.com. It took me about 5 months in my spare time to research, gather parts and assemble this. I got about $1300 in it and a ton of work. Hope it works as good as it looks. I did my homework so it should. 2 bbl carbs are rated differently than 4 bbl's. Adjusted CFM is about 816 CFM which should be about perfect for my 500 HP 383. 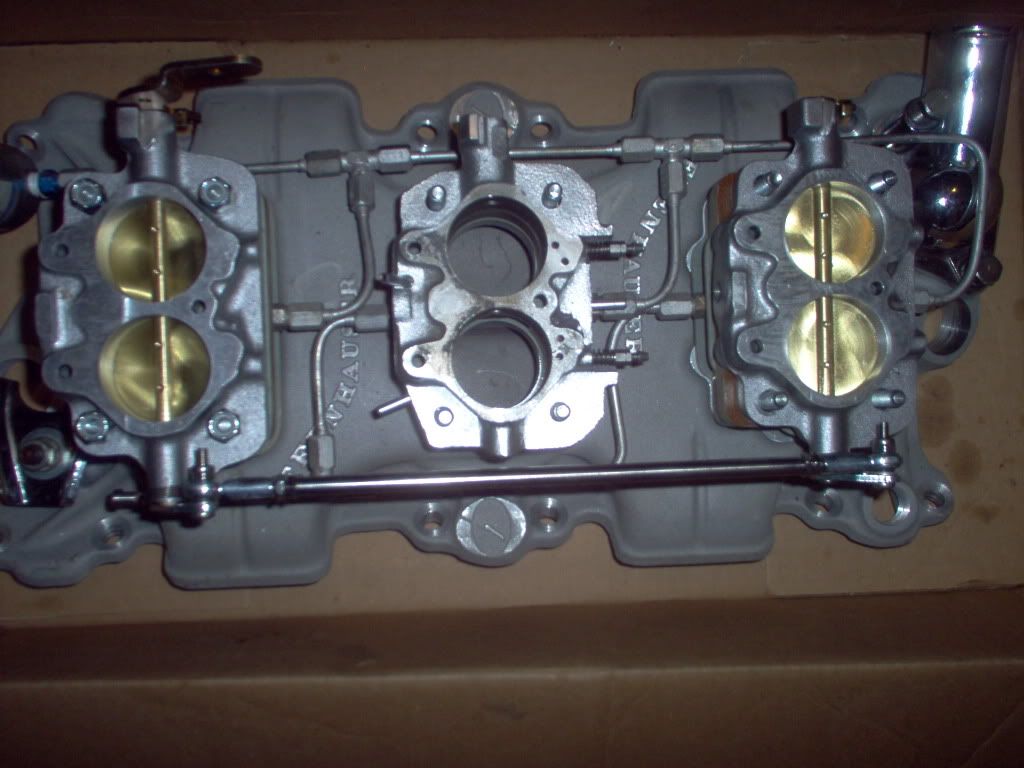
Last edited by 63mako; 09-03-2006 at 11:37 PM.
 09-04-2006, 12:18 AM
#2
Drifting

Wow! Your workmanship is impressive, and you've built it on a reasonable budget as well. I hope it does indeed run as well as it looks.
I recently ran across the pontiactripower.com website after running into some issues with the tri-power on my street rod. They are a great resource that I wish I had run across earlier. Another good source for tri-power parts/information is Automotion Inc (www.hotrodcarbs.com). Larry has a good website as well.
Just curious - what type of needle and seat are you using in your carbs? Mine use the ball & seat type, and I have had occasional problems with the secondary carbs flooding when they apparently do not seat well. A friend that is into Pontiac restorations suggested that I change them back to stock needle and seats because they are more forgiving. I have not done that yet since the problems are becoming less frequent now. I'll usually get it out where I can open the secondaries every time I drive the car now to keep fresh fuel in them. I believe this has helped since I only get to drive the car a couple of times a week.
Again, I am very impressed with the setup you have built, and I hope all goes well when you get it running.
TB
09-04-2006, 12:28 AM
#3
Race Director
Thread Starter
Originally Posted by Jalopy31
Wow! Your workmanship is impressive, and you've built it on a reasonable budget as well. I hope it does indeed run as well as it looks.
I recently ran across the pontiactripower.com website after running into some issues with the tri-power on my street rod. They are a great resource that I wish I had run across earlier. Another good source for tri-power parts/information is Automotion Inc (www.hotrodcarbs.com). Larry has a good website as well.
Just curious - what type of needle and seat are you using in your carbs? Mine use the ball & seat type, and I have had occasional problems with the secondary carbs flooding when they apparently do not seat well. A friend that is into Pontiac restorations suggested that I change them back to stock needle and seats because they are more forgiving. I have not done that yet since the problems are becoming less frequent now. I'll usually get it out where I can open the secondaries every time I drive the car now to keep fresh fuel in them. I believe this has helped since I only get to drive the car a couple of times a week.
Again, I am very impressed with the setup you have built, and I hope all goes well when you get it running.
TB
I recently ran across the pontiactripower.com website after running into some issues with the tri-power on my street rod. They are a great resource that I wish I had run across earlier. Another good source for tri-power parts/information is Automotion Inc (www.hotrodcarbs.com). Larry has a good website as well.
Just curious - what type of needle and seat are you using in your carbs? Mine use the ball & seat type, and I have had occasional problems with the secondary carbs flooding when they apparently do not seat well. A friend that is into Pontiac restorations suggested that I change them back to stock needle and seats because they are more forgiving. I have not done that yet since the problems are becoming less frequent now. I'll usually get it out where I can open the secondaries every time I drive the car now to keep fresh fuel in them. I believe this has helped since I only get to drive the car a couple of times a week.
Again, I am very impressed with the setup you have built, and I hope all goes well when you get it running.
TB
 09-04-2006, 12:49 AM
#4
Burning Brakes

I have a question....where do you get the little Heim-Joints for the linkages? I have been casually looking around for some to spruce up my linkage setup but all I can find are really cheezy ones and nice but too big versions. Yours look to be a good size and definitely not the poor quality ones I have seen around.
Thanks
Darren
Thanks
Darren
09-07-2006, 12:40 AM
#5
Race Director
Thread Starter
Originally Posted by macdarren
I have a question....where do you get the little Heim-Joints for the linkages? I have been casually looking around for some to spruce up my linkage setup but all I can find are really cheezy ones and nice but too big versions. Yours look to be a good size and definitely not the poor quality ones I have seen around.
Thanks
Darren
Thanks
Darren
 09-07-2006, 01:05 AM
#6
Drifting


Great looking setup and craftmanship. Just curious about a couple of things.
In photo one, looking down the throat of the center carb, I don't see a spray bar. Am I missing something?
You said you drilled the spray bar(s). Does this mean that there are no N2O Jets to regulate the flow?
Even though used during WW2 (a bit differently), I didn't realize that Nitrous had been in use in autos that long.
09-07-2006, 08:36 PM
#7
Race Director
Thread Starter
Originally Posted by Vogie
Great looking setup and craftmanship. Just curious about a couple of things.
In photo one, looking down the throat of the center carb, I don't see a spray bar. Am I missing something?
In photo one, looking down the throat of the center carb, I don't see a spray bar. Am I missing something?
You said you drilled the spray bar(s). Does this mean that there are no N2O Jets to regulate the flow?
Even though used during WW2 (a bit differently), I didn't realize that Nitrous had been in use in autos that long.
Last edited by 63mako; 09-07-2006 at 08:43 PM.