Follow along as I add a custom frame, LS2 engine & 5-speed to a '65 vette!
 01-13-2007, 01:32 PM
#21
Racer

Thread Starter
Member Since: Jun 2004
Location: freehold NJ
Posts: 384
Likes: 0
Received 0 Likes
on
0 Posts

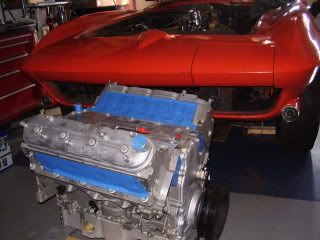
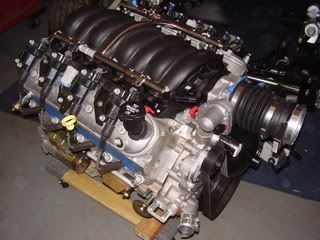
Here's a pick of the recently arrived LS2 long block:
 01-20-2007, 12:42 AM
#22
Racer
Thread Starter
Member Since: Jun 2004
Location: freehold NJ
Posts: 384
Likes: 0
Received 0 Likes
on
0 Posts
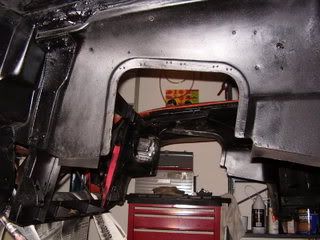
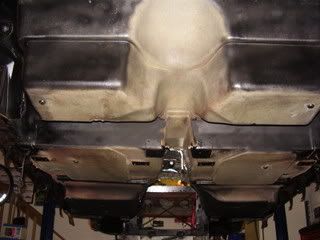
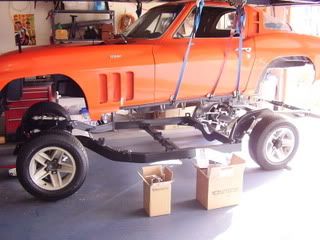
I've been working under the car all week. Cleaned with soap and water then painted. Have sanded the radiator support, filled in holes in the engine bay with fiberglass body filler, sanded and painted. Used a small paint brush and detailed the whole engine bay.
I'm not done yet but have some initial pics to post tonight. Next week the new chassis will be here!
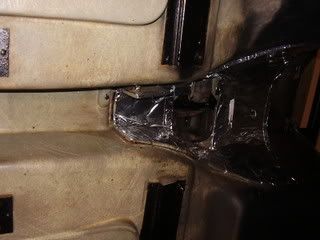
I had to re-bolt on the #4 driver side body mount bracket because it had come off. I used lots of contact cement then bolts. I know you're supposed to use rivets but it seems bolts will hold better. I even drilled out the holes to make them bigger so I could put in bigger bolts. I'll try to get a pic of it this week.
Here are pics of the project for this week:
I'm not done yet but have some initial pics to post tonight. Next week the new chassis will be here!
I had to re-bolt on the #4 driver side body mount bracket because it had come off. I used lots of contact cement then bolts. I know you're supposed to use rivets but it seems bolts will hold better. I even drilled out the holes to make them bigger so I could put in bigger bolts. I'll try to get a pic of it this week.
Here are pics of the project for this week:
01-20-2007, 02:46 AM
#23
Team Owner

Member Since: Dec 2000
Location: Dinosaur Victrola, Listnin' to Buck Owens...
Posts: 30,642
Likes: 0
Received 0 Likes
on
0 Posts
Excellent! This is exactly how I'd want my dream driver done, only a Mosport Green or Trophy Blue 'vert and an LS7. 
Keep up the good work and keep the updates coming!
Keep up the good work and keep the updates coming!


 01-26-2007, 09:44 PM
#25
Racer
Thread Starter
Member Since: Jun 2004
Location: freehold NJ
Posts: 384
Likes: 0
Received 0 Likes
on
0 Posts
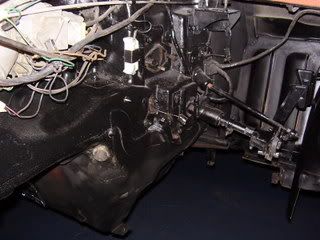
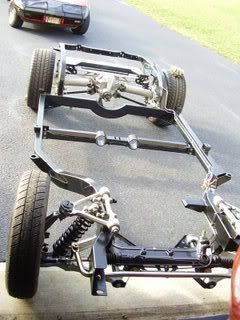
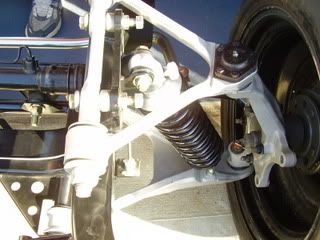
Well, this week, I have been putting together the engine. I put on the front rotating assembly. I may have to move the alternator up if it is too close to the rack and pinion. The old chassis is gone and the new one has arrived. I've put on some temporary Chevy wheels and tire to roll it around while I work on it.
I've started laying out the engine harness and labeling the ends and where they go on the motor. The gas pedal came with it and runs to the engine via only wires, no cables, thus making it "drive by wire". The gas pedal wire sends a signal the the little motor on the throttle body to open/close it.
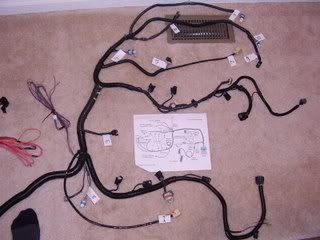
In the next week I'll put in the engine and gas tank. The transmission is still on order.
I've started laying out the engine harness and labeling the ends and where they go on the motor. The gas pedal came with it and runs to the engine via only wires, no cables, thus making it "drive by wire". The gas pedal wire sends a signal the the little motor on the throttle body to open/close it.
In the next week I'll put in the engine and gas tank. The transmission is still on order.
01-27-2007, 12:04 AM
#26
Burning Brakes

Member Since: Feb 1999
Location: Patagonia Arizona
Posts: 1,057
Likes: 0
Received 9 Likes
on
2 Posts

Who did the frame? On my Newman frame/66 coupe I had to move the alt up to miss the steering shaft (R & P), used the Vette alt/ps stand and had to space it out 3/4" as the F-Body (my motor/trans came from a Camaro) crank pulley is different than the Vette. Since the F-body is gone, I assume the crate motors are based on the Vette layout so your crank pulley should (?) be in the right place to use the Vette stand.
The photo of the motor doesn't show an a/c compressor. Are you going to have a/c? If so, you may want to check the fit of the a/c comp in the chassis. I had to move mine up as it hit my frame. Alf Eberroth in Ca has a bracket to do this if you are interested.
I also had to cut and reclock the thermostat housing to allow the hose to clear the frame.
Your progress reports are fun, looks like you are moving right along. It took me 2-1/2 years to do mine working on weekends and a few hours during the week so your time frame is very ambitious. Looking forward to the next report
Nick
01-27-2007, 12:20 AM
#27
Intermediate

Member Since: Oct 2006
Location: Wheat Ridge Co
Posts: 38
Likes: 0
Received 0 Likes
on
0 Posts
Great thread, Z! Really cool to see this conversion done. I saw 8-10 midyear frame conversions in Kississime last weekend and they were all awesome cars. Yours looks to be well on the way to be the same.
I'm doing the a similar conversion with a 63 vert. Mine is an ex-drag car and restoring it to some normality has been challenging. It was tubbed, so the rear floor needs some serious attention. My frame, suspension and drivetrain are pretty well done but the body is still a ways off before I can drop it on.
Are you going to need to trim your body for suspension or tranny clearance and if so, can you determine what and where to trim without dropping the body on?
I agree with Firstgear about the costs. I expect my conversion costs will be about $40K finished, including paint. This includes a donor '94 and stroking the LT1 to 383- I'd much prefer your drive train. The conversions I saw in Fla were priced $130-150K so I consider it a hell of a deal!
Good luck on yours and keep up the posts.
01-27-2007, 09:30 AM
#28
Racer
Thread Starter
Member Since: Jun 2004
Location: freehold NJ
Posts: 384
Likes: 0
Received 0 Likes
on
0 Posts
Who did the frame? On my Newman frame/66 coupe I had to move the alt up to miss the steering shaft (R & P), used the Vette alt/ps stand and had to space it out 3/4" as the F-Body (my motor/trans came from a Camaro) crank pulley is different than the Vette. Since the F-body is gone, I assume the crate motors are based on the Vette layout so your crank pulley should (?) be in the right place to use the Vette stand.
The photo of the motor doesn't show an a/c compressor. Are you going to have a/c? If so, you may want to check the fit of the a/c comp in the chassis. I had to move mine up as it hit my frame. Alf Eberroth in Ca has a bracket to do this if you are interested.
I also had to cut and reclock the thermostat housing to allow the hose to clear the frame.
Your progress reports are fun, looks like you are moving right along. It took me 2-1/2 years to do mine working on weekends and a few hours during the week so your time frame is very ambitious. Looking forward to the next report
Nick
The photo of the motor doesn't show an a/c compressor. Are you going to have a/c? If so, you may want to check the fit of the a/c comp in the chassis. I had to move mine up as it hit my frame. Alf Eberroth in Ca has a bracket to do this if you are interested.
I also had to cut and reclock the thermostat housing to allow the hose to clear the frame.
Your progress reports are fun, looks like you are moving right along. It took me 2-1/2 years to do mine working on weekends and a few hours during the week so your time frame is very ambitious. Looking forward to the next report
Nick
I had Griffin Radiator custom make for me a radiator with outlet and return both on the passenger side so I don't have a hose going from one side to the other (just for aesthetics).
Can the power steering pump be put on the pass. side head with a spacer like you mentioned?
01-27-2007, 09:33 AM
#29
Racer
Thread Starter
Member Since: Jun 2004
Location: freehold NJ
Posts: 384
Likes: 0
Received 0 Likes
on
0 Posts
Great thread, Z! Really cool to see this conversion done. I saw 8-10 midyear frame conversions in Kississime last weekend and they were all awesome cars. Yours looks to be well on the way to be the same.
I'm doing the a similar conversion with a 63 vert. Mine is an ex-drag car and restoring it to some normality has been challenging. It was tubbed, so the rear floor needs some serious attention. My frame, suspension and drivetrain are pretty well done but the body is still a ways off before I can drop it on.
Are you going to need to trim your body for suspension or tranny clearance and if so, can you determine what and where to trim without dropping the body on?
I agree with Firstgear about the costs. I expect my conversion costs will be about $40K finished, including paint. This includes a donor '94 and stroking the LT1 to 383- I'd much prefer your drive train. The conversions I saw in Fla were priced $130-150K so I consider it a hell of a deal!
Good luck on yours and keep up the posts.
I'm doing the a similar conversion with a 63 vert. Mine is an ex-drag car and restoring it to some normality has been challenging. It was tubbed, so the rear floor needs some serious attention. My frame, suspension and drivetrain are pretty well done but the body is still a ways off before I can drop it on.
Are you going to need to trim your body for suspension or tranny clearance and if so, can you determine what and where to trim without dropping the body on?
I agree with Firstgear about the costs. I expect my conversion costs will be about $40K finished, including paint. This includes a donor '94 and stroking the LT1 to 383- I'd much prefer your drive train. The conversions I saw in Fla were priced $130-150K so I consider it a hell of a deal!
Good luck on yours and keep up the posts.
Colt
01-27-2007, 09:36 AM
#30
Racer
Thread Starter
Member Since: Jun 2004
Location: freehold NJ
Posts: 384
Likes: 0
Received 0 Likes
on
0 Posts
Originally Posted by vetrod62;1558398957B
Best of luck on this build. If you can stay on schedule and within budget, you should have you own TV show. The problem with these builds is the " I have gone this far, so why not just do a little more " syndrome. My red car started with a simple L-88 install and spiralled out of control to the tune of 12 years, 6000 man hours, $96000. in parts ( includes paint work , done by others ) and I did all the work myself, except the paint.
WE will be watching. Good luck again.
vetrod62
WE will be watching. Good luck again.
vetrod62
 01-27-2007, 10:12 AM
#31
Instructor
Member Since: Feb 2006
Location: Oklahoma
Posts: 189
Likes: 0
Received 0 Likes
on
0 Posts
01-27-2007, 12:48 PM
#32
Intermediate
Member Since: Oct 2006
Location: Wheat Ridge Co
Posts: 38
Likes: 0
Received 0 Likes
on
0 Posts
I have similar accessory clearance problems, primarily with the upper A arm mounts. I plan to try a more compact alternator for the left; not sure about the ac yet. Maybe the delete option.
There are several street rod shops that offer hardware for all sorts accessory configurations. I seen several in use and they look pretty nice. I can probably send some pics but I'm not sure I can give proper credit to the cars/owners.
I suspect the different frames might require different configs. My frame (Jamison) has much taller mounts than the Street Shop frame and I have not seen a Neuman frame.
You might try TheDrivenMan for your Tremec.
01-27-2007, 07:25 PM
#33
Burning Brakes
Member Since: Feb 1999
Location: Patagonia Arizona
Posts: 1,057
Likes: 0
Received 9 Likes
on
2 Posts
90ZR1,
Your comment that the alt is mounted low left means to me that when you buy an LS2 crate motor you get one configured for a Pontiac GTO, not a Corvette. The Corvettes mount the alt high left with the ps pump mounted on the same bracket.
You can use the Vette bracket to mount your alt and ps pump but I believe you will face the same problem as I with the pulleys not being in line with the crank. You can either change to the Vette crank pulley or space the alt bracket .75" away from the block. I heard changing crank pulleys was difficult and requires a special ($$$) puller so I had a spacer machined (I imagine the new pulley is expensive also). You can also use Street & Performance stuff to mount the alt and ps pump and there are probably others. The factory brackets tuck the accessories in tight and look much better in my eyes. The S & P stuff moves them up and out away from the block, I don't like the look at all.
Be sure to buy the alt and ps pump for the Vette if you use the Vette bracket, they are different than the GTO. The plastic coil-pak covers (the black ones with LS2 and Corvette in red) from the Vette should also fit and cover up the ugly coil-paks. Too bad your customer doesn't want ac, the brackets available work very well. I used the Vintage Air R-134 and it works great. It uses a Sanden compressor (much cheaper than the factory unit).
Have fun
Nick
Last edited by Nick D.; 01-27-2007 at 07:28 PM.
01-27-2007, 07:52 PM
#34
Racer
Thread Starter
Member Since: Jun 2004
Location: freehold NJ
Posts: 384
Likes: 0
Received 0 Likes
on
0 Posts
Beautiful job, Nick! I'm talking with S&P now about the bracketry. I bought the motor mount adapters from them. I think you're right about that stock vette alt bracket - will be off line unless I change the balancer.
did you have to change the t-stat housing to a straight one? How about the heater hose bibs?
I see you have power brakes - which booster and master cylinder did you use?
did you have to change the t-stat housing to a straight one? How about the heater hose bibs?
I see you have power brakes - which booster and master cylinder did you use?
01-27-2007, 08:06 PM
#35
Burning Brakes
Member Since: Feb 1999
Location: Patagonia Arizona
Posts: 1,057
Likes: 0
Received 9 Likes
on
2 Posts
Thanks Z,
When I did my car no one made a straight t'stat housing so I cut the stock one at about 30 degrees and welded it back together so it came straight out. The heater hose bibs were close to the frame so I went to Napa and looked through all their hoses til I found 2 that did a quick turn. Once they cleared the frame I cut them and used an inline union to get them to the firewall. The booster and brake master cyl came from Newman, he would never tell me where he got it. I think it may be a Master Power Brake setup. Are you using C4 suspension and brakes?
What are you going to do for an air cleaner?
Nick
01-27-2007, 08:56 PM
#36
Racer
Thread Starter
Member Since: Jun 2004
Location: freehold NJ
Posts: 384
Likes: 0
Received 0 Likes
on
0 Posts
Thanks Z,
When I did my car no one made a straight t'stat housing so I cut the stock one at about 30 degrees and welded it back together so it came straight out. The heater hose bibs were close to the frame so I went to Napa and looked through all their hoses til I found 2 that did a quick turn. Once they cleared the frame I cut them and used an inline union to get them to the firewall. The booster and brake master cyl came from Newman, he would never tell me where he got it. I think it may be a Master Power Brake setup. Are you using C4 suspension and brakes?
What are you going to do for an air cleaner?
Nick
When I did my car no one made a straight t'stat housing so I cut the stock one at about 30 degrees and welded it back together so it came straight out. The heater hose bibs were close to the frame so I went to Napa and looked through all their hoses til I found 2 that did a quick turn. Once they cleared the frame I cut them and used an inline union to get them to the firewall. The booster and brake master cyl came from Newman, he would never tell me where he got it. I think it may be a Master Power Brake setup. Are you using C4 suspension and brakes?
What are you going to do for an air cleaner?
Nick
As for the air cleaner, for now I'm looking for a 4 inch 90 degree bend because I already have a cylinder/cone shaped K/N filter. Later, I'll route it through the hole in the drive side of the radiator support.
01-27-2007, 10:59 PM
#37
Instructor
Member Since: Dec 2006
Location: Newburgh NY
Posts: 226
Likes: 0
Received 0 Likes
on
0 Posts
Thanks - great info! Yes, I'm using all brand new C4 suspension and brakes. The calipers even have ABS sensors. I'm actually considering putting in an ABS system! (But still in the info-gathering stage for that).
As for the air cleaner, for now I'm looking for a 4 inch 90 degree bend because I already have a cylinder/cone shaped K/N filter. Later, I'll route it through the hole in the drive side of the radiator support.
As for the air cleaner, for now I'm looking for a 4 inch 90 degree bend because I already have a cylinder/cone shaped K/N filter. Later, I'll route it through the hole in the drive side of the radiator support.
As mentioned, Street & Performance (www.hotrodlane.cc) make both a straight t-stat housing and swivle bibs for the heater in/outs. THey also have all the bracketry and other goodies you need. Not cheap, also not the fastest turnaround time. But nice stuff.
ps: Nice project!


Last edited by CorvetteTechInc; 01-27-2007 at 11:04 PM.
 01-28-2007, 08:59 AM
#39
Burning Brakes
Member Since: Feb 1999
Location: Patagonia Arizona
Posts: 1,057
Likes: 0
Received 9 Likes
on
2 Posts
CorvetteTech- Great looking motor! Is that S & P gear you have there? If so it looks great!! It's been awhile since I've seen their stuff, looks new and improved
90ZR1- ABS in a midyear, how cool would that be?!! When I looked at the ABS controller and the myriad of hard lines, I had nightmares so I gave up. Has anyone that you know of adapted the C4 system to their midyear resto-mods? Please share what you learn.
Nick
90ZR1- ABS in a midyear, how cool would that be?!! When I looked at the ABS controller and the myriad of hard lines, I had nightmares so I gave up. Has anyone that you know of adapted the C4 system to their midyear resto-mods? Please share what you learn.
Nick
01-28-2007, 09:18 AM
#40
Safety Car


Here is another S&P drive setup that I like better than the high/wide setup. I used the high/wide drive on the LS1 in my 59, and did not like the way it took up so much room in the engine compartment, so I went with the close-in drive on the LS2 in my C2. With the close-in setup, the A/C compressor is almost completely hidden from sight under the engine.You do have to trim the Fuel rail covers a little to clear the Alt, but that is no big deal.
Here are pics of both the high/wide and close-in drive.
http://img.villagephotos.com/p/2003-...3/P0000830.JPG
http://img.villagephotos.com/p/2003-...I-P0001580.jpg
Regards, John McGraw
Here are pics of both the high/wide and close-in drive.
http://img.villagephotos.com/p/2003-...3/P0000830.JPG
http://img.villagephotos.com/p/2003-...I-P0001580.jpg
Regards, John McGraw