L79 Engine Build Summary-- Pics, Parts and Specs
 09-01-2007, 01:30 PM
#1
Drifting

Thread Starter

This posting is a summary of my complete L79 engine story from start to finish. I hope this information provides value to the forum members in the future.
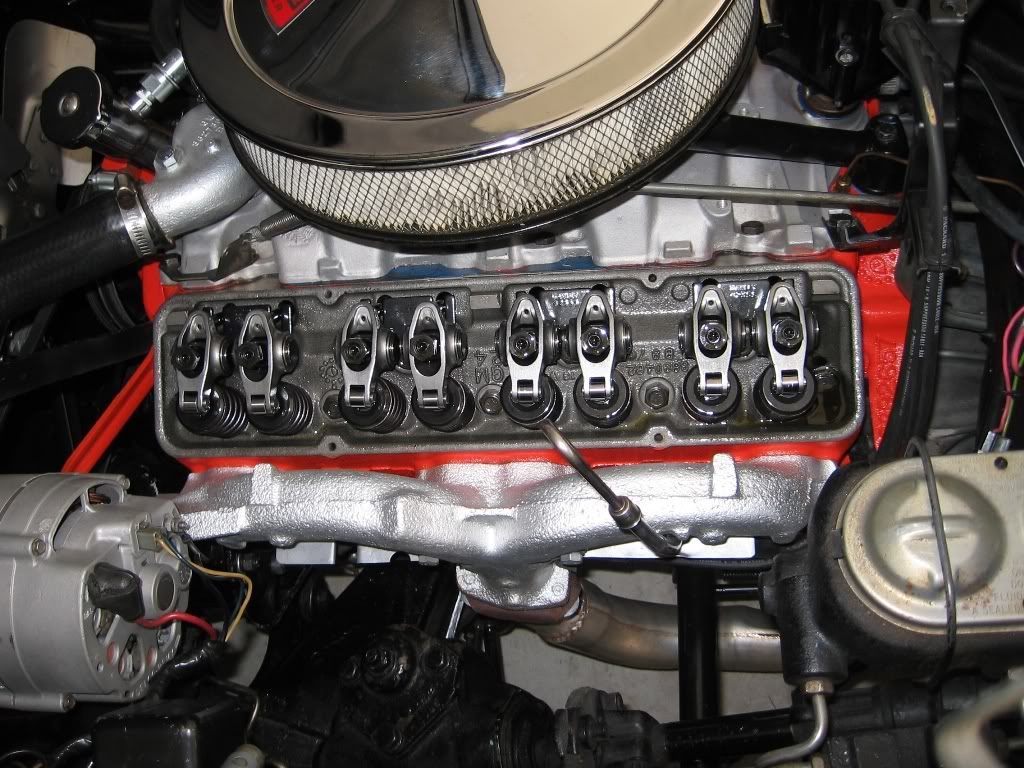
BackgroundIn April and May of this year I started a couple of posts on an engine problem I was having. In short, the #8 cylinder had an oiling problem and the spark plug was continuously fouling out. The engine was rebuilt just before I bought the car and had only 380 miles on it. I removed the engine from the car and brought it to the machine shop for a bore and rebuild thinking I would not have to touch most of the internals since it was recently rebuilt. Upon inspection of the block there were found to be serious cracks on the web areas supporting the main bearings. The engine block was junk. I contemplated putting in a crate motor or building a 383 stroker but in the end decided I wanted to keep the correct look of the car. I found a correct dated standard bore block at Tracy Performance in Michigan and began the rebuild journey.
Criteria for engine build
I had a whole list of criteria for the engine builder.
These were the major constraints I put on the builder. My approach was that I wanted the best possible street engine built with cost being a secondary consideration. More on that later.
The Build
Head
I retained the stock heads. The following head work was done.
Short Block
Engine Build Cost Details
The total cost to build and dyno test the motor was $7200, not including the block. A partial cost breakdown is as follows.


Engine break-in and dyno testing
The engine was put on an engine dyno. No accessories were on the engine. The engine was connected to headers with low restriction exhaust. 10W-30 was added to the crankcase along with zinc break-in fluid. The engine was run on the dyno for one hour and a total of 25 pulls. Below are the dyno results.


Installation and Test
The engine went back into the car easily. The transmission was in the car but the clutch alignment tool made mating up the transmission shaft easy. By the way there was only one circular ring on the transmission shaft so I know I have an M-20 in car.

Two issues came up when I tried to fire her up.
First. The ignition wires are indexed one post counter clockwise on the distributor. Once I understood this and fixed the problem the engine started instantly.
Second. The engine would buck and surge at light throttle settings and low speed. The root cause of the problem was too much total ignition advance at this operating point of the engine. The root cause of the problem was that at some time in the past a vacuum advance canister for a 327 fulie engine was installed on the distributor. The canister goes to maximum advance at 8.5 inches of vacuum, therefore there was too much vacuum advance contribution to the total advance at low engine speed and light throttle settings. I reinstalled the correct canister which has full vacuum advance at 16 inches of vacuum. Problem solved. Car has a nice lope at 800 RPM idle, drives smoothly at low speeds and light engine load, and goes like hell when you mash the throttle. No hesitation, no pinging, just a quick smooth transition from mild to wild up to 5500RPM.
The engine builder spends most of his life building high performance engines for street, track and marine. My engine was a bit out of the norm for him. It was not a full out custom performance engine putting out in excess of 1000HP. While I was there he had a chevy 302 built for some crazy person to put in his street car. The engine was a total performance job with methanol injection, 1200 HP with a blower and it was going into a mid 70's camaro. I am sure my engine is somewhat over built for my application but I am certain that I will never ever have to pull that engine from the car again due to engine failure.
I am done now. Time to take "Zora" out for ride and have some fun.
Regards,
Bruce
BackgroundIn April and May of this year I started a couple of posts on an engine problem I was having. In short, the #8 cylinder had an oiling problem and the spark plug was continuously fouling out. The engine was rebuilt just before I bought the car and had only 380 miles on it. I removed the engine from the car and brought it to the machine shop for a bore and rebuild thinking I would not have to touch most of the internals since it was recently rebuilt. Upon inspection of the block there were found to be serious cracks on the web areas supporting the main bearings. The engine block was junk. I contemplated putting in a crate motor or building a 383 stroker but in the end decided I wanted to keep the correct look of the car. I found a correct dated standard bore block at Tracy Performance in Michigan and began the rebuild journey.
Criteria for engine build
I had a whole list of criteria for the engine builder.
- Retain the 100% stock look of the engine. Keep all the parts original on the external part of the engine.
- Build it to a true 350 HP.
- Use only the best parts and materials.
- Convert it to a full roller engine.
- Have it run on pump gas as currently available anywhere in the US(meaning 91 octane and the witches brew they sell in CA and other western states).
- Make it so I can pull it to 6000 RPM on every shift, every day, for the next 20 years without it failing.
- Give it a meaty torque curve down low.
- Limit the upper power curve to 5500 RPM. Told the builder the engine can be all done after that since it will rarely if ever see anything more.
- No choppy idle but a nice lope is acceptable. Keep the idle vacuum at or above 15 inches of vacuum.
- Must be docile enough at low speeds and small throttle openings to not buck and surge.
- Want decent fuel mileage, at least 16 mpg with mostly around town driving. The car has 3.73 gears.
These were the major constraints I put on the builder. My approach was that I wanted the best possible street engine built with cost being a secondary consideration. More on that later.
The Build
Head
I retained the stock heads. The following head work was done.
- New Manley stainless steel valves. They were the street competition grade. I do not have the part numbers.
- 130# seat pressure beehive springs from Comp Cams. The spring pockets were enlarged slightly to accommodate the diameter of the springs.
- 3/8" Comp Cams screw in studs. This was a lot of machine work to do. Removing the original pressed in studs took almost 3/4 hr a piece.
- 5 angle valve seats.
- Bronze valve guides. Each valve guide was sized exactly for each valve stem. I cannot recall the details of the sizing but a lot of time was put into making each one very exact.
- Intake ports were ground to remove casting marks and smooth the edges leading into the valve seat.
- Pushrod holes were enlarged.
- Guide plates installed.
- Comp Cams Pro Magnum 1.6 ratio rockers installed.
- Port and gasket matching performed.
- Additional machine work to true up the surfaces and associated things like that.
Short Block
- Keith Black .030 over flat top 9.7 compression hypertueric pistons. I do not have the part number for the pistons.
- Comp Cams Extreme Energy roller cam Part # 12-422-8, Grind # CSXR270HR-10. This cam has a 110 deg lobe center, .528 lift intake, .535 lift exhaust, both numbers are with a 1.6 ratio rocker. The cam has a power band of 1600-5400 (check specs to be sure, this is from memory) and is advertised as having a "noticeable idle". It sounds nice at idle without being choppy.
- Comp Cams hydraulic roller lifters.
- ARP rod bolts.
- ARP head bolts, torqued using the APR thread sealer/lubricant for consistent torque settings.
- ARP main bearing studs were added in lieu of main bearing bolts. Given the cracked webbing on the old block I wanted as much strength as possible for a 2 bolt main engine. I will never see cracked webbing again.
- Melling high volume oil pump.
- Retained the stock rods and steel crankshaft. These parts were in excellent shape and there was no need to change them.
- Every conceivable part of the rotating mass was weighed and balanced. Had to add a small piece of tungsten to the pressure plate to bring it within spec. Engine is incredibly smooth now.
- A significant amount of detail work and machining went into line boring the block, decking the block, boring and straightening up the cylinders, etc. etc.....All the normal detail of work like using torque plates etc. were followed.
- The usual high quality gaskets and bearings were used. There is so much more to the details and precision of the assembly work that I cannot go into it here. It is all the small things in the end that make the difference.
Engine Build Cost Details
The total cost to build and dyno test the motor was $7200, not including the block. A partial cost breakdown is as follows.
- $500 - Tear down clean and magnuflux the original block. The block ended up being junk but it still cost money to figure this out.
- $2500 approx - This was the roller conversion to the engine. Included were the following:
- Removing the pressed in studs, replacing with screw in type. This took about one hour each stud.
- Machining the spring pockets for the 130# seat pressure springs required for the roller set up.
- Machining the block to accept roller lifters.
- Machining the heads to add guide plates.
- The cost of the roller springs, lifters and cam.
- $1350 - Cost of the vintage block from Tracy Performance, including shipping. The block was $1100.
- $500 - Dyno testing, tuning and engine break-in.
Engine break-in and dyno testing
The engine was put on an engine dyno. No accessories were on the engine. The engine was connected to headers with low restriction exhaust. 10W-30 was added to the crankcase along with zinc break-in fluid. The engine was run on the dyno for one hour and a total of 25 pulls. Below are the dyno results.
Installation and Test
The engine went back into the car easily. The transmission was in the car but the clutch alignment tool made mating up the transmission shaft easy. By the way there was only one circular ring on the transmission shaft so I know I have an M-20 in car.
Two issues came up when I tried to fire her up.
First. The ignition wires are indexed one post counter clockwise on the distributor. Once I understood this and fixed the problem the engine started instantly.
Second. The engine would buck and surge at light throttle settings and low speed. The root cause of the problem was too much total ignition advance at this operating point of the engine. The root cause of the problem was that at some time in the past a vacuum advance canister for a 327 fulie engine was installed on the distributor. The canister goes to maximum advance at 8.5 inches of vacuum, therefore there was too much vacuum advance contribution to the total advance at low engine speed and light throttle settings. I reinstalled the correct canister which has full vacuum advance at 16 inches of vacuum. Problem solved. Car has a nice lope at 800 RPM idle, drives smoothly at low speeds and light engine load, and goes like hell when you mash the throttle. No hesitation, no pinging, just a quick smooth transition from mild to wild up to 5500RPM.
The engine builder spends most of his life building high performance engines for street, track and marine. My engine was a bit out of the norm for him. It was not a full out custom performance engine putting out in excess of 1000HP. While I was there he had a chevy 302 built for some crazy person to put in his street car. The engine was a total performance job with methanol injection, 1200 HP with a blower and it was going into a mid 70's camaro. I am sure my engine is somewhat over built for my application but I am certain that I will never ever have to pull that engine from the car again due to engine failure.
I am done now. Time to take "Zora" out for ride and have some fun.
Regards,
Bruce
Last edited by NEVERL8; 10-10-2010 at 08:21 PM.
 09-01-2007, 01:51 PM
#2
Race Director


Member Since: Oct 2004
Location: Cape Cod, Mass.
Posts: 18,760
Received 4,542 Likes
on
2,158 Posts
2023 C3 of the Year Finalist - Unmodified
2021 C8 of the Year Finalist Unmodified
2020 Corvette of the Year Finalist (performance mods)
2019 C1 of Year Winner (performance mods)
2017 Corvette of the Year Finalist
2016 C2 of Year
2015 C3 of Year Finalist

Looks like nice mid range torque. Your readings on the dyno look pretty close to factory specs at the motor with no accessories. Now it's time to put some miles on it. Enjoy 
09-01-2007, 01:52 PM
#3
Burning Brakes

Looks like you got what you ordered. The engine looks great in the pic. Good job trouble shooting after the install.
Nice write up, too.
Enjoy the ride.
65-StingRay
Nice write up, too.
Enjoy the ride.
65-StingRay
09-01-2007, 02:04 PM
#4
Melting Slicks

Bruce, I like the way you approached the problem. Your plan was perfect. Would it be improper to ask cost? The motor sound like what a lot of folks here would like to have. Once again congrats on a fine job!
Earl
Earl
09-01-2007, 03:37 PM
#5
Drifting
Thread Starter
09-02-2007, 08:50 AM
#9
Melting Slicks
I looked at your write up and it sounded so familiar. Just like an engineering spec at work, looked at your profile, well there ya go.
Well done. You are fortunate to have a engine builder that would
work with you to that level of detail.
Well done. You are fortunate to have a engine builder that would
work with you to that level of detail.
09-02-2007, 09:08 AM
#10
Le Mans Master

 , great write up. I read the "Heads" part with greatest interest. Glad you solved and killed the "gremlins".I remember some of your past post, you were a bit less than happy..when it wouldnt start,lol. Congrats.
09-02-2007, 11:07 PM
, great write up. I read the "Heads" part with greatest interest. Glad you solved and killed the "gremlins".I remember some of your past post, you were a bit less than happy..when it wouldnt start,lol. Congrats.
09-02-2007, 11:07 PM
#12
Instructor


Member Since: Dec 2005
Location: Novato CA
Posts: 160
Likes: 0
Received 0 Likes
on
0 Posts
I am having my L79 rebuilt and found cracking in what sounds like the same, exact place. I found a block with a date that works and went with that. Otherwise, I'm going for a similar setup. I hope to have it back in about 3 weeks as I'm having some other, minor work done to the car too.
09-03-2007, 03:49 PM
#13
Melting Slicks
should be a decent street motor, i wouldve done a few differnet things for some more power w/o sacrificing driveability, car should put down around 300 hp at the tire its ok.
09-04-2007, 10:04 AM
#16
Racer
I would like to run your engine on desktop dyno for comparison, do you know your head casting #? And the Manley valve size? I'm curious to see how accurate the desktop dyno is vs a real dyno.
Thanks, Jules
Thanks, Jules


 09-04-2007, 12:03 PM
#19
Drifting
Thread Starter
I am running the stock 202 double hump fulie heads. Intakes valves are 2.02 inch, exhaust are 1.60 inch.
04-13-2008, 04:27 PM
#20
Instructor

Great write up!! Just now looking at your power/torque numbers - I have a 66 L79 - still running - all factory and want similiar power and realiability.
Question - who went thru your Holley carb - I am thinking of sending mine to Holly rebuild service. I have owned and driven this car since 1979 and have had continuous problems with the Holley.
Question - who went thru your Holley carb - I am thinking of sending mine to Holly rebuild service. I have owned and driven this car since 1979 and have had continuous problems with the Holley.

