Power Steering Control Valve leak and Rebuild
 04-27-2010, 07:21 PM
#41
Advanced


Member Since: Oct 2008
Location: banner elk NC
Posts: 59
Likes: 0
Received 0 Likes
on
0 Posts
ok, so i messed up.. i messed with the PSCV control nut (which from the store is already balanced) .. and now i can't seem to balance it... how do i get it to stop pulling the wheel of the left?! quick and dirty solutions please...
 04-27-2010, 11:18 PM
#42
Race Director


Thread Starter
Adjust the nut one way, it doesn't matter which way you start just pic a direction and rotate the nut 1 full turn. Make sure you do this with the car off. Then turn the car on while the front is still in the air. Make sure to keep your hands/arms out of the steering wheel. If it whips harder to the left then you know to go the other way with the rotation of the nut. If it turns slower to the left turn it (the nut) in the same direction until when you start the car the steering wheel does not move.
Dave
Dave
04-28-2010, 08:15 AM
#43
Le Mans Master


Adjust the nut one way, it doesn't matter which way you start just pic a direction and rotate the nut 1 full turn. Make sure you do this with the car off. Then turn the car on while the front is still in the air. Make sure to keep your hands/arms out of the steering wheel. If it whips harder to the left then you know to go the other way with the rotation of the nut. If it turns slower to the left turn it (the nut) in the same direction until when you start the car the steering wheel does not move.
Dave
Dave
Easier way . . . . if the rod is extending, turn the adjusting nut counterclockwise. If the rod is retracting, turn the nut clockwise.
 04-28-2010, 08:58 AM
#44
Race Director
Thread Starter
04-28-2010, 10:03 PM
#45
Advanced
Member Since: Oct 2008
Location: banner elk NC
Posts: 59
Likes: 0
Received 0 Likes
on
0 Posts
ok, so.. let me just say this.. get a pickle fork or ball joint seperator...
Total Time: 2-3 hours, depending on much skill you have underneath the car.
Mine vette is a 1972, small block.
Process
begin by jacking the car up on both sides, and remove the left tire (makes it easier to move around, i did mine with the tire still on, cause im a 22 y/o dummy pre-med student :p ).
Next, disconnect the two hoses on the side (remember top hose from the power slave cylinder goes to the bottom port, and the bottom one goes to the top) (7/32 wrench)
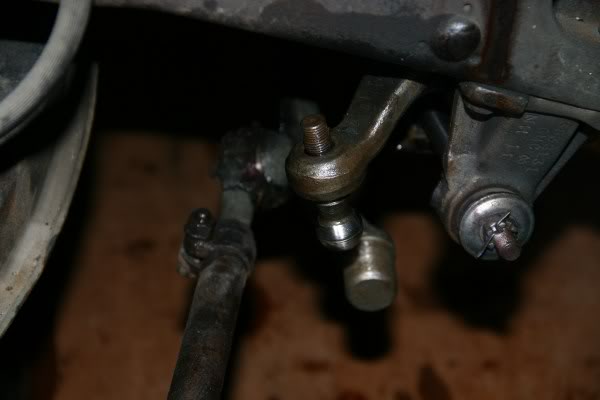
Remove the hoses on the top (1/2 and 7/32 wrenches), then remove the cod pin and unscrew the bolt (9/16 wrench) once off, use a pickle fork perpendicular to the pitarm and carefully hammer it until the ball joint seprates. OR, use a ball joint seperator. (you can use a large flat tip screw driver and position it underneath the pitarm and above the ball joint and with a hammer knock it loose-takes forever though)
then use a 5/8 wrench (i think..) and remove the bolt on the backside of the PSCV that puts pressure on teh PSCV where the relay rod screws in. Then unscrew the relay rod (to the left .. dar).
Install the new PSCV in the reverse order, making sure the hoses are connected correctly. Most of the time the new PSCV will already be balanced, but in case it isn't...
To balance PSCV
Disconnect the power slave cylinder.. there is two bolts, both are 3/4. One is on the relay rod, and the other is on the mounting bracket right below the pitarm. Then remove the dust cover on the end of the PSCV, it's underneath the crossed side hoses. Turn the car on and watch which way the piston moves, retract twist the nut clockwise, extends, counter-clockwise. Mess with this until the piston dosen't move, and you can push and pull it with your hand (there will be some resistance). I did the good old, turn it one way half a turn, watch the movement and then the other way until it extended or retracted, then found a happy medium in between the two.
Troubleshooting
ok, first off, if you know for sure the piston has been adjusted properly, but you are still getting the wheel to jerk or sieze (i like this term better) back and forth, or pull to one side or the other, check the two side hoses, if they are reversed it will cause this problem.
Next, if that is all squared away and right, undo the power slave cylinder, and re-adjust the PSCV.
Total Time: 2-3 hours, depending on much skill you have underneath the car.
Mine vette is a 1972, small block.
Process
begin by jacking the car up on both sides, and remove the left tire (makes it easier to move around, i did mine with the tire still on, cause im a 22 y/o dummy pre-med student :p ).
Next, disconnect the two hoses on the side (remember top hose from the power slave cylinder goes to the bottom port, and the bottom one goes to the top) (7/32 wrench)
Remove the hoses on the top (1/2 and 7/32 wrenches), then remove the cod pin and unscrew the bolt (9/16 wrench) once off, use a pickle fork perpendicular to the pitarm and carefully hammer it until the ball joint seprates. OR, use a ball joint seperator. (you can use a large flat tip screw driver and position it underneath the pitarm and above the ball joint and with a hammer knock it loose-takes forever though)
then use a 5/8 wrench (i think..) and remove the bolt on the backside of the PSCV that puts pressure on teh PSCV where the relay rod screws in. Then unscrew the relay rod (to the left .. dar).
Install the new PSCV in the reverse order, making sure the hoses are connected correctly. Most of the time the new PSCV will already be balanced, but in case it isn't...
To balance PSCV
Disconnect the power slave cylinder.. there is two bolts, both are 3/4. One is on the relay rod, and the other is on the mounting bracket right below the pitarm. Then remove the dust cover on the end of the PSCV, it's underneath the crossed side hoses. Turn the car on and watch which way the piston moves, retract twist the nut clockwise, extends, counter-clockwise. Mess with this until the piston dosen't move, and you can push and pull it with your hand (there will be some resistance). I did the good old, turn it one way half a turn, watch the movement and then the other way until it extended or retracted, then found a happy medium in between the two.
Troubleshooting
ok, first off, if you know for sure the piston has been adjusted properly, but you are still getting the wheel to jerk or sieze (i like this term better) back and forth, or pull to one side or the other, check the two side hoses, if they are reversed it will cause this problem.
Next, if that is all squared away and right, undo the power slave cylinder, and re-adjust the PSCV.
Last edited by midweekwarrior; 04-28-2010 at 10:06 PM. Reason: .. spelling.. med students can't spell

 05-02-2010, 01:30 PM
#47
Racer

Member Since: Sep 2005
Location: Elk Grove California
Posts: 325
Received 0 Likes
on
0 Posts

I recently finished my rebuild on the power steering control valve. One problem I had was getting the strap tight enough around the outer seal. I ended up using two hose clamps to hold both ends nice and tight so that I could pull the tab tight.
05-07-2010, 07:31 PM
#48
Racer
Member Since: Mar 2008
Location: Triangle Area NC
Posts: 434
Likes: 0
Received 0 Likes
on
0 Posts
I just completed round 1 trying to remove the ball joint from the valve. I'm a bit confused by "the pickle fork should be perpendicular to the pitman arm" statement. I am inserting the fork from the back of the car with the forks towards the front, with the shaft of the pickle fork roughly parallel to the frame rails. I gave it some healthy whacks with not much luck yet, so I blasted the whole works with PBblaster and will try again tomorrow.
Is this any easier using a puller of some sort? If so , which and how did you place the puller?
Thanks
John
Is this any easier using a puller of some sort? If so , which and how did you place the puller?
Thanks
John
05-08-2010, 09:28 AM
#49
Burning Brakes


John, without climbing under my car to see how much room is there I don't know if you can swing a hammer.
I had mine off the car and used two hammers. One against the south side and hit the north side and that popped the joint.
Again, without looking under, I also use a U shaped joint tool that slides between the two parts and uses a screw to push the joint open.
If you plan on using any of the old threaded parts it is best to leave the nut on the part until after it is popped to help "rethread" the rolled over edges.
When ever I have the need to use the fork I drive it in with a few good wacks of the hammer, then hit the side of the part that is pinching the taper.
Hope this helps.
05-08-2010, 09:06 PM
#51
Advanced
Member Since: Oct 2008
Location: banner elk NC
Posts: 59
Likes: 0
Received 0 Likes
on
0 Posts
i know you got this off, but i wanted to give you the info...
place the pickle fork between the pitarm and the ball join. Parallel to the PSCV and then perpendicular to the pitarm. then , whack away =)
place the pickle fork between the pitarm and the ball join. Parallel to the PSCV and then perpendicular to the pitarm. then , whack away =)
11-13-2010, 04:26 PM
#52
Le Mans Master

Glad to hear that you are taking care of this before it becomes a big problem. Sorry I've been traveling and not been on the forum much. There is a thread I made about rebuilding the PSCV that shows the correct installation of the hoses. Give me a call or shoot me an email if you have any questions.
Dave
Dave
http://forums.corvetteforum.com/c1-a...d-rebuild.html
Getting the ball stud off the pitman arm problem
The stud is drawn up into the pitman arm by the nut. Once on , it does not come off unless pressed out or pried out with a ball joint remover.
For those who do not have a lift nor want to take a pry bar to valve, I have come up with an easy solution
First read above post on rebuild, next
Jack up car, put jackstands under side rails.
Take off front wheels for room to work.
Take off all hoses from pump to valve and valve to ram.
Clean valve of grease.
Take off dust cover, unscrew nut from valve shaft. Count turns as stated in post.
Unbolt valve mounting bolts ( hold assemblies together)
Carefully pull Adapter housing off valve Housing, taking all the parts with you. Have a pan under to catch fluid and any parts that may fall out of valve.
With the tension released from the ball seats, you can pull the valve off the stud ball. It will come up through rubber seal, you can also take off stud seal clamp, pry up tab to release clamp, it will allow seal to come off valve with ball stud
To take adjuster housing off control arm, turn counter clockwise, counting turns as stated in post above
The valve housing and adjuster and all parts are now laid out
See photo

You now have stud ball in pitman arm.
To remove it from pitman arm, you use a compact car size (small) pitman arm remover. It is available at VIP or other
See photo
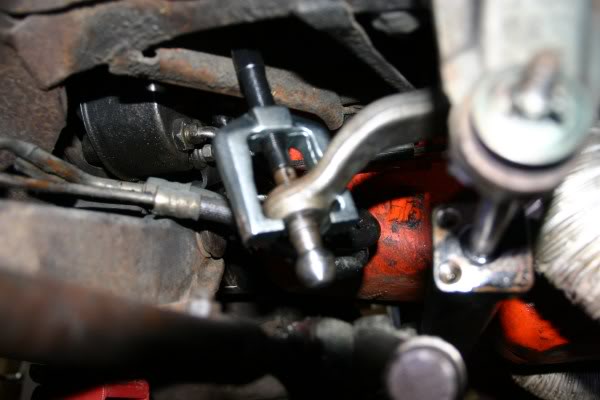
Using a wrench , you can turn the pressing nut till the stud pops out of pitman arm.
You may have to turn wheel to get pitman arm in best position, have a rag over the ends of ram to prevent squirting of fluid on you . Do not disconnect the ram from the frame to adjust. (see post)
This is one method of removing the valve from pitman arm.
Follow instruction on post to rebuild and install valve
Jack
11-13-2010, 07:19 PM
#53
Le Mans Master
The lines coming out of the end of the control valve that go to the power cylinder MUST be crossed, as shown in the assembly manual and the photo below, or the system won't work. Most replacement control valves are pre-centered, but some aren't; if not, follow the procedure in the Chassis Service Manual to center it.
DO NOT grease the zerk fitting on the valve (if it has one - some just have a plug) - you'll blow the seals in the valve and you get to start all over again. Most valves come with a card that tells you the warranty is void if you grease it.
DO NOT grease the zerk fitting on the valve (if it has one - some just have a plug) - you'll blow the seals in the valve and you get to start all over again. Most valves come with a card that tells you the warranty is void if you grease it.
I am rebuilding the valve , do I put grease in the ball stud area or not, if I am not to use zerk fitting.
Does this area need grease?
If so how do you grease it?
Jack
12-28-2011, 12:42 AM
#54
3rd Gear

Member Since: Dec 2011
Posts: 3
Likes: 0
Received 0 Likes
on
0 Posts
I know this an old thread, but lots of people refer to it (from other forums) when dealing with power steering control valves.
A few months ago, we disconnected the pscv and removed the ram from a '66 Nova. When we did this, we marked one of the hoses so that we'd know how to route them. It was only supposed to be apart for a few hours, but those couple of hours turned into a few months. After rebuilding the valve a couple of days ago, I reconnected the hose how I thought we marked them.
After starting the car up, it seemed like the pscv wassn't doing anything. If I loosened the hoses at the control valve (the ones from the ram to the valve) I was getting fluid there (dribbling out, not spraying). I tried turning the adjustment nut 1/2 turn counter clockwise. nothing happened. then I returned it to its original position, then turned it 1/2 turn clockwise. still nothing.
Someone suggested that I try reversing the hoses, so I did. At first startup, the wheel would turn on its own. After turning off the car, adjusting the nut, then restarting a few times, I got it so that the steering wheel didn't spin a startup. After centering, if I turned the wheel to the left, the steering took off spinning to the right (very fast). If I turned it to the right, it took off to the left (very fast). At that point, I figured that I had a major air bubble or something the first time around and that I now had the lines reversed.
After switching the lines back to how I had them the first time, I am having the same problem - The pscv doesn't seem to be doing anything. I ran through the bleeding procedure (available here), but it didn't change anything.
Anyone have any idea what I'm doing wrong?
Thanks!
Last edited by 63ChevyII.com; 12-28-2011 at 12:44 AM.
12-28-2011, 10:50 AM
#55
Advanced
Member Since: Oct 2008
Location: banner elk NC
Posts: 59
Likes: 0
Received 0 Likes
on
0 Posts
First, i'd check the hoses again- when i did mine it took a bit of trial and error (i had the same problem, a few hour job turned into a few months later). I remember adjusting the nut on the control valve and watching the piston for movement, then connecting it all back, bleeding the system twice, and then slowly moving the steering wheel through its full range of motion (the tires were still off the ground here)
12-28-2011, 12:35 PM
#56
3rd Gear
Member Since: Dec 2011
Posts: 3
Likes: 0
Received 0 Likes
on
0 Posts
Do you think I should switch the hoses back to where the steering wheel was doing the opposite of what was supposed to do?
12-28-2011, 01:51 PM
#57
Team Owner


Member Since: Oct 2000
Location: Washington Michigan
Posts: 38,899
Received 1,857 Likes
on
1,100 Posts

The pscv-to-ram pipes/hoses must be crossed as shown below, or the system won't work. 
12-28-2011, 02:00 PM
#58
3rd Gear
Member Since: Dec 2011
Posts: 3
Likes: 0
Received 0 Likes
on
0 Posts
I've seen the routing for the hoses on the novas listed in two different ways - based on that pick you posted though, if the ram is turned 90 counter clockwise, then spun 180 degeress so the hose exit on the passenger side, then the hoses would be back ram to bottom pscv, front ram to top pscv. I will do that.
Does anyone know what would cause the wheel to spin in the opposite direction of what you want?
03-13-2012, 07:56 PM
#59
Burning Brakes

I recently purchased a '64 coupe with a known power steering leak. Upon receiving the car, the PS reservoir was empty. I filled it, drove it about 20 miles, had a huge puddle under the car and the reservoir was empty again.
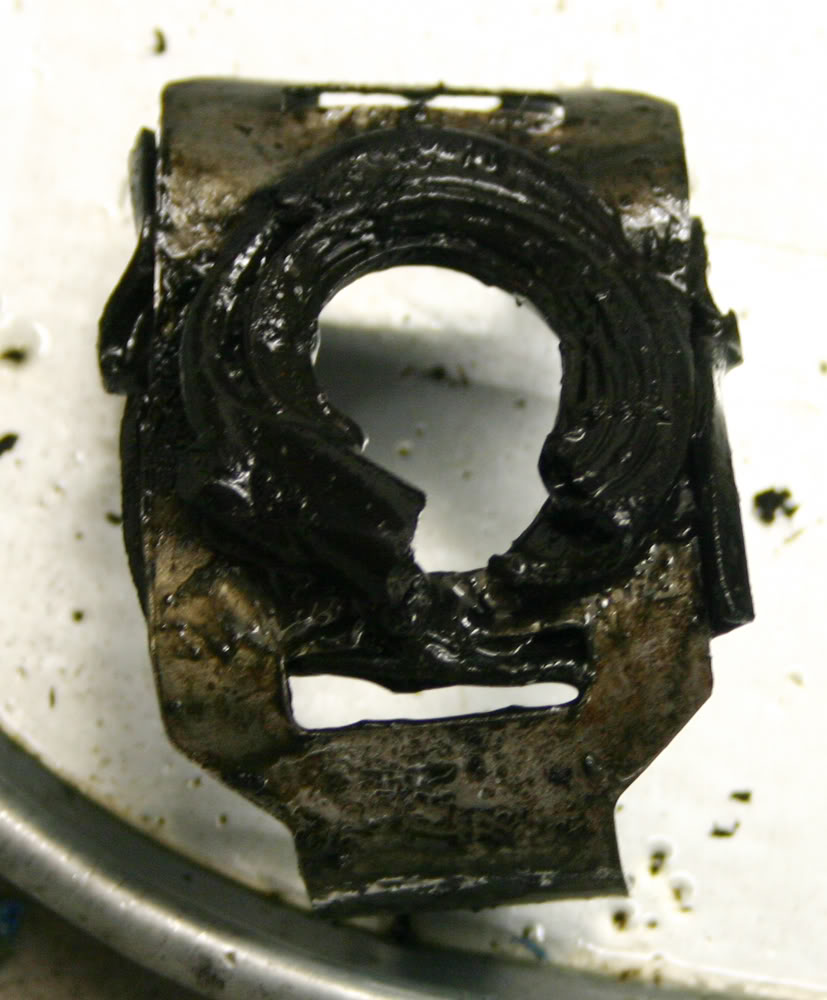
Today I put it on the lift and discovered the leak was coming from the control valve at the rubber seal surrounding the ball stud. The ball stud was not centered in the hole and had destroyed the seal. The seal was so destroyed that I when I stuck my finger in that area, PS fluid gushed out.
My question is do I need to replace or rebuild the control valve or will replacing the ball stud seal do the trick?
Also, is the ball stud normally centered in the hole or does it move around as you steer?
Since the seal was so destroyed, I would assume contaminants entered the control valve. Would that alone be a reason to either rebuild or replace it?
03-13-2012, 09:14 PM
#60
Burning Brakes
I recently purchased a '64 coupe with a known power steering leak. Upon receiving the car, the PS reservoir was empty. I filled it, drove it about 20 miles, had a huge puddle under the car and the reservoir was empty again.
Today I put it on the lift and discovered the leak was coming from the control valve at the rubber seal surrounding the ball stud. The ball stud was not centered in the hole and had destroyed the seal. The seal was so destroyed that I when I stuck my finger in that area, PS fluid gushed out.

My question is do I need to replace or rebuild the control valve or will replacing the ball stud seal do the trick?
Also, is the ball stud normally centered in the hole or does it move around as you steer?
Since the seal was so destroyed, I would assume contaminants entered the control valve. Would that alone be a reason to either rebuild or replace it?
Today I put it on the lift and discovered the leak was coming from the control valve at the rubber seal surrounding the ball stud. The ball stud was not centered in the hole and had destroyed the seal. The seal was so destroyed that I when I stuck my finger in that area, PS fluid gushed out.
My question is do I need to replace or rebuild the control valve or will replacing the ball stud seal do the trick?
Also, is the ball stud normally centered in the hole or does it move around as you steer?
Since the seal was so destroyed, I would assume contaminants entered the control valve. Would that alone be a reason to either rebuild or replace it?