Changing Main Rear Seals
 02-11-2008, 12:56 PM
#1
Racer

Thread Starter
Member Since: Jun 2003
Location: Aspenden Hertfordshire U.K.
Posts: 431
Likes: 0
Received 0 Likes
on
0 Posts

Having just rebuilt and refitted my SB350 I was somewhat anoyed to find a small oil leak dripping on the mat after a run . I traced it to the rear of the motor so it had to be either poor fitting pan gasket or rear main seal , I have removed and refitted the oil pan with new gaskets and rubber end seals but the leak persists so I guess it must be the rear main seal .
Question :- is it possible to change the top of the rear seal with the motor in place ? I was thinking of dropping the crank about 1/4" or so leaving the main caps in position but lossened and obviously removing the rear main cap completely , will this give me enough room to slide out the upper seal and fit a new one without damage ? has anyone actually done it this way ?
I did check the seal when refitting the pan gaskets and yes they are the correct way round and I did use a small amount of silicone on the seal mating services as well as the corner / edge of the main cap , so I guess it may be poorly manufactured or perhaps it got nipped during my assembly , I have never had this before and I really do not want to remove the motor or strip it any further than I need to .
Your ideas and advice as always much appreciated .
Mike
 02-11-2008, 01:20 PM
#2
Race Director


It can be done like that, but it is a pain. No guarantee your replacement won't leak either.
Doug
Doug
02-11-2008, 01:36 PM
#3
Race Director

Member Since: Jan 2002
Location: Close to DC
Posts: 14,546
Received 2,127 Likes
on
1,466 Posts
C2 of the Year Finalist - Modified 2020
Did you check the oil pan drain bolt? If your sure it the rear main seal you do not need to pull the motor or drop the crank. Drop the rear main cap, clean up as you go. You can push the one end of the seal with a piece of wood. Anything other then steel to prevent gouging the seal surface. Push the upper half around enough to grip the other end with pliers or whatever tool work for you and walk it out. Take the new seal half, lube it with a dab of oil and place it to the crank surface. Start it into the opening carefully and slowly. Make sure you keep it tight to the crank surface. Install the other half, dab some silicone as you did before and re-torque the main, your done! Just by chance, did you up the oil pressure on the engine during a rebuilb? If so that might contribute to leaking at this point. Another point to look at, is make sure the oil pan rail and all bolt holes are not dimpled in. This will compress the gasket more than it should be and contribute to leaking. Lay a straight edge along the pan and check. You can use a small ball pein hammer to correct this.  Dennis
Dennis
02-11-2008, 02:17 PM
#5
Racer
Thread Starter
Member Since: Jun 2003
Location: Aspenden Hertfordshire U.K.
Posts: 431
Likes: 0
Received 0 Likes
on
0 Posts
Thanks for your thoughts , pretty much as I expected .
For info the 350 is basically a 78 ish fitted to my 61 , the rear seals are the two piece rubber type , not rope . Yes the oil pressure was a bit high initially around 75-80 cold dropping to 60 psi running hot and 45+ at hot idle , as the gauge only goes to 60 max I was concerned at blowing it so I refitted my original pump so am now back to 60 cold dropping to 50 psi running hot and 35 at idle , I may refit the new (standard ) pump if pressures fall once the motor loosens up a little .
Regarding the pan , all the holes were flattened and a good bead of silicone applied to the sides , front and rear of the pan before assembly , the drain bolt is good with new washer and smear of silicone , the leak is definitely from above at the rear of the motor , as I said earlier I have rebuilt plenty over the years with no problems but this one is being a right PIA . If I cant fix it simply I will just run with it for a while and give it a quick wipe underneath to keep it clean .
Mike
02-11-2008, 03:19 PM
#6
Safety Car

Mike ..
I just went through the exact same scenario you describe with my refreshed/rebuilt 327. During the initial engine fire-up and 20 minute 2000 rpm cam break-in period an oil leak was noted coming from the rear of the oil pan/inspection cover area. The leak rate was fairly consistent at about a drop every 45-60 seconds. This seemed to suggest a 'pressure' leak rather than a gasket leak.
A question: Was the rear main cap on your engine sealed at the ends upon reinstallation, as shown to do in the shop manual? .. That could be a potential leak point, also.
Despite all other checks for an oil leak and even though brand new, in my case, it did turn out to be a rear main seal leak. My guess is that you too might have a leaky rear main seal. The rear main seal I removed appeared to be in great shape - no obvious sign of any damage or nicks on the seal lip. The crankshaft main that the rear main seal rides on appeared to be in good shape, too.
It really wasn't all that hard to change out the rear main seal. Drop the front steering gear at the idler arm to gain clearance for sliding the oil pan down and back. Remove the rear main cap. Since the engine is new and hasn't had any real time to 'bake' the upper half of the rear main seal in place inside the engine block the seal should slide out easily. If not, then loosen up the #4 and #3 main caps.
A needle nose plier can be used to pull the exposed portion of the seal out the rest of the way. When installing a new seal half in the block a small plastic installation shield should be provided along with the new rear main seal. It's important to use this shield as it will prevent the back side of the rear main seal from getting goughed when sliding it into position inside the block. Lube the seal, especially the sealing lips. Make sure the sealing lips face forward, upon installation, towards the front of the engine.
Some recommend that the seal should be installed 'offset' from the rear main/block surface parting line. This means to push the rear main seal up about 1/4 inch into the block so that the rear main seal parting line doesn't match up with the rear main/block parting line. That's how I did mine.
GM also recommends that no sealer be applied to the mating seal end halves. Make sure the rear main cap and block gets sealed in the places indicated in the shop manaul. The installation sheet that comes with the new rear main seal also mentions this. Also, make sure the rear main thrust bearing is set as per the shop manual instruction. This usually means carefully knocking the crank forward, or wedging it forward while the rear main cap has a small amount of preload on it (10 st. lbs.). Then, final torque.
For a replacement rear main seal I used the one that is available from GM. The part number is 10121044. These are a bit pricey but are claimed to be the best available.
So far, so good ... . .. Leak free!
02-11-2008, 04:10 PM
#7
Racer
Thread Starter
Member Since: Jun 2003
Location: Aspenden Hertfordshire U.K.
Posts: 431
Likes: 0
Received 0 Likes
on
0 Posts
Geat detail there especially the "offset" of the seals makes great sense to stagger the joints , is it definitely no sealer between the seals ? as my manuals all reccomend a smear on the mating surfaces .
Was not aware about the tension on the rear thrust bearing , again not mentioned in the manual , or is this just when fitting with the crank in place .
One good bit of news , I have aftermarket front suspension and steering so no need to remove anything to drop the pan .
I will try and find the GM seals here in the UK , as most I have seen are all made in Tiawan or similar .
Thanks for your advice
Mike .
02-11-2008, 04:33 PM
#8
Le Mans Master


Some recommend that the seal should be installed 'offset' from the rear main/block surface parting line. This means to push the rear main seal up about 1/4 inch into the block so that the rear main seal parting line doesn't match up with the rear main/block parting line. That's how I did mine.
I was going to mention that but since you have I will just say
 02-12-2008, 12:52 PM
#9
Team Owner


Member Since: Oct 2000
Location: Washington Michigan
Posts: 38,899
Received 1,857 Likes
on
1,100 Posts
The GM 2-piece rear main seal (#10121044) is EXACTLY the same as the Fel-Pro #2912; Fel-Pro makes it for GM. 
02-12-2008, 02:00 PM
#10
Race Director

Member Since: Nov 2000
Location: Beverly Hills (Pine Ridge) Florida
Posts: 10,152
Received 525 Likes
on
374 Posts
Note from Fel-Pro to avoid leakage from main seals:
To ensure no leaks in the parting line area, place a very thin coat of RTV silicone sealant on the end of each seal half, making sure not to get any on the helix on the lip surface of the seal. The seal will leak if any silicone gets onto the helix.
Also:
There is a radius in the cap register of the block, and a matching chamfer along the sides of the bearing cap. This creates a leak path that must be sealed, When installing any rear main seal, remove any oil film from the block register (and the cap surface) and apply a SLIGHT amount of RTV silicone sealant or anaerobic just prior to installing the bearing cap.
This is the way I have always done it, and never had a problem.
Plasticman
02-12-2008, 02:16 PM
#11
Team Owner
Member Since: Oct 2000
Location: Washington Michigan
Posts: 38,899
Received 1,857 Likes
on
1,100 Posts
Don't forget to use the little white plastic spoon tool that comes with the seal kit - it protects the edge of the upper seal as you roll it into the groove in the block so the sharp edge at the joint surface doesn't damage the seal.
02-12-2008, 03:13 PM
#12
Racer
Thread Starter
Member Since: Jun 2003
Location: Aspenden Hertfordshire U.K.
Posts: 431
Likes: 0
Received 0 Likes
on
0 Posts
Thanks for the tips , I do normally do all the things mentioned and have not had a problem before , but it is interesting that some suggest sealer on the seal mating surfaces but others say no , even on the packet containing the seals says "no sealer" .
I was pleased to see the Felpro seals are the same as GM as the GM version are $84 USD equivalent over here , I am going to look at some other types that apparently have 2 lips as oposed to the normal 1 and the local supplier uses them on his race engines , has anyone seen or used this type of seal ?
Also your thoughts on ofsetting the seals , seems to make sense to me but I have never tried it before .
Mike .
02-12-2008, 03:48 PM
#13
Team Owner

Well, I am not an expert like many here but I put this seal in a 1979 L-82 five years ago and it is still leak-free.

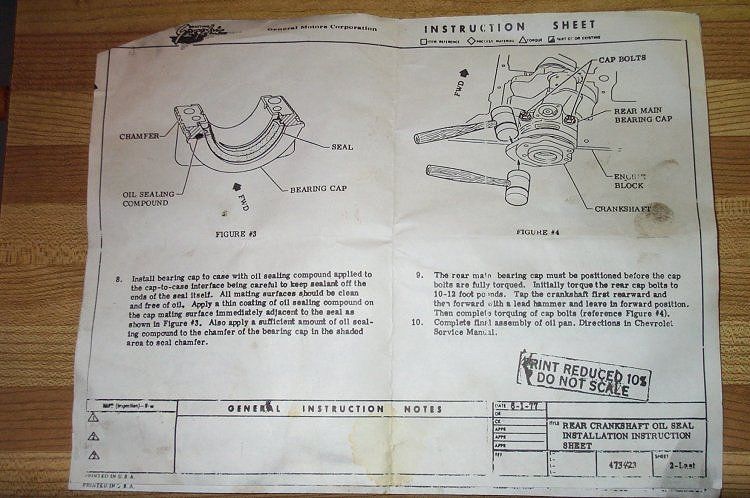
This is the installation tool.

These are the GM instructions re sealant.
This is the installation tool.
These are the GM instructions re sealant.
Last edited by Paul L; 02-12-2008 at 03:58 PM.
02-12-2008, 04:44 PM
#14
Race Director
Member Since: Nov 2000
Location: Beverly Hills (Pine Ridge) Florida
Posts: 10,152
Received 525 Likes
on
374 Posts
Direct from Fel-Pro Tips:
REAR MAIN BEARING SEALS
Seal Installation
Inadequate seal lubrication before first-time start up is the leading cause of rear main seal failure.
�Lubricate the seal lip and crankshaft with oil or grease. Use grease if there will be a long period of time before start up.
�Debur the edge of the block and cap to prevent damage to the back side of the seal during installation.
�If there is a slight mismatch of the bearing cap and block, it will help align the seal halves if you offset their parting line about 3/8" from the cap/block parting line.
�To ensure that there are no leaks in the parting line are, place a thin coating of RTV on the end of each seal half.
�There is a radius in the cap register of the block and a matching chamfer along the sides of the cap. This creates a leak path which must be sealed. When installing any rear main seal, remove any oil film from the block register and apply a SLIGHT amount or RTV silicone or anaerobic just prior to installing the cap.
Also, from Chevy Service manual (1970): Use sealer at parting line on cap half of seal and cylinder block in seal area.
Plasticman
Last edited by Plasticman; 02-12-2008 at 04:48 PM.
02-13-2008, 12:37 AM
#15
Burning Brakes


I just rebuilt a 78ish 350 also. I too have a drop from the rear of the pan area. Today I removed the lower bell housing cover and got a clean rag up by the crank and cleaned the oil residue. I got a dental mirror and a good flashlight and found the crank dry but the lower oil pan seal was weeping. This was my first try with the one piece silicone oil pan gasket. My first oil change is coming up so I may pull the pan and reposition the seal. Double check yours.
brgds
rene
brgds
rene