Carter Carbs - settings & manual
 04-09-2009, 12:16 PM
#1
3rd Gear

Thread Starter

Member Since: Apr 2009
Posts: 3
Likes: 0
Received 0 Likes
on
0 Posts
I own a 1958 Corvette/ 270HP (2 x 4). I just had the original Carter carbs restored. Can anyone tell me please . . . 1) the factory settings for these carbs 2) is there a manual for the Carter carbs and 3) is there a special tool for adjusting the carbs (it is impossible to do it with a screwdriver and very tedius with a wrench!) Thank you.
 04-09-2009, 01:02 PM
#2
Team Owner


Member Since: Oct 2000
Location: Washington Michigan
Posts: 38,899
Received 1,857 Likes
on
1,100 Posts

The ST-12 ('53-'62 Shop Manual) doesn't have anything on the WCFB's; best source for all the WCFB detail info is the '61 Passenger Car Shop Manual, available from the NCRS on-line store at www.ncrs.org. You'll need a LONG 1/4" open-end wrench to adjust the idle mixture. 
04-09-2009, 01:05 PM
#3


The ST-12 ('53-'62 Shop Manual) doesn't have anything on the WCFB's; best source for all the WCFB detail info is the '61 Passenger Car Shop Manual, available from the NCRS on-line store at www.ncrs.org. You'll need a LONG 1/4" open-end wrench to adjust the idle mixture.
04-09-2009, 01:25 PM
#4
Team Owner


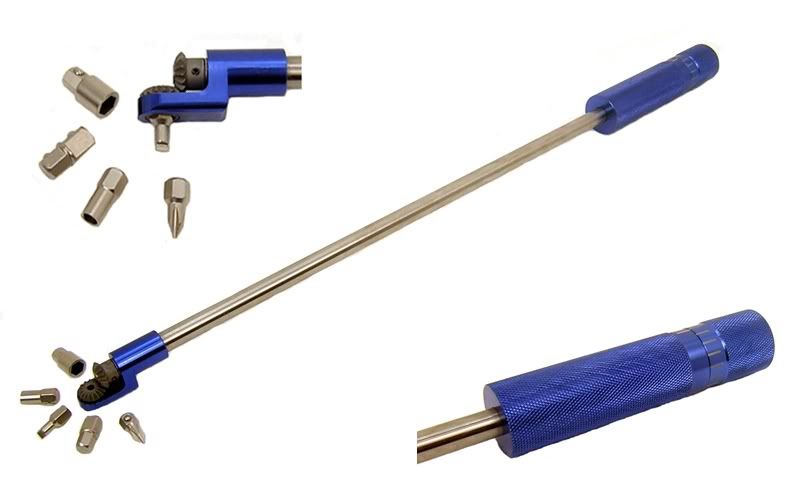
There is a manual (bottom right hand corner of picture) - I got it off eBay but had to wait 4 weeks for it to be printed in China - go figure.
There is also a long flexible screw-driver like tool for adjusting the mixture screws, which some folks rave about, but I have gotten much better at just using a short 1/4" box end wrench. Here is the tool: http://www.handsontools.com/search.a....y=0&search=GO
Install the carbs with the linkage set for progressive ( rear carb linkage in top hole; front in bottom hole). Front carb should kick in when the rear carb throttle plate is about 1/2 way open.
If your restorer was decent you should only have to adjust the idle (and possibly the fast idle). Mine idle rock steady at 800RPM with 18" of vacuum. I adjust the four idle screws for max vacuum starting with them 3/4" of a turn OUT from lightly seated then start cranking them in clockwise. Recheck your carb mounting bolts and all air horn screws after 200 miles or so... Even the one hiding under the fuel vent cap cover on the front.
Set the front carb's idle speed screw just enough to 'crack open' the front carb throttle plate (prevents possible sticking) and use the rear idle speed screw for actual speed adjustment. This is how Bob Kunz (the top WCFB restorer) coached me through setting mine up. Make sure your timing is spot on before the adjustment...any variations here will make optimum idle hard to achieve.
If you have any flooding problems check your fuel pump pressure. I had to put a regulator in my fuel line to keep from driving the needle valves off their seats. 4.5lb-5.5lb is about optimal.
If you run into trouble PM me and I'll give you my phone number to help you out (I'm on Eastern Time BTW).
Last edited by Frankie the Fink; 04-09-2009 at 01:59 PM.
10-02-2010, 10:09 AM
#6
Advanced
There is a manual (bottom right hand corner of picture) - I got it off eBay but had to wait 4 weeks for it to be printed in China - go figure.
There is also a long flexible screw-driver like tool for adjusting the mixture screws, which some folks rave about, but I have gotten much better at just using a short 1/4" box end wrench. Here is the tool: http://www.handsontools.com/search.a....y=0&search=GO
Install the carbs with the linkage set for progressive ( rear carb linkage in top hole; front in bottom hole). Front carb should kick in when the rear carb throttle plate is about 1/2 way open.
If your restorer was decent you should only have to adjust the idle (and possibly the fast idle). Mine idle rock steady at 800RPM with 18" of vacuum. I adjust the four idle screws for max vacuum starting with them 3/4" of a turn OUT from lightly seated then start cranking them in clockwise. Recheck your carb mounting bolts and all air horn screws after 200 miles or so... Even the one hiding under the fuel vent cap cover on the front.
Set the front carb's idle speed screw just enough to 'crack open' the front carb throttle plate (prevents possible sticking) and use the rear idle speed screw for actual speed adjustment. This is how Bob Kunz (the top WCFB restorer) coached me through setting mine up. Make sure your timing is spot on before the adjustment...any variations here will make optimum idle hard to achieve.
If you have any flooding problems check your fuel pump pressure. I had to put a regulator in my fuel line to keep from driving the needle valves off their seats. 4.5lb-5.5lb is about optimal.
If you run into trouble PM me and I'll give you my phone number to help you out (I'm on Eastern Time BTW).
There is also a long flexible screw-driver like tool for adjusting the mixture screws, which some folks rave about, but I have gotten much better at just using a short 1/4" box end wrench. Here is the tool: http://www.handsontools.com/search.a....y=0&search=GO
Install the carbs with the linkage set for progressive ( rear carb linkage in top hole; front in bottom hole). Front carb should kick in when the rear carb throttle plate is about 1/2 way open.
If your restorer was decent you should only have to adjust the idle (and possibly the fast idle). Mine idle rock steady at 800RPM with 18" of vacuum. I adjust the four idle screws for max vacuum starting with them 3/4" of a turn OUT from lightly seated then start cranking them in clockwise. Recheck your carb mounting bolts and all air horn screws after 200 miles or so... Even the one hiding under the fuel vent cap cover on the front.
Set the front carb's idle speed screw just enough to 'crack open' the front carb throttle plate (prevents possible sticking) and use the rear idle speed screw for actual speed adjustment. This is how Bob Kunz (the top WCFB restorer) coached me through setting mine up. Make sure your timing is spot on before the adjustment...any variations here will make optimum idle hard to achieve.
If you have any flooding problems check your fuel pump pressure. I had to put a regulator in my fuel line to keep from driving the needle valves off their seats. 4.5lb-5.5lb is about optimal.
If you run into trouble PM me and I'll give you my phone number to help you out (I'm on Eastern Time BTW).
I�m looking for a vacuum gauge. What kind of gauge do you use?
Heinz
10-02-2010, 11:36 AM
#7

no real voodoo here.
assuming the restorer did them correctly ; set the mixture screws at about 3/4 to 1 turn out on both carbs. turn the front idle stop screw all the way out to close the blades. then turn it in to open the blades about 1/2 to 3/4 turn. set your base idle speed using the rear carb to the desired speed by turning that idle speed screw.
some folks try to set the front and rear idle air rates (speed screws) to be exactly the same. It does not really matter. i've done it both ways with equal results. i've seen unmolested front carbs with no base idle screws at all in them- meaning the base idle was done entirely on the rear carb. this method also works fine.
bottom line is it takes some tweaking after a few road tests to get the idle speed where you want it.
FTF has all the good dope on info.
assuming the restorer did them correctly
; set the mixture screws at about 3/4 to 1 turn out on both carbs. turn the front idle stop screw all the way out to close the blades. then turn it in to open the blades about 1/2 to 3/4 turn. set your base idle speed using the rear carb to the desired speed by turning that idle speed screw. some folks try to set the front and rear idle air rates (speed screws) to be exactly the same. It does not really matter. i've done it both ways with equal results. i've seen unmolested front carbs with no base idle screws at all in them- meaning the base idle was done entirely on the rear carb. this method also works fine.
bottom line is it takes some tweaking after a few road tests to get the idle speed where you want it.
FTF has all the good dope on info.
10-02-2010, 01:34 PM
#8
Team Owner
no real voodoo here.
assuming the restorer did them correctly; set the mixture screws at about 3/4 to 1 turn out on both carbs. turn the front idle stop screw all the way out to close the blades. then turn it in to open the blades about 1/2 to 3/4 turn. set your base idle speed using the rear carb to the desired speed by turning that idle speed screw.
some folks try to set the front and rear idle air rates (speed screws) to be exactly the same. It does not really matter. i've done it both ways with equal results. i've seen unmolested front carbs with no base idle screws at all in them- meaning the base idle was done entirely on the rear carb. this method also works fine.
bottom line is it takes some tweaking after a few road tests to get the idle speed where you want it.
FTF has all the good dope on info.
assuming the restorer did them correctly
; set the mixture screws at about 3/4 to 1 turn out on both carbs. turn the front idle stop screw all the way out to close the blades. then turn it in to open the blades about 1/2 to 3/4 turn. set your base idle speed using the rear carb to the desired speed by turning that idle speed screw. some folks try to set the front and rear idle air rates (speed screws) to be exactly the same. It does not really matter. i've done it both ways with equal results. i've seen unmolested front carbs with no base idle screws at all in them- meaning the base idle was done entirely on the rear carb. this method also works fine.
bottom line is it takes some tweaking after a few road tests to get the idle speed where you want it.
FTF has all the good dope on info.
Bob Kuntz (and others) advised me to adjust the front idle screws to at least just 'crack' the throttle plates to avoid sticking. The idle adjustment is different on '56 carbs as they have the idle air bypass screw in the base. If you have ORIGINAL idle speed screws a 1/4" box end wrench works nicely and there are also special 'flex' carb adjustment tools (like a long screwdrive with a flexible shaft with a 1/4" socket on the end). I also don't try to get all 4 idle mixture screws withing a 1/4" turn as many advocate (although mine just naturally settled in to being that close). I actually found a copy of the WCFB manual shown in my earlier post online and downloaded it. I can email it to the OP or others but it is too large to post to the forum. I'll need an email address to do that.
I adjust idle mixture at the idle speed for max vacuum then do a "lean roll" of 1/8" turn on each screw as these carbs tend to run rich at idle anyway.
Last edited by Frankie the Fink; 10-02-2010 at 01:37 PM.
 10-02-2010, 02:32 PM
#10
Team Owner