C4 suspension disassembly and re-assembly
 10-04-2009, 12:19 PM
#1
Pro

Thread Starter

First: How are some of you removing and eventually reinstalling the front and rear transverse springs in these C4's? I am looking at buying used suspension's from a C4 to use in my 60 restomod. The complete suspensions will be removed from its donor car. I will only have the suspension assemblys. Photos and tips are appreciated. How are rear wheel bearings done? Any advice appreciated. I have no experience with C4 cars. I have only restored C1 and C2 cars.
Thanks DG
Thanks DG
 10-04-2009, 02:47 PM
#2
Safety Car


Member Since: Apr 2001
Location: Sarver Pa
Posts: 4,557
Received 775 Likes
on
531 Posts
2021 C1 of the Year Finalist - Modified

The wheel bearings are sealed units, you have to change the whole thing. About $125 at the auto parts.
The spring in mine was cracked so I pitched it and went with coil overs, much more adjustable. The suspension units are fairly simple and nice to work with.
The spring in mine was cracked so I pitched it and went with coil overs, much more adjustable. The suspension units are fairly simple and nice to work with.
10-04-2009, 04:41 PM
#3
Le Mans Master


Member Since: Sep 2003
Location: Norwalk ohio
Posts: 8,927
Received 640 Likes
on
358 Posts
2019 Corvette of the Year Winner
St. Jude Donor '15
good question, but they sure look good back there......
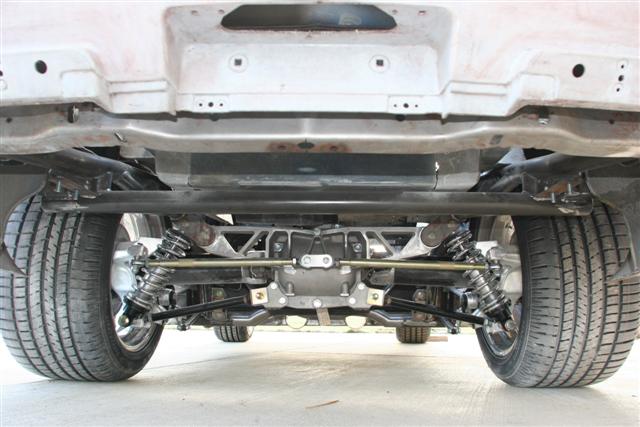
I bought my set up complete from SRIII Motorsports.....since I was running larger rear tires I let them handle the details like narrowing up the bat wing.....
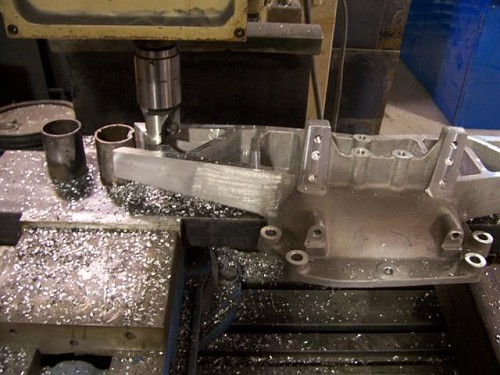

look closely and you can see the Car Creations logo in the casting. This is a Dana 44 set up.
The body is tubbed about 3" for the bigger tires and required the frame to be moved in board as well as the machining of the bat wing.....good luck...
I bought my set up complete from SRIII Motorsports.....since I was running larger rear tires I let them handle the details like narrowing up the bat wing.....
look closely and you can see the Car Creations logo in the casting. This is a Dana 44 set up.
The body is tubbed about 3" for the bigger tires and required the frame to be moved in board as well as the machining of the bat wing.....good luck...
10-04-2009, 07:36 PM
#4
Le Mans Master

I too went with Coilovers. I went over all the aluminum with a wire wheel on a drill and then used scotch pad. Then gave it a light spritz of Quanta Dul Alumimum Paint. For me, I like the finished look. Others have polished them to a shine and others have powdercoated or left bare alumimum. Depends on what you want and how much time and money you want to put into it.


10-04-2009, 08:30 PM
#5
Safety Car

First: How are some of you removing and eventually reinstalling the front and rear transverse springs in these C4's? I am looking at buying used suspension's from a C4 to use in my 60 restomod. The complete suspensions will be removed from its donor car. I will only have the suspension assemblys. Photos and tips are appreciated. How are rear wheel bearings done? Any advice appreciated. I have no experience with C4 cars. I have only restored C1 and C2 cars.
Thanks DG
Thanks DG
The rear spring is not too much trouble. If the rear suspension assembly is out of the car, just remove the cotter pin and unscrew the nut on the end of the long link bolt. Be very careful because the spring will still be under compression when the nut reaches the end of the bolt. When replacing the spring (assuming the differential and other rear suspension parts are installed in the car) you can compress the rear spring by jacking up the rear end and then place a large block under the outside end of the spring near the bolt hole and then lower the car so that the weight of the car will compress the spring. Compressing the spring will make installing the long bolt easier.
The front spring is a pain, and possibly dangerous. There is a special spring compression tool made just for the front spring, but it can be done without it. Without the spring compressor you will have to remove the top and bottom ball joints from the knuckle. I'll leave you to your own devices as to how the loosen the ball joint from the knuckle because the way I do it (with a big hammer and a drift) may mess up the threads if you aren't careful. After the ball joints are loose, (again assuming that the whole front end assembly is removed from the car) unscrew the ball joint nuts so that there is about a half nuts worth of threads holding it on. Remove the top and bottom bolts holding the inner ends of the �A� arms to the crossmember. Once the inner �A� arm bolts are removed, remove the ball joint nuts and the �A� arms should fall off. Now you can unbolt the spring brackets and remove the spring.
Remember that there will be a lot of spring pressure on �A� arms, so be very, very careful when you remove these bolts and nuts.
Replacing the front spring with the crossmember in the car can also be accomplished without the spring compressor. With the spring bolted to the crossmember and the inner ends of the lower �A� arms bolted in, jack the front end up and place a block under the end of the lower 'A' arm and then let the car down to compress the spring. It also helps if the engine and transmission are installed as this puts more weight on the spring. Do one side at the time to get the most weight on one end of the spring. With the spring compressed, place the ends of the ball joints in the top and bottom �A� arms and start the nuts. It also helps if the upper bolts that hold the �A� arms to the crossmember ( the bolts onto which the caster/camber shims are placed) are loose. Once all the attachment nuts are started, just tighten them up and the spring will compress.
Once again, be extremely careful when releasing the pressure on these springs.
Charles
10-04-2009, 08:55 PM
#6
Le Mans Master
Member Since: Sep 2003
Location: Norwalk ohio
Posts: 8,927
Received 640 Likes
on
358 Posts
2019 Corvette of the Year Winner
St. Jude Donor '15
I too went with Coilovers. I went over all the aluminum with a wire wheel on a drill and then used scotch pad. Then gave it a light spritz of Quanta Dul Alumimum Paint. For me, I like the finished look. Others have polished them to a shine and others have powdercoated or left bare alumimum. Depends on what you want and how much time and money you want to put into it.
10-05-2009, 12:14 AM
#7
Le Mans Master
Herb, Don't know enough about MEtalurgy to answer your question. My guess only would be the 400 Degree would not be an issue for the control arms but someone more in the know would have to chime in.
In my case as mentioned I wire wheeled everything, scotchbrited, then painted with Quanta Dull Aluminum. Still looks like the day I did it two years ago and cleans up nice with a quick wipe down. But powdercoating would probably last much longer. I didn't want to replace the bushings or ball joints though being they were in good shape so I saved some time and money that way.
Joe..
10-05-2009, 12:37 PM
#8
Le Mans Master
Member Since: Sep 2003
Location: Norwalk ohio
Posts: 8,927
Received 640 Likes
on
358 Posts
2019 Corvette of the Year Winner
St. Jude Donor '15
Herb, Don't know enough about MEtalurgy to answer your question. My guess only would be the 400 Degree would not be an issue for the control arms but someone more in the know would have to chime in.
In my case as mentioned I wire wheeled everything, scotchbrited, then painted with Quanta Dull Aluminum. Still looks like the day I did it two years ago and cleans up nice with a quick wipe down. But powdercoating would probably last much longer. I didn't want to replace the bushings or ball joints though being they were in good shape so I saved some time and money that way.
Joe..
In my case as mentioned I wire wheeled everything, scotchbrited, then painted with Quanta Dull Aluminum. Still looks like the day I did it two years ago and cleans up nice with a quick wipe down. But powdercoating would probably last much longer. I didn't want to replace the bushings or ball joints though being they were in good shape so I saved some time and money that way.
Joe..
98, assembly, bat, batwing, c1, c4, corvette, disassebly, disassemble, disassembly, narrowed, rear, suspension, wings

