The best way to redo the undercarriage of a C2 frame on?
 01-07-2010, 06:04 PM
#21
Drifting

What you're talking about is opening Pandora's Box - you have to decide how far into the box you're willing to go, and what you're prepared to do while you're in there. And, if you're going to do it 'correctly' or not.
Personally, I wouldn't think about painting the frame if I wasn't going to rebuild the entire chassis (and drive train while it's out).

 01-07-2010, 06:21 PM
#22
Race Director


Dave
01-07-2010, 06:43 PM
#23
Le Mans Master


Thread Starter

I am going take out the engine thats in the car now and put in a correct SPH 365 hp. And change some seals on the manual transmission. Also have a friend of mine to respray the engine bay and underside of the hood.So it`s going to be a lot of work.
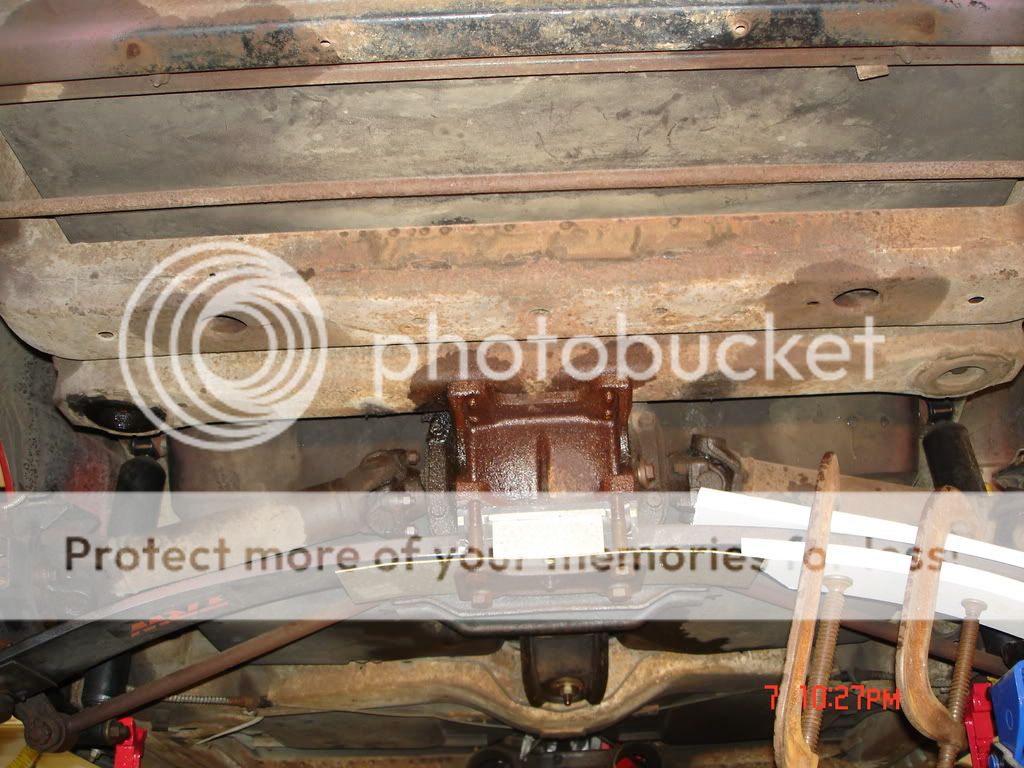
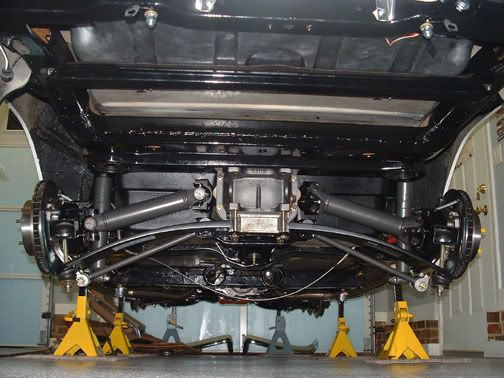
Yes, they look great - lots of work involved to get to that point. The above shots represent a significant portion of the work involved to do a 'body on' restoration.
What you're talking about is opening Pandora's Box - you have to decide how far into the box you're willing to go, and what you're prepared to do while you're in there. And, if you're going to do it 'correctly' or not.
Personally, I wouldn't think about painting the frame if I wasn't going to rebuild the entire chassis (and drive train while it's out).
01-07-2010, 07:50 PM
#24
Race Director
Dave

 01-07-2010, 09:05 PM
#26
Le Mans Master


http://www.vbandp.com/detail.aspx?ID=485
01-10-2010, 10:30 AM
#27
Le Mans Master
Thread Starter
I just suppose to get a result like this it must have been sprayed on and not used a brush?It really looks the way i would like to have my car done
01-10-2010, 10:46 AM
#28
Race Director
It can be done either way and with out a lot of parts removal however the best way would be remove and refurb as many parts as you can and paint them separately. My frame was done with a foam brush and doesn't have any lines in it with POR15 top coated with Rustoleum Industrial black. The foam brushes allow the paint to flow out and level.
You can definitely use spray cans however you will need to be careful about overspray. JMO
 01-10-2010, 02:18 PM
#29
Le Mans Master
Thread Starter
I will try to look up a foam brush on the net to see how it looks because i have never heard of it before
And i just looked it up so i know what it looks like
And i just looked it up so i know what it looks like
It can be done either way and with out a lot of parts removal however the best way would be remove and refurb as many parts as you can and paint them separately. My frame was done with a foam brush and doesn't have any lines in it with POR15 top coated with Rustoleum Industrial black. The foam brushes allow the paint to flow out and level.
You can definitely use spray cans however you will need to be careful about overspray. JMO
You can definitely use spray cans however you will need to be careful about overspray. JMO
Last edited by TheSaint; 01-10-2010 at 02:21 PM.
01-10-2010, 09:23 PM
#30
Racer

I basically replaced every component under my car. The only thing not removed was the frame which I cleaned a painted before reassembly of the suspension. Any parts that were'nt replaced where cleaned and painted. The engine was rebuilt, TKO600 5spd, VBP suspension, offset trailing arms, Duntov differential, new brake rotors, brake lines, ebrake, calipers and all new power steering parts and hoses. I'm just finishing up a 2 1/2 year body-on restoration, which I had orignally planned to do in one winter.
Talk about a Pandora's Box, I could'nt agree more. If I'd known I was going to go this far It might have made more sense to pull the body. Anyway I'm happy with the results, my goal was to have a nice clean driver because that's what I do with my vettes.
Talk about a Pandora's Box, I could'nt agree more. If I'd known I was going to go this far It might have made more sense to pull the body. Anyway I'm happy with the results, my goal was to have a nice clean driver because that's what I do with my vettes.
Last edited by vettegozzzz; 01-10-2010 at 09:26 PM.


 01-10-2010, 10:06 PM
#32
Racer
Nice job Shemp, Absolutely worth the effort. I did'nt take before pics of my car cause it was so ugly. Ever notice when you have nice car, people always look underneath???
07-19-2010, 12:01 PM
#35
Le Mans Master
Thread Starter
After i have painted the undercarriage i still have to paint the spring,rear axle and springs silver.
I know the shocks is supposed to be painted gray. Wich other parts is supposed to be gray?
I have to clean the exhaust pipes that is supposed to be stainless steel. Cant say they look like stainless steel but the rust y stuff can be easy wiped off using thinner and a cloth

I know the shocks is supposed to be painted gray. Wich other parts is supposed to be gray?
I have to clean the exhaust pipes that is supposed to be stainless steel. Cant say they look like stainless steel but the rust y stuff can be easy wiped off using thinner and a cloth
Last edited by TheSaint; 07-19-2010 at 12:04 PM.
02-03-2011, 05:49 PM
#36

Lots of good information in this post. I didn't worry about cleaning any grease off anything when I was doing mine. My DeWalt angle grinder with a wire knot wheel would remove almost any paint or under coating that I could find. What I couldn't get to with it I used a wire wheel on a high speed drill and lastly wire wheels on the dremel sparingly.
Once all cleaned up POR15 with foam brushes. It flows out well and lays smooth with no brush strokes. Best of all the brushes are cheap just throw them out as needed. I top coated with Rustoleum Industrial Gloss Black. It's held up well over the last six years. Now is this correct heck no. It was what I wanted, if you want a more correct sheen top coat with some semi-flat black.
Dave
I dont know if your still following this thread but I was wondering if you brushed on the Rustoleum Industrial Black Gloss also or was it sprayed. I know you can brush the POR 15 on. I want to try some spot painting with a brush now that I will have my front suspension off. Do you need the top coat? I guess you are basically using the POR 15 as a primer? I think some people just use POR 15 with no primer and no top coat, not sure. I tried orange POR 15 on my intake and it didnt work out that well.
Brian
02-03-2011, 06:03 PM
#37
Team Owner


Member Since: Jan 2007
Location: cookeville tennessee
Posts: 28,846
Received 1,762 Likes
on
1,529 Posts

 Great job man would you like to do it again.
 02-03-2011, 06:18 PM
#38
Melting Slicks

If you use POR 15 make sure you have the proper breathing mask on.
02-05-2011, 01:39 PM
#40

