64 Frame Rust Repair
 05-22-2010, 09:28 AM
#1


 I have a 64 vert with some visible rust in the #3 area. Today I'm going be removing the body from the frame. I was told that I should have the frame stripped and dipped in a strip tank to better remove all rust (inside frame) and see damage. Once repaired then I should have it powder coated. The threads I've seen on CF only mention sandblasting the frame. Is it really something I should consider doing? If so, what kind of treatment should I apply to the inside of frame once the outside has been powder coated. How is it done? I'm looking for some guidance. I would appreciate any other assistance on process and best places to get whatever parts and materials needed for this project.
 05-22-2010, 09:59 AM
#2
Le Mans Master


When I repaired the frame on my 63 I first had the frame sandblasted. We made the repairs and I then had the frame chemically stripped. Following the chemical strip there were two factory welds that showed fracture and needed to be ground out and repaired. These did not show with the sandblasting. In fact I believe the sand blasting filled in the cracks and hid them.
Since you are going to be involved with frame repair don't skimp on the process. Find a company that does electro chemical stripping. This does not remove metal from the rest of your frame as it is NOT an acid dip. It removes the rust due to the electric charge that is applied to the frame in the solution.
Rich

 05-29-2010, 02:45 AM
#7
Drifting


I had mine dipped... came out beautiful! Then I cleaned it and painted it, but my cleaning wasn't thorough enough and I ended up doing it again, so take special pains to get it ready to accept paint... if I were doing it again, I think I'd tape off holes and have it very lightly sandblasted after dipping. I bought an undercoating gun/wand kit from J.C. Whitney, and after painting the frame with Imron, I sprayed a 3-M rustproof coating inside the frame (taping off all holes I didn't currently have the wand inserted through). My local body shop supply vendor had the 3-M rustproofing in cans that screwed onto the gun.
The undercoating gun kit I bought came with several lengths of bendable aluminum rods (can be bent to shape needed to get deep into spaces through access holes). The rods screwed together, as did a couple of screw-on spray tips with differing spray patterns (J.C. Whitney doesn't seem to sell the kit any more).
Here's an undercoating gun similar to the one I bought, except it doesn't say if the wand can be bent, or if there are directional nozzles.
http://tinyurl.com/2bqkvak
Here's some more:
http://oemproamtools.com/undercoat.htm
http://tinyurl.com/2fb9l8m
http://raybuck.com/c-54857-undercoat-rustproofing.html
http://oemproamtools.com/undercoat.htm
05-29-2010, 03:17 AM
#8
Drifting
[IM6]http://tinyurl.com/26wbv6w[/IM6]
Here is what you get if you put the "G's" back in
(the photo is on Photobucket.com):
There is a facility on this forum website for uploading photos, but I don't think it's intended for hosting photos to be used in posts (I could be wrong).
Last edited by waynec; 05-29-2010 at 03:31 AM.
 Having the enginebay and frame/undercarriage primed and painted
06-04-2010, 09:21 AM
Having the enginebay and frame/undercarriage primed and painted
06-04-2010, 09:21 AM
#11
Le Mans Master
The best surface for powder coating to adhere to is a sanblasted surface. The powder coater may not like it because they have to use more material to make it slick, but that's even better for "you". Make sure they use an iron phosphate wash prior to coating to prevent peeling in the future.
06-04-2010, 09:32 AM
#12
Le Mans Master

i must have been very lucky because there was absolute no visable rust on the window frame(had the windshield out)or at the frame at all on my car.
When we cleaned the frame on my car a lot of old paint fell off before we sanded it down and it looked like new metall
When we cleaned the frame on my car a lot of old paint fell off before we sanded it down and it looked like new metall
06-04-2010, 09:34 AM
#13
Le Mans Master
 06-04-2010, 11:10 AM
#14
Le Mans Master
There where no surface rust at all either. Yes i am happy about that especially thinking of that this is an European car and have probably been driven in the snow(but not any salty winter roads i think)
I heard that if you dip the frame it will be absoulte rustfree but also that cracks that will not show after sandblasting will show.
I suppose there will be cracks at almost all of the old frames if that procedure is followed. Mine included off course
I heard that if you dip the frame it will be absoulte rustfree but also that cracks that will not show after sandblasting will show.
I suppose there will be cracks at almost all of the old frames if that procedure is followed. Mine included off course
Last edited by TheSaint; 06-04-2010 at 11:12 AM.


 06-09-2010, 03:34 PM
#18
Tech Contributor

Member Since: Aug 1999
Location: At my Bar drinking and wrenching in Lafayette Colorado
Posts: 13,652
Received 4,919 Likes
on
1,929 Posts

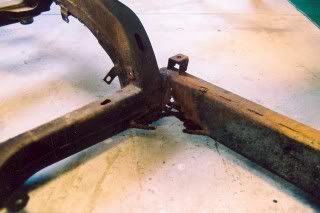
Your frame looks pretty normal... Here are the same areas on my frame, showing same damage as yours:

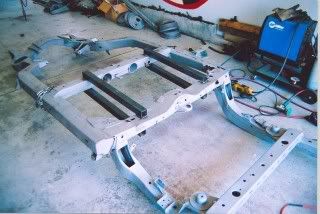
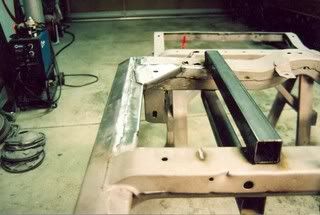
After sandblast, I welded in 4 square tubes to hold the frame straight during cutting. I only cut 1 side of the frame at a time and welded it back together complete before cutting the other side and doing the same thing:
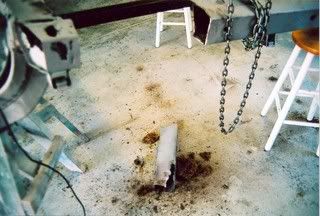
Here’s the rust section cut out:
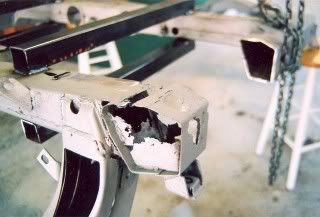
The sandblast really shows the extent of the rust damage – holes straight through the endcaps:
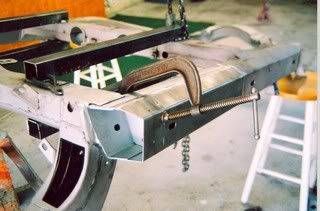
Here’s the repair section fit and clamped in place and ready to weld:
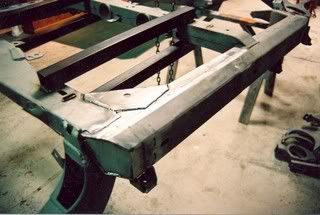
First side welded in complete with the stiffening bars still in place:
First side complete:
Welding done!
I used black DP90LF Epoxy with DAR9000 Urethane topcoat.
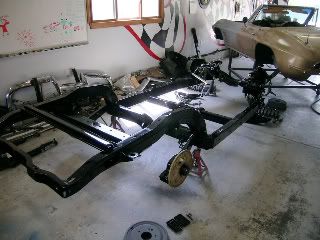
After sandblast, I welded in 4 square tubes to hold the frame straight during cutting. I only cut 1 side of the frame at a time and welded it back together complete before cutting the other side and doing the same thing:
Here’s the rust section cut out:
The sandblast really shows the extent of the rust damage – holes straight through the endcaps:
Here’s the repair section fit and clamped in place and ready to weld:
First side welded in complete with the stiffening bars still in place:
First side complete:
Welding done!
I used black DP90LF Epoxy with DAR9000 Urethane topcoat.
Last edited by lars; 06-09-2010 at 03:40 PM.
06-09-2010, 04:45 PM
#19
Hello Lars
Your right, Damage very similar. Do you have any close up photos of the crossmember rust repair. Did you buy repair pieces or fabricate your own crossmember metals patches. How critical was it in aligning the gusset pieces. Any advice on vendors for repair pieces and complete Chasis/suspension overhaul parts needed.
Your right, Damage very similar. Do you have any close up photos of the crossmember rust repair. Did you buy repair pieces or fabricate your own crossmember metals patches. How critical was it in aligning the gusset pieces. Any advice on vendors for repair pieces and complete Chasis/suspension overhaul parts needed.
06-09-2010, 05:15 PM
#20
Tech Contributor
Member Since: Aug 1999
Location: At my Bar drinking and wrenching in Lafayette Colorado
Posts: 13,652
Received 4,919 Likes
on
1,929 Posts
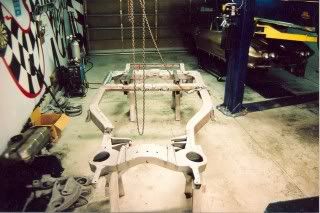
For the crossmember, I cut the rust out and fabricated my own patches that I welded in - it was pretty simple. The frame section repair pieces are the Paragon repair kits that come complete with the end caps and internal gussets - they fit well, and internal placement of the gussets is easy since they align with the slots placed for the welds. The triangular corner gussets are also the Paragon pieces - these gussets are not critical in their placement since they are only seat belt attach points.
You want to make sure you have a good high speed cutoff wheel, an angle grinder, good clamps and basic metalworking tools.
I bought the reproduction springs from Paragon and all other suspension pieces are stock replacement parts from NAPA, including the bushings, tie rods, ball joints, idler arm, etc. The NAPA parts are Sealed Power and TRW, so they look stock and fit well.
Last edited by lars; 06-09-2010 at 05:19 PM.