When you click on links to various merchants on this site and make a purchase, this can result in this site earning a commission. Affiliate programs and affiliations include, but are not limited to, the eBay Partner Network.
Hey Jack!....you still with us bud? Did you get snowed in last week in Maine?
I guess you're still waiting for the rear end to come in as well. Just checking.....:
Here I am , hard at work, air chisel , drinks, lots of drinks, cross member, and I figure heat with do the trick.
PT equipment and hot tub for me after, I am so tired of snow...it would not be so bad if I could be driving in it.....
Oh no, I just looked out the window and it is snowing again. I just finished......shoveling and snow-blowing......
What started as a stuck plug has changed into a Under body restoration.
First the plug would not come out, then the rear end blew, and before you know it project creep.
Well I finally got the plug out. I had to remove the welded muffler pipe and header pipe, and after many failed attempts, I used an Irwin stripped bolt remover socket. I heated the plug, I put penetrate on it, I froze it.
I had to remove the pipe to be able to hammer on the socket, once on, I could use the long ratchet to remove it. Out it came see photos.
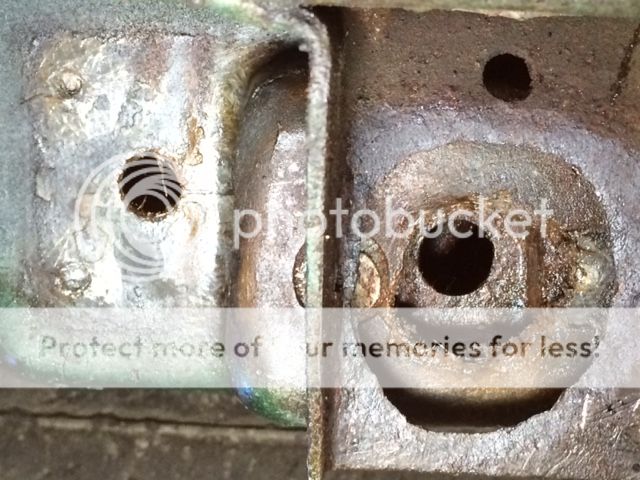
The #4 body mount bolt is the one that has me working hard.
Congrats on getting it out, but you were'nt using a torque wrench as a breaker bar, were you?
Here on the #4 mount looks like you might be able to get a cutting disc or maybe a sawzall blade in their to cut that bugger bolt out? It's been over 10 years but I think I finally just popped one side of the cage up and bent it up to extract the bolt I eventually snapped. Was no room to wiggle out the rest of the bolt and caged nut. Horrible 2 man, 3 day job IIRC.
Hi Paul,
Yes I do use it, it is reversible , it thinks it is tightening a bolt, when it is really taking it out!
I am still soaking it, it is the only one (2) other side , bolts that are rusted in. I may leave them and put rubber in the space
Hi Paul,
Yes I do use it, it is reversible , it thinks it is tightening a bolt, when it is really taking it out!
I am still soaking it, it is the only one (2) other side , bolts that are rusted in. I may leave them and put rubber in the space
Jack
I've been told/taught/read that using a torque wrench as a breaker throws the calibration off. In fact, I bought a new t.w. last year and it specifies this. It's a bit of teasing too, but mostly sharing since you may also want to use yours as a t.w. and trusting its calibration at some point is after all a safety issue.
On the bolts - You're this close and you'd really leave the bolts in?
Like to hear what others would say about that
I think the warming weather just has you itchin' to drive!
2020 Corvette of the Year Finalist (appearance mods)
C1 of Year Finalist (appearance mods) 2019
Can you not get a dremel or a dremel cable in there with a cutter to slice through the bolts Jack? Leaving them is a big no no to me. In for a penny, in for a pound.....
Can you not get a dremel or a dremel cable in there with a cutter to slice through the bolts Jack? Leaving them is a big no no to me. In for a penny, in for a pound.....
Hi,
I can cut the bolt , but I want to try to take it out first. I must be looking at the inner bushing sleve in the picture. If I can remove it, I will have a shot at turning the bolt. I can see the threads coming through the nut. I posted a picture in the other post
We left off with the bolts soaking and all the rubber peeled away on # 4 mount.
I went out this afternoon to soak the bolts again and while there I picked a bit at the bushing sleeve and bolt.
I decided to give the bolt a little bit of a turn. The result, the bolt came out with the nut . The nut capture cage is not rusted , but the frame mount and and mount reinforcement was rusted, one turn and out it popped.
I will let you all give me advice on what to do next. I do not weld !
2020 Corvette of the Year Finalist (appearance mods)
C1 of Year Finalist (appearance mods) 2019
Well that certainly sucks! Without taking it right apart, as in body off, I think if you made a square insert to fit into that bracket with a hole in it for the bolt you may get away with it as a bubba fix. I'd have a pro welder come over and weld it up solid before final assembly Jack. I had one come over years ago to weld in a new sombrero bracket onto the frame. and he make it stronger than stock on my instructions. Not expensive at all to get the pro welder truck to stop by.
Hi, thanks for The response, I will clean out area of rusted metal to see actual size of frame mount hole. I think I am going to replace the reinforcement piece as that hole is rusted out. My nut cage is in good shape. The new reinforcement piece will give me a normal landing for the bushing and spacers. I will deal with the frame with a washer / plate to anchor the lower bushing to frame mount.
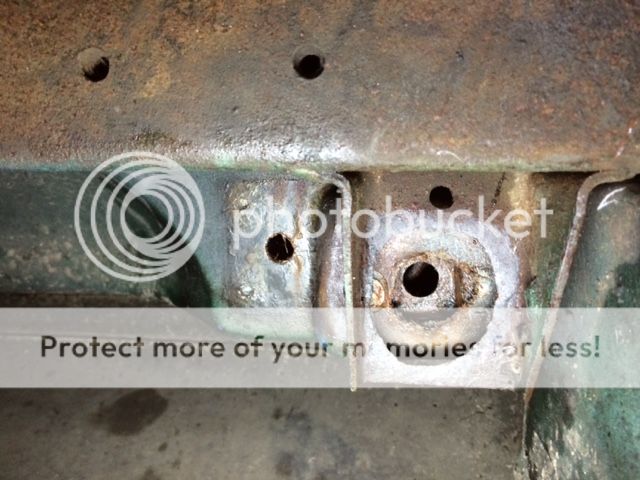
I went out to the garage , forgot to change my clothes, I was just going to spray a little more penetrate on the bolt holding the reinforcement plate.
Well I could not resist putting a ratchet to the bolt. I forgot to take the deck off and just reached in . It took a while to get the right extractor socket on the bolt . 9/16 to big , 1/2 to small. You must be able to hammer the socket on to really get them to work.
After 10 minutes, I put my big wrench to it. The one that I am always told not use. Well one click at a time the bolt came out. It took about 20 minutes to get it out, not hard , just one little click because of the tight space.
I was them able to remove the rusted mount reinforcement plate . Once removed , I will be able to put a small piece of fiberglass over the hole to hold the nut in the cage. The cage was not rusted . The new reinforcement plate for the # 4 mount will secure the bushing to the body.
I will then be able to fabricate a retaining plate for the # 4 frame mount which had a rusted out hole. The mount is good. I will get the plate welded to the mount once I have the car on the road.
I was very fortunate to not have a rusted out deck hinge area. All the rust was in the wheel well, except for the retainer bolt. It was only a few inches away from the rusted bushing.....
Here are the photos
Ratchet in place with a little hammer to hit socket on to bolt
View of position of extraction
The rusted plate # 4
49 year old bolt with very little rust
The old bushing and plate
# 4 mount after clean up
Close up of nut and cage - rivets still holding it in with very little rust
As you all know, this started out as a stuck plug on my tranny. Well the rear end blew and I got a chance to take the rear down to Gary Ramadei, in New Haven CT. He is one of the best re-builders in the country.
He did my steering box and now the rear.
Here are the photos of Gary at work doing a preliminary inspection of my rear. As you know, it was a mess after blowing up a few months ago.
The posi unit would not come out even with the side yokes removed. Gary will use a case spreader later in week to spread the side walls of case so that the bearings and posi can be removed. We tried with a pry bar but could only get it half way out.
I will have follow up photos as Gary sends them to me next week.
The end result will be a rear that will go from 3:70 back to the original 3:36 that the car was born with.
The arrival
Proper mounting needed to work on rear
Cover is off and that look is not good !
You expect me to fix this ?
Oh my ! what do we have here ?
Need a big wrench to turn the unit to get at snap rings
Got them off after a bit of work
Pry Bar did not work
Needed a big hammer to get the side yokes to come out, usually they side right out but the case is a little twinkled
Gary Ramadei has been working on my rear end. In my other post he is trying to remove the posi unit from the case but it will not come out because the case was spread and distorted by the explosion of the posi unit after 300,000 miles.
He took a torch to the posi to remove it , to see if the case would be usable to rebuild. It was not.....
Enjoy the pictures.....he will replace the whole rear end for me and then tune it.
***************
Hi Gang, as you know by the posts, my rear end let go. Gary Ramadei, who is one of the best re-builders you can find posted this information on my NCRS forum post. I thought I would re-post it because it will help explain what happened.
Ed Johnson , a NCRS member and friend has donated a 78 rear end to be used as base carrier and case for Gary to work on.
I hope this info helps some of the new and old members .
Hi Jack, Ed, Guys
Some information for you on Jack's diff issue and 63-79 vette diff's in general.
Jack had a 1968 complete differential in his '66 for the past 45 years. The '65-68's used the 1st design Eaton Posi case in place of the Dana posi used in 63-64. Keep in mind posi was optional until 1970 so there are some open differentials out there still. They were stronger then the Dana posi and I think equal to the Eaton 1st design.
The Eaton 1st design can be ID'd by looking at the case, they have what I call the "postage stamp" window in them. They were a parallel seam casting and this design was prone to cracking at the seam to large window opening. This casting are rough with sharp edges that are stress risers and with abuse or time the cracks form. Once a crack is started then it's a time bomb. Weld or drill repair does not work out well once a crack is there, the only solution is to replace the posi case with the better 2nd design Eaton case used from 1969 -1979 and still sold in the aftermarket today. The 2nd design can be ID'd again by the window, in this case a larger "tear-drop" window. These have a single staggered tooth seam and are much less prone to cracking but they still crack. When ever I build a diff I polish and tune the posi's to cut down on this from happening. I also have them cryo treated for HP applications.
In Jack's case the posi case developed a crack, who knows when, could have been in 1983 when Jack was burning rubber, could have been driving across the country, who knows. The only way you will know is to remove the diff and check it. However I have heard posi's getting ready to break by a clicking sound. I don't know if Jack heard that, I think he said he did when he came in last week but he would know better. My son heard it before his posi case broke in 1/2 on the street. Once the crack reached the cross shaft hole it was over. That is when I think it starts to click as play in the cross shaft and spider pinion gears increases. Then the gears will jam up and lock the posi and break. Jack's locked up and spun into the pinion "milling" it down in a second. Once the case broke it expanded inside the housing and really jammed up. It wrecked the RH axle and bearing and that is why I don't trust the housing. I have seen them break before but they usually shear and become loose parts inside the housing. Then when I open them up the parts fall out. Jack's was just the opposite. It was wedged so tight it was like having a case spreader on it and still wouldn't come out until I torched it out.
 02-08-2015, 05:17 PM


 :
: