C2 Top Install Video
 05-22-2011, 10:44 PM
#1
Pro

Thread Starter

HI guys,
I am replacing the soft top on my 65, the Al Knoch installation video has been highly recommended.
Do you have one to loan or rent to me??
Thank you,
George
I am replacing the soft top on my 65, the Al Knoch installation video has been highly recommended.
Do you have one to loan or rent to me??
Thank you,
George
 05-24-2011, 01:29 AM
#2
Pro


For my C1, I bought one from Knoch for like 80 bucks. When done viewing it, I sold it on this forum for 65. Quality is somewhat sloppy of the video. Looks like Knoch had originally done on VHS tape and then copied later to DVD's. But still presentable and gets the job done.
05-24-2011, 07:57 AM
#3
Drifting

For my C1, I bought one from Knoch for like 80 bucks. When done viewing it, I sold it on this forum for 65. Quality is somewhat sloppy of the video. Looks like Knoch had originally done on VHS tape and then copied later to DVD's. But still presentable and gets the job done.
 05-24-2011, 07:57 PM
#4
Pro
Thread Starter
Sxrxrnr,
HI, I am glad to hear you found it helpful. I have one on the way from another forum member who is loaning his to me, this forum is great!!
Thank you,
George
HI, I am glad to hear you found it helpful. I have one on the way from another forum member who is loaning his to me, this forum is great!!
Thank you,
George
For my C1, I bought one from Knoch for like 80 bucks. When done viewing it, I sold it on this forum for 65. Quality is somewhat sloppy of the video. Looks like Knoch had originally done on VHS tape and then copied later to DVD's. But still presentable and gets the job done.
07-03-2011, 01:47 PM
#5
Pro
Thread Starter
Hi Guys,
I have the top about 1/2 installed. This is an Al Knoch top and a forum member was kind enough to loan me his video to learn how to do the install.
I am ready to attach the front of the top to the header bow and have a question;
In the Al Knoch video the top is not glued to the header bow, merely pulled over and stapled. In the Rowley instructions available on-line the top is glued to the header bow and the header tack strip. What is your preference and experience?
Thank you,
George
 07-03-2011, 10:30 PM
#7
Pro
Thread Starter
Larry,
Hi, and thanks for the response. The deed is done, I followed AK instructions and the top is completely stapled to the front header bow tack strip. I think it came out very well, I will post a couple of photos tomorrow.
Now my dilema turns to the header bow windlace. The one I received in the kit has 1/2 foam, and seems to short to be able to tuck the ends in even if I take it apart and taper the foam on the ends. I guess I need to wait til Tueday and give AK a call.
Thank you again,
George
 07-04-2011, 07:24 AM
#9
Safety Car

George,
The important thing is to get the "windless" centered with equal distance on both sides. If it is too long you will run out of tack strip to staple it. Sometimes you can use the same hole where the weatherstrip ends are screwed down to help hold it in place. The diameter of the windless should be 1/2 over the edge of the header so it is squeezed when the top is latched. Stapel one end then see how centered it is. When it is centered lift up the flap and run the rest of the staples under the it so no staples are showing. Then tuck the flap under the weatherstrip.
The important thing is to get the "windless" centered with equal distance on both sides. If it is too long you will run out of tack strip to staple it. Sometimes you can use the same hole where the weatherstrip ends are screwed down to help hold it in place. The diameter of the windless should be 1/2 over the edge of the header so it is squeezed when the top is latched. Stapel one end then see how centered it is. When it is centered lift up the flap and run the rest of the staples under the it so no staples are showing. Then tuck the flap under the weatherstrip.
07-04-2011, 09:43 AM
#10
Pro
Thread Starter
Woodsdesign,
Thank you for your response. Did you use the windlace that came with the AK top kit? Are you saying to open up the material flap that is sewn around the foam seal, and only staple through one layer of fabric, if so that sounds like it would leave a nice clean install?
It appears I still have an issue with length, as I don't think the windlace I have is long enough to tuck the ends in as shown in many photos as the correct way.
Any additional information is appreciated. This morning I will finish the side flaps ahd then the only remaining task will be the windlace.
Thank you,
George
07-04-2011, 05:54 PM
#11
Safety Car
I always use the windlace that comes with the AK kit. They used to supply one with one end open so you could adjust the length. I don't have any problems with the one in the kit. I think you will find that it is fine once you start installing it. Yes, I first put one staple in each end to get it aligned then lift the flap and finish stapeling under it. then tuck it under the W/S so no staples are visiable. A nice clean install is always the goal.
 07-04-2011, 10:11 PM
#14
Pro
Thread Starter
Woodsdesign,
Thank you for the clarification. I did send you a PM, as I can't see where this windlace is long enough to be able to tuck the ends in as shown in this photo I borrowed from a previous post.
http://www.ncrs.org/forums/showthrea...dlace&uid=1588
Thank you,
George
Thank you for the clarification. I did send you a PM, as I can't see where this windlace is long enough to be able to tuck the ends in as shown in this photo I borrowed from a previous post.
http://www.ncrs.org/forums/showthrea...dlace&uid=1588
Thank you,
George
07-06-2011, 11:05 PM
#15
Pro
Thread Starter
Well I am making progress on this top install. Everything done now except the front bow windlace, and then the dreaded heat gun to shrink out the wrinkles.
I have some pretty big wrinkles on the driver side behind the window as the photo's will show.
Thanks for all the assistance along the way,
George
[IMG]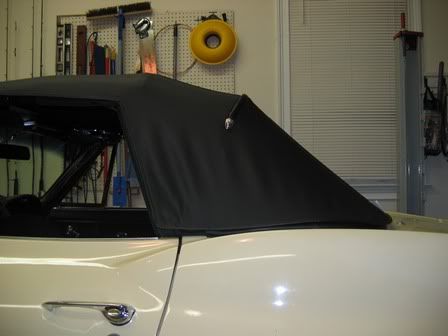 [/IMG]
[IMG]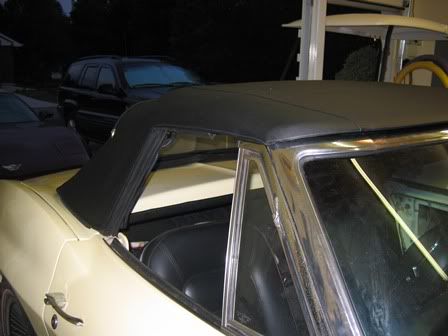 [/IMG]
[IMG]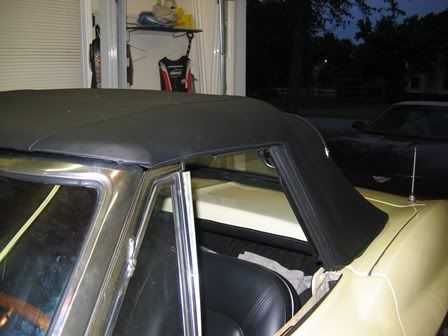 [/IMG]
I have some pretty big wrinkles on the driver side behind the window as the photo's will show.
Thanks for all the assistance along the way,
George
[IMG]
[/IMG][IMG]
[/IMG][IMG]
[/IMG]
Last edited by Aflyer; 07-06-2011 at 11:08 PM. Reason: Add an image
07-07-2011, 06:48 PM
#16
Safety Car
George,
To get the wrinkles out behind the drivers window you will have to remove the weatherstrip, use a heat gun to loosen the glue and undo the flap (behind the w/s). re-apply the glue, Then heat the back panel and pull the top material over the side window rail until the wrinkles come out. then re attach the w/s. One trick is to soak the top from the inside where the wrinkles are. I usually use a spray bottle for this. Soaking the top from the inside will shrink it slightly to remove or reduce the wrinkles. Use a ready heater to "blast" the rear window. This will pull all the wrinkles out of the plastic rear window. The idea is to get the plastic heated all at the same time. This is why it won't work with a regular heat gun. I also use this on the top material. This will relieve the stress, relax the top material and help the wrinkles go away. I use a 35,000 BTU propane heater. A Kerosene ready heater will also work fine. Obviously, keep it moving. I use a circular motion and work form one side to the other.
To get the wrinkles out behind the drivers window you will have to remove the weatherstrip, use a heat gun to loosen the glue and undo the flap (behind the w/s). re-apply the glue, Then heat the back panel and pull the top material over the side window rail until the wrinkles come out. then re attach the w/s. One trick is to soak the top from the inside where the wrinkles are. I usually use a spray bottle for this. Soaking the top from the inside will shrink it slightly to remove or reduce the wrinkles. Use a ready heater to "blast" the rear window. This will pull all the wrinkles out of the plastic rear window. The idea is to get the plastic heated all at the same time. This is why it won't work with a regular heat gun. I also use this on the top material. This will relieve the stress, relax the top material and help the wrinkles go away. I use a 35,000 BTU propane heater. A Kerosene ready heater will also work fine. Obviously, keep it moving. I use a circular motion and work form one side to the other.

 07-07-2011, 09:08 PM
#18
Pro
Thread Starter
GreaseMonkey,
Thanks for the compliment. I will be much happier when I work out the wrinkles and get the new Windlace I ordered from AK installed.
Larry,
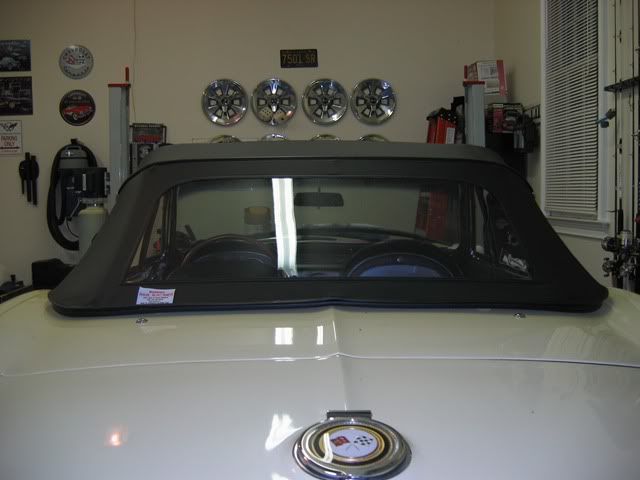
Hi, the back window is perfect, no wrinkles. And thanks for the water spray tip for the area behind the side window.
George
Thanks for the compliment. I will be much happier when I work out the wrinkles and get the new Windlace I ordered from AK installed.
Larry,
Hi, the back window is perfect, no wrinkles. And thanks for the water spray tip for the area behind the side window.
George