When you click on links to various merchants on this site and make a purchase, this can result in this site earning a commission. Affiliate programs and affiliations include, but are not limited to, the eBay Partner Network.
Mudbone, looks like Christmas came early. Nice collection.
The long rods will help your rod angle with zero negative effect.
What compression and heads did you decide on?
Mark
Man, did it ever. However, given all that Santa brought me I'm afraid it won't come back for a few years.
Ya' know Mark, I'm kind of conflicted on those rods. I know the extra length will be a good thing but I'm afraid there will be a weight penalty and that extra weight won't help the engine's ability to rev. I'm not too worried about though. I doubt I'll ever be able to detect any ill effects.
The engine will be 10.8:1 and the heads are Promaxx 64cc chambers with 185cc runners. I can't wait to make some tire smoke.
I'll preface this post by saying I don't know jack crap about transmissions so I'm going to need some help.
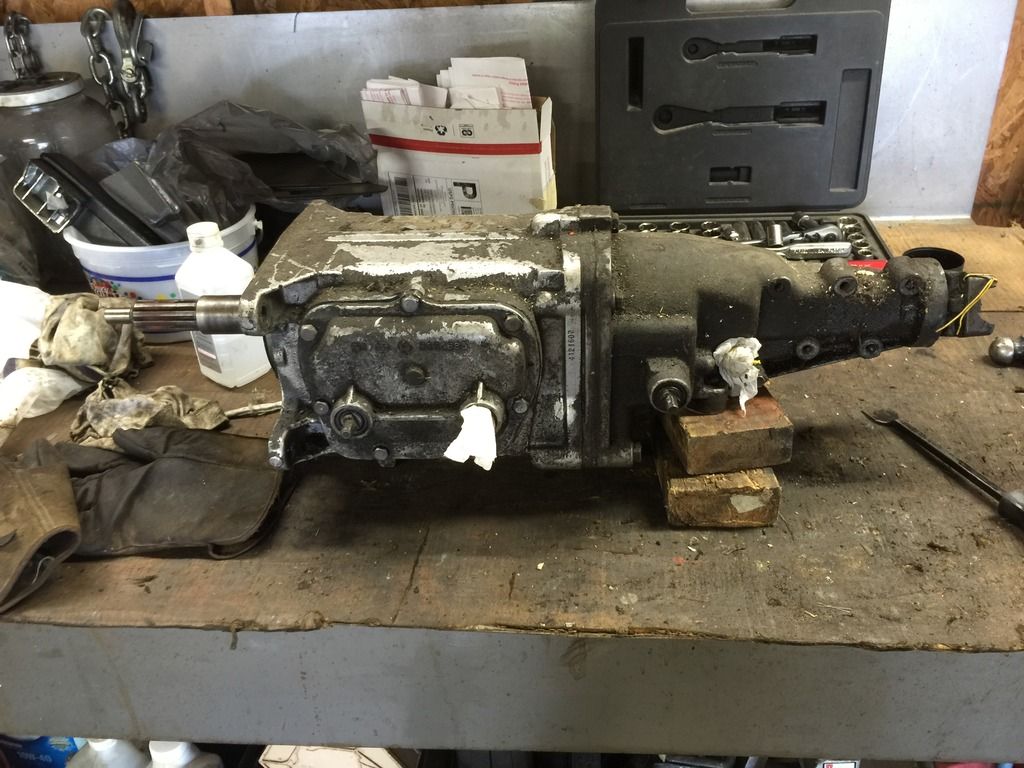
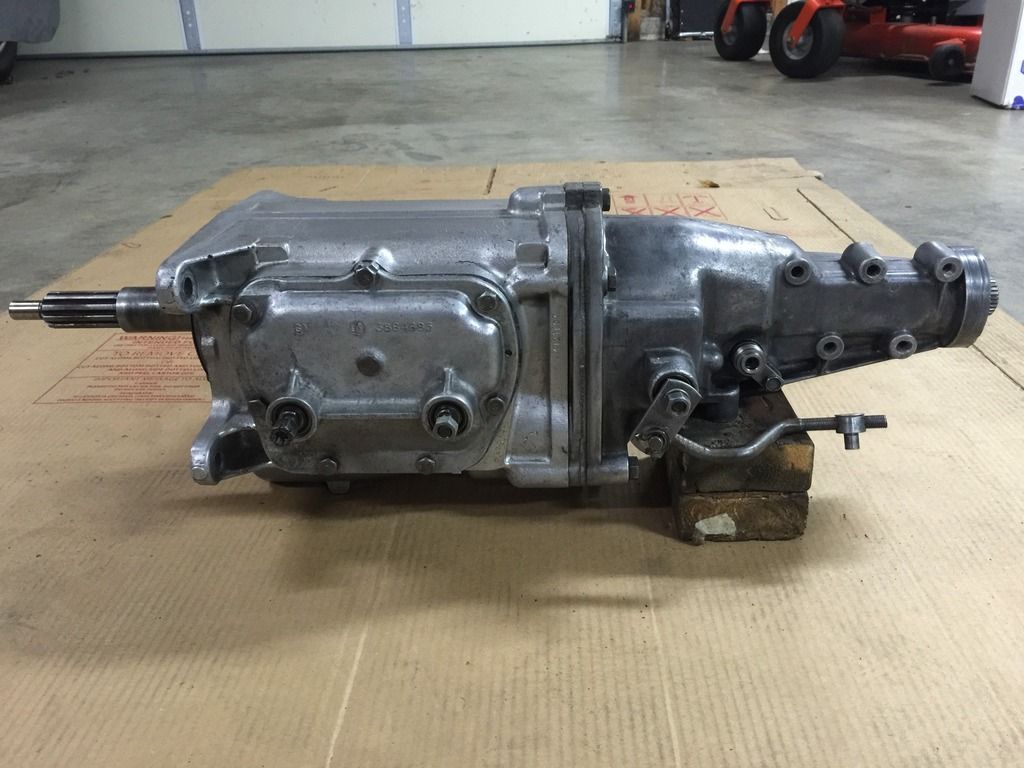
A few days I began cleaning up the transmission and I wanted to take the side cover off and give the gears and syncros an inspection before putting the transmission back in service. As I was removing the side cover the rear fork or horseshoe assembly or whatever it is pulled out of the side cover. I obviously would like to get fork re-installed in it's previous position and I know the small "poll" needs to go back in the notches on the lever that's mounted to the cover but I have no idea about which one.
Below is a picture:
See the three notches in the lever? The "poll" on the horseshoe shaped object has to go in one of those and I'm wondering which one. Is there a relationship between the front horseshoe and the rear horseshoe meaning if the front horseshoe is in one of the slots then the rear horseshoe has to be in another specific slots?
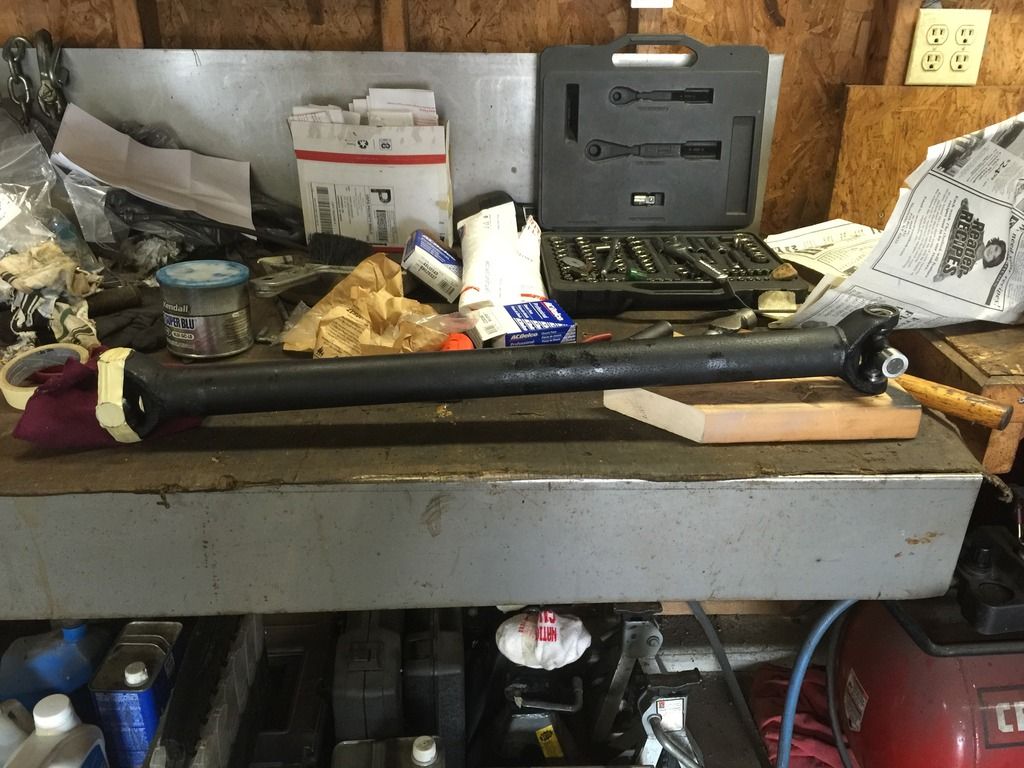
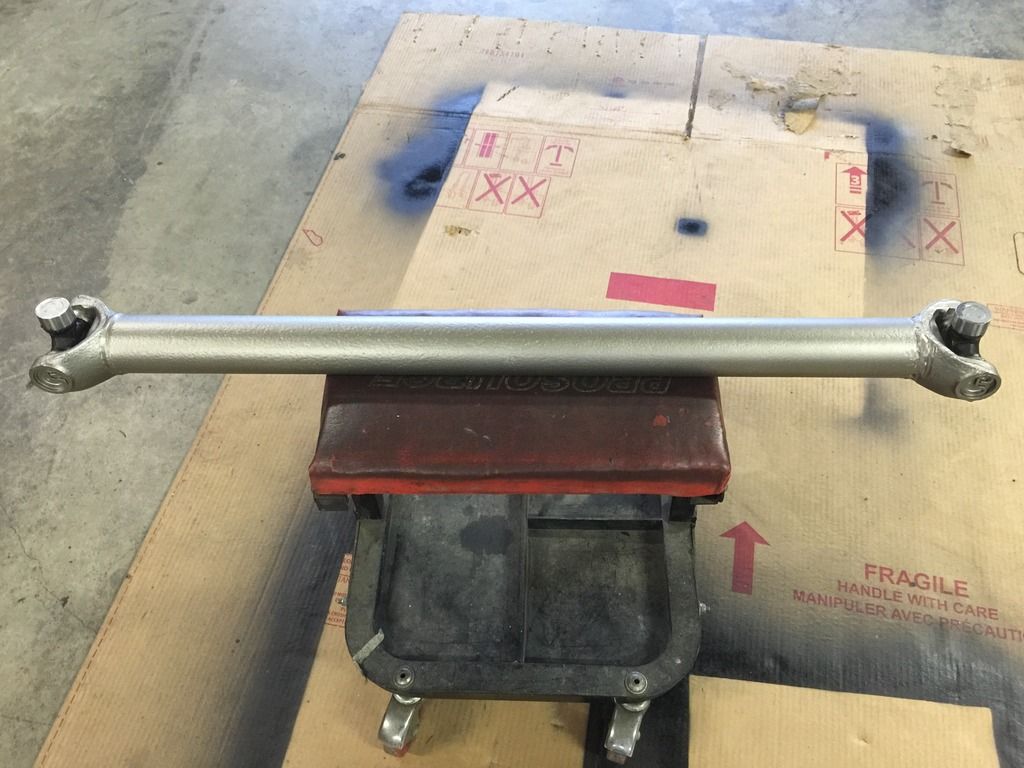
A couple of weeks ago I removed the u-joints and mercy what a struggle. I thought I was going to have to remove the u-joints with some dynamite. I figured the new u-joints would go in about as hard as the old ones came out but mercifully I was wrong. The new ones installed as easily as could be expected.
I'd be willing to guess the driveshaft isn't close to the proper color but I'm not too worried.
The world's dirtiest transmission:
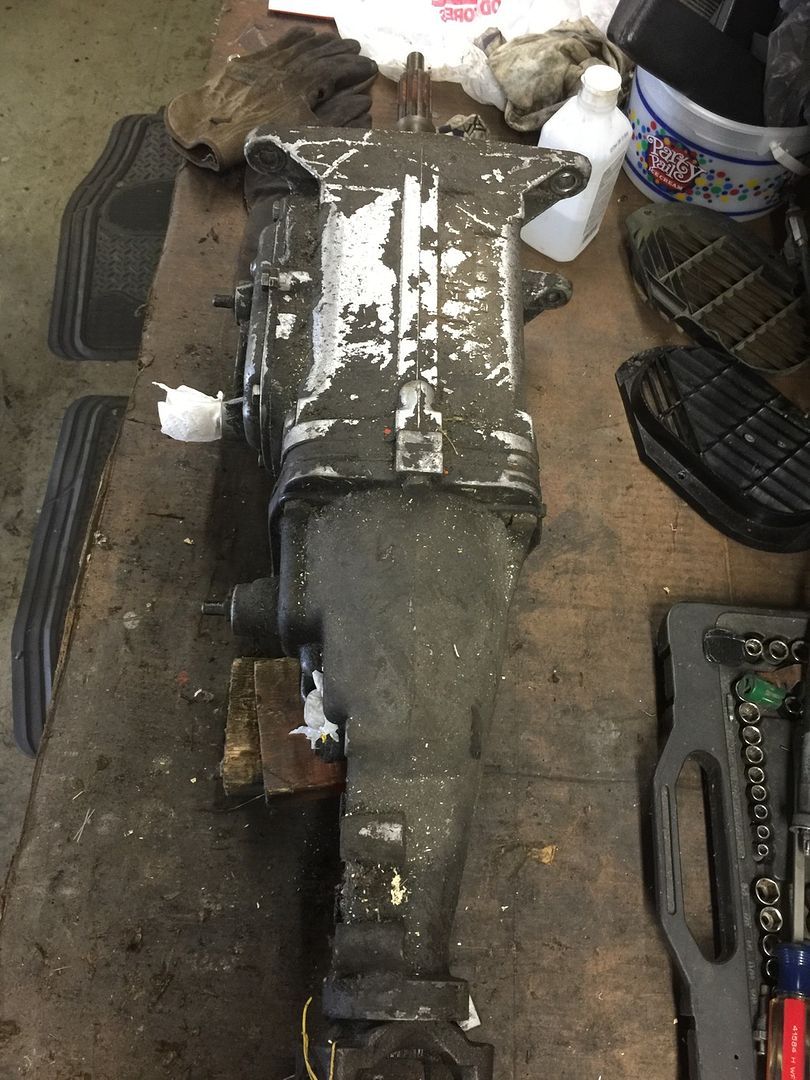
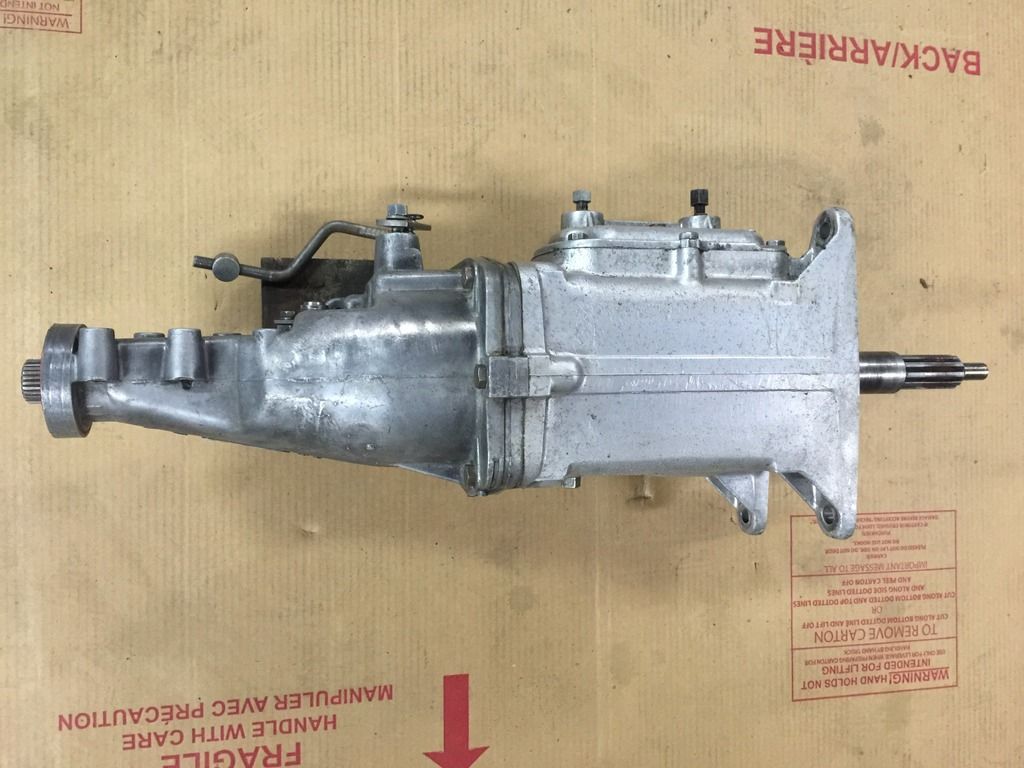
The world's dirtiest transmission after hours of elbow grease and lots of carb cleaner:
After deciding things looked good enough on the inside of the trans I replaced the front gasket, side cover gasket, shifter seals, speedometer O-ring, and rear seal. The rear bushing felt fine so I chose not to replace it. I'm not exactly sure how long I'll use this transmission anyway. If I wind up driving this thing very much I'll definitely be wanting a 5-speed.
Can someone tell me what size the head gasket bore should be? Obviously this is for my 327. The engine bore size is 0.030" over but I don't know how to equate that with the bore sizes listed on the Summit web-site. http://www.summitracing.com/search/p...rder=Ascending
I'm going to double check but I believe the compressed thickness I'm looking for is 0.041". If anyone believes there's a more appropriate head gasket other than a Fel-Pro I'm all ears.
Mudbone, any of the 4 inch bore gaskets will work from std bore to .060 oversize.
Thickness varies but .039 is most popular. What compression and what metal are your heads made of? Aluminum or cast iron?
I'm in long meetings all week but will help if I can.
Mark
Mudbone, any of the 4 inch bore gaskets will work from std bore to .060 oversize.
Thickness varies but .039 is most popular. What compression and what metal are your heads made of? Aluminum or cast iron?
I'm in long meetings all week but will help if I can.
Mark
The compression ratio was calculated as 10.8:1 and that was using a head gasket with a compressed thickness of 0.041". The heads are aluminum.
The best but most expensive is the MLS head gaskets. At your compression ratio detonation could happen and MLS will live where stock gaskets can fail. I think I would at least run a performance head gasket. If that is too expensive the 501 series is far better than a stock gasket.
I don't have access to catalogs till Sunday if you need part numbers.
Sorry on a work trip
Last edited by Westlotorn; 02-10-2016 at 11:00 PM.
The best but most expensive is the MLS head gaskets. At your compression ratio detonation could happen and MLS will live where stock gaskets can fail. I think I would at least run a performance head gasket. If that is too expensive the 501 series is far better than a stock gasket.
I don't have access to catalogs till Sunday if you need part numbers.
Sorry on a work trip
Don't sweat the head gasket. I got something worked out with Chris.
A few weeks ago my head engine builder gearbanger and I finished assembling my 327. Below are some of the assembly pics.
Zee patient:
The build:
The pistons required four sprio locks per piston. That's a total of 32 locks. After intently watching sprio lock installation videos I can proudly say the final installation score was mb64: 0 and gearbanger: 32. I've never felt so useless in all of my life.
Degreeing the cam went like a breeze after I decided to purchase a proper timing set.
Fitting the scraper took much more time than I anticipated.
I had to modify the crap out of the windage tray to get it to work with the L76 oil pan:
What you can't likely see is the number of louvers that had to be trimmed to clear the crank. Fitting the tray was a game of getting it as close to the crank as I could so it would clear the pan. Doing so required me to do a lot of trimming.
Some of you might find this pic a little disturbing:
A few weeks ago a bit of hullabaloo was raised about valve train geometry and the tools required to get proper valve train geometry established. Below are my super exotic unobtainium valve train tools. First are my checking springs:
I know I've spent an unheard of amount on them. Maybe even upwards of two dollars.
Next is my adjustable pushrod. Making this so very rare tool involved cutting a used sbc pushrod and threading one end. After installing a section of all thread you then install two nuts. One nut is basically a jack that lifts up the other end of the pushrod thus also lifting the rocker arm. The second nut is just a jam nut used when locking everything down so as to measure the pushrod so the proper length an be ascertained.
I've never seen an adjustable pushrod and I'm certainly no expert. Why adjustable?
Whenever you switch over from a flat tappet camshaft and stamped steel rockers to a roller camshaft, hydraulic roller lifters that are much taller than stock and roller rocker arms the pushrod length will change. The adjustable pushrod is made longer or shorter as needed until proper rocker arm geometry is established. There's at least one video on Youtube that illustrates proper rocker arm geometry and what measurements you make to get there.
Whenever you switch over from a flat tappet camshaft and stamped steel rockers to a roller camshaft, hydraulic roller lifters that are much taller than stock and roller rocker arms the pushrod length will change. The adjustable pushrod is made longer or shorter as needed until proper rocker arm geometry is established. There's at least one video on Youtube that illustrates properrocker arm geometry and what measurements you make to get there.
Pretty cool. Thanks for sharing. Engine looks awesome!! Love the orange!
Engine is looking good Mudbone but you forgot to fill the holes on the front of the heads and add the double humps!
Funny you should mention the accessory holes in the cylinder heads. I myself was trying to come up with a simple and cost effective way of covering them up. I need a flat plastic piece that has camel humps on the front and those friction fasteners on the back. I hate the accessory holes but I also don't like the way stock heads perform.
I would love to dyno the engine but dyno time ain't cheap ya' know.
 11-30-2015, 03:44 PM


 .
.