Trialer hitch for Mid Year
 03-26-2012, 08:51 AM
#21
Melting Slicks


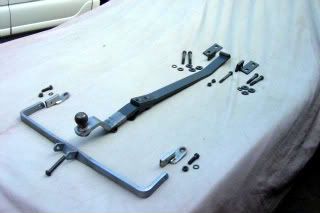
Great idea! It should have been done that way in the first place. My two pieces were bolted on top of the spring plate. I guess you can eliminate the original plate with this design.
 03-26-2012, 10:25 AM
#22
Le Mans Master


That's similar to the method I was trying to propose to properly locate the holes in the plates bolted to the differential. I realize you may want all of the assembly chromed . . . . on the originals only the "U" bracket and its connectors and the rear drawbar that the hitch ball bolts into were chromed. The other pieces are not normally visible were painted black!
I'll still try and get you a picture of the two piece connectors at the differential on my car. They replace the original flat plate and are not used in conjunction with the original plate.
Looks like you're on the right track!!!
FWIW . . .
Ron
I'll still try and get you a picture of the two piece connectors at the differential on my car. They replace the original flat plate and are not used in conjunction with the original plate.
Looks like you're on the right track!!!
FWIW . . .
Ron

 03-26-2012, 10:33 AM
#24
Le Mans Master
May be a little difficult to see in the photo, but that's the way the pull tabs at the differential on my car, and on the previous Valley hitches for C2's were made as well.
 03-27-2012, 02:27 PM
#26
Intermediate


Member Since: May 2009
Location: Kinston North Carolina
Posts: 40
Received 0 Likes
on
0 Posts

Or you could go this route:
See the last four pictures here:
http://community.webshots.com/album/582480239XLJMUY
Not an easy task, but worth the effort. With a little fabrication skills, welding skills and a lot of patience you can do it.
I welded a 1-1/4" "receiver" (2" long) to a 10" piece of 2"X2"X1/4" angle and bolted the piece of angle to the rear frame cross member. This length of angle fits between two dimples in the cross member. This strengthened the thin cross member.
Then I cut two pieces of 1" square tubing (I think it was 1/8" wall) to go from the top flat portion of the 2" angle over to the chassis on both sides. I bolted them through the top flat portion of the angle and through the frame cross member using 1/2" bolts.
Then on the chassis where it is open on the inside I welded two tabs on each chassis end to bolt the other ends of the 1" Sq tunbing.
Pretty simple set-up, but a very "tight" place to work. After mocking it up I removed the exhaust and spare tire compartment so I could get to it better for the final welding and install.
By the way, I use it to pull a small light weight luggage trailer on road trips. I wouldn't recommend towing a race car or car trailer, lol.
Last edited by LynnJ; 03-27-2012 at 03:02 PM.
03-29-2012, 05:17 PM
#27
CF Senior Fox Bat

Thread Starter
Or you could go this route:
See the last four pictures here:
http://community.webshots.com/album/582480239XLJMUY
Not an easy task, but worth the effort. With a little fabrication skills, welding skills and a lot of patience you can do it.
I welded a 1-1/4" "receiver" (2" long) to a 10" piece of 2"X2"X1/4" angle and bolted the piece of angle to the rear frame cross member. This length of angle fits between two dimples in the cross member. This strengthened the thin cross member.
Then I cut two pieces of 1" square tubing (I think it was 1/8" wall) to go from the top flat portion of the 2" angle over to the chassis on both sides. I bolted them through the top flat portion of the angle and through the frame cross member using 1/2" bolts.
Then on the chassis where it is open on the inside I welded two tabs on each chassis end to bolt the other ends of the 1" Sq tunbing.
Pretty simple set-up, but a very "tight" place to work. After mocking it up I removed the exhaust and spare tire compartment so I could get to it better for the final welding and install.
By the way, I use it to pull a small light weight luggage trailer on road trips. I wouldn't recommend towing a race car or car trailer, lol.
See the last four pictures here:
http://community.webshots.com/album/582480239XLJMUY
Not an easy task, but worth the effort. With a little fabrication skills, welding skills and a lot of patience you can do it.
I welded a 1-1/4" "receiver" (2" long) to a 10" piece of 2"X2"X1/4" angle and bolted the piece of angle to the rear frame cross member. This length of angle fits between two dimples in the cross member. This strengthened the thin cross member.
Then I cut two pieces of 1" square tubing (I think it was 1/8" wall) to go from the top flat portion of the 2" angle over to the chassis on both sides. I bolted them through the top flat portion of the angle and through the frame cross member using 1/2" bolts.
Then on the chassis where it is open on the inside I welded two tabs on each chassis end to bolt the other ends of the 1" Sq tunbing.
Pretty simple set-up, but a very "tight" place to work. After mocking it up I removed the exhaust and spare tire compartment so I could get to it better for the final welding and install.
By the way, I use it to pull a small light weight luggage trailer on road trips. I wouldn't recommend towing a race car or car trailer, lol.
03-29-2012, 05:34 PM
#28
CF Senior Fox Bat
Thread Starter
So it looks like I am good to go
 02-20-2017, 11:28 PM
#29
Le Mans Master

I hope to pull our boat with it some day, that would be fun.
 02-21-2017, 01:00 AM
#30
Race Director


Member Since: Nov 2003
Location: Cottonwood AZ
Posts: 10,698
Received 3,048 Likes
on
1,934 Posts
C1 of Year Finalist (performance mods) 2019

I could not see the pictures in post #26 but it sounds like what I did years ago on a mid year. I remove the rear valance and had a strong unit built/attached to the frame for a receiver tube, cut a square hole in the valance behind the license plate and attached a spring type plate bracket off of an old car that had a gas fill behind the plate. That way you don't see the ugly hitch all of the time. The ball mount was held in with a threaded bolt that came in through the bottom.
02-23-2017, 08:20 PM
#31

Steve
The following users liked this post:
North of 40 (02-23-2017)
02-24-2017, 08:57 PM
#32
Le Mans Master
2,000 Pounds, wow that is not much, I have seen several pictures of guys pulling trailers with race cars, that must be at least 5,000 pounds? Same hitch or did they have improved models? My car originally had one of the bumper hitches with no attachment to the frame or differential. The Valley has to be better than that for sure.
Have a great weekend.
Mark
Have a great weekend.
Mark
02-25-2017, 02:17 PM
#33
2,000 Pounds, wow that is not much, I have seen several pictures of guys pulling trailers with race cars, that must be at least 5,000 pounds? Same hitch or did they have improved models? My car originally had one of the bumper hitches with no attachment to the frame or differential. The Valley has to be better than that for sure.
Have a great weekend.
Mark
Have a great weekend.
Mark
I am new at posting photos so hopefully below are a couple of them showing our ride, one near Banff Canada and the at Ely, MN.


The following users liked this post:
Westlotorn (02-26-2017)