1963 LSx Project
 05-20-2012, 10:07 AM
#1
Racer

Thread Starter
Hello Everyone,
I've posted a few times before (giving updates and posting some pictures) and I know I should start a thread that takes my project from day one until today, but I'm waiting until it's a little closer to done before starting a thread and having HUGE delays..
Should be going to paint soon, just finishing up some minor details...

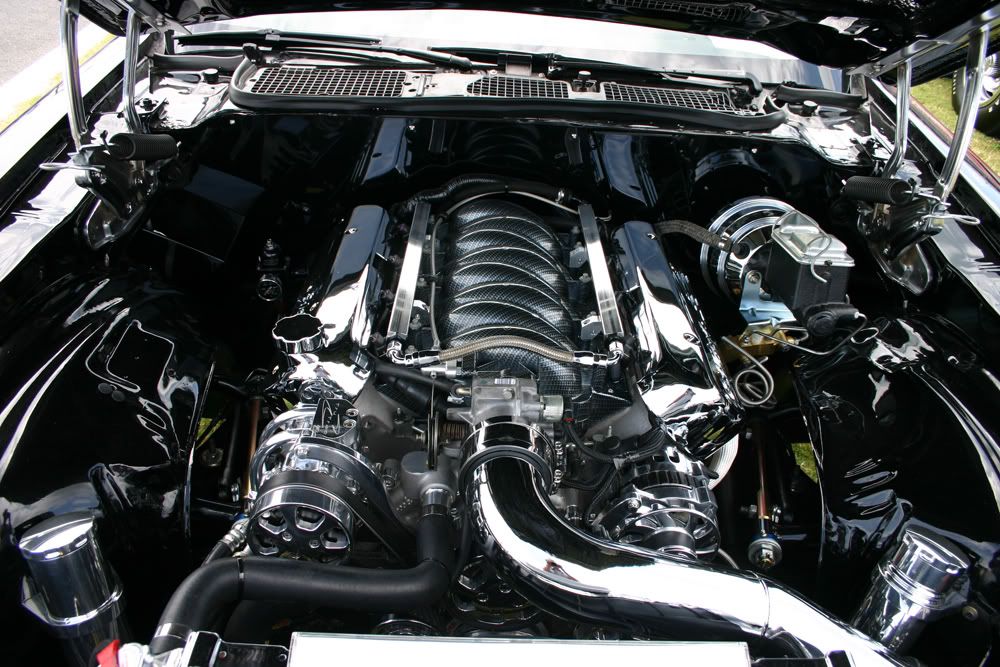
I finished up my coil relocation brackets and really love them - the plug wires are just about completely hidden from a casual above look - and that's pretty good for 10.4mm wires.. I ended up getting some extra sets of the brackets made up, as it was as much for one pair as it was for six, if anyone is interested in a pair, shoot me a PM...


During and after paint I'll start posting more pictures again -- Still planning out the interior, but I'm wanting to go with cut down C5 seats in black leather with a Harley cream stitch/accent color and I'll use that black leather and Harley cream accent through-out the interior, but I haven't decided how much cream and how much black I'll use where.. Where did people get their dash pads covered in leather with the accent stitching that I've seen? Any highly recomended places??
Thanks,
Rich
I've posted a few times before (giving updates and posting some pictures) and I know I should start a thread that takes my project from day one until today, but I'm waiting until it's a little closer to done before starting a thread and having HUGE delays..
Should be going to paint soon, just finishing up some minor details...
I finished up my coil relocation brackets and really love them - the plug wires are just about completely hidden from a casual above look - and that's pretty good for 10.4mm wires.. I ended up getting some extra sets of the brackets made up, as it was as much for one pair as it was for six, if anyone is interested in a pair, shoot me a PM...
During and after paint I'll start posting more pictures again -- Still planning out the interior, but I'm wanting to go with cut down C5 seats in black leather with a Harley cream stitch/accent color and I'll use that black leather and Harley cream accent through-out the interior, but I haven't decided how much cream and how much black I'll use where.. Where did people get their dash pads covered in leather with the accent stitching that I've seen? Any highly recomended places??
Thanks,
Rich


 05-20-2012, 04:42 PM
#3

Hey Rich- Looking great! I got my dash pads from Al Knoch, but they were the standard black dash pads. The cream and black interior is going to look awesome! I should get my car back this week and I'll post some more pics on my 63. Keep the pics coming! 
05-20-2012, 06:00 PM
#4
Drifting

Rich,
It's looking really good!! Your coil brackets came out nice and keep the engine looking clean. Did you end up having to build your headers or is someone now producing a set that will fit?? Keep the pictures coming.
R/
Jeff
It's looking really good!!
Your coil brackets came out nice and keep the engine looking clean. Did you end up having to build your headers or is someone now producing a set that will fit?? Keep the pictures coming.R/
Jeff
05-20-2012, 06:28 PM
#6
Burning Brakes

Awesome!
What frame and suspension did you go with on this RestoRod project?
You are ahead of me with my 1964 Convertible. I plan to drive it through the summer until my Street Shop chassis is complete (with LS3 + TKO 600 5 speed).
I - with the help of other forum members - have been compiling the hundreds of possible parts/service suppliers that support the RestoRod movement on VETTERODDER.COM
Take a look as it may help you find what you are looking for as you complete your VetteRod.
Good luck. I hope to also be postin pictures as I begin my project this coming fall.
VETTERODDER.COM
05-20-2012, 07:45 PM
#7
Racer
Thread Starter
Thanks Everyone...
Vettsplit 63 - I'll check out Al Knoch when I get closer to the interior, thanks!
Hi Rob - Thanks as well, love to see more pictures.. Have you gotten some miles on it yet? That thing should be a blast, with your engine! I took the GTO out this morning, with 100 less horsepower and probably 500 more pounds (then my Vette) that still gives me a giggle when playing around - it's such a torque monster!
Hi Jeff - Thanks, I completely re-wired a 572 (in a '55 Chevy) for a friend a couple years back and that started my desire to try to wire engines where people wonder when you're going to finish the job so it will run (and then look in amazement when you turn the key) - my goal for the Vette is to have all engine wiring just disappear into the surroundings, but this is my first LSx motor, so we'll see how it goes - your motor was a benchmark, it's surgically clean!! I had the headers made at Stainless Works, to fit my needs exactly. Crazy dollars, but I couldn't be happier and they allowed me to tuck the entire exhaust up very nicely! I moved my body up (from no shims at all) .600" to allow better fitment of the TKO-600 in the tunnel with perfect U-joint angles - as luck would have it, that small lift allowed me to do things with the exhaust that wouldn't have otherwise been possible (mine is an early '63 with the very deep buckets under the seats)... I've seen cars with stacks of shims, so I'm not completely sure how far up from "normal" I really am, I'm guessing maybe 3/8's or so.. My header's primary pipes should be on file digitally, so I'm currently checking with the concept of if they'll sell me (or others) the pieces in kit form...
SLWRNU - Thanks, no AC this time - if I lived elsewhere that might be different, but (for the most part) I don't find myself missing it on the play toys arond here...
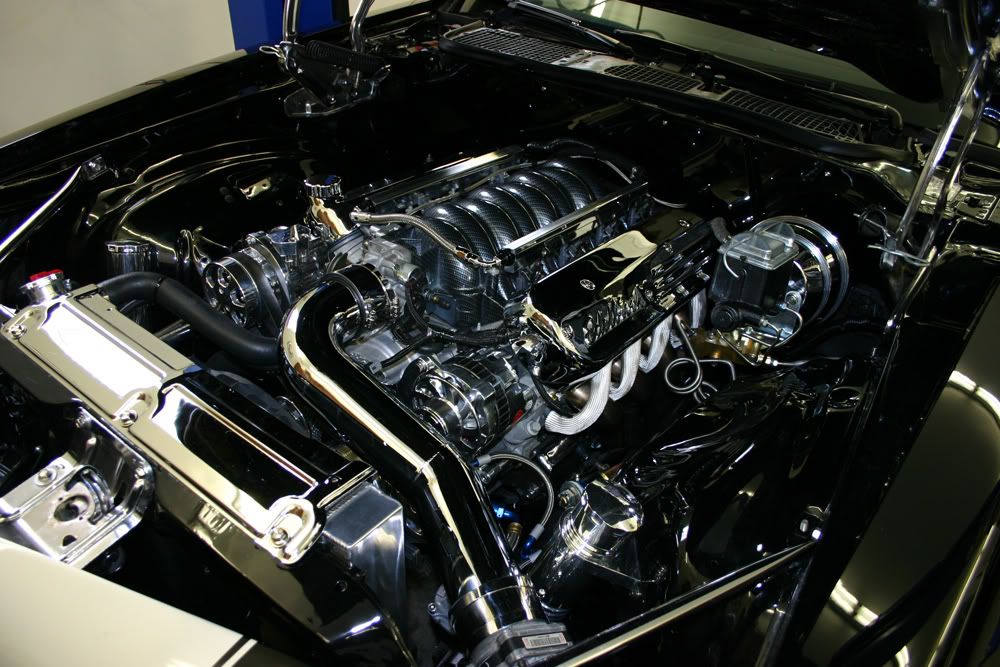
Dan -I checked out your site a few days back, should be very helpful for many poeple, thanks for taking the time to do that.. My chassis is a Street Shop as well, although I made some modifications, the largest being the extra exhaust doughnuts in the rear crossover.. I did my own fuel line and main brake line as well and some other changes.. The engine is an LS3 crate motor, that I pulled apart and swapped in a Texas Speed cam and ported heads. Using the TKO-600, like you, as well... Here are a few more pictures of what the frame modifications allowed me to do for full 3" exhaust - the lowest section is under the differential and, there, the pipes will clear a pop can standing upright.. Obviously I haven't completed the rear most part of the system yet... If I can help you out with anything, Dan (or anyone), just let me know...
I really need to find the time to put together a web-site build diary or something sometime - I'm at around 3000 pictures now...
Thanks,
Rich


Vettsplit 63 - I'll check out Al Knoch when I get closer to the interior, thanks!
Hi Rob - Thanks as well, love to see more pictures.. Have you gotten some miles on it yet? That thing should be a blast, with your engine! I took the GTO out this morning, with 100 less horsepower and probably 500 more pounds (then my Vette) that still gives me a giggle when playing around - it's such a torque monster!
Hi Jeff - Thanks, I completely re-wired a 572 (in a '55 Chevy) for a friend a couple years back and that started my desire to try to wire engines where people wonder when you're going to finish the job so it will run (and then look in amazement when you turn the key) - my goal for the Vette is to have all engine wiring just disappear into the surroundings, but this is my first LSx motor, so we'll see how it goes - your motor was a benchmark, it's surgically clean!! I had the headers made at Stainless Works, to fit my needs exactly. Crazy dollars, but I couldn't be happier and they allowed me to tuck the entire exhaust up very nicely! I moved my body up (from no shims at all) .600" to allow better fitment of the TKO-600 in the tunnel with perfect U-joint angles - as luck would have it, that small lift allowed me to do things with the exhaust that wouldn't have otherwise been possible (mine is an early '63 with the very deep buckets under the seats)... I've seen cars with stacks of shims, so I'm not completely sure how far up from "normal" I really am, I'm guessing maybe 3/8's or so.. My header's primary pipes should be on file digitally, so I'm currently checking with the concept of if they'll sell me (or others) the pieces in kit form...
SLWRNU - Thanks, no AC this time - if I lived elsewhere that might be different, but (for the most part) I don't find myself missing it on the play toys arond here...
Dan -I checked out your site a few days back, should be very helpful for many poeple, thanks for taking the time to do that.. My chassis is a Street Shop as well, although I made some modifications, the largest being the extra exhaust doughnuts in the rear crossover.. I did my own fuel line and main brake line as well and some other changes.. The engine is an LS3 crate motor, that I pulled apart and swapped in a Texas Speed cam and ported heads. Using the TKO-600, like you, as well... Here are a few more pictures of what the frame modifications allowed me to do for full 3" exhaust - the lowest section is under the differential and, there, the pipes will clear a pop can standing upright.. Obviously I haven't completed the rear most part of the system yet... If I can help you out with anything, Dan (or anyone), just let me know...
I really need to find the time to put together a web-site build diary or something sometime - I'm at around 3000 pictures now...
Thanks,
Rich
05-20-2012, 10:58 PM
#8
Safety Car

That looks sweet! A great attention to detail. It is going to be one bad azz ride! Keep us updated, will want to follow along!
05-21-2012, 09:41 AM
#9
Melting Slicks


Rich,
Great to see the latest progress pictures. It's looking great!
Best of luck in completing your project.
Rich
Great to see the latest progress pictures. It's looking great!
Best of luck in completing your project.
Rich
05-21-2012, 10:22 AM
#10
Burning Brakes

Member Since: Sep 2007
Location: Fort Worth Texas
Posts: 902
Received 187 Likes
on
71 Posts
C2 of Year Finalist (track prepared) 2019

Beautiful combination of chassis and running gear. If you need more bling, we are selling the door hinges like the ones I made for my GS:
05-21-2012, 06:43 PM
#11
Melting Slicks
Member Since: Apr 2002
Location: Ellicott City Maryland
Posts: 2,881
Received 1,962 Likes
on
664 Posts

Rich,
Awesome build . . . love all of the details.
Question . . . where did you get the attachment for the clutch push rod (on the transmission side of the clutch cross shaft "Z-bar") that I see in photo #3? I'm doing a special transmission installation, and that caught my interest. Thanks.
Tom
Awesome build . . . love all of the details.
Question . . . where did you get the attachment for the clutch push rod (on the transmission side of the clutch cross shaft "Z-bar") that I see in photo #3? I'm doing a special transmission installation, and that caught my interest. Thanks.
Tom
05-21-2012, 08:53 PM
#13
Melting Slicks
Member Since: Apr 2002
Location: Ellicott City Maryland
Posts: 2,881
Received 1,962 Likes
on
664 Posts
Nope, that's not the part I'm talking about:
http://sdparts.com/details/scoggin-d...s-center/sdcbv
I'm talking about the 2-piece clutch fork push rod, specifically the front piece that connects to the z-bar. This piece connects to the z-bar on both sides with a clevis pin and holds a threaded push rod. That's the piece I'm looking for!
Tom
http://sdparts.com/details/scoggin-d...s-center/sdcbv
I'm talking about the 2-piece clutch fork push rod, specifically the front piece that connects to the z-bar. This piece connects to the z-bar on both sides with a clevis pin and holds a threaded push rod. That's the piece I'm looking for!
Tom
05-21-2012, 09:14 PM
#14
Racer
Thread Starter
Tom,
Here's a link:
http://www.mcmaster.com/#rod-ends/=hmyg56
Look at the first picture listed under Clevis styles - I then cut and threaded a standard rod for a 64-67 set-up, I can't recall which, but one set of years for different engine applications is longer and I believe it's the longer one I cut and threaded 3/8"-24
I made brass "thrust washers" that fit on each side of the z-bar conection to adjust the side to side "float", relative to the space inside the clevis rod end (you need some side to side angularity ability).. Originally I was going to use a spherical rod end on each side (like sold in some kits), but played with this idea first before cutting the clutch fork (I didn't like the look/final product of the extra brackets I've seen on the kits that are sold) - the clevis rod end, when "bushed" with thrust washers, tightens the movement up significantly, without having to do anything different on the clutch fork side and it's a perfect straight application of force without any side loading, like when you have something only attached on one side or the other of the z-bar..
Hope this helps,
Rich
Last edited by Rzepka_r; 05-21-2012 at 09:27 PM. Reason: rod correction
05-21-2012, 10:27 PM
#16
Burning Brakes

Looks fantastic. I like your attention to detail as well. I installed a LS1 last year into a Pro-Touring Camaro and it was a great project. I went a somewhat different route to hide the coil packs. Edelbrock makes a cover for the coil packs that I liked. You actually removed the coil packs from the standard brackets and then mount them directly to the covers. This allows the cover to sit lower and completely cover them. It also gives the motor a different look. Many people commented that it looked the covers made it look like a big block.
I was also able to tuck most of the wires under the covers which cleaned up the top fo the motor. Unfortunately on modern motors, there are multitudes of wires to deal with.
I was also able to tuck most of the wires under the covers which cleaned up the top fo the motor. Unfortunately on modern motors, there are multitudes of wires to deal with.
 05-29-2012, 07:54 PM
#18
Racer
Thread Starter
Hello Everyone,
I suppose I'll use this thread to document my build, slowly bringing it up to date with where I'm at today...
I'll try to touch on things I've learned and/or changed along the way - maybe it will help others and/or generate some thought for something someone is doing different on their project...
Along the way, if there is anything anyone wants to see, just let me know...
Here is where it all started, with a classified e-bay ad and probably one of the most honest sellers I've met in my life... I had a friend I knew through work, that lived close to the area, check the car out a few weeks beforehand and then I went and checked it out myself and trailered it back home for the ten hour trip - October 2nd 2009 was the day I officially owned it and, although much later that day, was the day it was sitting in the driveway...
A body shell, a basically complete chassis (that I sold off) and a pick-up load of parts (including the inside of the car packed full too)...
Every so many days I'll try to add how things moved forward...
Thanks,
Rich
05-29-2012, 10:17 PM
#19
Le Mans Master


Member Since: Sep 2003
Location: Norwalk ohio
Posts: 8,927
Received 640 Likes
on
358 Posts
2019 Corvette of the Year Winner
St. Jude Donor '15
Rich, if you want a nice dash, PM me....got a name that does a nice job....did my headliner and trunk in my '60 and the complete interior in my '30 Model A street rod....all in leather.?..oh yeah. Forgot to say very reasonable.....
05-30-2012, 01:09 AM
#20
