61 gas tank install questions
 11-19-2012, 12:14 AM
#1
Safety Car

Thread Starter
Member Since: Jan 2000
Location: Poway CA
Posts: 4,845
Received 1,295 Likes
on
560 Posts
2023 C1 of the Year Finalist - Unmodified
2022 C1 of the Year Finalist - Unmodified
2021 C1 of the Year Finalist - Unmodified
2019 C1 of Year Finalist (stock)
2016 C1 of Year Finalist

Greetings,
I'm partially through this challenging project.
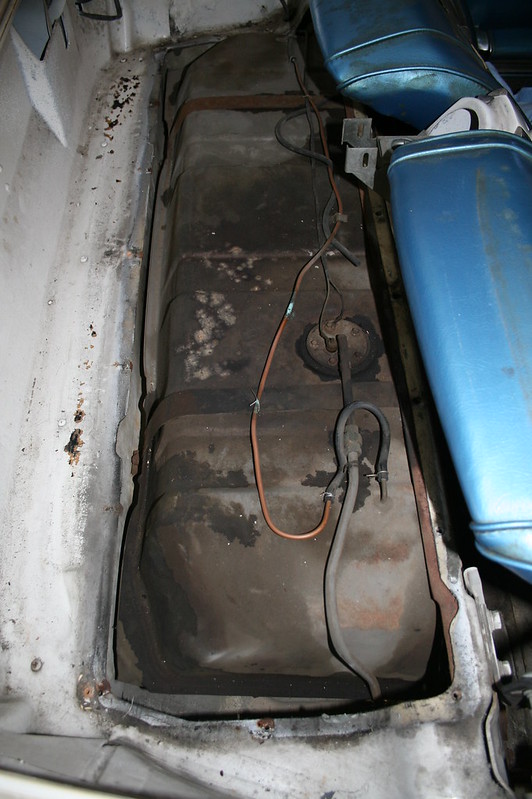
See below for a photo of my original tank hookups. Both ends of the "upper fuel line" have threaded nuts on my original. My original fuel sender/pickup also had the mating threads, as does the main fuel line (on the frame rail).
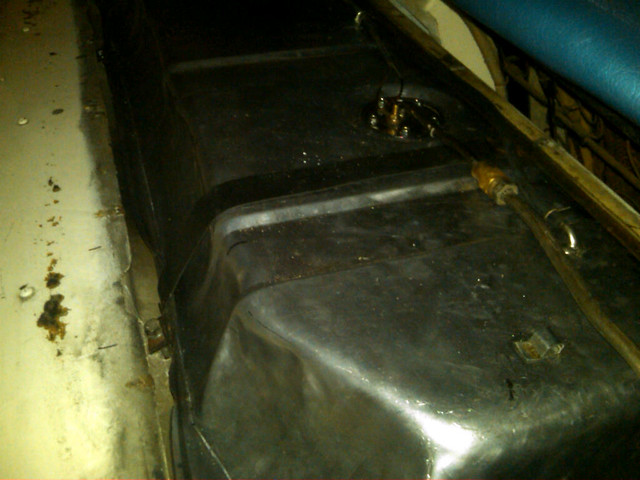
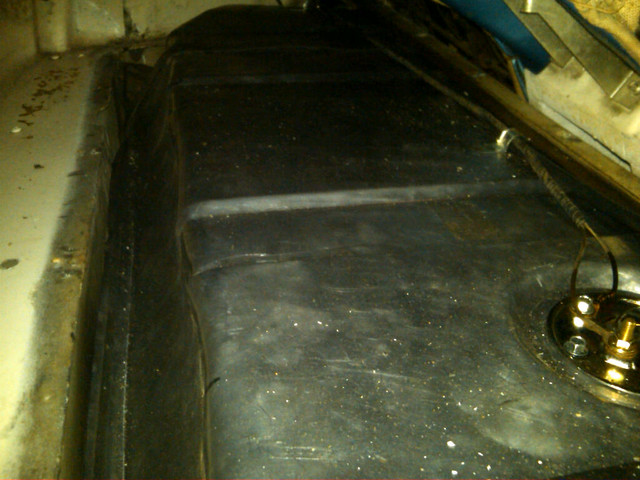
The new parts (sender and upper fuel line) do not have the nuts. From the looks of the assembly manual, it looks like clamps and rubber hose are used at these junctions.
It seems the threads is a much better solution. I'm thinking of re-using the OLD upper fuel line, allowing me to connect to the frame fuel line with the threaded connection - just wish the new sender/pickup had a threaded end..
Or am I missing something obvious here? Thanks.
Also, it looks like my vent tube takes a very odd path from the vent to the gas door. Thinking I will re-route this towards the front (as shown in the AIM), as this will fit better under the cover. As others have found, the new tank sits higher than the original (even after much 'encouragement' from a dead blow hammar!)
Fred
EDIT: After some additional research, it appears that my 61 has tank hardware from a 60.. The 60 had the hard attach points, 61/62 had soft (at least that's what the vendors say). I think the venders have it wrong.. the early 61's used hard attachment points, correct?
I'm partially through this challenging project.
See below for a photo of my original tank hookups. Both ends of the "upper fuel line" have threaded nuts on my original. My original fuel sender/pickup also had the mating threads, as does the main fuel line (on the frame rail).
The new parts (sender and upper fuel line) do not have the nuts. From the looks of the assembly manual, it looks like clamps and rubber hose are used at these junctions.
It seems the threads is a much better solution. I'm thinking of re-using the OLD upper fuel line, allowing me to connect to the frame fuel line with the threaded connection - just wish the new sender/pickup had a threaded end..
Or am I missing something obvious here? Thanks.
Also, it looks like my vent tube takes a very odd path from the vent to the gas door. Thinking I will re-route this towards the front (as shown in the AIM), as this will fit better under the cover. As others have found, the new tank sits higher than the original (even after much 'encouragement' from a dead blow hammar!)
Fred
EDIT: After some additional research, it appears that my 61 has tank hardware from a 60.. The 60 had the hard attach points, 61/62 had soft (at least that's what the vendors say). I think the venders have it wrong.. the early 61's used hard attachment points, correct?
Last edited by SDVette; 11-19-2012 at 12:53 PM.
 11-19-2012, 07:47 AM
#2
Team Owner


I have a very late '61 (about 100 cars from the last one built) and no pictures of the gas tank so I'm not much help here.
I'd be tempted to go with the threaded connections just the same.
Don't forget to run an extra ground wire for the 'dancing fuel gauge when you step
on the brakes' classic C1 problem! Takes 5 minutes and can keep you from doing it
later on.
I'd be tempted to go with the threaded connections just the same.
Don't forget to run an extra ground wire for the 'dancing fuel gauge when you step
on the brakes' classic C1 problem! Takes 5 minutes and can keep you from doing it
later on.
Last edited by Frankie the Fink; 11-19-2012 at 07:49 AM.
11-19-2012, 08:16 AM
#3
Safety Car


Member Since: Apr 2009
Location: Georgetown TX
Posts: 3,786
Received 573 Likes
on
307 Posts
2021 C2 of the Year Finalist - Unmodified
C2 of Year Finalist (stock) 2019
2016 C2 of Year Finalist

I don't think there ever was a hard coupling of the lines. See Section 8.00 page 3.00 in the AIM. Should be the same as 62s.
11-19-2012, 08:22 AM
#4
Team Owner
I'm fairly sure there was a threaded connection on some years of later C1s. I can't recall which years -- it's come up several times here on the forum.
Last edited by Frankie the Fink; 11-19-2012 at 08:25 AM.
11-19-2012, 09:35 AM
#5
Race Director

See below for a photo of my original tank hookups. Both ends of the "upper fuel line" have threaded nuts on my original. My original fuel sender/pickup also had the mating threads, as does the mail fuel line (on the frame rail).
The new parts (sender and upper fuel line) do not have the nuts. From the looks of the assembly manual, it looks like clamps and rubber hose are used at these junctions.
EDIT: After some additional research, it appears that my 61 has tank hardware from a 60.. The 60 had the hard attach points, 61/62 had soft (at least that's what the vendors say). I think the venders have it wrong.. the early 61's used hard attachment points, correct?
Some vendors do incorrectly list the sending units as 56-60 and 61-62, but both Corvette Central and Paragon, correctly list them as 56-61E and 61L-62.

http://www.parts123.com/parts123/yb....Z5Z5Z50000050x
https://www.paragoncorvette.com/p-35...ding-unit.aspx
11-19-2012, 12:09 PM
#6
Le Mans Master

 The GM fuel senders sold in the 70's by Chevy did not have the fitting and were considered replacements for all the years. When I installed one in my 59, I liked the idea of keeping the fuel lines stock with original threaded ends, so I just removed and brazed the old fitting on to the replacement sender. Not a big deal.
  Pilot Dan
11-19-2012, 12:10 PM
Pilot Dan
11-19-2012, 12:10 PM
#7
Safety Car
Thread Starter
Member Since: Jan 2000
Location: Poway CA
Posts: 4,845
Received 1,295 Likes
on
560 Posts
2023 C1 of the Year Finalist - Unmodified
2022 C1 of the Year Finalist - Unmodified
2021 C1 of the Year Finalist - Unmodified
2019 C1 of Year Finalist (stock)
2016 C1 of Year Finalist
Yep, I'm beginning to think I should have bought the 60 AIM instead of the 61! BTW, my VIN is 10867S102794, which C1 Registry tells me was built Nov 14, 1960.
Thanks guys. It looks like the 56-61E units are 14 ohms, and the 61L-62 units are 30 ohms. That's another difference. I measured the unit I have, and it's 30 ohms. My original sender was non-functional (aka rusted to death), so I can't measure it.
Were the gauges different or did they use another resistor in the circuit to make them read correctly?
Last edited by SDVette; 11-19-2012 at 03:05 PM.
11-19-2012, 04:22 PM
#8
Team Owner


Member Since: Oct 2000
Location: Washington Michigan
Posts: 38,899
Received 1,857 Likes
on
1,100 Posts
Thanks guys. It looks like the 56-61E units are 14 ohms, and the 61L-62 units are 30 ohms. That's another difference. I measured the unit I have, and it's 30 ohms. My original sender was non-functional (aka rusted to death), so I can't measure it.
Were the gauges different or did they use another resistor in the circuit to make them read correctly?
11-19-2012, 05:04 PM
#9
Safety Car
Thread Starter
Member Since: Jan 2000
Location: Poway CA
Posts: 4,845
Received 1,295 Likes
on
560 Posts
2023 C1 of the Year Finalist - Unmodified
2022 C1 of the Year Finalist - Unmodified
2021 C1 of the Year Finalist - Unmodified
2019 C1 of Year Finalist (stock)
2016 C1 of Year Finalist
11-19-2012, 05:19 PM
#10
Team Owner
Member Since: Oct 2000
Location: Washington Michigan
Posts: 38,899
Received 1,857 Likes
on
1,100 Posts
12-10-2012, 07:18 PM
#12
Safety Car
Thread Starter
Member Since: Jan 2000
Location: Poway CA
Posts: 4,845
Received 1,295 Likes
on
560 Posts
2023 C1 of the Year Finalist - Unmodified
2022 C1 of the Year Finalist - Unmodified
2021 C1 of the Year Finalist - Unmodified
2019 C1 of Year Finalist (stock)
2016 C1 of Year Finalist
Well, I'm almost done with this BEAR of a project.
The new tank is in, sender, vent, fuel line, and filler are all connected.
WCBF has been rebuilt and is installed. New throttle linkage is on the way from zip.
Also changed my fuel pump - that turned into a nasty little project of it's own! Difficult to get the new pump installed while keeping the lifter in place (yes, I tried grease... No, my block does not have a bolt to hold it).
For future searchers: Getting the new gas tank in the proper position was every bit a pain as others said it would be! I had to beat it with a dead-blow hammer out of the car, and again while in the car. Whoever said their gas tank looked as if it was in a roll-over accident after installation was right - mine too! This would be SO MUCH EASIER if the repo tanks were 1/4 inch smaller instead of a 1/4 inch bigger than the originals!
Hoping to be able to fire it up after a few more hours work. I will post photos and a final summary.
Fred
Last edited by SDVette; 12-10-2012 at 08:18 PM.
12-10-2012, 07:54 PM
#13
Team Owner
Sounds like you are on the home stretch.
EVEN SO! Do the initial start up in a well ventilated area (outside if possible) with a fire extinguisher within arm's reach.
EVEN SO! Do the initial start up in a well ventilated area (outside if possible) with a fire extinguisher within arm's reach.
12-11-2012, 05:42 PM
#14
Drifting

Well, I'm almost done with this BEAR of a project.
The new tank is in, sender, vent, fuel line, and filler are all connected.
WCBF has been rebuilt and is installed. New throttle linkage is on the way from zip.
Also changed my fuel pump - that turned into a nasty little project of it's own! Difficult to get the new pump installed while keeping the lifter in place (yes, I tried grease... No, my block does not have a bolt to hold it).
For future searchers: Getting the new gas tank in the proper position was every bit a pain as others said it would be! I had to beat it with a dead-blow hammer out of the car, and again while in the car. Whoever said their gas tank looked as if it was in a roll-over accident after installation was right - mine too! This would be SO MUCH EASIER if the repo tanks were 1/4 inch smaller instead of a 1/4 inch bigger than the originals!
Hoping to be able to fire it up after a few more hours work. I will post photos and a final summary.
Fred
The new tank is in, sender, vent, fuel line, and filler are all connected.
WCBF has been rebuilt and is installed. New throttle linkage is on the way from zip.
Also changed my fuel pump - that turned into a nasty little project of it's own! Difficult to get the new pump installed while keeping the lifter in place (yes, I tried grease... No, my block does not have a bolt to hold it).
For future searchers: Getting the new gas tank in the proper position was every bit a pain as others said it would be! I had to beat it with a dead-blow hammer out of the car, and again while in the car. Whoever said their gas tank looked as if it was in a roll-over accident after installation was right - mine too! This would be SO MUCH EASIER if the repo tanks were 1/4 inch smaller instead of a 1/4 inch bigger than the originals!
Hoping to be able to fire it up after a few more hours work. I will post photos and a final summary.
Fred
12-16-2012, 10:52 PM
#15
Safety Car
Thread Starter
Member Since: Jan 2000
Location: Poway CA
Posts: 4,845
Received 1,295 Likes
on
560 Posts
2023 C1 of the Year Finalist - Unmodified
2022 C1 of the Year Finalist - Unmodified
2021 C1 of the Year Finalist - Unmodified
2019 C1 of Year Finalist (stock)
2016 C1 of Year Finalist
Promised photos are here.
New tank, straps (actually fixed and painted the old ones), fuel pickup, sender, fuel lines, fuel pump, carb rebuild, choke, and choke tube. FINALLY DONE!

Took a bit of cranking to 'prime the pump', but it fired up beautifully! Car runs and idles MUCH better now with the rebuilt carb and good fuel supply.
Thanks for all the input/advise/tips!
Fred
12-17-2012, 10:32 AM
#16
Drifting
I don't see any gas tank strap gaskets, make sure you use them. They prevent excessive vibration of straps that eventually cut into tank over time. Can use 3/16" thick x 2�� wide adhesive weather stripping or a bicycle inner tube between straps & tank on the edges of the tank top & bottom will work fine.
rustylugnuts
rustylugnuts
12-17-2012, 11:11 AM
#17
Safety Car
Thread Starter
Member Since: Jan 2000
Location: Poway CA
Posts: 4,845
Received 1,295 Likes
on
560 Posts
2023 C1 of the Year Finalist - Unmodified
2022 C1 of the Year Finalist - Unmodified
2021 C1 of the Year Finalist - Unmodified
2019 C1 of Year Finalist (stock)
2016 C1 of Year Finalist
Rusty - I don't think I've seen any photos or AIM reference to this..???? Are you talking about the tar paper-like strips that go under the tank? Or something else?
There were no such gaskets on the original setup.. nor on anyone else's photos, unless I'm missing something?
There were no such gaskets on the original setup.. nor on anyone else's photos, unless I'm missing something?
12-17-2012, 11:16 AM
#18
Race Director
Member Since: Jun 2006
Location: Inverness FL
Posts: 17,891
Received 727 Likes
on
621 Posts
St. Jude Donor '07
Rusty - I don't think I've seen any photos or AIM reference to this..???? Are you talking about the tar paper-like strips that go under the tank? Or something else?
There were no such gaskets on the original setup.. nor on anyone else's photos, unless I'm missing something?
There were no such gaskets on the original setup.. nor on anyone else's photos, unless I'm missing something?
Bill
12-17-2012, 12:16 PM
#19
Drifting
I personally like the added protection, and if it takes a hit one must evaluate the benefits. I look at it as safety, same as the battery disconnect and fire extinguisher.
rustylugnuts
rustylugnuts
12-17-2012, 12:35 PM
#20
Le Mans Master
Rusty - I don't think I've seen any photos or AIM reference to this..???? Are you talking about the tar paper-like strips that go under the tank? Or something else?
There were no such gaskets on the original setup.. nor on anyone else's photos, unless I'm missing something?
There were no such gaskets on the original setup.. nor on anyone else's photos, unless I'm missing something?
Pilot Dan