Getting the nose ready.. but...
 02-01-2013, 09:48 AM
#21
Burning Brakes

Thread Starter


Rene-Paul, thanks a bunch for that dim. and I hope you had a good night at work? Good and work, do they go together? I am so determined to get this resolved that I took the day out of work (making this a good day) and concentrating on the Vette.
I hammered off the pillar cover and placed it where it should have been in the first place and got a measurement of 38 1/2" to the center location minus the plastic bumper. I'd like to ask you to confirm if you measured to the fiberglass behind the bumper or to the face of the plastic that screws on to it?
If and when you are up to it, another measurement that will help is the spread between the lock pillars from pass to drivers side. I replaced all this metal and those two pillars are still floating while I determine where I need to attach the metal spreader that fits across the package trays and if those pillars are paralleled from top to bottom. I can't trust the spread between the convertible mechanism because that was bent at one time from a side impact.
After I got the pillar cover off I confirmed that it is too big. I also noted that on the back side were impressions of the bolt holes that hold the lock latch to it and I used those to drill the locations. WRONG! After cleaning off the glue I repositioned it and see that those holes are way too far outside of the location they should be. Using the molded in bumper on the backside of the glass against the lock pillar the door and pillar line up! DUH? I am now grinding the backside of the PM replacement to match the original part and will make note of how much and the locations where I removed material.
Thanks again and I do appreciate everyone's help.
 02-01-2013, 10:23 AM
#22

ptwohey, just read your post and if you don't mind advice from another rookie.
First, before you try to align rear quarters or front clip, check the up and movement of your doors. With the door open try lift the door to check for looseness of the aluminum rivets holding the 'glass to the metal skeleton. If the door can be lifted you need to replace the rivets first so the door is square to the door hinge (not hanging down as it appears in one photo), now when you align the style lines on the body they will be straight along the side (I used 1/4" masking tape on line for visual alignment.) I did a post on how I did mine and there are others. Sorry, I don't know how to link to it.
My car was also hit at left door and quarter and I had to replace the door pillar cover also.
It's aggravating sometimes but the satisfaction is worth it, don't give up. I've been beating on mine off and on for a few years now.
CJ
If you need measurements
02-01-2013, 01:46 PM
#23
Burning Brakes

Pat, Just having my coffee, confirming that the measurement is from the top hinge bolt to the center of the plastic bumper. I did have that door off to replace the rivets at the front. I used pop rivets. Hind sight being 20/20 I should have used the Mc Masters Carr
projection weld studs as recomended by John Z. I will get the upper measurement door to door shortly.
Brgds,
Rene
projection weld studs as recomended by John Z. I will get the upper measurement door to door shortly.
Brgds,
Rene
02-02-2013, 12:51 AM
#25
Instructor


Try referring to the body checking dimensions in the Assembly Instruction Manual.You will find all the dimensions your looking for.I am in the process of building a coupe with custom chassis and birdcage and without these it would be impossible.Also start from the hinge pillar and work back,using the AIM. good luck!
02-03-2013, 09:31 AM
#26
Burning Brakes
Thread Starter
Update time: I have checked the door to see if it is loose or missing rivets and glad to report that it is solid.
I have also checked and rechecked the AM for what I need and the only place I can see where those dim's are will be in the grid lines but seeing that I am looking at numbers 1/4" or less it's been easier to ask you members how your cars measure out
I have had some progress since talking Friday out of work. The lock pillar cover which I removed and ground down has lowered and moved back 1/8" each way. My door will now close without the latch gouging the glass. I can also close the door without hitting the glass on the lower corner but it is so close that a coat of primer and paint will scrape. I can raise the rear edge of the door to gain clearance but that will cause the gaps along the lower edge and rocker to misalign but I'm not really sure if everyone' door is parallel to the rocker.
I have the cellar warming up now and will head down with the camera to give everyone a photo show.
02-19-2013, 08:48 PM
#27
Burning Brakes
Thread Starter
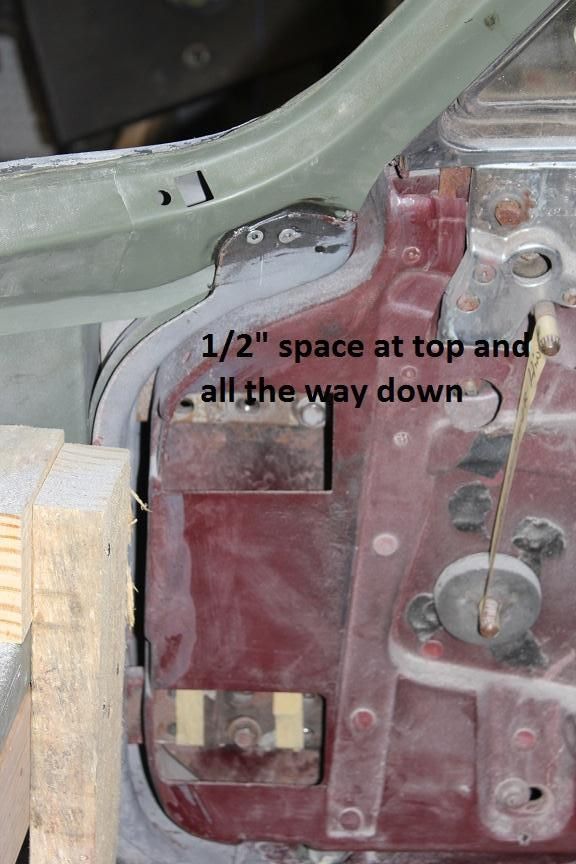
OK, so I took in everyone's help and advise and very almost happy with getting the lock pillar, door alignment and rear quarter sections to line up properly. NOW, it's the front of the door I need to conquer.
To inform everyone of the fact that this car was damaged badly on the drivers side but the seller never filled me in on the extent of that damage. I found it after tearing the bad repairs off the sides to reveil the mess.
The passenger front of the door has an even 1/2" gap from the top to bottom on the hinge piller. The drivers side touches at the top and about 3/8" toward the bottom. Anyone and everyone can tell me to keep my measuring tapes in the tool chest. I have measured both doors and they match. I measure the door openings between pillars and the drivers side is larger...yet the door does not fit as well. This does not make sense to me so I pulled both doors off to start with the measurements all over again. If I ignore the measurements and bend the drivers hinge pillar forward 1/4" at the top I should be able to get the door to fit, but that will make the drivers opening 3/4" wider at the top than the passenger side. Grrrr! I am obviously missing something and my suspision is that the body is twisted.
What is everyone's comments about me putting the hard top on the car and using that to align the body then making the doors fit? Isn't more critical that the roof fits first?
[IMG]<a href="http://s160.beta.photobucket.com/user/ptwohey/media/passengersidedoor_zps6097ef79.jpg.html" target="_blank"><img src="http://i160.photobucket.com/albums/t186/ptwohey/passengersidedoor_zps6097ef79.jpg" border="0" alt=" photo passengersidedoor_zps6097ef79.jpg"/></a>[/IMG]
 .beta.photobucket.com/user/ptwohey/media/doorsoffagain_zps1c91ce8d.jpg.html" target="_blank"><img src="http://i160.photobucket.com/albums/t186/ptwohey/doorsoffagain_zps1c91ce8d.jpg" border="0" alt=" photo doorsoffagain_zps1c91ce8d.jpg"/></a>[/IMG]
To inform everyone of the fact that this car was damaged badly on the drivers side but the seller never filled me in on the extent of that damage. I found it after tearing the bad repairs off the sides to reveil the mess.
The passenger front of the door has an even 1/2" gap from the top to bottom on the hinge piller. The drivers side touches at the top and about 3/8" toward the bottom. Anyone and everyone can tell me to keep my measuring tapes in the tool chest. I have measured both doors and they match. I measure the door openings between pillars and the drivers side is larger...yet the door does not fit as well. This does not make sense to me so I pulled both doors off to start with the measurements all over again. If I ignore the measurements and bend the drivers hinge pillar forward 1/4" at the top I should be able to get the door to fit, but that will make the drivers opening 3/4" wider at the top than the passenger side. Grrrr! I am obviously missing something and my suspision is that the body is twisted.
What is everyone's comments about me putting the hard top on the car and using that to align the body then making the doors fit? Isn't more critical that the roof fits first?
[IMG]<a href="http://s160.beta.photobucket.com/user/ptwohey/media/passengersidedoor_zps6097ef79.jpg.html" target="_blank"><img src="http://i160.photobucket.com/albums/t186/ptwohey/passengersidedoor_zps6097ef79.jpg" border="0" alt=" photo passengersidedoor_zps6097ef79.jpg"/></a>[/IMG]
.beta.photobucket.com/user/ptwohey/media/doorsoffagain_zps1c91ce8d.jpg.html" target="_blank"><img src="http://i160.photobucket.com/albums/t186/ptwohey/doorsoffagain_zps1c91ce8d.jpg" border="0" alt=" photo doorsoffagain_zps1c91ce8d.jpg"/></a>[/IMG]
 G]
G]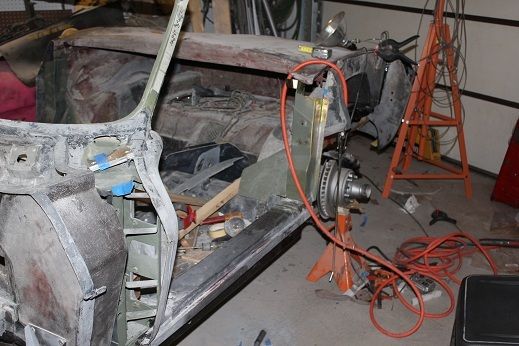 02-19-2013, 08:52 PM
#29
Burning Brakes
Thread Starter

http://i160.photobucket.com/albums/t...psc99b5313.jpg
I'll figure this photo thing out someday! Maybe just after I figure out how to get the car together!
02-20-2013, 12:50 AM
#30
Le Mans Master

The first step I was taught when rebuilding cars was to make sure the doors fit first, then everything else follows. verify the mid line is the same distance from the rocker on both sides as well. Its smart to have the latches on the door and pillar and make sure they close like they should because there isn't a lot of adjustment in them, better now than later. I am assuming the drivers door fits at an angle because you have the rear lifted to meet the quarter, keep it straight. Its probably going to look something like this once you have the door level

Yes the rear of the drivers door can sit low on some of these convertibles, you can see this complaint on the NCRS website as well. Myself, I would worry less about the quarter right now and pin down the doors square in the pillars. I had to reworked that driver's side corner, door decklid, and quarter to make mine perfect. If you have the hardtop that should verify that the windshield pillars aren't bent as well.
Do not rely on that aftermarket pillar cover for lining stuff up, you will end up grinding the snot out of it to make it fit by the time you are done. Also hang the rear quarter with duct tape and install the bumper so you are sure its in the correct position.
Then you can add some layers of glass to build the door up to match the quarter and deck lid. That rear corner of the door can get pretty thick but if you lay down glass you can grind the backside to thin it down.
Last edited by Scott Marzahl; 02-20-2013 at 11:42 AM.
02-20-2013, 05:09 PM
#31
Burning Brakes
Thread Starter
[IMG]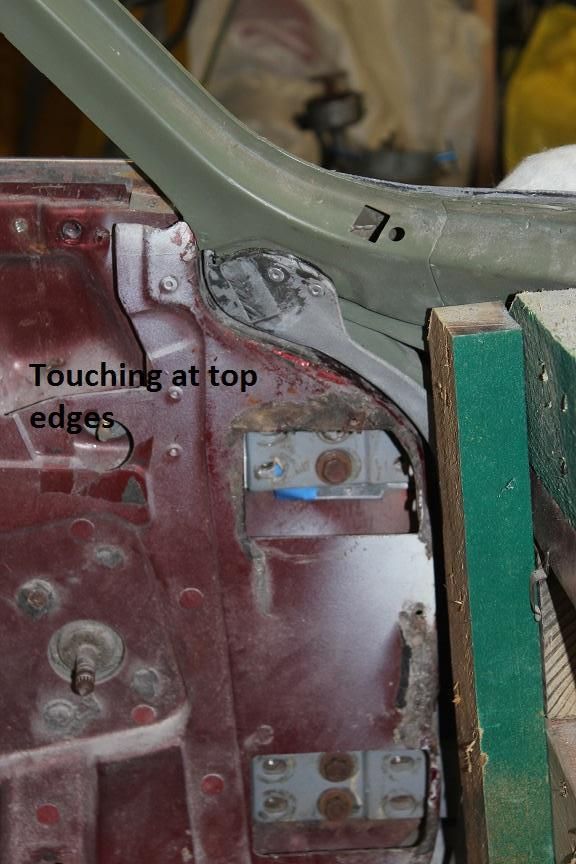 [/IMG]
Scott, your photos tell a lot. I tried inserting the drivers side photo that tells me to bend the hinge pillar forward at the top. If I bend that pillar I can get an even gap along the pillar/door and also open the area at the edge that is presently hitting. I can't make the left and right sides match dimensions but I can make them look the same. I'll bring the HT in tonight and let it warm up.
[/IMG]Scott, your photos tell a lot. I tried inserting the drivers side photo that tells me to bend the hinge pillar forward at the top. If I bend that pillar I can get an even gap along the pillar/door and also open the area at the edge that is presently hitting. I can't make the left and right sides match dimensions but I can make them look the same. I'll bring the HT in tonight and let it warm up.
02-23-2013, 04:38 PM
#32
Burning Brakes
Thread Starter
I took the doors and hinges off then put the drivers door in place and I'm convinced that the angle of the hinge pillar should match the door and it doesn't. The fancy dancy jig I made before pulling the bird cage appart was obviously flawed or duplicated a bend from the accident. I also put the hard top in place and the pin does not line up. Measurements indicate that the top of the drivers side hinge pillar needs a porta power push forward of about 1/4". So that I don't make things worse I am having my neighbor/body man bring his knowledge and tools over so that the spreading is done properly. With my hopes high the next posting will be of progress and success. Thanks everyone.
03-03-2013, 06:55 PM
#33
Burning Brakes
Thread Starter
I'm still fighting the drivers door. I can't get that top front edge to space out. I have the hinge/door bolts maxed to the rear and still can't open that space. I am considering to grind the slots futher toward the rear but still confused with rene-paul's measurement of 38 1/4". Mine already measures 38 5/8" but that top corner hits the w/s frame!
I started this morning by swapping the hinges passenger to drivers side and had the same results so there is no difference between hinges. I removed all the shims and started over. I measured every which way I could but still haven't found the one that will explain why I have this problem. It's 6:53 PM EST and 8 solid hours of no progress. Good night!
I started this morning by swapping the hinges passenger to drivers side and had the same results so there is no difference between hinges. I removed all the shims and started over. I measured every which way I could but still haven't found the one that will explain why I have this problem. It's 6:53 PM EST and 8 solid hours of no progress. Good night!
03-03-2013, 08:52 PM
#34
Burning Brakes
Thread Starter
I found where I am loosing the gap but I need ideas on how to fix it.
It's the windshield frame on top of the hinge pillar. After I sent the last post I had a hunch of one area I did not measure and sure enough the windshield frame on the drivers side is welded 5/8" different than the passengers! How in the world did the factory jig these up? It looks like I have to remove all the fiberglass around the hinge pillar, drill out the welds betiween the frame and pillar, push the frame forward then reweld. This car must have been a mess from the very beginning. At least I can feel some accomplishment knowing that I not totally nuts.
It's the windshield frame on top of the hinge pillar. After I sent the last post I had a hunch of one area I did not measure and sure enough the windshield frame on the drivers side is welded 5/8" different than the passengers! How in the world did the factory jig these up? It looks like I have to remove all the fiberglass around the hinge pillar, drill out the welds betiween the frame and pillar, push the frame forward then reweld. This car must have been a mess from the very beginning. At least I can feel some accomplishment knowing that I not totally nuts.
04-12-2013, 01:06 PM
#35
Burning Brakes
Thread Starter
Now that it's fixed, it wasn't the w/s frame at all! It was the entire hinge pillar. Rather than pull ALL the fglass panel off, I removed the hinge pillar cover and used a sawzall to cut 7/8 through the metal support, used a portapower to push the pillar forward at the top, then welded everything back in. Everything fits now, after years of trying to find the problem.
Now I can fit the nose but it does not settle in to place when the doors are on so they have been removed. I do plan on having the door on when the nose is cemented in place but right now the fenders are hitting the door edges so I will use the doors, off the car, to mark and trip back the fender edges.
I am flabergasted over finding that leaning the pillar just a few degrees and moving the top 1/4", has made so much of a difference on how this car is now going together!
04-20-2013, 02:10 PM
#36
Burning Brakes
Thread Starter
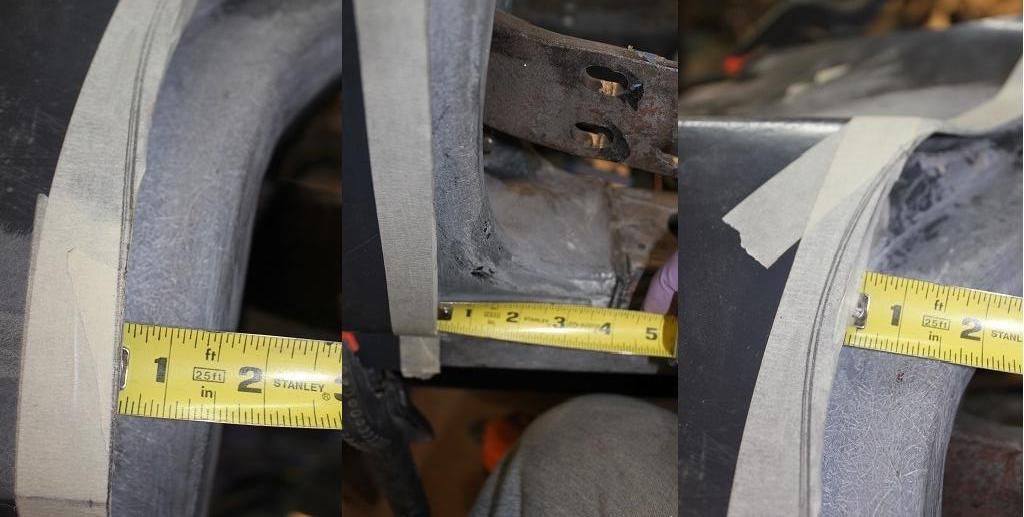
I have the nose in place and strapped down to the bonding areas but need your input as far as the fender overhang.
[IMG]
[/IMG]
[IMG]
[/IMG]
 04-20-2013, 02:16 PM
#39
Burning Brakes
Thread Starter
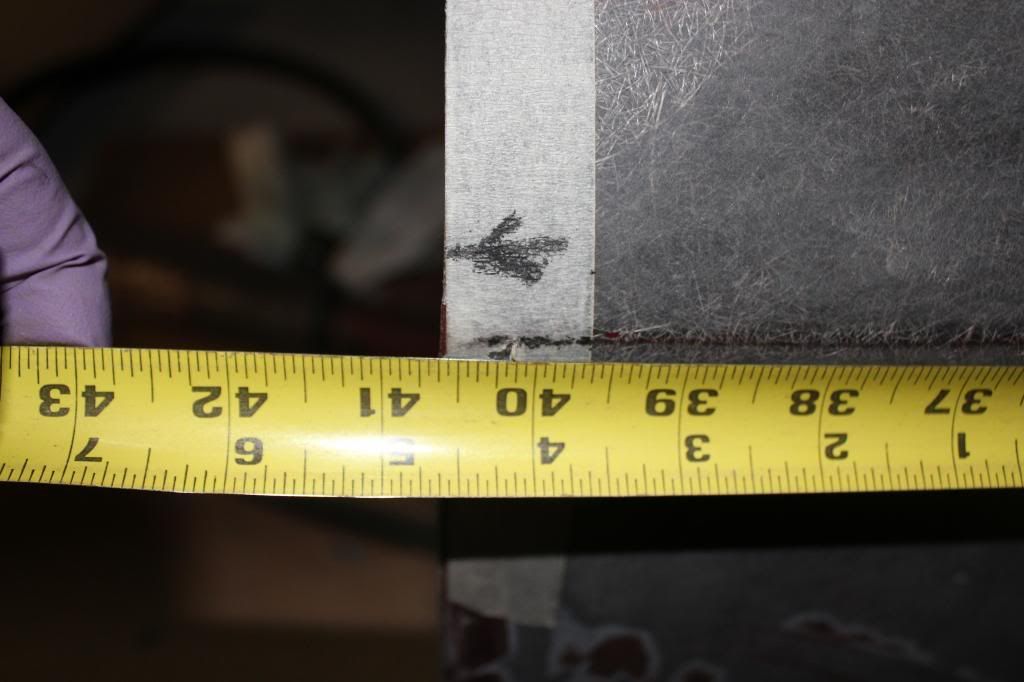
From the photo you can see that there is a 1/2" overhang from the hinge pillar to the edge of the finder. The pencil mark is where the door matches the fender. I can open the gap to factory spec's of 3/16" +/- but will still have a large space to fill. I can't move the nose forward but I could extend the door edge toward the front.
What's your thoughts? Thanks.
What's your thoughts? Thanks.
04-20-2013, 09:10 PM
#40
Drifting


[IMG][/IMG]
Scott, your photos tell a lot. I tried inserting the drivers side photo that tells me to bend the hinge pillar forward at the top. If I bend that pillar I can get an even gap along the pillar/door and also open the area at the edge that is presently hitting. I can't make the left and right sides match dimensions but I can make them look the same. I'll bring the HT in tonight and let it warm up.
[/IMG]Scott, your photos tell a lot. I tried inserting the drivers side photo that tells me to bend the hinge pillar forward at the top. If I bend that pillar I can get an even gap along the pillar/door and also open the area at the edge that is presently hitting. I can't make the left and right sides match dimensions but I can make them look the same. I'll bring the HT in tonight and let it warm up.