When you click on links to various merchants on this site and make a purchase, this can result in this site earning a commission. Affiliate programs and affiliations include, but are not limited to, the eBay Partner Network.
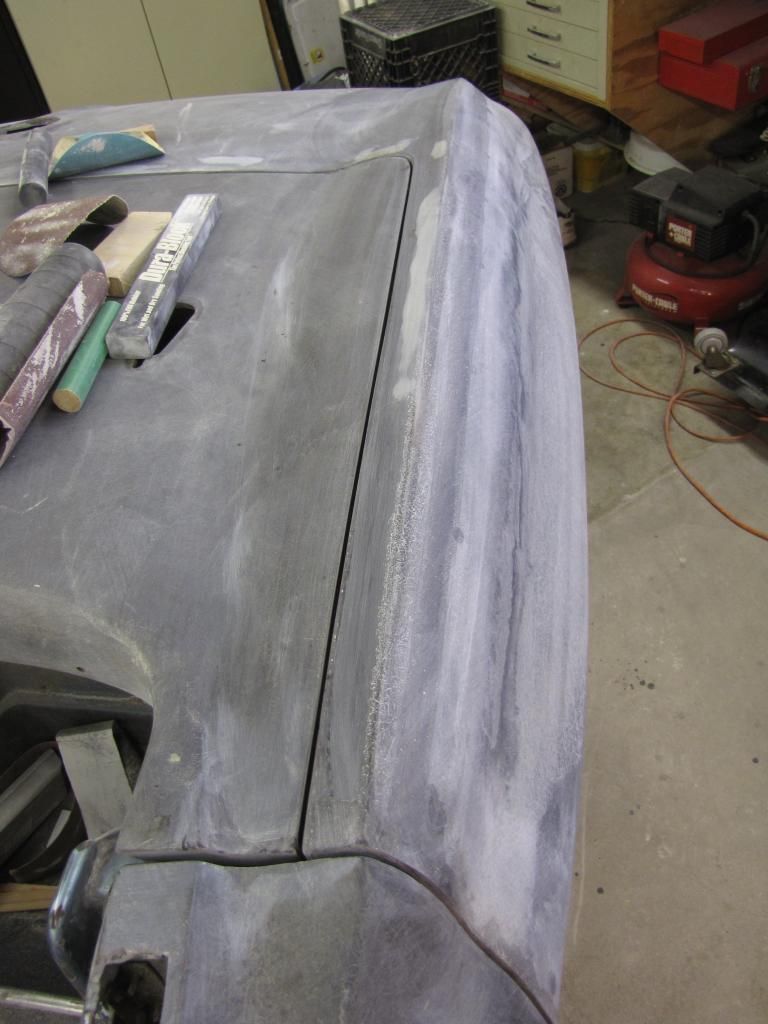
The gaps where the door, rear quarter and deck lid were a little wide and also had been worn down on the edges from years of storage and sliding things around on it. I am using glass to set the gaps to just over 1/8" and will then use filler to feather them all to 1/8".
I am also getting started on glassing over the bonding seams, here's the first one before grinding down to the tape, then sanding to level.
Last edited by slalomfiend; 12-21-2017 at 04:11 PM.
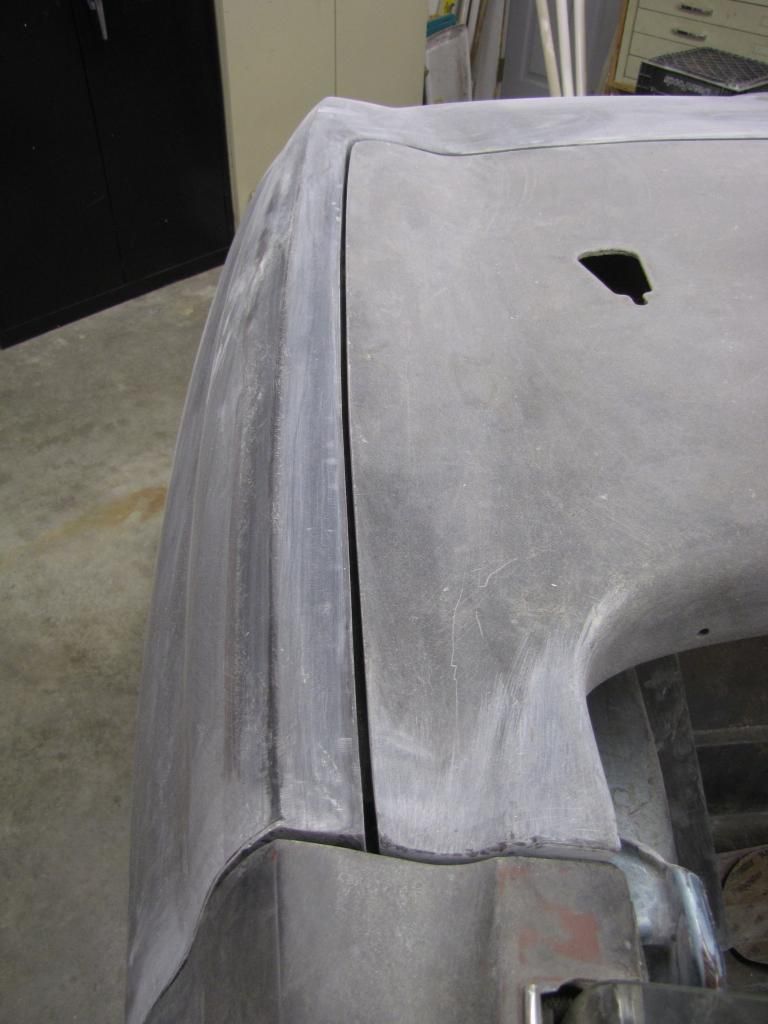
I got the rear quarter glass fill sanded and the rear deck gaps adjusted after sanding. They came out really nice, the driver side is just over 1/8" all the way down and the pass side will only need a little skim coat of filler towards the front.
I'll do the passenger side and rear lip bond seam next as well as fill in the heater box cowl hole.
Last edited by slalomfiend; 12-21-2017 at 04:13 PM.
I got the rear quarter glass fill sanded and the rear deck gaps adjusted after sanding. They came out really nice, the driver side is just over 1/8" all the way down and the pass side will only need a little skim coat of filler towards the front.
I'll do the passenger side and rear lip bond seam next as well as fill in the heater box cowl hole.
You're doing a super job! If you go for 1/8" gaps around the lid do you think that is enough seeing that you will be most likely adding a lot of paint on top of all this work. After gel coat if you use it plus primers, sealers, color, clear and what ever you may be left with a very tight seam. I'm led to believe that an 1/8" for a final gap would be minimum to allow for the twisting and bumping that a Vette is subject to on rough roads. Your lid fits nice, is the weather-strip on it as you work it?
Yes Patrick, the old weather stripping is still on the deck and doors. Also, I should clarify that the end result gap will be 1/8" or so as I'm sanding to just over prior to primer/paint, no gelcoat.
I got all three long bonding lines glassed over, for detail here is how the process goes. Grind out a trough about an inch wide, probably 3/32" deep in the middle, clean it, line with tape, glass in a full width piece and a half width strip of mesh. I curl up the bottom of the lower run of tape so the resin catches in the "gutter" and doesn't drip down the car. Let cure and then grind off with the 3"/40 grit until just barely catching the tape edge, remove the tape, clean the sticky off with laquer thinner and hand sand to contour.
All the long bond lines glassed in - SHWEET!! I'll do the two smaller vertical ones at the rear panel today.
I've also made a closure panel for the heater core opening, will get that in today as well.
Last edited by slalomfiend; 12-21-2017 at 04:18 PM.
OK on the gap detail and the weather strip. Nice info on sealing the seams because I will be there someday too. Since I found that the mount holes don't match the body at #4 I'm moving forward with body panel fit and presently modifying the repro B pillar covers. The drivers side is not as bad as the passenger and it's odd because the drivers side was smashed the passenger is factory. The passenger quarter has a nice door edge gap but over extends 1/8" past the B cover at the top, meets in the middle and is short at the base. Standing the B pillar to match the quarter is not practical because then the door latch with hit the door and the door can't move forward. I'm not sure if the factory filled that big a differenced.
I see that you sanded the quarter even with the cover then sealed it with f'glass. Is yours up to 1/8" thick over the cover on the edge? Nice filler on the heater delete!
Patrick, my B pillar on the driver's side was exactly like your passenger side. The top got extra bonding adhesive, the bottom got an additional layer of glass on the back side as back up strength then ground it down to match up with the door/quarter panel line up. Then I glassed in the entire face. There was approx. 1/4" of extra filler at the top from the factory when I removed it to do my quarter replacement and the lower lip was shattered/gone so no telling what they had done there.
I glassed the inside of the cowl/firewall fill panel and then sanded the face flush. Will apply a bit of filler and prep for paint. I've also been sanding/prepping the front clip before final fitment. Nothing glamorous I know but pushing to get to paint by March, then it will get exciting.
Last edited by slalomfiend; 12-21-2017 at 04:20 PM.
Thanks so much for confirming the pillar stuff. I feel confident to move forward. I'm not sure if this will interest you but when I've repaired areas that are reasonably flat I place pieces of plastic sheet over the laminated resin/f'glass and clamp it to achieve a smooth finish and less sanding. Any firm poly/nylon sheet works well and even metal if that is more assessable. I use Delron because I have it.
Nice tip on the glass press. Work looking good.
I remember a forum member posting that he used 1/8 inch balsa wood to get all gaps correct. He put the balsa wood in the gap and glassed the body to fit tight up to the wood. It gave a tight even gap line that was easy to sand clean for the next step.
Interesting about the balsa wood because I have a lot left over from another hobby of model building. I will try the similar idea using 1/8 poly that I will not have to sand away. Friend gave me a can of evercoat 994 that he uses at the body shop. When I open the can a distinct order of Acrylic was apparent. I was expecting a polyester scent. Does your bonding resin have an odd odor or smell like polyester?
I would like to input on how I should build the body lines back to peaks. Should I do it with filler or glass? They have gotten rounded/softened over the years and I want to sharpen them back to original. I typically use the Rage product for my filler work. Thanks in advance! I'll also ask this in a separate thread...
I would like to input on how I should build the body lines back to peaks. Should I do it with filler or glass? They have gotten rounded/softened over the years and I want to sharpen them back to original. I typically use the Rage product for my filler work. Thanks in advance! I'll also ask this in a separate thread...
A skim coat of Evercoat 870 goes a long way. However, Make sure you have some heavy grit sandpaper on hand. This stuff is like concrete once it cures. Works well for narrowing gaps as well. I've never used it as for panel bonding, but it works great as a very strong filler for spots that need to be extremely tough.
I got out the headlight buckets so I can see what new parts I need for proper install/fit into the new clip. They were pretty dirty so figured it was time to clean up - the RH housing has a couple cracks, a missing tab and both front corners broken off. LH is fine but had about 1/4" of bondo all over the top that took a while to grind off. Got them cleaned up and then fabricated replacement pieces for the aluminum welder.
This piece tapers to a point so it'll be welded on then trimmed down.
Last edited by slalomfiend; 12-22-2017 at 09:59 AM.
Got the headlight bucket repairs back and the welds are great! Took some time to get it worked back close to original. Will do the final file work once the front clip is in place. Had to be careful re-shaping the bezel tab that had been broken off but the weld was solid and it is good to go.
Also did quite a bit of prep work on the front clip but nothing really to show. Finished the fill work/sanding on the firewall and got it painted. Must easier to do at this point and any dings will be easy to touch up.
Last edited by slalomfiend; 12-22-2017 at 10:03 AM.
I've been asked if I know who makes the lift I just got but it doesn't have any markings. It doesn't look home made. Does anyone have any insight as to who makes these? If anyone wants, I can take lots of pics and measurements...
For those who want to construct their own gantry cranes, I got my plans from this place: www.gizmoplans.com Their phone # 218-348-1473. The plans are on a cd. They have plans for other neat projects.http://gizmoplans.com/gantry-crane-plans
I straightened the windshield frame, it had a 1.25" dip in the top corner on the driver side. I figure it gets pulled down as the driver is getting out of the car - will try to remind myself not to do this!! Also modified the core support bolt holes a bit so the clip lines up really nice. Then pre-fit the front bumpers and was surprised at how close they lined up on initial bolt up. Just a little lift in the center and they will be great. Starting to look like a car!!
Last edited by slalomfiend; 12-21-2017 at 04:23 PM.
Did you by any chance take a photo of the inside rear wheel tub before you attached the quarter panel? I purchased repro covers for behind the B pillars that hold the metal plates that access the #3 mount bolts plus I repaired the upper panels that they attach to. The outer most edge of those two panels where they cement to the quarter skin are overlapping and fighting each other on mine. I don't know which one I should cut or if it matters but I need to do something because the quarter will not fit. The assembly manual is not clear enough to show me what to do.
Did you match the hood to your front end yet or is that a coming attraction?
I would like to input on how I should build the body lines back to peaks. Should I do it with filler or glass? They have gotten rounded/softened over the years and I want to sharpen them back to original. I typically use the Rage product for my filler work. Thanks in advance! I'll also ask this in a separate thread...
You might be surprised how far it will get you to use a sanding board on the bare fiberglass and sand on each side of the character line, towards the line in a 45 degree cross hatch pattern. Then go to the other side and repeat. You may not need any glass or filler. Unless the edges have really been butchered up previously, it doesn't take much to bring them back to a sharp edge. You can also guide coat the character line and then work one side of it and that allows you to judge when it is straight or contoured properly. Then go to the other side and sand it towards the line in a 45 deg pattern until virtually all traces of the guide coat are gone except for a hint on the very edge.
On the 1/8 inch gap - that is a little narrow for being in bare glass. By the time high build primer, color coats and clear coats are all on, it will have closed up appreciably. I would shoot for 3/16 inch but not less than 5/32. PM Dub or John McGraw concerning this for an expert opinion.
Nice work on the bonding joints. Brings back memories.
 12-28-2014, 03:10 PM


 Brings back memories.


