Vintage Air & cutting
 02-21-2013, 03:19 PM
#1
Heel & Toe

Thread Starter

Member Since: Dec 2012
Posts: 23
Likes: 0
Received 0 Likes
on
0 Posts
I have a new Vintage Air system to install into my 66. The installer has told me that he will have to cut 6 in from my center consul near the fire wall and the side of the consul on the passenger side. The cut at the firewall will not be noticeable, but the side of the consul will be ruined. I hate to cut anything on my car.
Does this install sound familiar? Is there a way to do this without ruining the side of the consul?
Does this install sound familiar? Is there a way to do this without ruining the side of the consul?
 02-21-2013, 04:22 PM
#2
Instructor

Member Since: Oct 2011
Location: Nashville TN
Posts: 120
Likes: 0
Received 0 Likes
on
0 Posts
I have a new Vintage Air system to install into my 66. The installer has told me that he will have to cut 6 in from my center consul near the fire wall and the side of the consul on the passenger side. The cut at the firewall will not be noticeable, but the side of the consul will be ruined. I hate to cut anything on my car.
Does this install sound familiar? Is there a way to do this without ruining the side of the consul?
Does this install sound familiar? Is there a way to do this without ruining the side of the consul?
Also, the passenger side vent was saved by routing the hoses through the heater core opening.
I would suggest having your mechanic call Vintage Air's R&D group for advice. They were very helpful with an issue I had with the appearance of the driver's side duct for a '63 or '64 (I ended up using the duct they normally supply for a '66 or '67.)
02-21-2013, 04:24 PM
#3
Le Mans Master


I installed a Vintage Air system in my 66. The only cut required is for the drain hole in the firewall. You can go on the Vintage Air website and download the install instructions in a PDF file and see for yourself. Jerry
02-21-2013, 05:06 PM
#4
 02-21-2013, 08:01 PM
#5
Safety Car


66 install here ZERO cutting. Crap install but zero cutting

 02-21-2013, 08:34 PM
#7

Instructions for the new Gen IV kit, states that the center console trim piece must be cut 6 inches on the passenger.
CUT & REMOVE 6� FROM CENTER CONSOLE FLOOR TRIM AS SHOWN BELOW IN FIGURE 15.
There is not cutting of the center console with the previous Vintage air kits.
CUT & REMOVE 6� FROM CENTER CONSOLE FLOOR TRIM AS SHOWN BELOW IN FIGURE 15.
There is not cutting of the center console with the previous Vintage air kits.
02-21-2013, 09:06 PM
#8
Instructor
Member Since: Oct 2011
Location: Nashville TN
Posts: 120
Likes: 0
Received 0 Likes
on
0 Posts
Instructions for the new Gen IV kit, states that the center console trim piece must be cut 6 inches on the passenger.
CUT & REMOVE 6” FROM CENTER CONSOLE FLOOR TRIM AS SHOWN BELOW IN FIGURE 15.
There is not cutting of the center console with the previous Vintage air kits.
CUT & REMOVE 6” FROM CENTER CONSOLE FLOOR TRIM AS SHOWN BELOW IN FIGURE 15.
There is not cutting of the center console with the previous Vintage air kits.
02-21-2013, 10:22 PM
#9
Melting Slicks


i have an older version, but i also had to cut the passenger side of the center console, a couple/three inches. tried, but just couldn't get it back in place due to interference. the instructions back then did not say anything about cutting it. but then again, it's advertised as a "sure fit" system and the running joke was and probably always will be: "yeah, if you cut and hack and modify enough, it sure fits!" 
02-21-2013, 10:54 PM
#10
Safety Car
i have an older version, but i also had to cut the passenger side of the center console, a couple/three inches. tried, but just couldn't get it back in place due to interference. the instructions back then did not say anything about cutting it. but then again, it's advertised as a "sure fit" system and the running joke was and probably always will be: "yeah, if you cut and hack and modify enough, it sure fits!"

 02-23-2013, 01:52 PM
#12
Safety Car

I just installed a new, Gen IV unit, and saw the instruction to cut the console. I mocked the unit up, and saw that it did look like the console would hit on the servo motor. I forced the mounting of the unit slightly inboard before I installed the mounting brackets on the Z-bar, and the console cleared. Just finished the carpet today, and slipped the console back in place. Sure enough, the console cleared by at least 1/16"!
Don't trim the console, until you have to, it may clear,if you work with it a little. The older units cleared by a mile, but the Gen IV units are real close, but I think with a little finesse in the mounting, it can be made to clear.
Regards, John McGraw
Don't trim the console, until you have to, it may clear,if you work with it a little. The older units cleared by a mile, but the Gen IV units are real close, but I think with a little finesse in the mounting, it can be made to clear.
Regards, John McGraw
 02-23-2013, 03:21 PM
#14
Le Mans Master

i have an older version, but i also had to cut the passenger side of the center console, a couple/three inches. tried, but just couldn't get it back in place due to interference. the instructions back then did not say anything about cutting it. but then again, it's advertised as a "sure fit" system and the running joke was and probably always will be: "yeah, if you cut and hack and modify enough, it sure fits!"
02-23-2013, 11:57 PM
#15
Safety Car
02-24-2013, 08:06 PM
#16
Safety Car
As promised, here is a pic of my new Gen IV VA unit installed without cutting the console. It is clear, but it take a little finessing when mounting to miss the console.
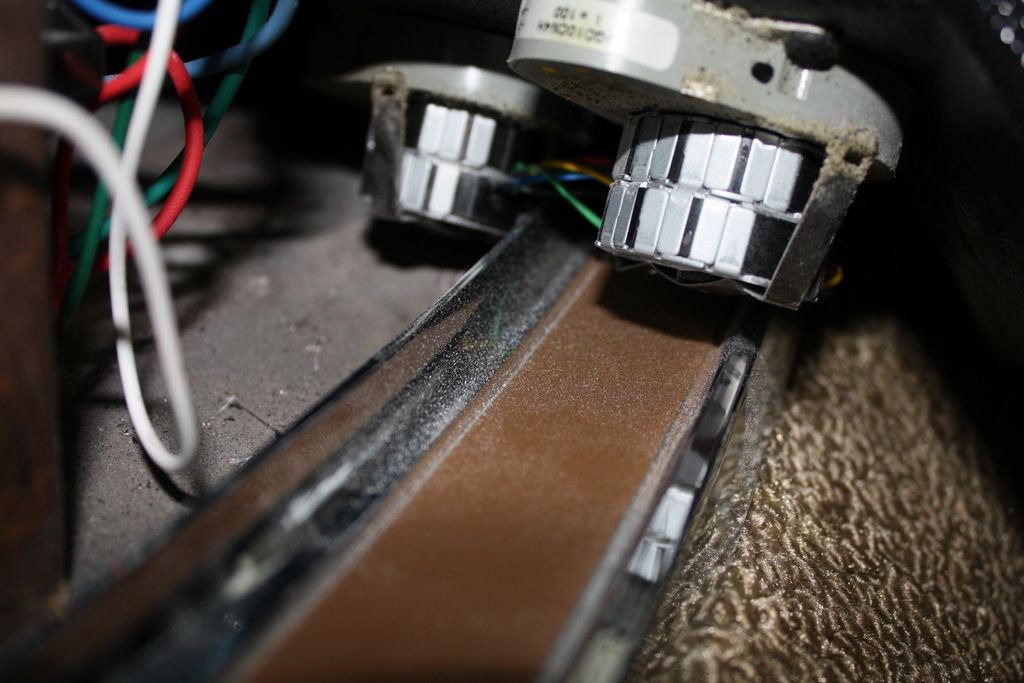
Nobody will ever see the cut, even if you need to cut it, I had a hard enough time just getting a pic of it!
Regards, John McGraw
Nobody will ever see the cut, even if you need to cut it, I had a hard enough time just getting a pic of it!
Regards, John McGraw
03-26-2013, 02:22 PM
#17
Burning Brakes

Sorry to butt into this thread but it looks like there is a bunch of experience related to my questions  I am planning ordering a gen IV system for a 63 split window I am picking up this week. The car has a base 327 and I have a few questions.
Did you all move your alt to the drivers side or did you just put the compressor on the drivers site? Looks like the order form will let me order either way.
If you move the alt what bracket did you use?
What water pump and crank double pulley's did you use and where did you get them?
Did you have to upgrade your alt?
Did you need to add an electric fan?
Did you have to remove the radiator to install the condenser or is there another way to install that?
Any other tips?
Sorry for all the questions, I just installed a gen IV in my 60 corvette and it seemed a lot easier compared to the directions I read for the 63.
I am planning ordering a gen IV system for a 63 split window I am picking up this week. The car has a base 327 and I have a few questions. Did you all move your alt to the drivers side or did you just put the compressor on the drivers site? Looks like the order form will let me order either way.
If you move the alt what bracket did you use?
What water pump and crank double pulley's did you use and where did you get them?
Did you have to upgrade your alt?
Did you need to add an electric fan?
Did you have to remove the radiator to install the condenser or is there another way to install that?
Any other tips?
Sorry for all the questions, I just installed a gen IV in my 60 corvette and it seemed a lot easier compared to the directions I read for the 63.
03-26-2013, 03:09 PM
#18
Instructor
Member Since: Oct 2011
Location: Nashville TN
Posts: 120
Likes: 0
Received 0 Likes
on
0 Posts
[QUOTE=C1-Curt;1583465798]Sorry to butt into this thread but it looks like there is a bunch of experience related to my questions I am planning ordering a gen IV system for a 63 split window I am picking up this week. The car has a base 327 and I have a few questions.
Did you all move your alt to the drivers side or did you just put the compressor on the drivers site? Looks like the order form will let me order either way.
I moved the alternator to the driver's side. Factory air cars have A/C on passenger side plus the hose routing looks much better with the compressor on the passenger side.
If you move the alt what bracket did you use?
They sent me the correct brackets by selecting "move alternator to driver's side."
What water pump and crank double pulley's did you use and where did you get them?
Mine already had double pulleys. You also have to select short or long shaft water pump. It should have a short shaft unless it has been changed.
Did you have to upgrade your alt?
No
Did you need to add an electric fan?
No, but I did go with a factory type 7-blade w/AC fan blade
Did you have to remove the radiator to install the condenser or is there another way to install that?
No, just had to loosen the support brackets.
Any other tips?
1. Route the hoses through the heater core opening to save your passenger side vent.
2. Ask for the '67 drivers side duct/eyeball. The one that comes with the '63 & '64 kit puts the eyeball too far to the right. Installation of the duct is much easier if you purchase a '63 w/air hood release cable and move it the right of where it was originally (there are holes already drilled in the bar.)
Good luck,
Dennis
I am planning ordering a gen IV system for a 63 split window I am picking up this week. The car has a base 327 and I have a few questions. Did you all move your alt to the drivers side or did you just put the compressor on the drivers site? Looks like the order form will let me order either way.
I moved the alternator to the driver's side. Factory air cars have A/C on passenger side plus the hose routing looks much better with the compressor on the passenger side.
If you move the alt what bracket did you use?
They sent me the correct brackets by selecting "move alternator to driver's side."
What water pump and crank double pulley's did you use and where did you get them?
Mine already had double pulleys. You also have to select short or long shaft water pump. It should have a short shaft unless it has been changed.
Did you have to upgrade your alt?
No
Did you need to add an electric fan?
No, but I did go with a factory type 7-blade w/AC fan blade
Did you have to remove the radiator to install the condenser or is there another way to install that?
No, just had to loosen the support brackets.
Any other tips?
1. Route the hoses through the heater core opening to save your passenger side vent.
2. Ask for the '67 drivers side duct/eyeball. The one that comes with the '63 & '64 kit puts the eyeball too far to the right. Installation of the duct is much easier if you purchase a '63 w/air hood release cable and move it the right of where it was originally (there are holes already drilled in the bar.)
Good luck,
Dennis
03-26-2013, 03:26 PM
#19
Le Mans Master
The above info is pretty sound.
I went with a SPAL puller fan inside the shroud including factory 5 blade and clutch. Keeps it cool in Houstons heat and provides heat soak relief on short stops. Doesn't take any extra hp either.
I went with a SPAL puller fan inside the shroud including factory 5 blade and clutch. Keeps it cool in Houstons heat and provides heat soak relief on short stops. Doesn't take any extra hp either.
05-01-2013, 09:42 AM
#20
Burning Brakes
When you all moved your alternator to the drivers side did you have to use a different upper radiator hose. I see one listed at CC for cars with and without A/C in 63, wondering if that was to accommodate for the alt belt.