58: complete rewiring of the car - need advice
 06-12-2013, 10:28 AM
#21
Melting Slicks


Member Since: Feb 2011
Location: Middletown Ohio
Posts: 2,892
Received 167 Likes
on
130 Posts
2016 C1 of Year Finalist
1957 and earlier Corvettes are very easy to work under the dash, Just remove the seats and possibly the steering wheel and there is lots of space.
1958 through 1962 are more difficult due to the center console.
After 1962 just pay someone to do it...
1958 through 1962 are more difficult due to the center console.
After 1962 just pay someone to do it...
 06-16-2013, 01:53 AM
#22
Tech Contributor
Thread Starter

Hi everyone,
OK. So I removed the seats, but they didn't come out like I was expecting (like shown in Joe's .pdf)
Below is Joe's instructions:
After pushing the seat back, I used a swivel to remove the two front seat track bolts
The rear of the track just pushes into two brackets on the floor.


Below is a picture of the seat frame in my '58. The back cushions/springs came off relatively easily, then the bottom slid forward and up and out. Then I removed those two bolts circled in yellow then moved the seat frame forward and removed the 4 more rear screws. There was no rear bracket... I wish there were... It took 3 hours to get both frames out
As you can see there is no way that frame is coming out without first removing the cushions/springs.

What is the correct way that these are supposed to be removed and then installed again? Are the cushions supposed to come out that easily?
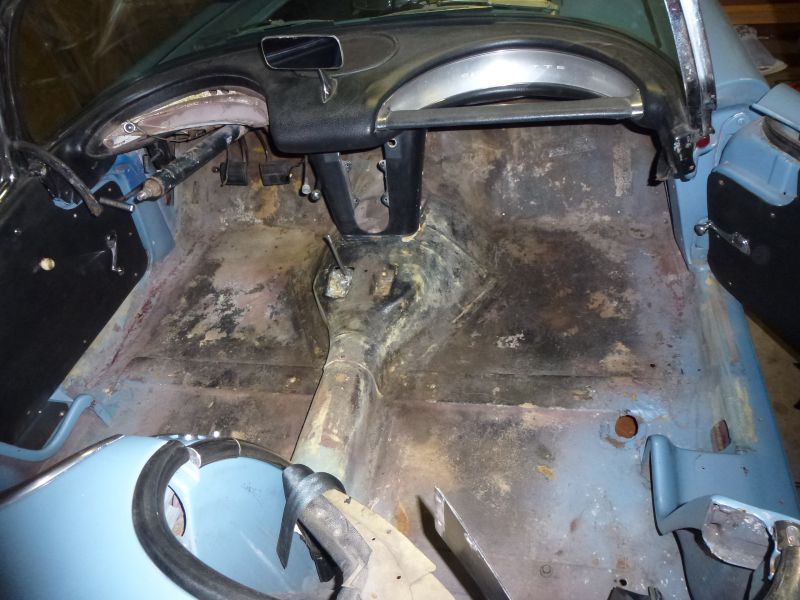
Also, I want to replace the interior carpet. Can the carpet that sits on top of the tunnel be replaced easily? Can that center brace (pointed with the yellow arrow) be lifted by about a quarter inch to get new carpet under? Pretend like you don't see that Audiovox tape deck - it was there when I bought the car

OK. So I removed the seats, but they didn't come out like I was expecting (like shown in Joe's .pdf)
Below is Joe's instructions:
After pushing the seat back, I used a swivel to remove the two front seat track bolts
The rear of the track just pushes into two brackets on the floor.
Below is a picture of the seat frame in my '58. The back cushions/springs came off relatively easily, then the bottom slid forward and up and out. Then I removed those two bolts circled in yellow then moved the seat frame forward and removed the 4 more rear screws. There was no rear bracket... I wish there were... It took 3 hours to get both frames out
As you can see there is no way that frame is coming out without first removing the cushions/springs.
What is the correct way that these are supposed to be removed and then installed again? Are the cushions supposed to come out that easily?
Also, I want to replace the interior carpet. Can the carpet that sits on top of the tunnel be replaced easily? Can that center brace (pointed with the yellow arrow) be lifted by about a quarter inch to get new carpet under? Pretend like you don't see that Audiovox tape deck - it was there when I bought the car
06-16-2013, 07:56 AM
#23
Team Owner


Yes...earlier C1 seats come out differently. Joe shows the 61/62 setup in his PDF. The center console is immovable. You have to remove the lower chrome horseshoe and carefully trim carpet around the console to fit under the chrome piece.
06-16-2013, 09:14 AM
#24
Instructor


[/QUOTE]
I estimate this project will take me 6 months. (it took me one month to replace the water pump I'm pretty sure this is going to turn into an interior restoration project)
Thanks again.
aobrien[/QUOTE]
Wow just catching up on this thread... this is exactly how my body off total rebuild of my '58 started!
1. Burn down wiring
2. Decide to rewire
3. Gee those guages could use restoring
4. Dash pad could use a fresh -up
5. Since the dash is out might as well paint it!
6. I really should take care of the frame and engine if everything else is gunna look new....
Have fun.... It's all doable...Use the forum... these folks saved me many times..take lots of pics as you go for the rebuild (just kept my smart phone with me and snapped 100's as I went)
I will help when I can but most here have more knowledge and are quicker on the replies!
Kurt
I estimate this project will take me 6 months. (it took me one month to replace the water pump
I'm pretty sure this is going to turn into an interior restoration project)Thanks again.
aobrien[/QUOTE]
Wow just catching up on this thread... this is exactly how my body off total rebuild of my '58 started!
1. Burn down wiring
2. Decide to rewire
3. Gee those guages could use restoring
4. Dash pad could use a fresh -up
5. Since the dash is out might as well paint it!
6. I really should take care of the frame and engine if everything else is gunna look new....
Have fun.... It's all doable...Use the forum... these folks saved me many times..take lots of pics as you go for the rebuild (just kept my smart phone with me and snapped 100's as I went)
I will help when I can but most here have more knowledge and are quicker on the replies!
Kurt
06-16-2013, 11:55 AM
#25
Tech Contributor
Thread Starter
Ok, thanks Frank... just wanted to make sure I wasn't crazy.
Does anybody have instructions on the correct way to remove/install the seats on a 58 so I can put them back together properly when the time comes?
Kurt, yep pretty much the same. I am drawing the line at the windshield, however. The consignment shop, where I bought the car, broke two windshields trying to replace the weatherstripping.
I want to put in a new engine reallllllly bad... but I should probably restore the suspension first
I took a bunch "before" pictures... I'll just put them here so you can see what I started with


[EDIT] fixed the links [EDIT]
Does anybody have instructions on the correct way to remove/install the seats on a 58 so I can put them back together properly when the time comes?
Kurt,
yep pretty much the same. I am drawing the line at the windshield, however. The consignment shop, where I bought the car, broke two windshields trying to replace the weatherstripping. I want to put in a new engine reallllllly bad... but I should probably restore the suspension first
I took a bunch "before" pictures... I'll just put them here so you can see what I started with
[EDIT] fixed the links [EDIT]
Last edited by aobrien; 06-16-2013 at 03:56 PM.
06-16-2013, 01:03 PM
#26
Team Owner
By the way the C1 ST-12 Service manual is on line now and talks about seat removal:
http://chevy.oldcarmanualproject.com...62csg0124.html
Another tip on the center console carpet ( I don't glue it down anywhere at all BTW). Lay the carpet piece over the tranny hump and punch a hole thru the center of where the ashtray hole is then CAREFULL cut outwards all around the ash tray opening. Then install the ashtray only and this sort of 'locks' the carpet piece in and you can then trim around the gear shift opening and center console without things moving around on you. Best to make screw holes in carpet with hot soldering iron. Just screwing into the carpet will unravel threads!
Last edited by Frankie the Fink; 06-16-2013 at 04:17 PM.
11-30-2013, 10:42 PM
#27
Tech Contributor
Thread Starter
Well, it looks like this is turning into an 6 month project anyway.
Here are some more picts...
The radiator was leaking pretty badly... I'll be damned if I put a new harness in just to let it get doused with radiator fluid.
New radiator!
TIP: you don't need to remove the hood to get the radiator out. I spent several days jerking around with that hood and I'm still not happy with the fit. Wish I had never taken it off the car.
Here is the gutted interior. Need to learn how to play with fiberglass to fill that hole.
I spent 2 months hand sanding the driver side seat frame. This is the end result.
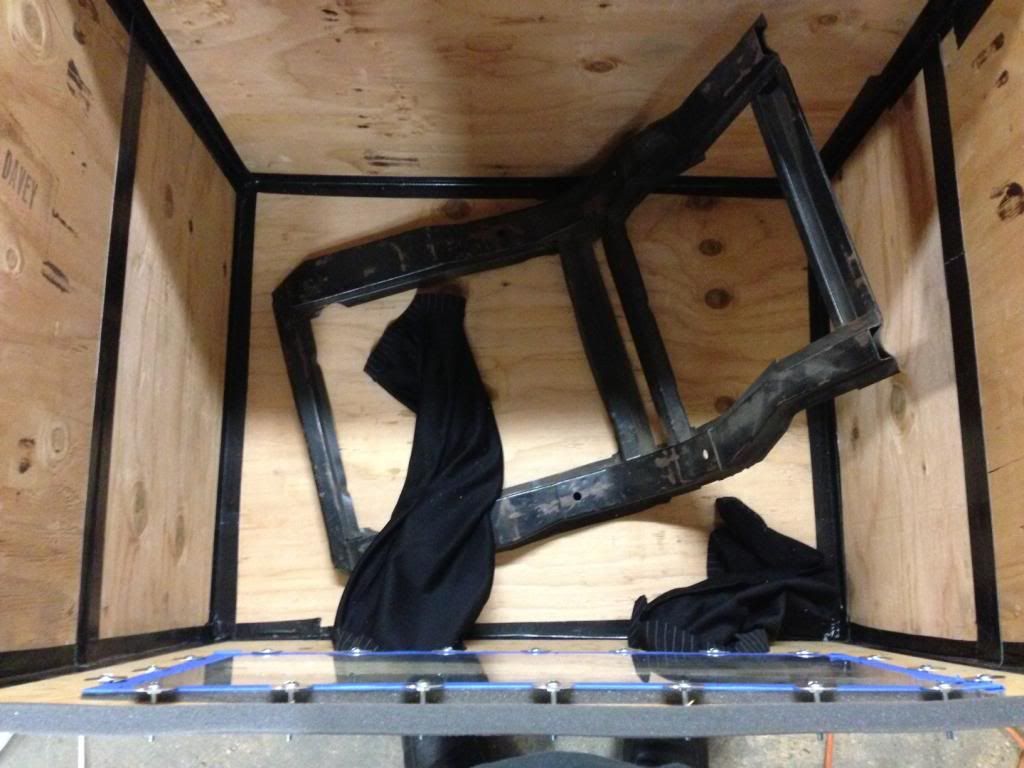
Built a sandblast cabinet for the second seat frame. It is total crap, but it works so much better than sanding by hand.
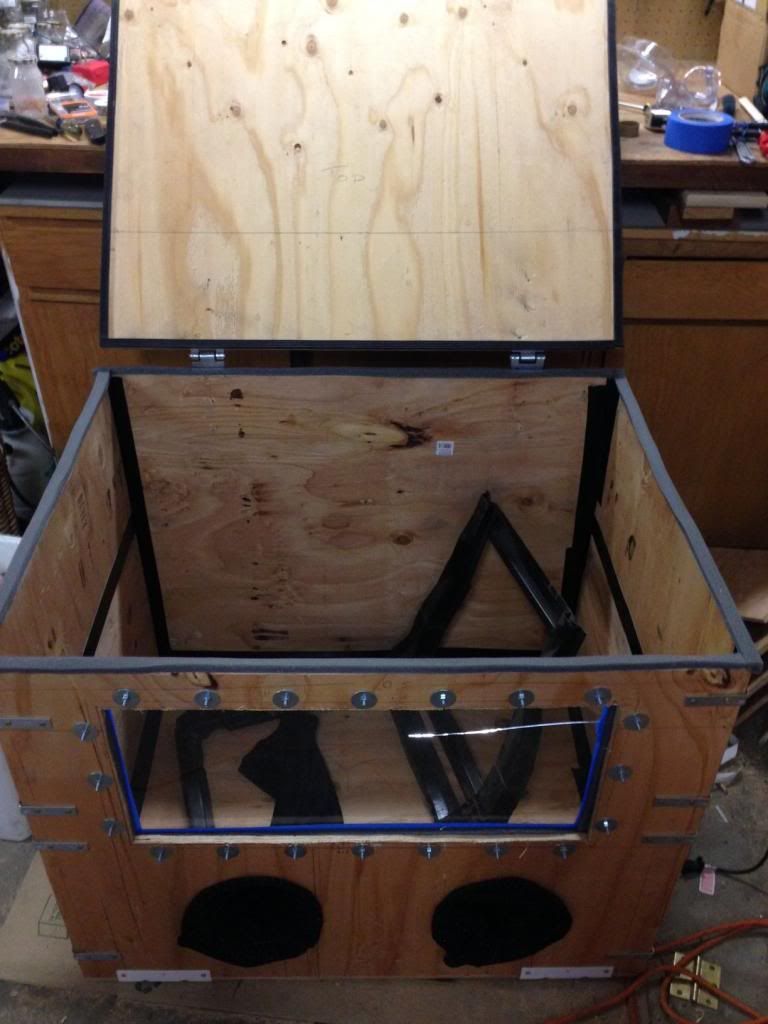
I cut up a pair of slacks for the arm holes. Originally, I had fastened them to a pair of gloves, but it works much better without the gloves. Closed up the hole where the foot comes out and just grab what you need to grab.
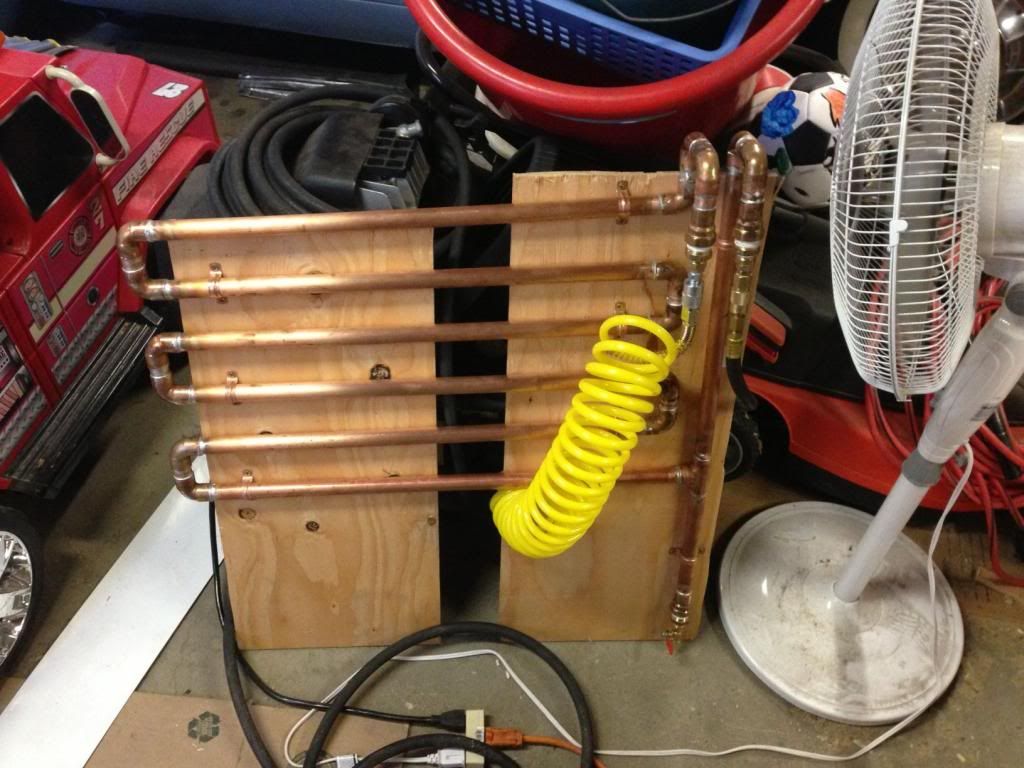
Condenser and water trap for the compressed air.
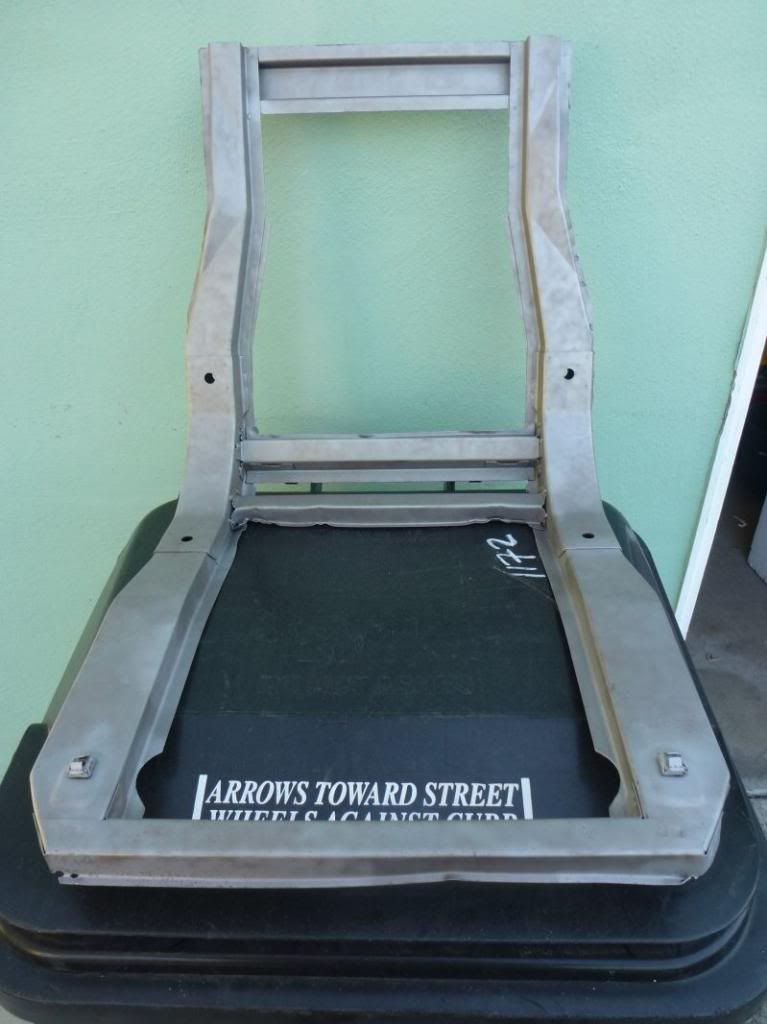
This is the passenger side seat frame after sand blasting.
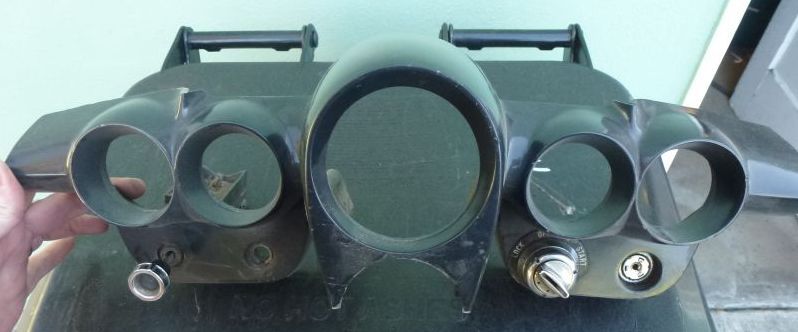
How do I take these 3 pieces (headlight switch, ignition switch, cig lighter) out of the cluster?. I need to get them out before I can sand blast it.
Here are some more picts...
The radiator was leaking pretty badly... I'll be damned if I put a new harness in just to let it get doused with radiator fluid.

New radiator!
TIP: you don't need to remove the hood to get the radiator out. I spent several days jerking around with that hood and I'm still not happy with the fit. Wish I had never taken it off the car.

Here is the gutted interior. Need to learn how to play with fiberglass to fill that hole.

I spent 2 months hand sanding the driver side seat frame. This is the end result.

Built a sandblast cabinet for the second seat frame. It is total crap, but it works so much better than sanding by hand.

I cut up a pair of slacks for the arm holes. Originally, I had fastened them to a pair of gloves, but it works much better without the gloves. Closed up the hole where the foot comes out and just grab what you need to grab.

Condenser and water trap for the compressed air.

This is the passenger side seat frame after sand blasting.

How do I take these 3 pieces (headlight switch, ignition switch, cig lighter) out of the cluster?. I need to get them out before I can sand blast it.
 11-30-2013, 11:05 PM
#28
Tech Contributor


Ignition switch: Insert key. Turn key to the left and while holding to the left insert a paperclip into one of the 2 tiny holes on the face of the switch assembly. Press the paperclip in to release a spring and then turn the key further to the left, removing the key and ignition tumbler as an assembly. Now, grasp the nut from the front of the cluster and unscrew it. The ignition switch will come out from the back.
Cig lighter: Yours looks odd, but normally you just unscrew the outer cig. lighter housing from the back of the cluster, and then the inner assembly comes out from the front.
12-01-2013, 06:28 AM
#31
Safety Car

I must have missed this thread back in June when it started. You're doing a nice job. Lots of good help from the crew here.
I caught the comment about not being happy with the hood alignment and may have some ideas which may help.
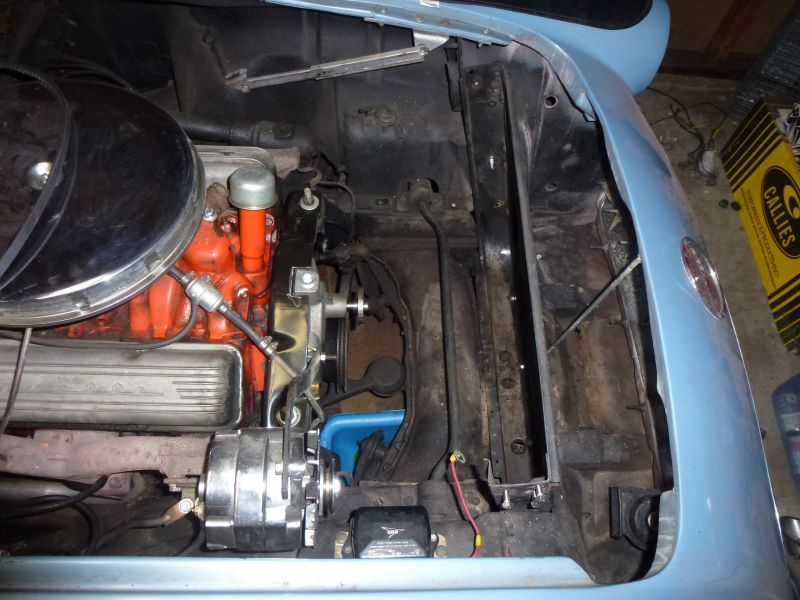
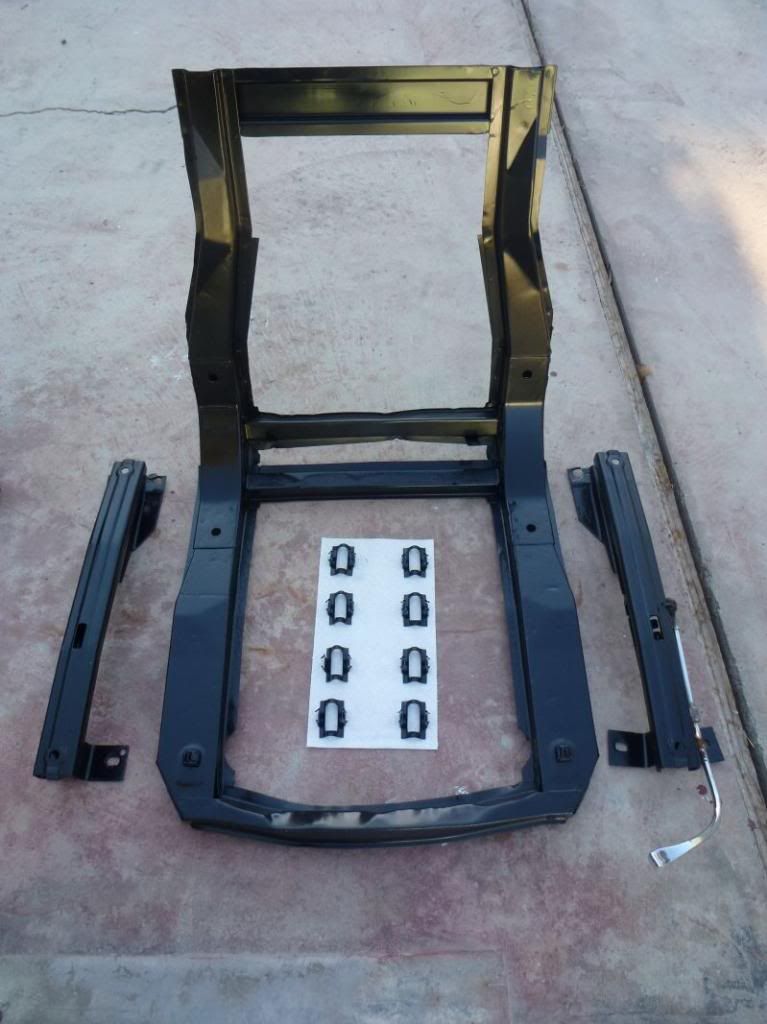
First, I see something which doesn't look right with the radiator support that may be a hood alignment issue. That appears to be a reproduction. Maybe a while ago, but maybe not original. Originals had a notch on the outer horizontal bar to allow the side of the hinges to fit flat against the support. Check that the hinge fits flat. If it doesn't it'll throw off your alignment. Early repros up to a few years ago or so had this flaw. I believe the newer ones are corrected. A few pics below. 1st is yours, 2nd is a original in a '59, 3rd/4th a repro after modification/correction.
Also make sure you use flange head bolts with the toothed lock washers to keep them locked tight. I can't be sure in your photo but they look like regular hex bolts.
Next, check your hood hinges for too much play in the pivot rivets. If they're badly worn it will make for a inconsistent fit every time you adjust it. If they're too loose, you can buy replacement rivets to tighten things up. It's easy, just drill out the old ones and install the new rivets using a hammer and drift, of if you have a press even easier. Just make sure you don't crush the circular springs too much.
Make sure your radiator support is tightly fastened at the 2 side positions where bolted to the inner skirts, and at the bottom 2 carriage bolts where shimmed to the frame third-arm steering bracket. That's what's really holding your hood in position. The rad support doesn't move, but it's attach points can.
This is what helps me for every 58-62 hood installation. I always prefer to install the hood by myself. I install it when it's in the closed position.
When I restore a car I test fit the grille when I install bumpers, etc, then I remove the grille. When it comes time for the hood, I leave the rear male latches off. I install the hinges to the radiator support, 3 finger tight bolts each side.
Lay towels around the entire hood ledge on the body. I tape rags around the front surround of the hood opening, especially at the front corners. I grab the hood by the sides with arms stretched and lay it down and over the towels into closed position.
Reach under and up into the grille opening and finger tighten the 2 bolts on each hinge to the hood. If things don't line up with the hood nut plates, thread in a 5/16" stud into one of the holes as an assist. Get one bolt in and tighten a bit to lock the nut plate in position for the other bolt, remove the stud and replace with the other bolt.
Tighten up 2 of the side hinge to rad support bolts, then tighten the 2 hood bolts on each side. This is all during the trial and error of checking the hood gap front and side and rear for alignment. BTW I use a ratcheting angled end box wrench for the tighten-up.
Being alone, carefully raise the hood a little bit on each side while eying the front corners. A little rechecking and adjusting of the hinge bolts will be needed as normal, but now you can do it without trying to hold the hood up with your neck and your head, with your buddy on the other side doing the same thing. It's all done with the hood closed and reaching under and through the grille opening. Finish up adding the 3rd bolts on the side of the hinges and tighten everything securely. Attach the hood support and rear latches, etc, etc, etc.
Rich
p.s. The same works for 63-67, if your grille is out of course, but requires bumpers to be removed also in order to remove the grille. If that stuff is already out during a restoration, install the hood the same as above before installing the grille and bumpers.
I caught the comment about not being happy with the hood alignment and may have some ideas which may help.
First, I see something which doesn't look right with the radiator support that may be a hood alignment issue. That appears to be a reproduction. Maybe a while ago, but maybe not original. Originals had a notch on the outer horizontal bar to allow the side of the hinges to fit flat against the support. Check that the hinge fits flat. If it doesn't it'll throw off your alignment. Early repros up to a few years ago or so had this flaw. I believe the newer ones are corrected. A few pics below. 1st is yours, 2nd is a original in a '59, 3rd/4th a repro after modification/correction.
Also make sure you use flange head bolts with the toothed lock washers to keep them locked tight. I can't be sure in your photo but they look like regular hex bolts.
Next, check your hood hinges for too much play in the pivot rivets. If they're badly worn it will make for a inconsistent fit every time you adjust it. If they're too loose, you can buy replacement rivets to tighten things up. It's easy, just drill out the old ones and install the new rivets using a hammer and drift, of if you have a press even easier. Just make sure you don't crush the circular springs too much.
Make sure your radiator support is tightly fastened at the 2 side positions where bolted to the inner skirts, and at the bottom 2 carriage bolts where shimmed to the frame third-arm steering bracket. That's what's really holding your hood in position. The rad support doesn't move, but it's attach points can.
This is what helps me for every 58-62 hood installation. I always prefer to install the hood by myself. I install it when it's in the closed position.
When I restore a car I test fit the grille when I install bumpers, etc, then I remove the grille. When it comes time for the hood, I leave the rear male latches off. I install the hinges to the radiator support, 3 finger tight bolts each side.
Lay towels around the entire hood ledge on the body. I tape rags around the front surround of the hood opening, especially at the front corners. I grab the hood by the sides with arms stretched and lay it down and over the towels into closed position.
Reach under and up into the grille opening and finger tighten the 2 bolts on each hinge to the hood. If things don't line up with the hood nut plates, thread in a 5/16" stud into one of the holes as an assist. Get one bolt in and tighten a bit to lock the nut plate in position for the other bolt, remove the stud and replace with the other bolt.
Tighten up 2 of the side hinge to rad support bolts, then tighten the 2 hood bolts on each side. This is all during the trial and error of checking the hood gap front and side and rear for alignment. BTW I use a ratcheting angled end box wrench for the tighten-up.
Being alone, carefully raise the hood a little bit on each side while eying the front corners. A little rechecking and adjusting of the hinge bolts will be needed as normal, but now you can do it without trying to hold the hood up with your neck and your head, with your buddy on the other side doing the same thing. It's all done with the hood closed and reaching under and through the grille opening. Finish up adding the 3rd bolts on the side of the hinges and tighten everything securely. Attach the hood support and rear latches, etc, etc, etc.
Rich
p.s. The same works for 63-67, if your grille is out of course, but requires bumpers to be removed also in order to remove the grille. If that stuff is already out during a restoration, install the hood the same as above before installing the grille and bumpers.
Last edited by rich5962; 12-01-2013 at 07:12 AM.
12-01-2013, 06:42 AM
#32
Team Owner
Well now Rich made me do another cut and paste to post all that good stuff in my tech library...
BTW - aobrian:
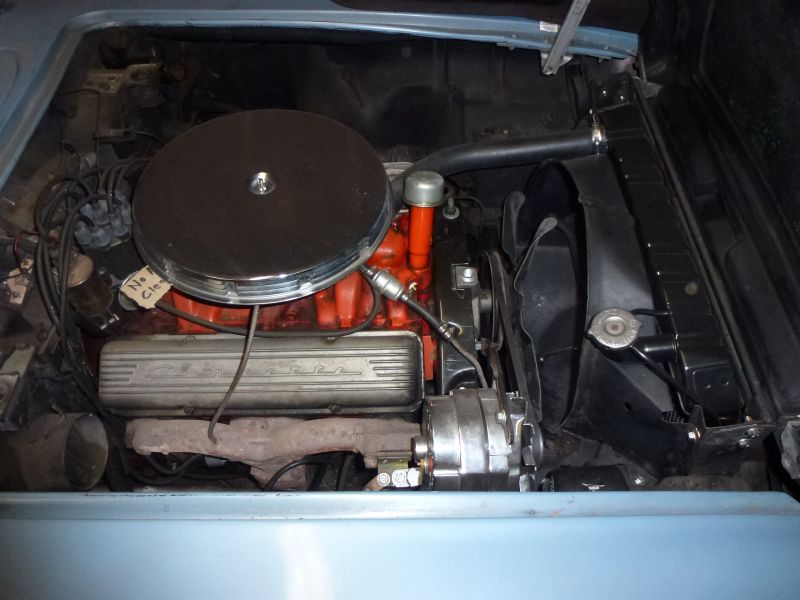
Get RID of that d@mn rubber fuel line over the intake manifold - wasn't one fire enough for you....
BTW - aobrian:
Get RID of that d@mn rubber fuel line over the intake manifold - wasn't one fire enough for you....
12-01-2013, 07:03 AM
#33
Safety Car
Yikes good catch Frank I missed that one.
I totally agree. Make or get a hard line in there. GM NEVER put a rubber hose after the fuel pump to the carburetor/filter for a reason. Imagine the law suits for negligent design practices if they did.
If you want to keep the filter function, get a period correct glass bowl GF-48 filter between the FP and the carb. Make up a few inverted flare lines or buy them made up. You could get this one and modify it to fit. Z102
It's not only functional and easily viewable, it's cool looking IMO.
edit.....BTW when you replace the FP to carb hard line, it fits between the front engine mount bracket and the front of the engine block, not in front of the engine mount as in your pic.
Last edited by rich5962; 12-01-2013 at 07:08 AM.
05-13-2014, 03:37 AM
#34
Tech Contributor
Thread Starter
Delayed thanks for the advice... I will be replacing that rubber fuel line before she gets back on the road.
I'm finally ready to start putting the car back together now and I have lots more questions.
I'm starting with the engine wiring harness. I took lots of pictures when I took out the old wires, but I have a sneaky feeling that bubba got his hands in there somewhere. I want to make sure I have everything right.
First, I need some help understanding the solenoid. I understand that there are basically 4 terminals on the solenoid.
1) + Battery input
2) + Battery output to the starter
3) S terminal
4) R terminal
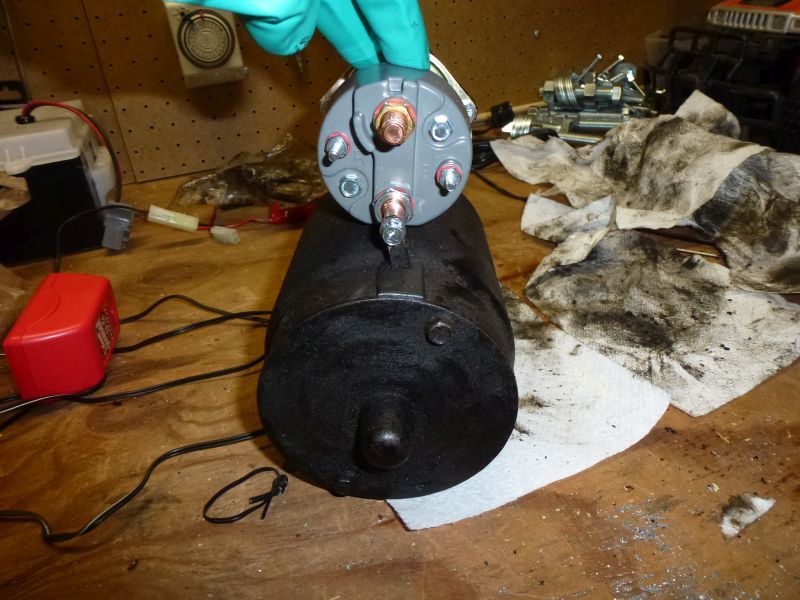
Applying a voltage to the "S" terminal will engage the relay which connects the +Battery input to +Battery output which provides power for the starter motor. GND for the starter is supplied through the engine block. What is the return path for the "S" terminal - GND through the engine block too?
I don't understand what the "R" terminal is for? The Doc Rebuild wiring diagram says the green wire connects from the "R" terminal to the coil resistor. For the life of me I couldn't find the information anywhere on the internet.
What is the proper way to wire the coil resistor... could someone post a pict, please?
I think my problem with the hood alignment has to do with the 2 side positions where the radiator boltes to the inner skirt. What is the best way to make sure that it doesn't slip? I used some 2" diameter washers, but it still slipped. I was thinking of sandwiching in some rubber or something... what is the right/best way This is a driver car and almost nothing is original.
That's all for now... I'm sure I'll have more later.
aobrien
I'm finally ready to start putting the car back together now and I have lots more questions.
I'm starting with the engine wiring harness. I took lots of pictures when I took out the old wires, but I have a sneaky feeling that bubba got his hands in there somewhere. I want to make sure I have everything right.
First, I need some help understanding the solenoid. I understand that there are basically 4 terminals on the solenoid.
1) + Battery input
2) + Battery output to the starter
3) S terminal
4) R terminal

Applying a voltage to the "S" terminal will engage the relay which connects the +Battery input to +Battery output which provides power for the starter motor. GND for the starter is supplied through the engine block. What is the return path for the "S" terminal - GND through the engine block too?
I don't understand what the "R" terminal is for? The Doc Rebuild wiring diagram says the green wire connects from the "R" terminal to the coil resistor. For the life of me I couldn't find the information anywhere on the internet.
What is the proper way to wire the coil resistor... could someone post a pict, please?
I think my problem with the hood alignment has to do with the 2 side positions where the radiator boltes to the inner skirt. What is the best way to make sure that it doesn't slip? I used some 2" diameter washers, but it still slipped. I was thinking of sandwiching in some rubber or something... what is the right/best way
This is a driver car and almost nothing is original.That's all for now... I'm sure I'll have more later.
aobrien
05-13-2014, 07:21 AM
#35
Team Owner
Delayed thanks for the advice... I will be replacing that rubber fuel line before she gets back on the road.
I'm finally ready to start putting the car back together now and I have lots more questions.
I'm starting with the engine wiring harness. I took lots of pictures when I took out the old wires, but I have a sneaky feeling that bubba got his hands in there somewhere. I want to make sure I have everything right.
First, I need some help understanding the solenoid. I understand that there are basically 4 terminals on the solenoid.
1) + Battery input
2) + Battery output to the starter
3) S terminal
4) R terminal
Applying a voltage to the "S" terminal will engage the relay which connects the +Battery input to +Battery output which provides power for the starter motor. GND for the starter is supplied through the engine block. What is the return path for the "S" terminal - GND through the engine block too?
I don't understand what the "R" terminal is for? The Doc Rebuild wiring diagram says the green wire connects from the "R" terminal to the coil resistor. For the life of me I couldn't find the information anywhere on the internet.
What is the proper way to wire the coil resistor... could someone post a pict, please?
I think my problem with the hood alignment has to do with the 2 side positions where the radiator boltes to the inner skirt. What is the best way to make sure that it doesn't slip? I used some 2" diameter washers, but it still slipped. I was thinking of sandwiching in some rubber or something... what is the right/best way This is a driver car and almost nothing is original.
That's all for now... I'm sure I'll have more later.
aobrien
I'm finally ready to start putting the car back together now and I have lots more questions.
I'm starting with the engine wiring harness. I took lots of pictures when I took out the old wires, but I have a sneaky feeling that bubba got his hands in there somewhere. I want to make sure I have everything right.
First, I need some help understanding the solenoid. I understand that there are basically 4 terminals on the solenoid.
1) + Battery input
2) + Battery output to the starter
3) S terminal
4) R terminal
Applying a voltage to the "S" terminal will engage the relay which connects the +Battery input to +Battery output which provides power for the starter motor. GND for the starter is supplied through the engine block. What is the return path for the "S" terminal - GND through the engine block too?
I don't understand what the "R" terminal is for? The Doc Rebuild wiring diagram says the green wire connects from the "R" terminal to the coil resistor. For the life of me I couldn't find the information anywhere on the internet.
What is the proper way to wire the coil resistor... could someone post a pict, please?
I think my problem with the hood alignment has to do with the 2 side positions where the radiator boltes to the inner skirt. What is the best way to make sure that it doesn't slip? I used some 2" diameter washers, but it still slipped. I was thinking of sandwiching in some rubber or something... what is the right/best way
This is a driver car and almost nothing is original.That's all for now... I'm sure I'll have more later.
aobrien
10-26-2014, 01:43 AM
#36
Tech Contributor
Thread Starter
I just want to wrap up this thread and thank everyone for the help advice.
The wiring harness is now installed and fully functional.
Installed a steel fuel line and correct filter from the pump to the carb.
Instrument cluster and seats are installed.
The '58 is back on the road
Next on the list is to finish the interior (seats/carpet/console/door panels...)
Thanks again everyone for the help.