Body Lift Advice - 1965 Convertible
 07-23-2013, 12:45 AM
#1
Racer


Thread Starter


I am getting close to lifting the body off of my 1965 Convertible. The body is in pretty decent shape needing only minor repair and the lines are pretty nice. My plan is to:
Lift the body off
Restore the frame and suspension
Clean the underside of the body
Do fiberglass repairs under the body
Paint the underside of the body
Put the body back on, prep and paint
Etc.
Should I keep the doors on when I do the lift? If so, will that prevent the body from flexing? Does the sequence above sound reasonable?
 07-23-2013, 02:07 AM
#2
Burning Brakes


I am getting close to lifting the body off of my 1965 Convertible. The body is in pretty decent shape needing only minor repair and the lines are pretty nice. My plan is to:
Lift the body off
Restore the frame and suspension
Clean the underside of the body
Do fiberglass repairs under the body
Paint the underside of the body
Put the body back on, prep and paint
Etc.
Should I keep the doors on when I do the lift? If so, will that prevent the body from flexing? Does the sequence above sound reasonable?
Lift the body off
Restore the frame and suspension
Clean the underside of the body
Do fiberglass repairs under the body
Paint the underside of the body
Put the body back on, prep and paint
Etc.
Should I keep the doors on when I do the lift? If so, will that prevent the body from flexing? Does the sequence above sound reasonable?
1. Leave the core support in while the body is on the dolly.
2. During the lift you may want to run a strap from the nose over the windshield to the rear license area. Tighten only snug. This will reduce the rear end sag.
3. Prep & paint the body on the dolly, not on the chassis.
4. Underside of the body is not painted

5. Oh, and leave the doors on.
Make a list first and double check that you have removed all items needed to lift body. Let us know if you need that list.
07-23-2013, 11:09 AM
#3
Melting Slicks

Here's the sequence that makes sense to me:
Do bodywork and prep with the body still on the chassis. Mandatory if you are massaging the shut lines.
Remove doors and brace opening with a length of B-strut or EMT from the upper hinge back to an L bracket attached to the striker mount holes.
Pull body, do chassis & underside work and reinstall body.
Mask from body down to floor, continuous seal.
Shoot jambs, reinstall doors, deck lid (if removed) and topcoat.
07-23-2013, 11:30 AM
#4
Burning Brakes
Here's the sequence that makes sense to me:
Do bodywork and prep with the body still on the chassis. Mandatory if you are massaging the shut lines.
Remove doors and brace opening with a length of B-strut or EMT from the upper hinge back to an L bracket attached to the striker mount holes.
Pull body, do chassis & underside work and reinstall body.
Mask from body down to floor, continuous seal.
Shoot jambs, reinstall doors, deck lid (if removed) and topcoat.
Do bodywork and prep with the body still on the chassis. Mandatory if you are massaging the shut lines.
Remove doors and brace opening with a length of B-strut or EMT from the upper hinge back to an L bracket attached to the striker mount holes.
Pull body, do chassis & underside work and reinstall body.
Mask from body down to floor, continuous seal.
Shoot jambs, reinstall doors, deck lid (if removed) and topcoat.
07-23-2013, 05:06 PM
#5
Burning Brakes
Pictures of body dolly that I used on my daughters car. I used rubber tires but would use solid ones if doing it again. The pneumatic tires tend to lose air and fold over when pushing. If you build one and want to use an engine hoist to lift body, make sure the hoist legs fit under the body dolly.
Make note of how many shims on each mount location.
The dolly used to be a foot or two taller but it was loaned to someone and they cut it down. Taller made it easier to get under to powerwash.
You might note where straps are located on the body and where the hoist boom is centered over the windshield. Body was in perfect balance when we lowered it onto frame. My son and I were able to center if easily for installing the bolts. Now other people were required, (but whole family there to record and grandson jacked the body up off the dolly.)
Good luck, a body-off runs into a huge and more expensive task than you might expect.
[IMG]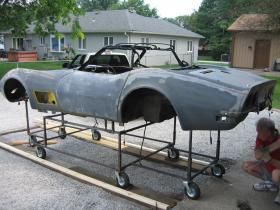 [/IMG]
[IMG]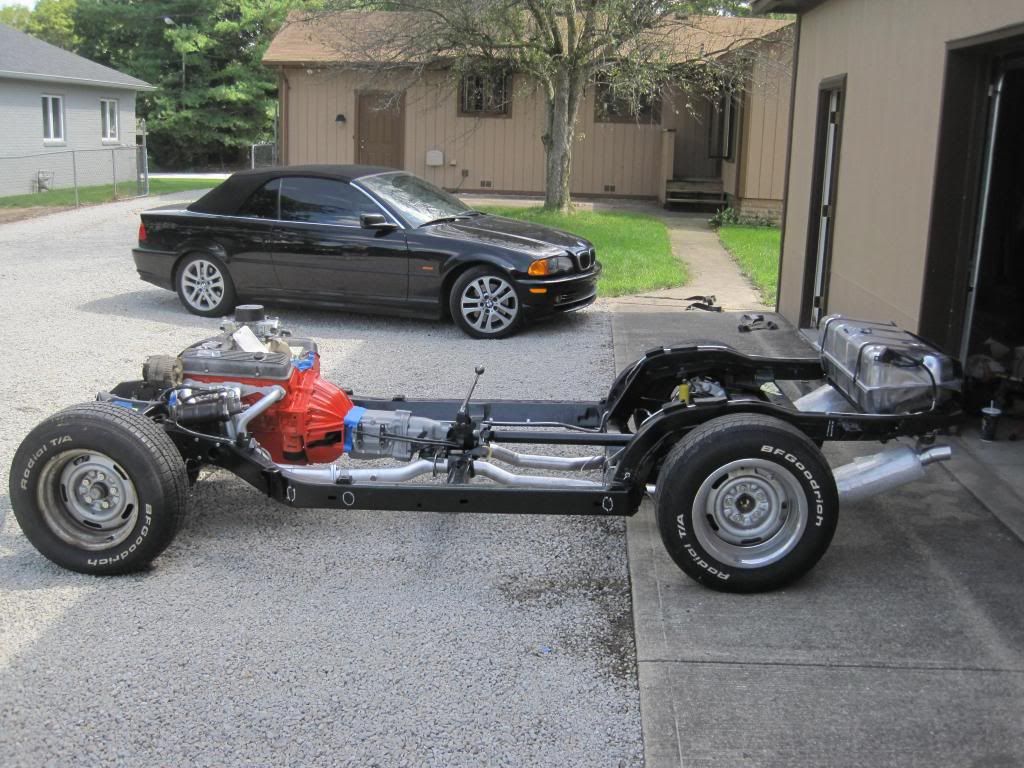 [/IMG]
[IMG]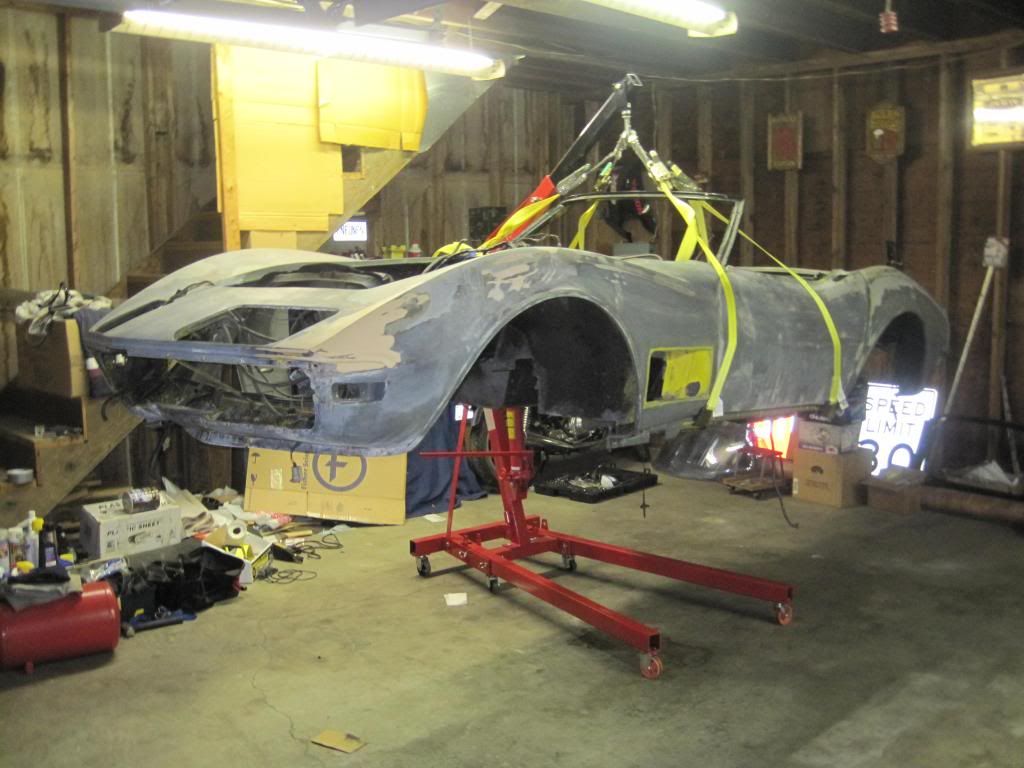 [/IMG]
[IMG]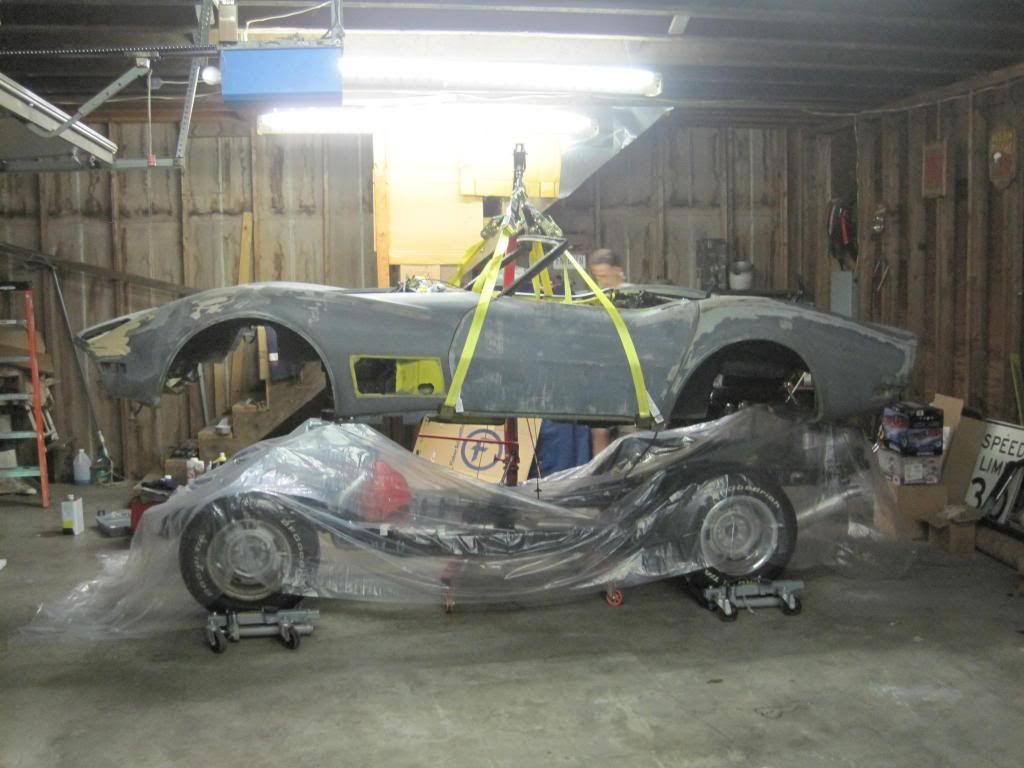 [/IMG]
Make note of how many shims on each mount location.
The dolly used to be a foot or two taller but it was loaned to someone and they cut it down.
Taller made it easier to get under to powerwash.You might note where straps are located on the body and where the hoist boom is centered over the windshield. Body was in perfect balance when we lowered it onto frame. My son and I were able to center if easily for installing the bolts. Now other people were required, (but whole family there to record and grandson jacked the body up off the dolly.)
Good luck, a body-off runs into a huge and more expensive task than you might expect.
[IMG]
[/IMG][IMG]
[/IMG][IMG]
[/IMG][IMG]
[/IMG]
07-24-2013, 02:23 PM
#6
Racer
Thread Starter
After you lift the body I assume you plan on setting it on a dolly?
1. Leave the core support in while the body is on the dolly.
2. During the lift you may want to run a strap from the nose over the windshield to the rear license area. Tighten only snug. This will reduce the rear end sag.
3. Prep & paint the body on the dolly, not on the chassis.
4. Underside of the body is not painted
5. Oh, and leave the doors on.
Make a list first and double check that you have removed all items needed to lift body. Let us know if you need that list.
So... some people paint the underside (I am not going for originality). I have some repairs that need to be done to the underside and will show up if you look.
And... I question not putting the body back on if you subject the body to the rigors of body working.
Also... Someone mentioned taking the doors off when lifting. What are the pros and cons?
07-24-2013, 03:24 PM
#7
Safety Car


I have never left the doors on when I lifted the body, and have never had a problem. I have also never painted or done all the body work on the chassis. The only gaps that could open up, will be closed up in the shimming process when you put the body back on. I bodywork and paint my bodies on my rotisserie, and it sure makes it easy to do! No paint holidays, and no overspray on stuff you don't want it on. There just ain't any substitute for painting on a rotisserie, where you can spin the body as you paint it. It keeps every surface you paint, up in the light, where you can see it.
Regards, John McGraw
Regards, John McGraw
07-24-2013, 03:54 PM
#8
Burning Brakes
I have never left the doors on when I lifted the body, and have never had a problem. I have also never painted or done all the body work on the chassis. The only gaps that could open up, will be closed up in the shimming process when you put the body back on. I bodywork and paint my bodies on my rotisserie, and it sure makes it easy to do! No paint holidays, and no overspray on stuff you don't want it on. There just ain't any substitute for painting on a rotisserie, where you can spin the body as you paint it. It keeps every surface you paint, up in the light, where you can see it.
Regards, John McGraw
Regards, John McGraw
Perhaps if one is replacing the whole front clip it might be better done setting on the frame.
Too bad they didn't use a rotisserie when the factory painted the bodies, they would have had more coverage under the doors and valance
 07-24-2013, 04:24 PM
#9
Safety Car

Member Since: Feb 2012
Posts: 4,532
Received 2,130 Likes
on
1,030 Posts
2023 C2 of the Year Finalist - Unmodified
2019 C2 of Year Finalist (stock)
2015 C2 of the Year Finalist

I bought my car fully restored from a guy who had done most of the work himself & explained it was his personal preference to paint the bottom semi-gloss black. While I wish he hadn't given the subject matter (65-396) and quality (95 points anyway) I think it looks nice. Does anyone else do this? Were any of these undercoated by dealers when new for noise (as if it would have made a difference)?
Dan
Dan
07-24-2013, 04:32 PM
#10
Racer
Thread Starter
I bought my car fully restored from a guy who had done most of the work himself & explained it was his personal preference to paint the bottom semi-gloss black. While I wish he hadn't given the subject matter (65-396) and quality (95 points anyway) I think it looks nice. Does anyone else do this? Were any of these undercoated by dealers when new for noise (as if it would have made a difference)?
Dan
Dan
Is the rotisserie something you have to buy or can you build it?
07-24-2013, 06:41 PM
#11
Burning Brakes
My plan was to paint it semi-gloss black because it looks nice and it covers up any fiberglass repairs; not that I am trying to hide them for future sale. One of the repairs is replacing part of the transmission tunnel.
Is the rotisserie something you have to buy or can you build it?
Is the rotisserie something you have to buy or can you build it?
You can buy a steel square tube wheeled body dolly that is adjustable to fit a Corvette body. When not in use it disassembles for storage.
Is it the rear portion of the tunnel or above the tunnel insulation? You can repair it and paint only that area. It's hard for judges to craw that far under the car.
 07-25-2013, 02:00 PM
#12
Safety Car
And we have always left the doors on with no ill effects 8-) If closed they may add a little support during the lift. No question a rotisserie is a great tool. Door and hood gaps can be checked, altered etc when the body is on a dolly.
Perhaps if one is replacing the whole front clip it might be better done setting on the frame.
Too bad they didn't use a rotisserie when the factory painted the bodies, they would have had more coverage under the doors and valance
Perhaps if one is replacing the whole front clip it might be better done setting on the frame.
Too bad they didn't use a rotisserie when the factory painted the bodies, they would have had more coverage under the doors and valance
You got that right! sometimes, I think that the paint guys at the factory were just too lazy to bend over to paint down low.

No downside to leaving the doors on, but no real downside to pulling them either. I usually pull my bodies by myself with a cherry picker, and just remove them to get the weight down. The body does flex slightly with the front and rear hanging free like this, but not enough to do any damage.
I do all my panel replacement on the rotisserie as well, it just makes for easier access. as long as you have the mount points correct, to match the original chassis pick-up points, you will never have a problem. It is not unusual for me to have to replace the entire front clip, as well as most of the rear at the same time.
On the car below, the only original exterior panel that was re-used, was the rear deck behind the top compartment.


Regards, John McGraw
07-25-2013, 03:55 PM
#13
Burning Brakes
You got that right! sometimes, I think that the paint guys at the factory were just too lazy to bend over to paint down low.
No downside to leaving the doors on, but no real downside to pulling them either. I usually pull my bodies by myself with a cherry picker, and just remove them to get the weight down. The body does flex slightly with the front and rear hanging free like this, but not enough to do any damage.
I do all my panel replacement on the rotisserie as well, it just makes for easier access. as long as you have the mount points correct, to match the original chassis pick-up points, you will never have a problem. It is not unusual for me to have to replace the entire front clip, as well as most of the rear at the same time.
On the car below, the only original exterior panel that was re-used, was the rear deck behind the top compartment.
Regards, John McGraw
The extra strap I mentioned running over the top of the windshield (used on roadsters only) helps reduce the sag. Do you have support points on your rotisserie for the bottom of the core support and #3 body mount when needed?
Once on the dolly, we can lift the whole dolly & body to reach the under body, even standing up.
07-25-2013, 10:05 PM
#14
Safety Car
With using straps on a two post lift weight isn't a problem. The extra strap I mentioned running over the top of the windshield (used on roadsters only) helps reduce the sag.
Do you have support points on your rotisserie for the bottom of the core support and #3 body mount when needed?
Once on the dolly, we can lift the whole dolly & body to reach the under body, even standing up.
The extra strap I mentioned running over the top of the windshield (used on roadsters only) helps reduce the sag. Do you have support points on your rotisserie for the bottom of the core support and #3 body mount when needed?
Once on the dolly, we can lift the whole dolly & body to reach the under body, even standing up.
Regards, John McGraw
07-26-2013, 06:10 PM
#15
Burning Brakes
Here is a quick check list for a body lift. I'm sure I've forgotten something. I'll update when it comes to me. Any additional input appreciated.
Steps needed to remove body on a C2 Corvette
These are not necessarily in sequential order
EDITED
1. Disconnect battery cables.
2. Removing the hood will help
3. Remove front and rear bumpers and front brackets
4. Remove exhaust tips if under car exhausts
5. Remove rear valance
6. Remove spare tire lid and tub.
7. Remove rear bumper brackets
8. Disconnect fuel gauge wires from sending unit on bottom of gas tank
9. If radio car, disconnect ground strap from antenna to frame
10. Remove covers in rear wheel wells that cover body bolt
11. If roadster, remove sill plates to access body bolt
12. Disconnect steering column from steering box.
13. Disconnect e-brake cable on chassis so that cable stays with body
14. Disconnect hoses from radiator and remove radiator, fan shroud, fan and fan clutch.
15. Disconnect heater hoses from engine.
16. Remove top shielding covering distributor, if radio car.
17. Remove splash shields inner and outer.
18. Disconnect all wiring at starter plus associated ground wire.
19. Disconnect positive wire to coil on standard ignition cars. On transistorized ignition cars, disconnect the two prong plug to the distributor and coil.
20. Disconnect water temperature sensor wire from the sensor and remove the wire from the associated clips on the valve cover.
21. Unplug backup light switch at firewall, if equipped.
22. Disconnect clutch linkage and remove Z bar.
23. Disconnect brake lines from master cylinder.
24. Disconnect vacuum line from PB booster is equipped.
25. Remove all body bolts, can range from 8 to 12 depending on model & year.
26. Remove shift **** and reverse lock out (if equipped) put car in neutral.
27. If car has LH battery location, remove access panel, battery and battery box.
28. Remove ground strap at #1 body mount to birdcage
29. Tie tail pipes together, loosen hangers, pull pipes together to help clear body when lifted
30. Disconnect oil pressure gauge line at block
31. Disconnect tach cable at distributor.
32. Disconnect speedo cable from transmission and body clips
33. Disconnect seat belt cables bolts from frame on otter cables and nut on inner cables
34. Disconnect all wiring from alternator.
35. Disconnect linkage from throttle lever.
36. If equipped with side pipes, remove side molding and pipe covers and front brackets (the rear brackets to the frame can stay attached to hold up the side pipe, just remove the nut to free the cover, then put the nut back on)
Last edited by A-Snake; 07-27-2013 at 04:01 PM.
07-29-2013, 01:13 AM
#16
Racer
Thread Starter
Here is a quick check list for a body lift. I'm sure I've forgotten something. I'll update when it comes to me. Any additional input appreciated.
Steps needed to remove body on a C2 Corvette
These are not necessarily in sequential order
EDITED
1. Disconnect battery cables.
2. Removing the hood will help
3. Remove front and rear bumpers and front brackets
4. Remove exhaust tips if under car exhausts
5. Remove rear valance
6. Remove spare tire lid and tub.
7. Remove rear bumper brackets
8. Disconnect fuel gauge wires from sending unit on bottom of gas tank
9. If radio car, disconnect ground strap from antenna to frame
10. Remove covers in rear wheel wells that cover body bolt
11. If roadster, remove sill plates to access body bolt
12. Disconnect steering column from steering box.
13. Disconnect e-brake cable on chassis so that cable stays with body
14. Disconnect hoses from radiator and remove radiator, fan shroud, fan and fan clutch.
15. Disconnect heater hoses from engine.
16. Remove top shielding covering distributor, if radio car.
17. Remove splash shields inner and outer.
18. Disconnect all wiring at starter plus associated ground wire.
19. Disconnect positive wire to coil on standard ignition cars. On transistorized ignition cars, disconnect the two prong plug to the distributor and coil.
20. Disconnect water temperature sensor wire from the sensor and remove the wire from the associated clips on the valve cover.
21. Unplug backup light switch at firewall, if equipped.
22. Disconnect clutch linkage and remove Z bar.
23. Disconnect brake lines from master cylinder.
24. Disconnect vacuum line from PB booster is equipped.
25. Remove all body bolts, can range from 8 to 12 depending on model & year.
26. Remove shift **** and reverse lock out (if equipped) put car in neutral.
27. If car has LH battery location, remove access panel, battery and battery box.
28. Remove ground strap at #1 body mount to birdcage
29. Tie tail pipes together, loosen hangers, pull pipes together to help clear body when lifted
30. Disconnect oil pressure gauge line at block
31. Disconnect tach cable at distributor.
32. Disconnect speedo cable from transmission and body clips
33. Disconnect seat belt cables bolts from frame on otter cables and nut on inner cables
34. Disconnect all wiring from alternator.
35. Disconnect linkage from throttle lever.
36. If equipped with side pipes, remove side molding and pipe covers and front brackets (the rear brackets to the frame can stay attached to hold up the side pipe, just remove the nut to free the cover, then put the nut back on)
Steps needed to remove body on a C2 Corvette
These are not necessarily in sequential order
EDITED
1. Disconnect battery cables.
2. Removing the hood will help
3. Remove front and rear bumpers and front brackets
4. Remove exhaust tips if under car exhausts
5. Remove rear valance
6. Remove spare tire lid and tub.
7. Remove rear bumper brackets
8. Disconnect fuel gauge wires from sending unit on bottom of gas tank
9. If radio car, disconnect ground strap from antenna to frame
10. Remove covers in rear wheel wells that cover body bolt
11. If roadster, remove sill plates to access body bolt
12. Disconnect steering column from steering box.
13. Disconnect e-brake cable on chassis so that cable stays with body
14. Disconnect hoses from radiator and remove radiator, fan shroud, fan and fan clutch.
15. Disconnect heater hoses from engine.
16. Remove top shielding covering distributor, if radio car.
17. Remove splash shields inner and outer.
18. Disconnect all wiring at starter plus associated ground wire.
19. Disconnect positive wire to coil on standard ignition cars. On transistorized ignition cars, disconnect the two prong plug to the distributor and coil.
20. Disconnect water temperature sensor wire from the sensor and remove the wire from the associated clips on the valve cover.
21. Unplug backup light switch at firewall, if equipped.
22. Disconnect clutch linkage and remove Z bar.
23. Disconnect brake lines from master cylinder.
24. Disconnect vacuum line from PB booster is equipped.
25. Remove all body bolts, can range from 8 to 12 depending on model & year.
26. Remove shift **** and reverse lock out (if equipped) put car in neutral.
27. If car has LH battery location, remove access panel, battery and battery box.
28. Remove ground strap at #1 body mount to birdcage
29. Tie tail pipes together, loosen hangers, pull pipes together to help clear body when lifted
30. Disconnect oil pressure gauge line at block
31. Disconnect tach cable at distributor.
32. Disconnect speedo cable from transmission and body clips
33. Disconnect seat belt cables bolts from frame on otter cables and nut on inner cables
34. Disconnect all wiring from alternator.
35. Disconnect linkage from throttle lever.
36. If equipped with side pipes, remove side molding and pipe covers and front brackets (the rear brackets to the frame can stay attached to hold up the side pipe, just remove the nut to free the cover, then put the nut back on)
How about removing door and windshield glass?
Also - anyone in Southern California either have a body dolly or rotisserie (preferred) they want to sell?
07-29-2013, 07:41 AM
#17
Burning Brakes
[QUOTE=PierreOlivier;1584528305]How about removing door and windshield glass?
[\QUOTE]
Those are not nessasary items to remove in order to lift the body.
[\QUOTE]
Those are not nessasary items to remove in order to lift the body.
08-03-2013, 04:36 PM
#18
Racer
I would count the body shims before you lift the body and mark them on a diagram. During separation, some shims will stick to the body, some will fall off and some remain on the frame.