Need help using 66-67 radiator air dam
#1
Instructor


Thread Starter
I purchased an air dam used on 66-67 cars with a/c from Dr. Rebuild. I am having a difficult time trying to figure out using this without modifiying it. I research it and can't seem to find a good photo of this item installed on a pre 66 car. The vendor is useless as he says it just clips on as it does in the 66-67 cars. Well the radiator mounting bracket is different. Also is the purpose of this flap to seal against the hood ? Any pictures would be greatly appreciated. I found some in some older discussions but they just show it mounted in the 66-67 models. Thanks again for all your ideas, Duke
#2
Melting Slicks


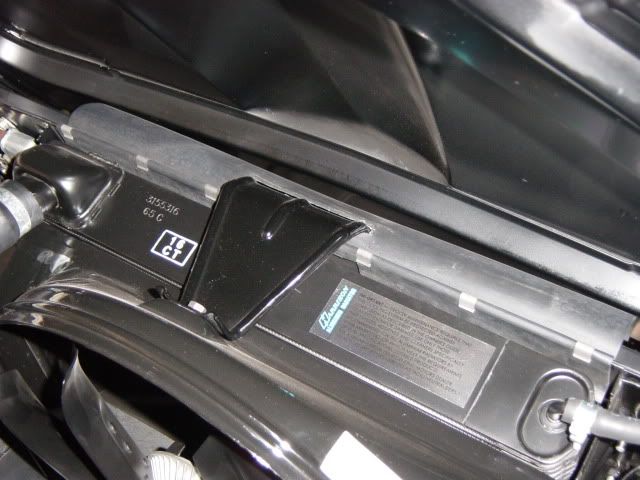
I've seen it installed 180* from mine, with the big flap lying on top of the rad, but that didn't make a lot of sense to me. A slit does need to be cut for the rad top brace to pass thru, as you can see.
At speed, the airflow lifts the flap up, pressing against the hood underside and blocking flow over the top of the rad. At least, that's my theory.
#4
Melting Slicks


To install after cutting the slot, slip the bracket part way thru and then do the front 2 bolts. Then you can slide it into place and install the clips. If it needs softening for workability, soak it in HOT water for a bit.
I think this seal IS worth the effort. Jamming some foam insulation stripping down the sides of the rad also helps. Everything you can do to minimize flow around (rather than thru) the condenser/radiator.
MIke
#5
Mike
I am in the same boat as you. I just bought one of these dams from the doc, as my 300 hp ac roadster runs warm-hot when I have the ac on.
Has anyone confirmed that your orientation of the dam is correct?
Did it help much?
Myron
I am in the same boat as you. I just bought one of these dams from the doc, as my 300 hp ac roadster runs warm-hot when I have the ac on.
Has anyone confirmed that your orientation of the dam is correct?
Did it help much?
Myron
#6
Melting Slicks


My belief is the factory orientation has the rear flap lying on top of the radiator, which isn't the greatest looking arrangement because it's so long. But apparently that's the way they came.
Actually, I recently changed mine to this orientation, BUT I shortened the flap to where it doesn't obscure the rad p/n or the foil sticker. Took about 1 1/4" off, which still provides a good barrier to prevent airflow over the radiatior top. And looks fairly sanitary.
Did it help? Well I did several things at about the same time and overall I saw 5-7* improvement based in IR gun readings. Moved the fan clutch spring, insulated radiator side gaps, had louvers punched in the large splash shields --and put on the top shield. The old shotgun approach since none were significant $$.
Mike

Last edited by Mike Geary; 08-24-2013 at 09:55 AM.
#7
Thanks for the response. How about the lower radiator seal from Dr rebuild? Their p/n1274207. Did you install one of them also? It's also for a 66-67. By the way, mine is a 65
#8
Safety Car


Member Since: Nov 2000
Location: Clinton Township MI
Posts: 4,750
Received 119 Likes
on
98 Posts
Cruise-In III Veteran

Renwaltoys & Others,
This was recently posted by SS409 and JohnZ chimed in as to the correct orientation of the top seal.
http://forums.corvetteforum.com/c1-a...er-sheild.html

Jim
In God We Trust!
This was recently posted by SS409 and JohnZ chimed in as to the correct orientation of the top seal.
http://forums.corvetteforum.com/c1-a...er-sheild.html

Jim
In God We Trust!


