When you click on links to various merchants on this site and make a purchase, this can result in this site earning a commission. Affiliate programs and affiliations include, but are not limited to, the eBay Partner Network.
PetuniaPilot, I just clicked on this thread for the first time today.
You'd be well-advised to post the things you intend to do next, as you go along, so that forum members can give you pointers ahead of time, before you get into the project and get frustrated when you run into issues you didn't expect. Frustration leads to desperation, which tends to result in damaged parts.
Also, Google and this website are your friends. I left a message in your inbox on this forum offering a checklist for body removal, then I found the same checklist on the net using Google:
This forum yields a wealth of info when searched, and there are frequently good how-to videos on youtube.com as well (Corvette-related or just generalized cleaning/painting/wrenching etc)... just do a search at the top of the youtube.com page on things you are interested in doing.
Also, get yourself a shop manual (63 manual + 65 supplement) and an assembly manual for your '65, and catalogs from several Corvette parts vendors (Long Island Corvette/Corvette Central/Zip Products, etc, so that you can do research and become familiar with the parts
Thanks for all the good advice! I do have the original shop manuals. And I search Google and this forum a lot. Google mostly points back to this forum, sometimes to my own posts! And I only ever found that one CL for body removal. It said itself that it wasn't necessarily complete, but it's awful good. And I was thrilled when I saw some of the videos on youtube! It really helped with the brakes, and will be great for lots of other things too, I can see!
I appreciate the advice to say in advance what I'm planning. That's a great idea. I must admit, I get intimidated by fear of criticism. I mentioned it earlier in my thread, along with a broad outline of my plan. So let me say a little more about that. For those of you who are interested, I think it'll help. For casual observers, you may want to skip this boring part.
The toughest part is being alone. I have simply taken to flat lying. I've been protesting my whole life, and that argument boils down to "If I waited until someone could do this with me, or help me, I literally would not have ever done a single stinkin' thing in my whole life." I'm so tired of people telling me I can't do this by myself, I just lie and say "Yes, I have help."
I am removing the body, alone, and plan to deliver the frame to a guy about 60 miles away for restoration, etc. Well, in the interest of advance notice, the "etc." roughly consists of: cleaning the frame via bead blast or another appropriate method tbd, after removal and inventory of the last of the extraneous lines, clamps, and stuff still hanging off the frame when I get it out there. So we'll decide what to do with the brake lines, fuel lines, and other things like that, together, depending on what we have when we get to that point.
I'm missing pipes, and he can make those, so I'm planing on that. I guess I plan to get all new brake lines. The truly important thing about fuel lines is of course kill switches, so that will be a driving factor in deciding what to do with those. And John uses PPK paint and coating products. I spent a fair amount of time last winter scouting for folks who can help me with a car like this. It's a little bit of a miracle that such a guy is right here. I went to the track, the corvette club meetings, and several garages, mostly out in the valley. I finally got to the guys who have their own shops, and some of them gave me the parts catalogs you recommend. And this guy has photos, trophies, references, and a lot of things on-site that indicate he really knows his stuff. So I'm not even sure at the moment if he plans to coat the frame, but I know he'll explain it to my satisfaction and do what I want.
He also wants to do the underbody, which of course I want to do. So the rough plan for that is that he'll do the frame, then I'll just do a round trip (well, 2, from here) where I go get the frame, just lower the body onto it, put a couple bolts on, and deliver the body to him that way. But, you know, $$$.
I promised Daddy I'd do my best. He knew I couldn't promise to do the whole car, or promise to do it right. That's all. I got some of Daddy's 401k money too, so I use that for the car. Things are pretty bad because I'm very sick, haven't worked in over a year. Big shot wheeler-dealers were saying $80k to restore the car, & maybe that's close to right. The 401k is nowhere near that, but it's going well. (I keep spending $2k on parts and supplies, and then a couple months later the fund has made $2k! I'm not bad at investing, most of the time). I just hope I don't have to use Daddy's money to buy groceries.
And I get just #@!&-ed on shipping of course. But this guy John places bulk orders, through friends actually, and he said he'd add my orders to his to save on shipping. So I've been holding off, and have a list of parts to buy as soon as I get the frame out there and he gets going on that.
AND THEN I GET TO TEAR INTO THE ENGINE!! Now that's what I'm talking about!!! I just have to rearrange the garage a little after I get the frame out.
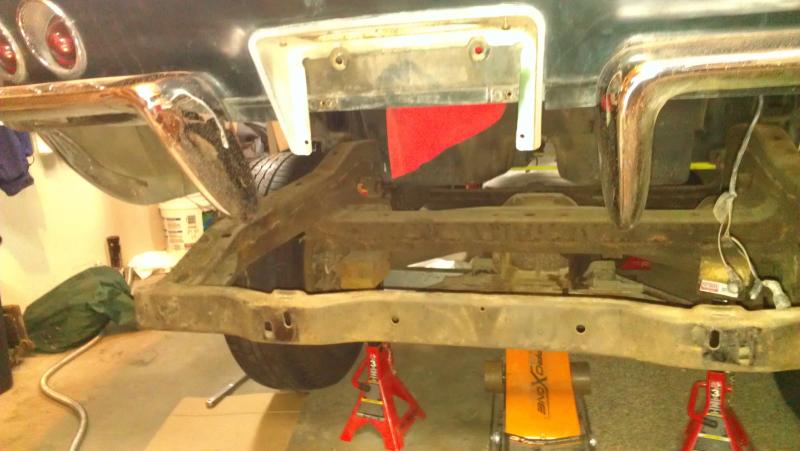
I was really scared to say anything that would let on that I'm pulling the body alone. When I first started planning it, I came up with the idea that 14 people would be needed. And you know what? I couldn't get 14 people to my house if I had a standing rib roast and a keg. That's a long story, just life, hell if I've figured it out. But now I've read about at least one guy who said he "always pulls the body by [him]self." And steveale had 2 helpers, but it doesn't sound like they did any heavy lifting. I've studied the process in depth. There's no reason a person can't do it alone. It's clearly very important to go slow, and that's exactly the point I'm at. With the hoist, and the engine compartment being empty, I separated the front � of the body from the frame and fed the heavy duty straps through the gap, in about the same place as shown in steveale's pictures (and others), having done a rough cg analysis. Now I'm trying to do the same thing with the hind end, and it's not going so smooth. The gas cap is out. So I have 3 straps fed through the hole, the hole all protected by padding and rags, and the straps through a pair of Al rings (some other random part I think) to take the load off the fuel cap opening, and pulling on the bumper mounts. The body is separating from the frame now, but the frame is also still lifting off the jackstand! I say jackstand singular because it's lifting on the left, not the right. That is, the body lifts about 2cms off the frame, at which point the frame is about <1mm off the jackstand. So I'll take the bumper off, but I think I'm going to put the brackets back on, because that's what I'm pulling on. And yes, that's 2 points and I said 3 straps and I'm just too scared to admit where I have the 3rd strap. I have my limits! It's just supposed to be a reference, not really bearing much weight, I hope, think. It's working fine so far, as I keep an eye on it.
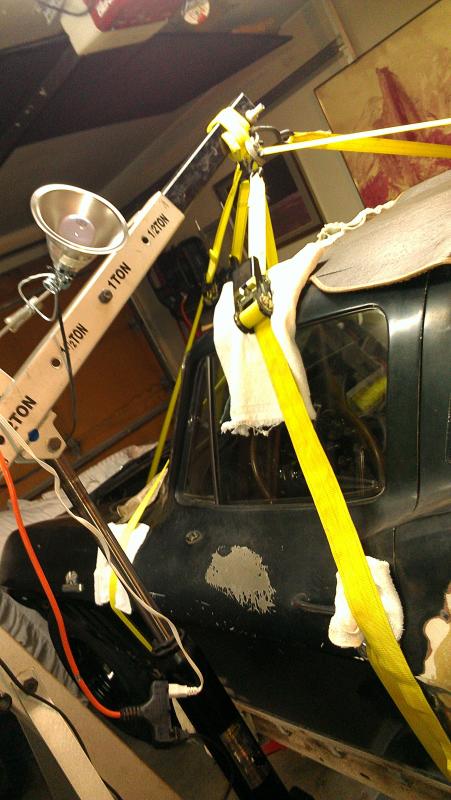
This is from when I was first placing the hoist and straps, no rags or load bearing rings yet.
Then I'll reposition the hoist for the full lift. I'll roll the frame out from under the body, take it to John on a car dolly from Uhaul, and I don't know how I'm going to set the body down yet. I've read that bending isn't a big problem with coupes, and how to attach a strap to minimize bending on the soft-tops. I already have door mis-alignment, and I caused it. It was never crooked at all, anywhere. The body has a couple minor imperfections, but is (was) (is again, now) perfectly straight. After I got it up on blocks here at my house after a long journey, I went in the garage one day and saw the door gap and about crapped my pants. (Bad joke. I have Crohn's.) After much , I remembered I had removed the wheels, mostly for security, had no place to put them, busted my you-know-what putting them in the crawlspace (another aside - this is common up here because we all have a 2nd set of studded tires - and yes - I will drive this car year round, having learned with my Mustangs that it is dang near more fun than sex, and works super if you put the studded tires on rims 1" smaller) (eight years w 245hp at the rear tires, I never used sandbags or weight, and I've never been in the ditch, and the tires rarely contact the pavement, so, it's time to up the hp and see if I can retain my record). So before I got the 4th wheel in the crawlspace, I was working on the brakes and other things, but realized my next plan was to deliver the frame to John, so why was I taking the wheels off?! So I left a wheel on. And I'm satisfied that that caused some bending. So the door gap is fixed/gone now.
So I think I'm going to set the body down on blocks, which I've been designing. I wanted to build a dolly like steveale's, but then I realized I had a snowmachine trailer that would make a great platform. So I could use that too. But then I thought "Well, I think the garage floor is straighter, flatter, more stable" (recent activity notwithstanding)(we had a 6.2, not good)(nothing fell on the car) "than anything, so why not the floor?" And I've spent a ton of time right under the car trying to get those dang seatbelt anchor bolts off, so I have an idea where the blocks should go.
Cheap, easy, Alaskan. You know, KISS. (Keep It Simple, Stupid). It's an aviation mantra, as many of you know. And it's very much an Alaskan mantra.
So see, I'm a pilot (and most of my work is high performance aircraft in very bad weather in remote villages/locations with no support and unimproved strips), and an engineer with a physics degree. I hate saying that, it's just that I'm almost 45, and I have a lot of experience coming up with schemes to get something done by myself with the resources I have on hand at the time. You guys have ALL been great, supportive. But I've had plenty of bad experiences. I got a 55gal drum out of a 207, alone, which isn't that hard, even though it weighs over 500lbs, depending on what's in it. It doesn't even really fit in a 207. The hard part is getting it out without damaging it. One day I was clear out the (Aleutian) Chain, and it's very hard to get gas. They won't sell it for any price. I was in a turboprop, which has provisions for running avgas. You just have to log the hours in the mx logs; there's a limit. And you have to add motor oil to the avgas. So you can see what's coming, right? This guy ran across the runway, hollering like crazy, because he saw a dumb girl doing something really stupid. "Honey! Honey! No! No! No! That's not where that goes! That's oil! You can't put it in the fuel tank!!!!" He had never flown a turbine. I had a couple 1000 hours in turbines. But I'm just a girl. Of course, everyone makes bonehead maneuvers. And my flight experience exceeds my Vette experience by a long ways. I know I'm going to do something really bad to this car at some point, and I just pray, and pray, and go slow. So see, I'm really afraid of someone reacting like the guy with the oil.
People do not believe me.
New Saddle carpet upside down on top of car, deck lumber in the way, ~�" clearance between hoist piston and fender.
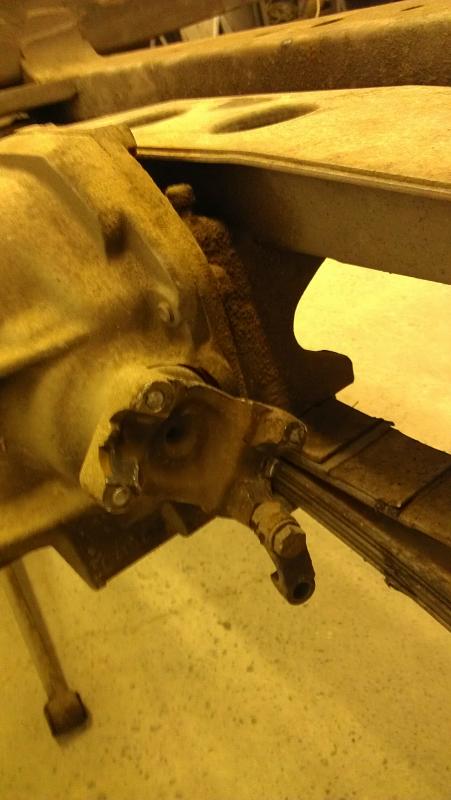
Will pull on bumper mounts
Besides being alone, the other hard part is the vocabulary. I think I've just killed off too many brain cells! But Daddy was very critical of that. So of course I know what an o-ring is, and a surge tank/overflow tank. But I often fail to come up with the right word at the right time. I say thing-a-ma-jig a lot. And I feel like an idiot about it.
So I'm a lonely idiot, so I'm afraid to tell y'all what my plans are. So I hope you can understand a bit, with all this disclosure, and somehow go easy on me while remembering I've built a lot of stuff and I know some physics.
So I'll post a less personal, more technical follow up to this, soon.
I am removing the body, alone, and plan to deliver the frame to a guy about 60 miles away for restoration, etc.
The "etc." roughly consists of: cleaning the frame via bead blast or another appropriate method tbd, after removal and inventory of the last of the extraneous lines, clamps, and stuff still hanging off the frame when I get it out there. So we'll decide what to do with the brake lines, fuel lines, and other things like that, together, depending on what we have when we get to that point.
I'm missing pipes, and he can make those, so I'm planing on that. I guess I plan to get all new brake lines. The truly important thing about fuel lines is of course kill switches, so that will be a driving factor in deciding what to do with those. And John uses PPK paint and coating products.
I went to the track, the corvette club meetings, and several garages, mostly out in the valley. This guy has photos, trophies, references, and a lot of things on-site that indicate he really knows his stuff. So I'm not even sure at the moment if he plans to coat the frame, but I know he'll explain it to my satisfaction and do what I want.
He also wants to do the underbody, which of course I want to do. So the rough plan for that is that he'll do the frame, then I'll just do a round trip (well, 2, from here) where I go get the frame, just lower the body onto it, put a couple bolts on, and deliver the body to him that way. But, you know, $$$.
And I get just #@!&-ed on shipping of course. But this guy John places bulk orders, through friends actually, and he said he'd add my orders to his to save on shipping. So I've been holding off, and have a list of parts to buy as soon as I get the frame out there and he gets going on that.
AND THEN I GET TO TEAR INTO THE ENGINE!! Now that's what I'm talking about!!!
With the hoist, and the engine compartment being empty, I separated the front � of the body from the frame and fed the heavy duty straps through the gap, in about the same place as shown in steveale's pictures (and others), having done a rough cg analysis accounting for doors on, seats out, and other details like that. Now I'm trying to do the same thing with the hind end, and it's not going so smooth. The gas cap is out. So I have 3 straps fed through the hole, the hole all protected by padding and rags, and the straps through a pair of Al rings (some other random part I think) to take the load off the fuel cap opening, and pulling on the bumper mounts. The body is separating from the frame now, but the frame is also still lifting off the jackstand! I say jackstand singular because it's lifting on the left, not the right. That is, the body lifts about 2cms off the frame, at which point the frame is about <1mm off the jackstand. So I'll take the bumper off, but I think I'm going to put the brackets back on, because that's what I'm pulling on.
This is from when I was first placing the hoist and straps, no rags or load bearing rings yet.
New Saddle carpet upside down on top of car, deck lumber in the way, ~�" clearance between hoist piston and fender.
Then I'll reposition the hoist for the full lift. I'll roll the frame out from under the body, take it to John on a car dolly from Uhaul, and I don't know how I'm going to set the body down yet. I've read that bending isn't a big problem with coupes, and how to attach a strap to minimize bending on the soft-tops. I already had door mis-alignment, and I caused it. After I got it up on blocks, I went in the garage one day and saw the door gap and about crapped my pants. (Bad joke. I have Crohn's.) After much , I remembered I had removed the wheels, mostly for security, had no place to put them, busted my you-know-what putting them in the crawlspace, & before I got the 4th wheel in the crawlspace, I realized my next plan was to deliver the frame to John, so why was I taking the wheels off?! So I left a wheel on. And I'm satisfied that that caused some bending. So the door gap is fixed/gone now.
So I think I'm going to set the body down on blocks, which I've been designing. I wanted to build a dolly like steveale's, but then I realized I had a snowmachine trailer that would make a great platform. So I could use that too. But then I thought "Well, I think the garage floor is straighter, flatter, more stable than anything, so why not the floor?" And I've spent a ton of time right under the car getting those dang seatbelt anchor bolts off, so I have an idea where the blocks should go.
Cheap, easy, Alaskan. You know, KISS. (Keep It Simple, Stupid). It's an aviation mantra, as many of you know. And it's very much an Alaskan mantra.
I have my 63 rear up in the air with ALL the rear suspension out and viewing your problems. IMHO I suggest that you remove the rear bumpers AND their attaching brackets [note shims]; and remove the rear valence panel. Note where the rear bumpers bolt to the SIDE of the body. That bolt actually connects to a bracket that snugs the body on the inside. Think pre-flight when lifting the body. Keep us informed.
Brgds,
Rene
Did that, before your post. Did that. Did that. Did that. Ran my fingers, & sometimes a feeler gauge, over every inch of space between body and frame. Can't be done.
I give up.
Originally Posted by rene-paul
I have my 63 rear up in the air with ALL the rear suspension out and viewing your problems. IMHO I suggest that you remove the rear bumpers AND their attaching brackets [note shims]; and remove the rear valence panel. Note where the rear bumpers bolt to the SIDE of the body. That bolt actually connects to a bracket that snugs the body on the inside. Think pre-flight when lifting the body. Keep us informed.
Brgds,
Rene
I had it. I got it separated, and free floating, checking everything every inch of the way. Made 1000 adjustments along the way. It was good!
But then it just turned. I can't even say how things went wrong, or how many things went wrong, and can't figure out why. No significant damage so far. But I'm likely to find something.
So close, but it's just going really badly.
And then I found out Bob died yesterday. We've lost one of the world's truly finest classic hot rodders, & a life-long friend.
Last edited by petuniapilot; 12-03-2014 at 12:43 AM.
Reason: Add details
The suspension is already mostly rebuilt. Everything is in very good shape. There will be one spot weld on the frame, at the front right. I hired this guy who does custom jobs and has most of the capabilities I lack, including the welding. He has produced 2 #1 show cars in the state. I really hired him for the body work. He uses PPG coatings. We were going to coat the frame, but it's in such good shape it just needs cleaning, and I want a flat black powder coat.
He says the rear end looks perfect and seems to turn perfectly. I did break part of the rear end suspension towing it out to his place. So we'll be ordering a couple replacement parts, and new rubber fittings, etc. for all the deteriorated spacers, grommets, etc. and a little hardware.
So I have to re-arrange the garage, finish the brake calipers, and tear into my 1st Chevy BB!
Cheers!
Kathy
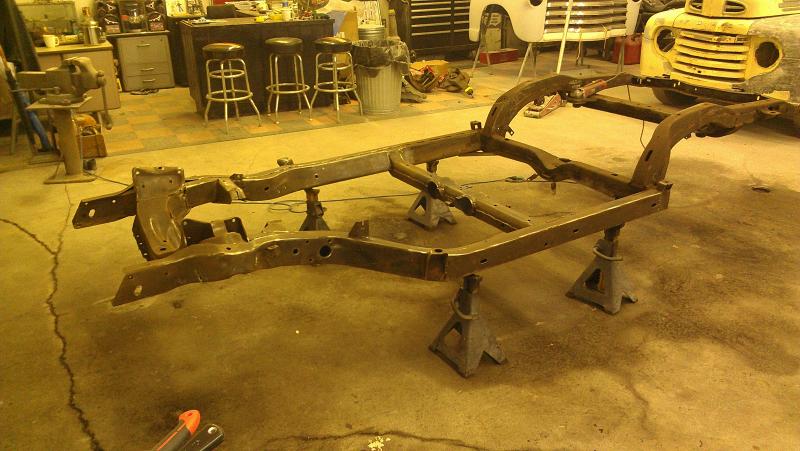
No bending evident during the pull.
Now I know how to pull a body: it's pure blood, sweat & tears.
Yes, that's yours truly in the picture of the El Camino, Nova, me, my brother, and Bob. Probably '91.
It turned out the big holdup on the pull, getting the rear end to separate was simply that the #3 body bolt on the right was not separating. Lube and gentle tugging, for a long time, and it finally popped free.
And yes the pull operation itself was pretty disastrous. I kept thinking I was really close, so I pulled an all-nighter. Then I was close, so I pulled another all-nighter. Then one more all-nighter to actually get the frame out of the garage. I'm very happy to report that the only damage is actually right on the flared portion of the left rear fender. Obviously, the hoist was too close, and kept shifting that direction.
Does anybody know how much the body weighs? I'm scouring the internet, but it's a needle in a haystack. As usual, I just can't get the right keywords. I type in "Corvette C2 body weight", or how much does it weigh, and I get info on cars from 2007, and specs that list oil volume, etc.
It's just the body, with the doors on, the rear valance removed, and just a few things still attached like seatbelt tie-downs, the E-brake cable, wiper motor, the first steering shaft, little stuff like that. No radiator, no fuel tank, no seats....
Does anybody know how much the body weighs?
It's just the body, with the doors on, the rear valance removed, and just a few things still attached like seatbelt tie-downs, the E-brake cable, wiper motor, the first steering shaft, little stuff like that. No radiator, no fuel tank, no seats....
Hey Katherine - Starting at the top, front turn signal assembly, clutch bellcrank, alternator bracket and exhaust bracket that is located at the center crossmember and also attaches to the trans mount.
Mike T - Prescott AZ
I have the engine and tranny on a custom rack. There's a cover plate on the carb mount and a rag in the hole where I removed the thermostat. It otherwise seems to consist of/include block, headers, valve covers, intake manifold, distributor cap and old wires, coil, alternator, starter, fuel pump, water pump, exhaust manifolds, bell housing.... various brackets, clips, supports...
Any suggestions as to where to start? I was thinking valve covers, intake manifold, exhaust manifolds..., heads? I haven't even looked in the book yet. I don't imagine there's a section for "Complete engine teardown and Rebuild", so any suggestions as to where I should start in the manual(s)?
It's all pretty dirty. I'm not sure if it matters how much I clean now, as opposed to things generally being easier to clean once they're off. I have wire brushes galore, my favorite polishing spool on the ⅜" drill, various solvents, rust removers, brake parts cleaner and stuff with several 5 gallon buckets standing by. Also got access to a bead blaster booth.
 09-27-2014, 06:19 PM


 Now that's what I'm talking about!!! I just have to rearrange the garage a little after I get the frame out.
 , I remembered I had removed the wheels, mostly for security, had no place to put them, busted my you-know-what putting them in the crawlspace (another aside - this is common up here because we all have a 2nd set of studded tires - and yes - I will drive this car year round, having learned with my Mustangs that it is dang near more fun than sex, and works super if you put the studded tires on rims 1" smaller) (eight years w 245hp at the rear tires, I never used sandbags or weight, and I've never been in the ditch, and the tires rarely contact the pavement, so, it's time to up the hp and see if I can retain my record). So before I got the 4th wheel in the crawlspace, I was working on the brakes and other things, but realized my next plan was to deliver the frame to John, so why was I taking the wheels off?! So I left a wheel on. And I'm satisfied that that caused some bending. So the door gap is fixed/gone now.
 But Daddy was very critical of that. So of course I know what an o-ring is, and a surge tank/overflow tank. But I often fail to come up with the right word at the right time. I say thing-a-ma-jig a lot. And I feel like an idiot about it.