headlight motor rebuild
 01-26-2014, 12:09 PM
#1
Melting Slicks

Thread Starter

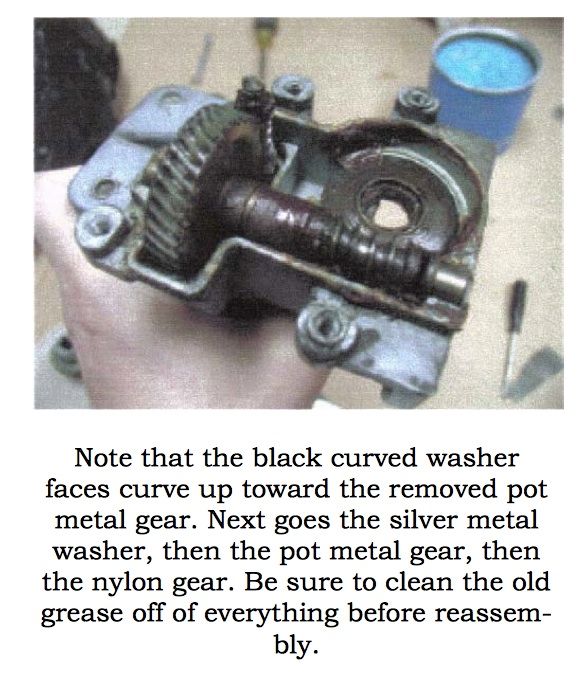
I did rebuild them according to the ncrs instruction written by Alann Boatright . Always surprising how much more comfortable one feels going into a task when assisted by an excellent write-up, tnx Alann 
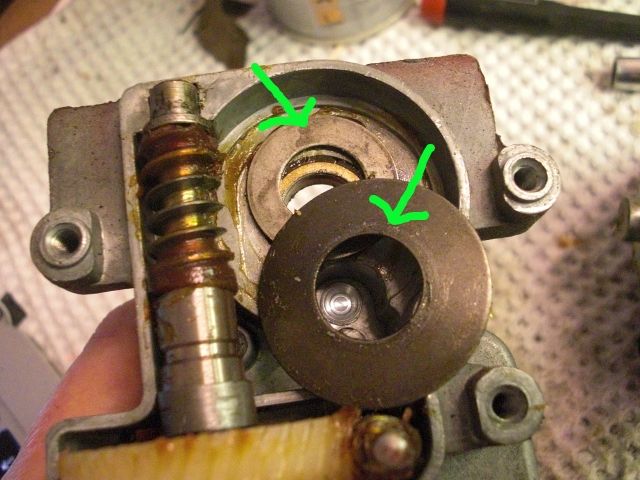
Now, the instructions specify the order of the two washers inside. One of my 2 motors had it the other way around. i assume Alann is correct? (the red arrow picture)
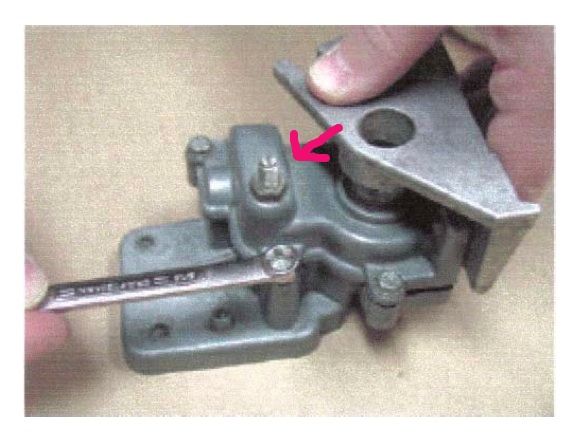
Next question: the set screw on the gearbox determines the backlash for the motor anchor (it wants to push and pull in and out depending on the turning direction ). Any suggestion how much is needed?
It's highly recommended to consider this simple rebuild. I was close to ordering new ones (at 360$ each, that is 500$ once they get through european customs....). But a couple of hours was all it took. Turning speed doubled while amps (unloaded) went from 9.5A down to 6.5A
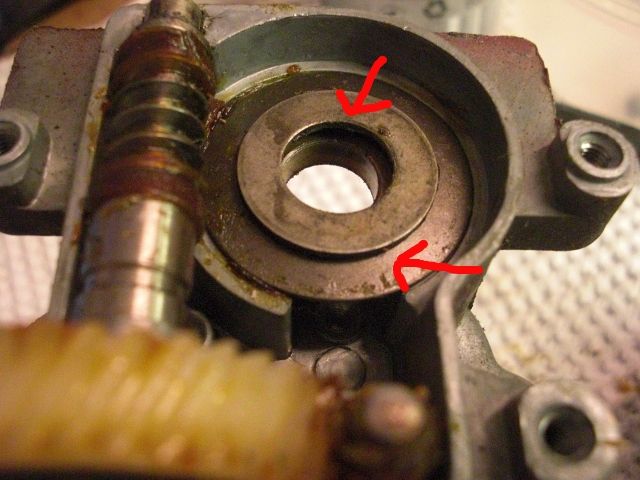
Now, the instructions specify the order of the two washers inside. One of my 2 motors had it the other way around. i assume Alann is correct? (the red arrow picture)
Next question: the set screw on the gearbox determines the backlash for the motor anchor (it wants to push and pull in and out depending on the turning direction ). Any suggestion how much is needed?
It's highly recommended to consider this simple rebuild. I was close to ordering new ones (at 360$ each, that is 500$ once they get through european customs....). But a couple of hours was all it took. Turning speed doubled while amps (unloaded) went from 9.5A down to 6.5A


 11-28-2015, 01:09 PM
#2
Melting Slicks
Thread Starter
following up on my own thread
I noticed during the rebuild that the top pot metal casing really needs to be tightened down with the 4 screws as if a spring was holding it from doing so. That appears to be the big conical washer over the metal gear. I reduced the coning (with careful hammering) so as to reduce the pressure and friction it causes on the gear. Now I have no clearance and no friction. Amps went further down to around 5.7A.
I painted the motors with POR15 cause they were slightly corroded and could use some fresh-up.
11-28-2015, 09:45 PM
#3
Team Owner


I actually have my original '63 motors out as I write and want to touch up the paint....is that gloss black correct or just something you decided to spray on there ??
I thought the motor housings were more of a silver color ...
I thought the motor housings were more of a silver color ...
Last edited by Frankie the Fink; 11-28-2015 at 09:45 PM.
11-29-2015, 06:10 AM
#4
Melting Slicks
Thread Starter
11-29-2015, 06:46 AM
#5
Team Owner
OK. Understand.
11-29-2015, 08:01 AM
#6
Le Mans Master


On that set screw for the armature lash, I believe the idea is to run it in until it makes light contact and then back it off around 1/8 to 1/4 'turn'. Just enough to have no binding in the mechanism but enough to prevent too much play.
Mike T - Prescott AZ
Mike T - Prescott AZ
11-29-2015, 08:19 AM
#7
Team Owner
I actually try to fine tune it a little further to see if I can get both motors speed synched up closely using the pre-load.
11-29-2015, 08:39 AM
#8
Melting Slicks
Thread Starter
I set the screw totally loose (say enough to have 1/8" backlash on the motor shaft). I then connect the motors to a regulated power supply with Amps read out. I turn the screw in till I have the slightest increase in amps. This goes very fast, only a little too much is needed to have to amps jump from 5.7 to 7 and more. When checking backlash again when done, it's very very little, less than 1/64".
I couldn't get it right till I flattened out the conical washer a bit. I guess it's conical to absorb (like a spring) the clearance caused by the not so precise pot housing castings. Mass production would not allow for individual checks. But we can solve that, it made all the difference in my case
I couldn't get it right till I flattened out the conical washer a bit. I guess it's conical to absorb (like a spring) the clearance caused by the not so precise pot housing castings. Mass production would not allow for individual checks. But we can solve that, it made all the difference in my case
11-29-2015, 10:49 AM
#9
Team Owner
Interesting - I am prepping my '63 for possible judging and have tweaked my motors and found the correct "095" NOS headlight switch.
Before anybody asks I will be keeping my early Detroit Speed conversion (the good one with the clutch)!
Before anybody asks I will be keeping my early Detroit Speed conversion (the good one with the clutch)!
11-29-2015, 11:50 AM
#10
Le Mans Master

 11-29-2015, 03:17 PM
#11
Safety Car


Member Since: Feb 2012
Posts: 4,525
Received 2,128 Likes
on
1,028 Posts
2023 C2 of the Year Finalist - Unmodified
2019 C2 of Year Finalist (stock)
2015 C2 of the Year Finalist

The idea of adding friction to synchronize motors is counter-intuitive to me as well...in the electrical world we don't impede mechanically to govern. I'd rather tell the folks who want to take points away to find something else.
Dan
11-29-2015, 03:39 PM
#12
Melting Slicks
Thread Starter
11-29-2015, 03:45 PM
#13
Team Owner
I reattached a power source after marking the current pre-load adjustment setting and re-adjusted for a bit back from the 'drag' position and the adjustment is so close to identical I can't tell a difference. Both motors are real close to 6 amps draw but I wouldn't bet the farm on my power supply regulation...
I'll install the motors tomorrow.....
I'll install the motors tomorrow.....
Last edited by Frankie the Fink; 11-29-2015 at 03:48 PM.
11-29-2015, 07:26 PM
#14
Le Mans Master
 This is common sense. I rebuilt the headlight motors in my first Corvette back in 1973 and have done dozens of them over the years. Unfortunately, Bubba is alive and well.
11-29-2015, 08:20 PM
This is common sense. I rebuilt the headlight motors in my first Corvette back in 1973 and have done dozens of them over the years. Unfortunately, Bubba is alive and well.
11-29-2015, 08:20 PM
#15
Le Mans Master
I took the conical washers out when I rebuilt mine. The motors work quickly, exhibit no shaft play, and are always solidly "open" or closed. After cleaning my motors, contacts, gear lube, new pot metal gears, this seemed to improve performance best. (Just stating my results)
11-30-2015, 01:32 PM
#16
Team Owner
I think people read a lot more into my simple description than what really transpired....lets just leave it at that....
I adjusted the preload off the drag point until the motor was free-spinning - did the same with the other motor; compared the two and they were running at unequal speeds by my observation so I readjusted the passenger side preload as I still found slight drag in the reverse direction..
I adjusted the preload off the drag point until the motor was free-spinning - did the same with the other motor; compared the two and they were running at unequal speeds by my observation so I readjusted the passenger side preload as I still found slight drag in the reverse direction..
Last edited by Frankie the Fink; 11-30-2015 at 03:29 PM.
11-30-2015, 02:49 PM
#17
Le Mans Master
Yes Frankie I may have a little bubba in me. I like to think of myself the way many of our membership were in the 1970's... Enjoying my car and fixing it sometimes with "restoration" in mind and sometimes with "safe functionality" as the goal. Bubba fixes can be ok, as long as safety isn't compromised. Those are fightin' words to a few perhaps...
11-30-2015, 03:16 PM
#18
Safety Car
Member Since: Feb 2012
Posts: 4,525
Received 2,128 Likes
on
1,028 Posts
2023 C2 of the Year Finalist - Unmodified
2019 C2 of Year Finalist (stock)
2015 C2 of the Year Finalist
I think people read a lot more into my simple description than what really transpired....lets just leave it at that....
I adjusted the preload off the drag point until the motor was free-spinning - did the same with the other motor; compared the two and they were running at unequal speeds by my observation so I readjusted the passenger side preload as I still found slight drag in the reverse direction..
If you think that's wrong -- say so but save the insults..
Be careful Chattanooga...you left parts out ? Guess you'll be called a Bubba next..
Frankie, I believe he was responding to the OP and the idea of inserting drag to sync the motors. Your posts don't say that you did that or thought it was wise. I don't think he lumped you in with Bubba.
On the other hand, and unrelated to anything you have written I take issue with the notion that there is a prescribed sync of the motors in the annals of Corvette assembly and maintenance directives chiseled in a tablet somewhere. If so, John Z can let us know. I understand that NCRS is entitled to say and do what they want in this regard in exchange for the points they issue or take away. If the motors in new C2's were perfectly synced I'd be surprised.
We all know that two identical electric motors, especially non-military or aircraft grade motors, will not draw identical current or produce identical torque or speed. The variables are many and include ambient temperature, winding resistance, resistance through the brushes and commutator, brush composition, wiring length and other immeasurable mechanical dimensions. I can't help but think the original designers would be spitting up their beer in laughter had they known 50+ years later guys like us would agonize over headlamp opening & closing speed.
My point, and the point made by the fellow who agreed with me is that motor speed is not properly controlled by inhibiting free motion with a preload adjustment. Slowing a motor down that way just heats up windings and stresses commutators and brushes. I'm no expert on these headlamps by the way, I'm just an old phone company guy that knows a little about electrical things.
I think what you ended up doing to get results you were happy with is what I myself would have done, or, in my case I live with slightly mistimed headlamps. I'm not after NCRS designations.
Dan
11-30-2015, 03:28 PM
#19
Team Owner
Frankie, I believe he was responding to the OP and the idea of inserting drag to sync the motors. Your posts don't say that you did that or thought it was wise. I don't think he lumped you in with Bubba.
On the other hand, and unrelated to anything you have written I take issue with the notion that there is a prescribed sync of the motors in the annals of Corvette assembly and maintenance directives chiseled in a tablet somewhere. If so, John Z can let us know. I understand that NCRS is entitled to say and do what they want in this regard in exchange for the points they issue or take away. If the motors in new C2's were perfectly synced I'd be surprised.
We all know that two identical electric motors, especially non-military or aircraft grade motors, will not draw identical current or produce identical torque or speed. The variables are many and include ambient temperature, winding resistance, resistance through the brushes and commutator, brush composition, wiring length and other immeasurable mechanical dimensions. I can't help but think the original designers would be spitting up their beer in laughter had they known 50+ years later guys like us would agonize over headlamp opening & closing speed.
My point, and the point made by the fellow who agreed with me is that motor speed is not properly controlled by inhibiting free motion with a preload adjustment. Slowing a motor down that way just heats up windings and stresses commutators and brushes. I'm no expert on these headlamps by the way, I'm just an old phone company guy that knows a little about electrical things.
I think what you ended up doing to get results you were happy with is what I myself would have done, or, in my case I live with slightly mistimed headlamps. I'm not after NCRS designations.
Dan
I'm a journeyman avionics technician (after a 4 year apprenticeship)...not that it matters. I haven't burnt up any electric motors in 50 years of dealing with them.
Didn't get to put motors in today; got tapped by the household Christmas committee of one to put up blinking lights all over the house (* SIGH *)...
Last edited by Frankie the Fink; 11-30-2015 at 03:39 PM.