C1 Rotisserie Pictures
 04-12-2014, 11:55 PM
#1
Instructor

Thread Starter
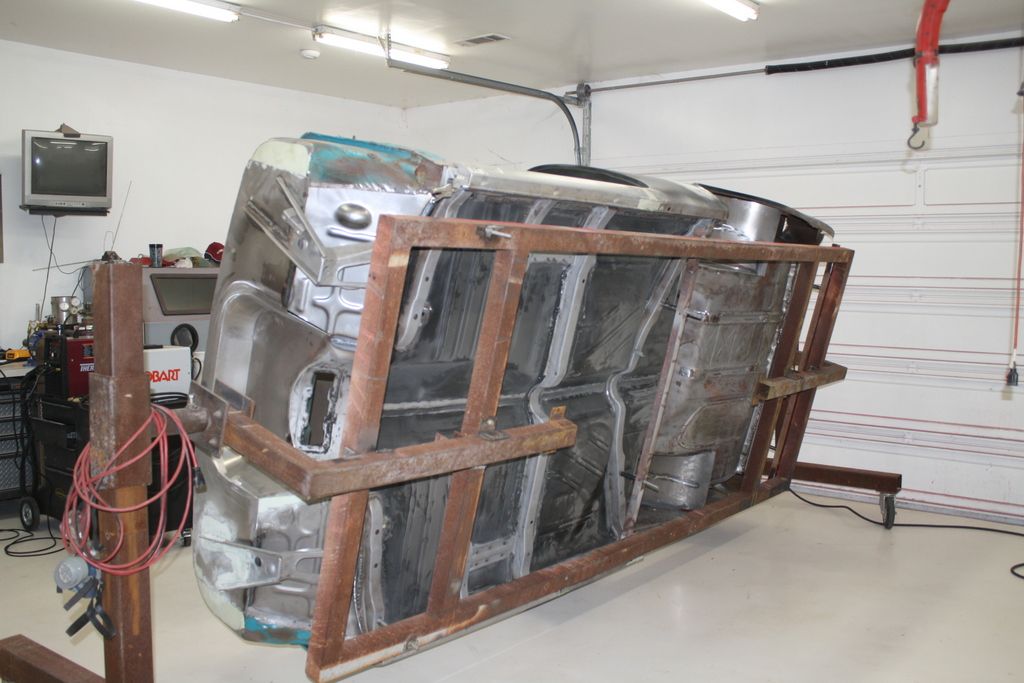
We finished an extra rotisserie for our C1 (59) restoration today. The body was originally on a wooden body dolly but I wanted to be able to clean the underside with no problems. And this is what we came up with. In the 2nd picture, we had to slide the rotisserie under the entire body which meant suspending it fairly high above the ground with our A-frame. I have to say it was pretty scary and made me a little nervous, especially since it has been fairly windy all day. It was a relief once we got it positioned underneath and began lowering her down. Needless to say, I started cleaning up the underside after she was all squared away on the rotisserie. Just wanted to share some of the progress we made today.
Jill.
Jill.

The following users liked this post:
dave28 (01-07-2022)
04-13-2014, 04:24 AM
#2


That's the right way to do it! 


 04-13-2014, 09:24 PM
#4
Melting Slicks


Here's a couple of pics using a rotisserie built off John McGraw's plans...
04-14-2014, 02:41 PM
#5
Instructor
Thread Starter
04-14-2014, 04:19 PM
#6
Safety Car


Damn Stan,
I forgot how good it looked when it was new! Here is how it looks now after 10+ years of use, a bunch of cars, and some rust.
You will notice that I made some new mounts to move the end "L's" in when I was mounting a car that does not have front fenders like a Corvette does.
I have my current 56 BelAir project mounted to it right now.
Regards, John McGraw
I forgot how good it looked when it was new! Here is how it looks now after 10+ years of use, a bunch of cars, and some rust.

You will notice that I made some new mounts to move the end "L's" in when I was mounting a car that does not have front fenders like a Corvette does.
I have my current 56 BelAir project mounted to it right now.
Regards, John McGraw
04-14-2014, 09:03 PM
#7
Melting Slicks
Another good idea John.. looks like that works real well with the 56 too...I wouldn't have guessed that it would work that well..
JJahn...you mentioned soda Blasting. Here's a pic of a soda blasting day my '61 on John's rotisserie. Rolled the car all over the property on that thing. Out of the shop to be blasted ...back to be washed and back into the shop..
Pretty handy ...for sure.
Thanks John...for the rotisserie plans... it really helped out, during this phase especially!
Stan...
Last edited by Stan's Customs; 04-14-2014 at 09:09 PM.
04-14-2014, 09:56 PM
#8
Instructor
Thread Starter
Cool picture. We installed much larger casters on this modified rotisserie so we can roll it around on all types of surfaces. the original casters were much smaller and didn't roll all that great, especially on the ground. This one rolls like a dream. I mentioned in an earlier post that I'm nearly finished with the frame and engine with the exception f the coil and break in process. Here are some pictures. That's me in one of the pictures. I bought the cat eye glasses last year to go with the car - lol. I feel like I've come a long way in a year (took delivery last year on March 21), especially with no engine or transmission in the car when I bought it. I'm doing my best to take it all back to original as much as I possibly can. I can't wait for the day to hear it run as well as drive it for the very first time...
The following users liked this post:
dave28 (01-07-2022)
04-14-2014, 10:09 PM
#9
Melting Slicks
Verrry Nice...great looking engine!!!
I know you will be glad to hear it ...two fours and all.
I know you will be glad to hear it ...two fours and all.
04-25-2014, 12:13 AM
#11
Heel & Toe

First, I am building a frame similar to yours and am wondering how long to make it. The body is 15' but I can make the frame up to 20' long. Is there any downside to having 2 1/2' clearance between the body ends and the rotisserie? My frame rails are 2 1/2" square tube with 3/16" walls so I think it's plenty strong enough to take the body's weight. I'm thinking the extra room will make the body work easier.
Second, I read somewhere that I shouldn't go beyond 90 degrees with the body (i.e. not upside down), I assume because the body mounts aren't designed for that. Looking at the body mounts it makes sense, but I thought I would see if you have any experience or opinions.
Thanks,
Mitch
04-25-2014, 12:52 AM
#12
Melting Slicks
Just curious. Why are the exhaust manifolds gold and the exhaust all black?
Cool picture. We installed much larger casters on this modified rotisserie so we can roll it around on all types of surfaces. the original casters were much smaller and didn't roll all that great, especially on the ground. This one rolls like a dream. I mentioned in an earlier post that I'm nearly finished with the frame and engine with the exception f the coil and break in process. Here are some pictures. That's me in one of the pictures. I bought the cat eye glasses last year to go with the car - lol. I feel like I've come a long way in a year (took delivery last year on March 21), especially with no engine or transmission in the car when I bought it. I'm doing my best to take it all back to original as much as I possibly can. I can't wait for the day to hear it run as well as drive it for the very first time...
04-25-2014, 01:49 PM
#13
Instructor
Thread Starter
Great thread, very helpful. I have a '68 and am getting ready to put the body on a rotisserie, but I have a couple of (hopefully) quick questions.
First, I am building a frame similar to yours and am wondering how long to make it. The body is 15' but I can make the frame up to 20' long. Is there any downside to having 2 1/2' clearance between the body ends and the rotisserie? My frame rails are 2 1/2" square tube with 3/16" walls so I think it's plenty strong enough to take the body's weight. I'm thinking the extra room will make the body work easier.
Second, I read somewhere that I shouldn't go beyond 90 degrees with the body (i.e. not upside down), I assume because the body mounts aren't designed for that. Looking at the body mounts it makes sense, but I thought I would see if you have any experience or opinions.
Thanks,
Mitch
Hi Mitch. I'm at work and saw your reply. Let me get some of the specs documented and I'll send a reply message either tonight or over the weekend so I can give you a comprehensive run-down on the measurements, etc. Jill
04-25-2014, 02:00 PM
#14
Instructor
Thread Starter
Do you know of anyone that's used the manifold dressing? I guess if it doesn't work the way it's supposed to, I can take them off and repaint them again so they look right according to the period... Jill
04-27-2014, 09:48 AM
#15
Heel & Toe
Thanks Jill. Don't go to too much trouble as I'm most interested in whether you ever had the body of your car past 90 degrees when on the rotisserie. Even so, I'm not sure how similar the body mounts on a C1 are versus on a C3 like mine. I think I'll post the question on the C3 site as we'll. Thanks. Mitch
04-27-2014, 11:16 PM
#16
Instructor
Thread Starter
Thanks Jill. Don't go to too much trouble as I'm most interested in whether you ever had the body of your car past 90 degrees when on the rotisserie. Even so, I'm not sure how similar the body mounts on a C1 are versus on a C3 like mine. I think I'll post the question on the C3 site as we'll. Thanks. Mitch
Hi Mitch. The most I've taken mine is around 80 degrees. That's more than sufficient for the type of work I'm doing to mine (cleaning the underbody, soda blasting inside the cab area, engine compartment, etc). Here's a picture from yesterday - the car is about 80 degrees and I was able to soda blast the passenger side of the cab area, the entire engine compartment, and the front nose section. This was all accomplished with only 3 bags (50 lb) of soda. All I have left to do is a little more of the front nose and all of the fender wells, the inside of my doors, and under the hood. Then, I'll start fiberglass repair work (have quite a bit to do since the previous owner pinched my nose and modified the rear with an inset license plate (similar to 61) as well as removed all of my tabs located under my bumpers. The fun begins...but at least I'll be doing the fiberglass work during the warmer months so I know all of the resin will dry good. If you still want the specs to the body dolly, I'll be happy to provide them. I started working on the car today and didn't stop until 8pm when it got dark outside...my usual weekend schedule. Jill
The following users liked this post:
dave28 (01-07-2022)

 04-28-2014, 10:23 PM
#18
Instructor
Thread Starter
10-22-2014, 11:16 PM
#20
Instructor
Thread Starter
Was on vacation last week and got a chance to have one week's worth of uninterrupted time to work on the car. We took the body off of the rotisserie to dry fit the body and several other components to make sure they all fit well. We were primarily interested in dry fitting both inner fender wells due to having to make repairs to the existing pieces. Needless to say, everything seems to be fitting like a glove (I'm pretty happy about that). Once the inner fender wells are in place and secured, we'll get the front nose secured onto the car. Next, we'll do the same with the bottom half of the rear end (since someone decided to cut an inset license plate). Then we'll finish any lingering fiberglass repairs and shoot a coat of sand able filler primer. Then sand, sand, sand...
Here, we have attached the hood to the radiator core support on the frame to test fit. Notice in the background of the 3rd picture the A-frame that is already set for lifting the car off of the rotisserie in preparation for the dry fit.
Here, we have attached the hood to the radiator core support on the frame to test fit. Notice in the background of the 3rd picture the A-frame that is already set for lifting the car off of the rotisserie in preparation for the dry fit.
The following users liked this post:
dave28 (01-07-2022)