Building my 383
 07-04-2014, 11:15 AM
#41
Melting Slicks


I think you are going to need a vintage type manifold for an oil fill tube. Here is a Weiand single plane with provision for fill tube.
Weiand SBC Alum Single Plane High Rise Intake Mod 7521 | eBay
Otherwise if you stick with a dual plane intake, you will need to have a something like the RPM or LT1 intake ported to match the intakes of the heads you select.
Weiand SBC Alum Single Plane High Rise Intake Mod 7521 | eBay
Otherwise if you stick with a dual plane intake, you will need to have a something like the RPM or LT1 intake ported to match the intakes of the heads you select.
I think I have one of those Weiands with the oil fill hole already in it. I had it on the '61 back in the 70's.
 07-21-2014, 04:32 PM
#42
Melting Slicks
Thread Starter


Ok...finally back from the Machinist. Ugh. Daves Performance Machine in Fresno did a great job..it just took like three months.
Bore .040, Bore Hone, align hone, decked, new cam bearings, balanced rotator assembly, checked clearances. I get to assemble it.
Manley forged crank. Forged H beam 6" rods. Forged Icon pistons.
Now to clean it up, paint it and start assembling the bottom end.
Bore .040, Bore Hone, align hone, decked, new cam bearings, balanced rotator assembly, checked clearances. I get to assemble it.
Manley forged crank. Forged H beam 6" rods. Forged Icon pistons.
Now to clean it up, paint it and start assembling the bottom end.
 07-21-2014, 05:42 PM
#43
Burning Brakes

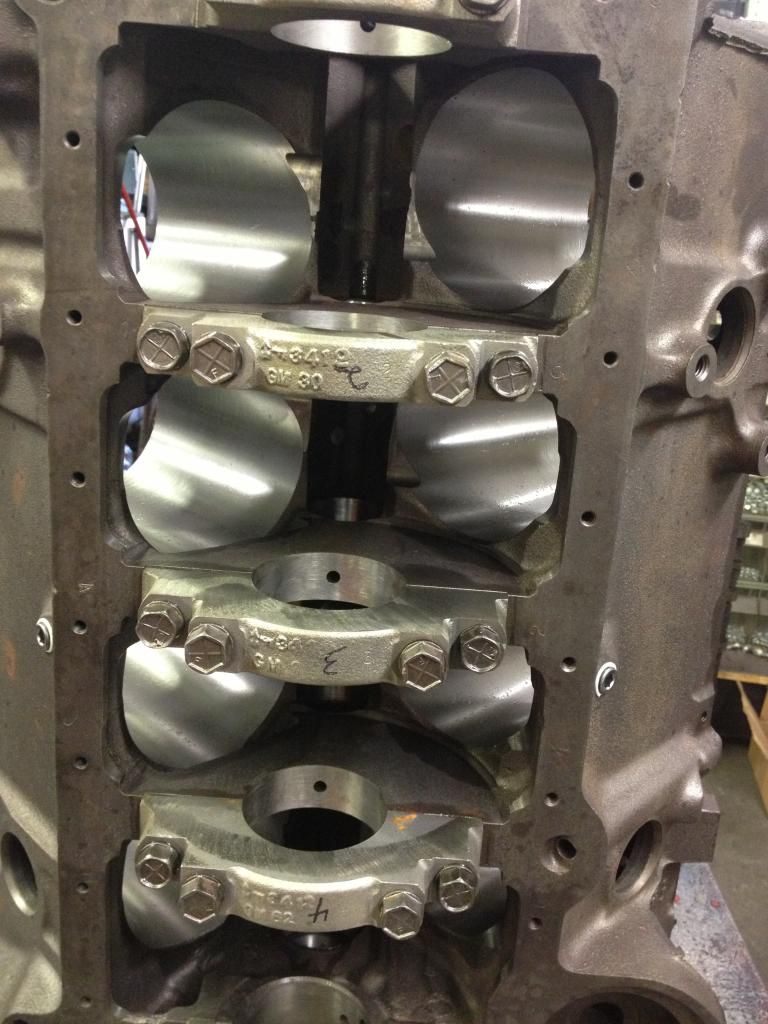
When you are putting the lower end together make sure you check the rod to oil pan rail clearance. I see they didn't do much grinding in the way of that for you on the block in the photo. Good luck with your build.
07-21-2014, 06:23 PM
#45
Team Owner


Member Since: Oct 2000
Location: Washington Michigan
Posts: 38,899
Received 1,857 Likes
on
1,100 Posts

If you haven't installed the crank and all the rods/pistons for mockup, you don't know if it's been clearanced or not, and if it hasn't, it'll need another complete teardown and cleaning before you assemble it.
If it hasn't been rod and rod-bolt clearanced, don't get too aggressive - one little wrong move can turn your block into instant junk. Typical 383 and "Oops" clearances are shown below.
If it hasn't been rod and rod-bolt clearanced, don't get too aggressive - one little wrong move can turn your block into instant junk. Typical 383 and "Oops" clearances are shown below.
07-22-2014, 01:49 PM
#48
Race Director

I've seen little holes like that repaired with a screw plug and Belzona. In fact we have used Belzona for some pretty fancy block/water jacket repairs on industrial diesels. The only problem will be that you would be thinking about it from now until forever.
Are you going to come to HAN next week?
Are you going to come to HAN next week?
07-22-2014, 02:26 PM
#49
Melting Slicks
Thread Starter
I was hoping to have this engine built and installed before HAN...thats obviously NOT going to happen. Right now we are on the fence, and may come out for the day in the Z...Im having an issue with the 63...maybe the throwout bearing again, or maybe just loose clutch rod adjustment nuts....so Im leery of taking it out to Reno at the moment.
Ill Pm you if we do head out there.
Ill Pm you if we do head out there.
07-22-2014, 02:49 PM
#50
Race Director
I was hoping to have this engine built and installed before HAN...thats obviously NOT going to happen. Right now we are on the fence, and may come out for the day in the Z...Im having an issue with the 63...maybe the throwout bearing again, or maybe just loose clutch rod adjustment nuts....so Im leery of taking it out to Reno at the moment.
Ill Pm you if we do head out there.
Ill Pm you if we do head out there.


 09-06-2014, 12:29 PM
#54
Melting Slicks
Thread Starter
Well, moving and buying a house have got in the way.
I have all of the bottom end ready for assembly.
I hope to have it on an engine stand sometime in the next two weeks.
I still have to wash the block and paint it, then end gap the rings.
Everything else has been checked and ready to install.
I havent picked out a cam yet. Which may slow things down, because I need to check cam to rod clearances before final assembly. Once i get moving again, ill share pics of the progress.
09-06-2014, 12:30 PM
#55
Melting Slicks
Thread Starter
...As for the throwout bearing, It only rears its head after an hour or two of driving. SO Ill plan on replacing it when I swap motors. Curious if anyone has used the bronze bushing with a 5 speed.
09-10-2014, 07:00 PM
#57
Melting Slicks


Ok...finally back from the Machinist. Ugh. Daves Performance Machine in Fresno did a great job..it just took like three months.
Bore .040, Bore Hone, align hone, decked, new cam bearings, balanced rotator assembly, checked clearances. I get to assemble it.
Manley forged crank. Forged H beam 6" rods. Forged Icon pistons.
Now to clean it up, paint it and start assembling the bottom end.
Bore .040, Bore Hone, align hone, decked, new cam bearings, balanced rotator assembly, checked clearances. I get to assemble it.
Manley forged crank. Forged H beam 6" rods. Forged Icon pistons.
Now to clean it up, paint it and start assembling the bottom end.
Also, don't neglect checking clearance between the rod bolts and the cam lobes in a stroker motor. If your rods use cap screws, there is often no problem, however, if the rods have bolts, some clearancing may be required.
10-10-2014, 10:46 PM
#58
Drifting

Hi Don:
I've been following your 383 build because I'm also building a 383. Mine is carefully disguised to look like a stock L79 for use in my '67. I wanted to comment on the discussion about intakes because I did some research on this.
You mention that you are using a Z28 intake but you don't say what year or casting number. However, I suspect that you have one of the "good ones," and I think you will be in good shape for your 383.
GM had a family of functionally identical high performance intakes, starting with the 1967 Z28 intake. With minor changes to the thermostat location and some other details, this same design was used on the Z28 and LT1 for several years. An experienced racer told me this was by far the best intake GM ever made for the small block, comparable to the best intakes from the aftermarket.
I chose the '67 casting 3811810 shown at the top in the photo below because with the air cleaner installed, it looks almost exactly like the stock L79 casting 3890490 shown at the bottom. Note the placement of the thermostat housing, temp sender, and oil fill tube, and the fact that it has the "stove" for a divorced choke. It even has the snowflake.
HOWEVER, the Z28 manifold is clearly a much better flowing design than the L79 manifold. It is taller and the runners are larger, with more graceful turns. The larger runner size matches up very well with the Dart Iron Eagle Platinum 200cc heads that I'm using.
So, if you have one of these manifolds, I don't think you are leaving any power on the table compared to an Edelbrock Performer RPM dual plane.

67 Z28 intake (top), 67 L79 intake (bottom)
 10-10-2014, 10:54 PM
#59
Melting Slicks
Thread Starter
Yes! I have one from a 68 Z28. I may try to use the stock L76 intake first....if the ports will match at all....just to keep the factory air cleaner. Failing that, Ill figure out a way to squeeze a 64 later air cleaner under the stock hood. Although I say stock hood, I do have a BB hood on the car....but want to keep the option of using the 63 hood at a later date.
10-11-2014, 12:57 PM
#60
Drifting
Yes! I have one from a 68 Z28. I may try to use the stock L76 intake first....if the ports will match at all....just to keep the factory air cleaner. Failing that, Ill figure out a way to squeeze a 64 later air cleaner under the stock hood. Although I say stock hood, I do have a BB hood on the car....but want to keep the option of using the 63 hood at a later date.
Hi Don:
What's the casting number on your intake? I'm 99% certain that it is one of the "good ones" that I described. There are quite a few different casting numbers in that group.
Regarding hood clearance, I have a '67 with the small block hood. The 3917610 Z28 intake that I'm using is about 1/2" taller than the L79 intake. I mocked this up on my car and and found that for the '67 air cleaner, the only interference point is the spot circled in the photo (the interference is not symmetric on the left side because midyear Corvettes have the engine offset about one inch toward the passenger side).
In my case I only needed another 1/8" to clear the stock '67 air cleaner. 65tripleblack suggested a simple fix that I never would have thought of myself. He suggested that I simply add 1/8" of shims at each body mount, raising the whole body by 1/8". This was pretty easy to do in a couple hours. I don't have the engine in the car yet, so I can't confirm that everything fits as expected, but my measurements indicate that it will.
I also considered modifying a repro air cleaner base to drop the element slightly, or using a slightly less-tall air cleaner element in the stock base. Both of these are viable options if the change is only 1/8".
However, this concept should not be taken too far. Even the stock '67 air cleaner already has a pinch point at the neck of the carb where there is only 1.25" clearance between the cover and the base. Some of the so-called "drop-down" aftermarket air cleaners make this gap even smaller. I recall hearing that simply taking the lid off one of those aftermarket drop-down air cleaners boosted the chassis dyno power by 25 HP on one car being tested. So, one has to be carefull taking the drop-down concept too far.
BTW, according to my measurements, here is how a couple of Corvette intakes compare in height to a couple of Edelbrock intakes, using the measurement definition that Edelbrock describes in their catalog:
1967 Corvette L79 (389040): 3.8"
1967 Z28 (3917610): 4.3"
Edelbrock Performer: 3.7"
Edelbrock Performer RPM: 4.2"

Interference point for '67 air cleaner when used with tall intake mainifold