Building my 383
 10-21-2014, 12:23 AM
#101
Race Director


ARP studs provide higher clamping pressure than the bolts which will make the bores change very slightly. It depends on a lot of factors re: condition of the block and caps and how tightly the caps fit the registers in the block, etc. Could you get away with not doing the hone? Maybe, but from what I'm reading in your posts, you want the best quality you can build, and I don't blame you since I think the same way. Better to do the hone and know what you have is correct.
Take a look at this thread. Though there is some conjecture, some good info lies within as well.
http://speedtalk.com/forum/viewtopic...t=align+honing
Take a look at this thread. Though there is some conjecture, some good info lies within as well.
http://speedtalk.com/forum/viewtopic...t=align+honing
 10-21-2014, 03:06 AM
#102
Le Mans Master


Sounds like you are making good progress.
Based on your ring gaps I think your cylinders may be loose. Normally right out of the box the ring gaps will be close to .016 if the bore is dead on. .016 is safe for the top ring with your engine. I don't know what Icon Pistons need, they were just coming in when I left the performance market. It may be they need more cylinder clearance and that is why your top rings are a little loose. I suspect your finished bore is at 4.041 rather than 4.040. The extra 1 will give you .004 more gap. Your gap will not hurt anything. The power difference with .016 gap and .019 gap is less than 5 HP.
Your Second rings can be set at wider gaps, up to .024 helps the top ring seal better.
More than that is a waste but I would go .022 to .024. It helps the top ring seat at the bottom of the bore as it starts the compression stroke. If it seats faster you build more compression. It actually helps control oil consumption also. It lets the trapped air between the top and second ring escape helping the top ring work better.
This fact is proven and has been used at OEM's since the late 1990's.
The line hone on the main bores helps keep your crankshaft straight. Blocks shift and a few thousands of out of line can affect crankshaft life. Toyota was one of the first OEM's to really zero in on this. They actually match engine bearings to the journal within a couple million's of each other to keep the crank as straight as possible with the exact same oil clearances from journal to journal. Toyota claimed it lowered NVH. Noise, vibration and harmonics inside the engine and extended life on the lower end. If you line bore the block should have deck plates torqued in place when you line bore or you are wasting your time and money.
ARP Studs are stronger no doubt, they might help avoid distortion inside your main caps but how much I have no idea. Many times studs are used in Race engines because they are worked on much more often than a passenger car engine. They are torn down and inspected and rebuilt many more times than any passenger car and studs are more reliable and durable for multiple use applications.
I have seen the short rod 383's break the web in the main caps and I don't think studs would have helped avoid that block breakage. I think you helped your cause with the 6" rods, they take a lot of stress out of the block for you effectively giving you a more durable block. Even the 5.7 rods pretty much eliminated the block break issue.
10-21-2014, 06:24 AM
#103
Le Mans Master

ARP studs provide higher clamping pressure than the bolts which will make the bores change very slightly. It depends on a lot of factors re: condition of the block and caps and how tightly the caps fit the registers in the block, etc. Could you get away with not doing the hone? Maybe, but from what I'm reading in your posts, you want the best quality you can build, and I don't blame you since I think the same way. Better to do the hone and know what you have is correct.
Take a look at this thread. Though there is some conjecture, some good info lies within as well.
http://speedtalk.com/forum/viewtopic...t=align+honing
Take a look at this thread. Though there is some conjecture, some good info lies within as well.
http://speedtalk.com/forum/viewtopic...t=align+honing
 10-21-2014, 12:37 PM
#104
Race Director
Thanks. IMOP there might be some snake oil in there. The pic of the main bearings can also be a sign that the crank is bent or the journals were cut poorly. True- a fine thread can produce higher clamping pressure. I believe the GM bolt torque is 65/70 and the ARP number is 80 (#134-5601). I guess that will make a difference. ARP recommends to check the condition of the bearings and crank after stud install and to align hone if necessary. I guess that is the determining factor... you have to first check the parts fitment before you spend the money on align honing.
10-21-2014, 02:12 PM
#105
Melting Slicks

Thread Starter


Great reading. I will stick with the stock bolts. I will double check the crank bores with my caliper to ensure they stay the same size with new factory windage tray bolt/studs.
I dont think i need ARP studs, and it seems the majority of walk issues are with studs.
Now I am waiting for my vendor to send me the right bolts after rushing me the wrong ones. (ordered large journal bolts, got small journal bolts.) ugh
Im dying to get the crank bolted in.....
I dont think i need ARP studs, and it seems the majority of walk issues are with studs.
Now I am waiting for my vendor to send me the right bolts after rushing me the wrong ones. (ordered large journal bolts, got small journal bolts.) ugh
Im dying to get the crank bolted in.....
10-21-2014, 02:14 PM
#106
Melting Slicks
Thread Starter
10-21-2014, 02:59 PM
#107
Race Director
Great reading. I will stick with the stock bolts. I will double check the crank bores with my caliper to ensure they stay the same size with new factory windage tray bolt/studs.
I dont think i need ARP studs, and it seems the majority of walk issues are with studs.
Now I am waiting for my vendor to send me the right bolts after rushing me the wrong ones. (ordered large journal bolts, got small journal bolts.) ugh
Im dying to get the crank bolted in.....
I dont think i need ARP studs, and it seems the majority of walk issues are with studs.
Now I am waiting for my vendor to send me the right bolts after rushing me the wrong ones. (ordered large journal bolts, got small journal bolts.) ugh
Im dying to get the crank bolted in.....
Buy or borrow a bore gauge. Your caliper just isn't accurate enough for that job. $100-150 for one good enough for the job.
 10-25-2014, 08:00 PM
#109
Melting Slicks
Thread Starter
Well, Its looking like the machine shop didnt fully assemble and check clearances.....or maybe I just grind it myself .
Rod side clearance is .015
Crank endplay is .005
but the rod bolt heads are less than .020...call it .018 at the bolt shoulder.
I believe that .050 was the minimum....

Awww CRAP!
Rod side clearance is .015
Crank endplay is .005
but the rod bolt heads are less than .020...call it .018 at the bolt shoulder.
I believe that .050 was the minimum....


Awww CRAP!
Last edited by DucatiDon; 10-25-2014 at 08:40 PM.
10-26-2014, 04:38 PM
#111
Team Owner


Member Since: Oct 2000
Location: Washington Michigan
Posts: 38,899
Received 1,857 Likes
on
1,100 Posts

 10-26-2014, 04:52 PM
#112
Drifting

Hi Don:
I set my rod-to-block clearance to .050" because that was the only number I could find online at the time I did the clearancing. Since that time I have seen numbers as small as .020" mentioned by other engine builders.
I'm inclined to think that .050" is overkill, but I don't know how low it is safe to go. My guess is that .020" might be fine. My reasoning is as follows:
1) It is well established that the absolute minimum recommended piston-to-head quench distance is in the range of .035". Some builders report that with quench in this range, a faint imprint of the piston top can be visible in the carbon deposits on the cylinder head quench area.
2) If you think about the forces at work to that cause the .035" quench distance to close completely at high RPM, it is apparent that the forces are HUGE. The piston is travelling at high speed up the bore, then completely reverses direction within a few milliseconds. The rapid reversal of all of that speeding mass will try try to stretch the rod and it will also try to distort the crank throw.
3) Now consider the case of the big end of the rod spinning past the clearanced area of the block. It seems to me that the forces that would close the block clearance gap are *far* smaller than the forces that try to close the quench gap, possibly by a factor of 100 or more. There is no reversal of a speeding mass (the piston), and no rod to stretch.
In summary, I suspect that for rod-to-block clearance, a clearance of .020" might be just fine.
I would be very interested to hear opinions on this topic from experienced engine builders on this forum. In particular, have some builders consistently used clearances in the .020" range and had no issues? Has anyone ever set the clearance too close and had interference occur at high RPM?
10-27-2014, 01:20 PM
#113
Melting Slicks
Thread Starter
 10-27-2014, 04:03 PM
#114
Drifting
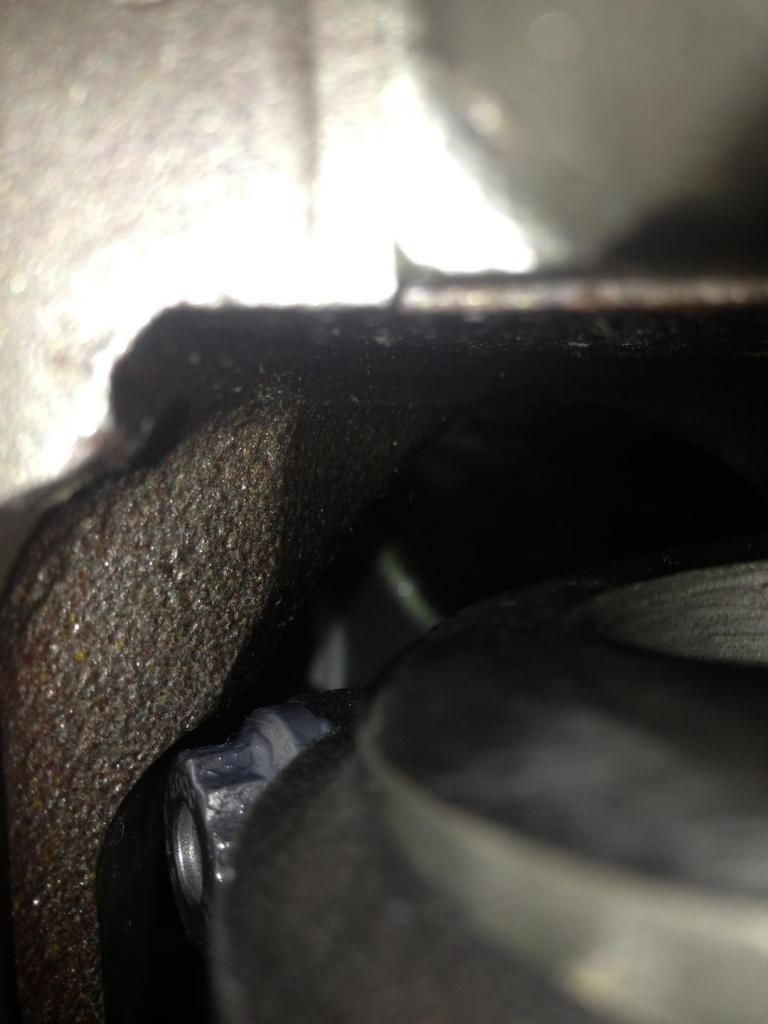
In the bare-block photo that Don posted on October 14, it appears to me that the block had definitely been clearanced, with quite a bit of material removed. The cylinder in the upper left of the photo shows it best.
However, the style of the clearancing looks to me like what you get from a generic CNC clearancing, rather than hand clearancing for the specific rod and block being used. Some of the CNC clearancing jobs I have seen look pretty aggressive.
So, it's possible that the machinist never checked the final clearance with the specific rods that are being used, since he believed his one-size-fits-all CNC program had the situation covered. It's also possible that the machinist did check the clearance, but felt that .018" was adequate.
In comparisons I have made among several aftermarket rods, there are significant differences among them regarding the amount of clearancing that is needed. The difference from best to worst is over .100". That can make the difference between hitting water or not. At present, the best rod for block clearance that I have found is the Scat Pro Comp, but I'm still researching this topic and will be testing a specific Manley rod soon.
Given that Don's block has already been clearanced and we don't know where his particular rod falls in the range of possibilities for the rod-to-block dimension, it might be wise to proceed with caution.
Per my earlier post on the topic of how much clearance is actually needed, I'd suggest that Don discuss this first with the machinist and also try to get some feedback from experienced engine builders on this forum.
It would be a damn shame to try and add more clearance than is actually necessary, and then end up hitting water.
10-27-2014, 05:02 PM
#115
Melting Slicks
Thread Starter
After hours of Googling, ive found anywhere from .020 (Jim Grubbs) to .050 minimum, with anywhere from .040-.100 being recommended.
I plan to just elongate the current clearances to ensure I have .050 all around the bolt head. I wont go any deeper than the current machine work. All of the crank throws look fine. Not even close. Just the rod bolt heads need some breathing room. (At least so far on Cyl 1/2....Ill take pics next week as I grind away and test fit the remaining cylinders, one at a time, grinding as I go.
I plan to just elongate the current clearances to ensure I have .050 all around the bolt head. I wont go any deeper than the current machine work. All of the crank throws look fine. Not even close. Just the rod bolt heads need some breathing room. (At least so far on Cyl 1/2....Ill take pics next week as I grind away and test fit the remaining cylinders, one at a time, grinding as I go.
10-27-2014, 05:30 PM
#116
Safety Car

After hours of Googling, ive found anywhere from .020 (Jim Grubbs) to .050 minimum, with anywhere from .040-.100 being recommended.
I plan to just elongate the current clearances to ensure I have .050 all around the bolt head. I wont go any deeper than the current machine work. All of the crank throws look fine. Not even close. Just the rod bolt heads need some breathing room. (At least so far on Cyl 1/2....Ill take pics next week as I grind away and test fit the remaining cylinders, one at a time, grinding as I go.
I plan to just elongate the current clearances to ensure I have .050 all around the bolt head. I wont go any deeper than the current machine work. All of the crank throws look fine. Not even close. Just the rod bolt heads need some breathing room. (At least so far on Cyl 1/2....Ill take pics next week as I grind away and test fit the remaining cylinders, one at a time, grinding as I go.
.050 is an arbitrary number, and I agree with Joe R's reasoning in a previous post. Very sound advice from 2 ME's to one very cautious engine builder.
Before I went any deeper, I'd knock the corner off of the 16 point ARP cap nuts; however, that shouldn't be necessary.
PS: You have been vacillating about the Z28/LT1 intake manifold that I steered you into last year. In stock form, it will be more than enough to feed your beast. If you want more juice, then get back to me and I'll tell you how to port it for more juice.
10-27-2014, 06:14 PM
#117
Drifting
After hours of Googling, ive found anywhere from .020 (Jim Grubbs) to .050 minimum, with anywhere from .040-.100 being recommended.
I plan to just elongate the current clearances to ensure I have .050 all around the bolt head. I wont go any deeper than the current machine work. All of the crank throws look fine. Not even close. Just the rod bolt heads need some breathing room. (At least so far on Cyl 1/2....Ill take pics next week as I grind away and test fit the remaining cylinders, one at a time, grinding as I go.
I plan to just elongate the current clearances to ensure I have .050 all around the bolt head. I wont go any deeper than the current machine work. All of the crank throws look fine. Not even close. Just the rod bolt heads need some breathing room. (At least so far on Cyl 1/2....Ill take pics next week as I grind away and test fit the remaining cylinders, one at a time, grinding as I go.
Hi Don:
If your pistons and rings are all assembled and clean, you might want to just use an old junk piston, with no rings installed, for the clearance adjustment. This is the approach I used. That way the rings can stay on the pistons and only the block and one rod will have to be cleaned again.
I don't think it matters if the old piston is standard bore and your block is now .040 over. However, if you want to be able to turn the crank 360 degrees for checking cam clearance, you may have to trim the skirts of the junk piston if it's not a 383 piston.
Speaking of cam clearance, remember that rod-to-cam clearance also has to be checked and may require some mild grinding on the rod. So, don't let the "final assembly" of the engine get too far before you check that too.
Checking rod-to-cam clearance is a PITA because it depends on the cam you choose, the rod you choose, and the cam phasing. So, you need to have your final cam choice installed, degreed as intended, along with the timing chain and gear set.
It is very hard to see the clearance area between the rod and cam, so a zip tie can be used as shown in the attached photo. It's somewhat easier to do this with only one rod installed, as opposed to what is shown in the photo.
BTW, another way to gain some rod-to-block clearance without additional grinding would be to use a rod bolt with a lower profile head like the ones in the photo below.
ARP offers some bolt types with lower profile heads. I can't tell from the photos of your rods whether they already have the low profile heads. The ARP web site has a table that shows all the available bolts and the dimensions.
10-27-2014, 07:54 PM
#118
Melting Slicks
Thread Starter
"IF" being the key word...I dont have any spare pistons laying around. I could just remove the rings from one piston and use it I guess....I like that zip tie trick.
I havent settled on a cam yet. Once I do, that will be the next step, getting it installed and degreed.
I havent settled on a cam yet. Once I do, that will be the next step, getting it installed and degreed.
10-27-2014, 10:11 PM
#119
Drifting
"IF" being the key word...I dont have any spare pistons laying around. I could just remove the rings from one piston and use it I guess....I like that zip tie trick.
I havent settled on a cam yet. Once I do, that will be the next step, getting it installed and degreed.
I havent settled on a cam yet. Once I do, that will be the next step, getting it installed and degreed.
FYI, shown below is the selection of ARP rod bolts. Note that some bolts have low-profile heads, which helps with block clearance. You may want to compare your current bolts to the ones in this table to see if a suitable low-profile bolt is available that would fit your rods.
I'm just trying to think of ways to avoid removing any more material from your block. Even if you simply elongate the existing clearance cut, I think you are moving closer toward water, due to the way that the bore curves around in that area. From the photos, the existing clearance cuts look pretty big already.
I would be very interested to know what rod-to-block clearance your machinist recommends. It would be interesting to ask what he thinks is required *before* you tell him what you measured........

ARP rod bolt dimensions
10-27-2014, 10:20 PM
#120
Melting Slicks
Thread Starter
My rods have the 7/16 ARP2000 bolts with 7/16 heads. Thats as small as they get.