My LS3 into 64 Coupe Project
 04-27-2014, 12:52 AM
#1
Pro

Thread Starter
I have been planning this for a while but things are starting to move along so decided to start a thread and share the info. There is a lot of info around but finding it all in one place has been tricky, hopefully I can document the process from start to finish for anyone that wants to do it.
As far as LS swaps go, I am probably going the simplest route. The car is already a no-AC, non-power anything car and I am not changing that.
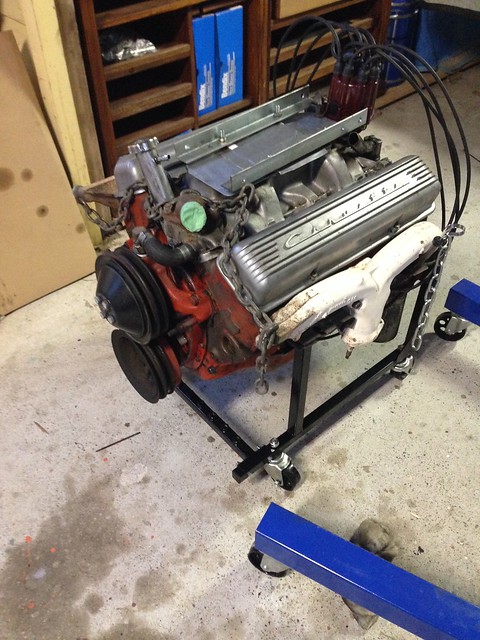
I bought the LS3 new, its actually a surplus from Holden Australia, they use them in high performance sedans and utes in the HSV range, but they are much the same as the C6 and run a corvette waterpump.
I also purchased the accessory drive package here :
http://paceperformance.com/i-9279131...drive-kit.html
While this is an easy way to go, you could piece this together buying the bracket from kwik performance, the tensioner from ebay, a late model alternator and a DAYCO 6060705 belt yourself. It does fit up nice though right out of the box, very easy :

As far as LS swaps go, I am probably going the simplest route. The car is already a no-AC, non-power anything car and I am not changing that.
I bought the LS3 new, its actually a surplus from Holden Australia, they use them in high performance sedans and utes in the HSV range, but they are much the same as the C6 and run a corvette waterpump.
I also purchased the accessory drive package here :
http://paceperformance.com/i-9279131...drive-kit.html
While this is an easy way to go, you could piece this together buying the bracket from kwik performance, the tensioner from ebay, a late model alternator and a DAYCO 6060705 belt yourself. It does fit up nice though right out of the box, very easy :

The following users liked this post:
GWD1983 (08-18-2021)


 04-27-2014, 01:15 AM
#3
Pro
Thread Starter
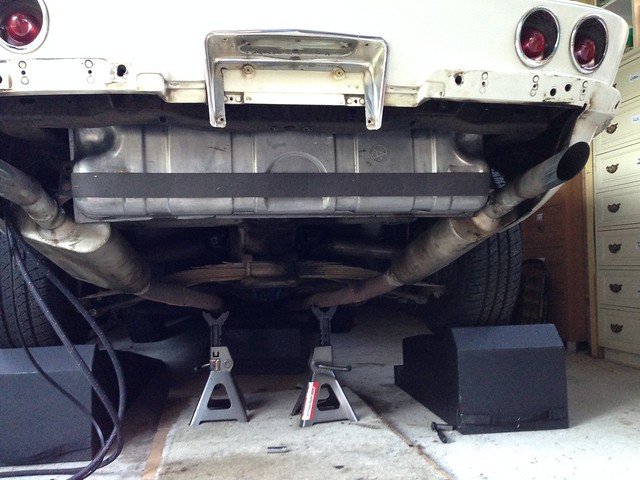
The first thing I touched on the car was the gas tank. The plan was to modify the fuel system so that I could get it ready but still drive the car with the old engine. I didnt know what the original tank was going to look like but thats what I needed to find out first.
At some stage the exhaust was put in place and welded rather than clamped into a single piece so I wanted to do this with it on... as it turns out that is possible but not easy.
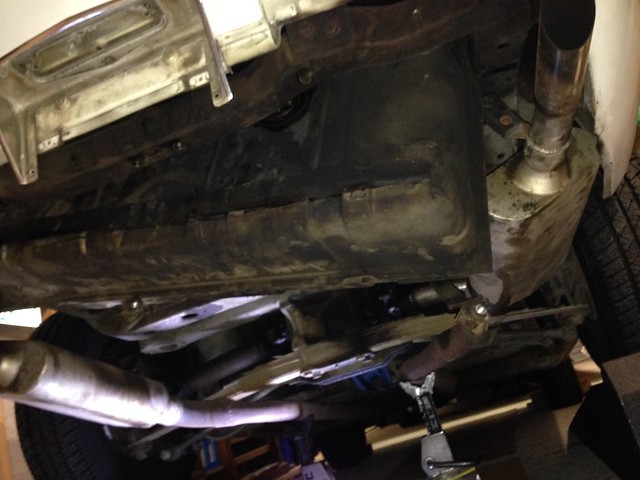
The tank must be rotated 90 degrees and angled as shown, but without the exhaust it would just roll down and out after removing the forward brace. As seen, it was super dirty from years of road grime and soot, but after a clean up I discovered a near perfect original tank.
At some stage the exhaust was put in place and welded rather than clamped into a single piece so I wanted to do this with it on... as it turns out that is possible but not easy.
The tank must be rotated 90 degrees and angled as shown, but without the exhaust it would just roll down and out after removing the forward brace. As seen, it was super dirty from years of road grime and soot, but after a clean up I discovered a near perfect original tank.
 04-27-2014, 02:04 AM
#5
Pro
Thread Starter
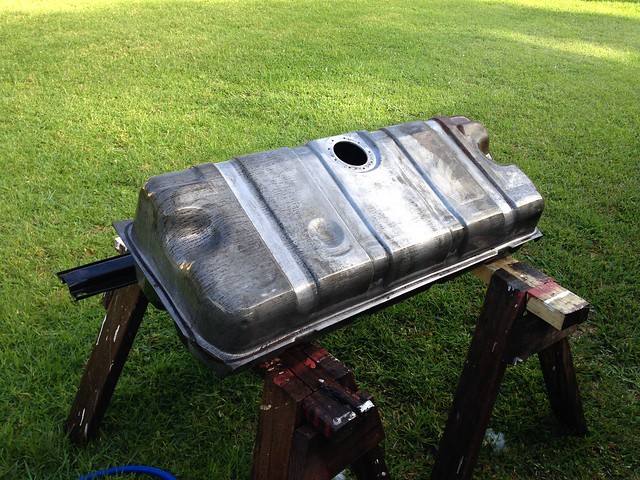
I stripped the tank back and painted the top with a black rust inhibitor just as extra protection, but heat proof cleared the bottom as it was so clean and nice.
Since the tank was in good shape it looked like a good candidate for EFI conversion so I got the PA-4 module from Tanks Inc and got the LS Fuel Filter Regulator (9904 kit with fittings) while I was at it.
I was a bit slack with photos on the PA-4 install which is a shame. My initial reference was this thread on the C3 forum. It debates options for the placement of the module and angling the tray so it sits flush on the tank floor. I ended up placing mine to the left of the filler which is forward in the tank.
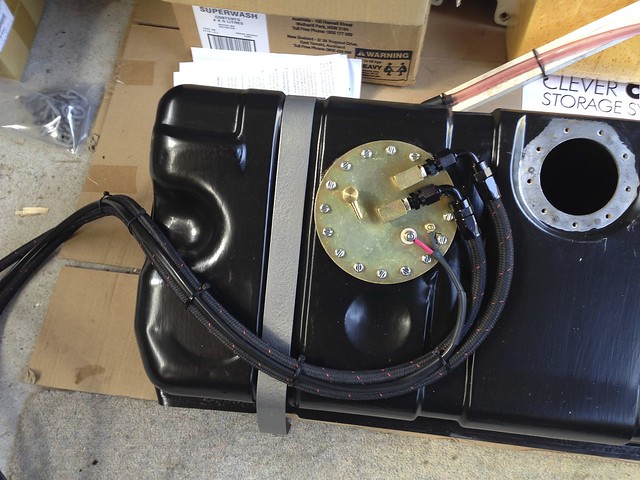
This means it is in the deepest part of the tank but technically susceptible to losing fuel in a near empty tank under hard acceleration. Another thing I like about this placement though is that there is plenty of headroom for the hose fittings and hoses in this location and I can even get spanner access through the filler if there was any leaks (without pulling the tank !). This is a photo through the filler door :

This is the same reason I ran the connections toward the door and then used 90deg fittings to turn them around, this is all fairly serviceable with the tank in.
The rest of the PA-4 install was pretty easy, I used a bimetal hole saw to cut the tank. I did this with the tank full of water and after a couple of weeks washing and airing it daily outside, be very careful !
I flattened the metal around the hole where the tank rib is using some g-clamps and hardwood cut to the shape I wanted. Actually installing the retainer ring was tedious (I held it with one hand inside the fuel filler while threading the first bolts with the other hand) but possible with patience. I used Permatex Aviation #3 around the gasket, that stuff is messy but seems effective.
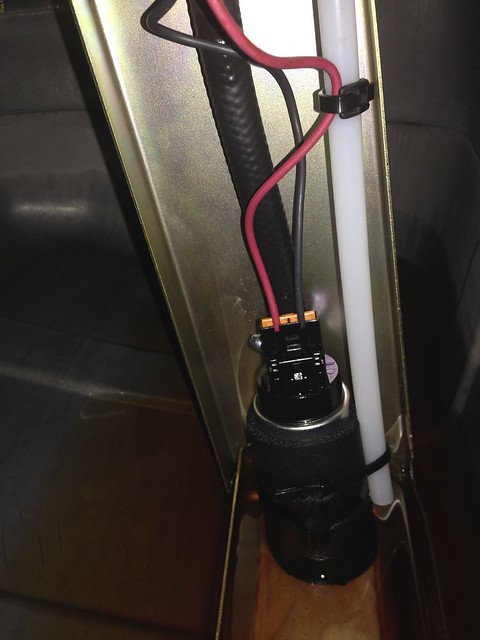
Wish I took a photo of it prior to install but here is the module in the tank with the first bit of fuel on it. You can kind of make out the tray is angled and flush with the bottom...
Since the tank was in good shape it looked like a good candidate for EFI conversion so I got the PA-4 module from Tanks Inc and got the LS Fuel Filter Regulator (9904 kit with fittings) while I was at it.
I was a bit slack with photos on the PA-4 install which is a shame. My initial reference was this thread on the C3 forum. It debates options for the placement of the module and angling the tray so it sits flush on the tank floor. I ended up placing mine to the left of the filler which is forward in the tank.
This means it is in the deepest part of the tank but technically susceptible to losing fuel in a near empty tank under hard acceleration. Another thing I like about this placement though is that there is plenty of headroom for the hose fittings and hoses in this location and I can even get spanner access through the filler if there was any leaks (without pulling the tank !). This is a photo through the filler door :
This is the same reason I ran the connections toward the door and then used 90deg fittings to turn them around, this is all fairly serviceable with the tank in.
The rest of the PA-4 install was pretty easy, I used a bimetal hole saw to cut the tank. I did this with the tank full of water and after a couple of weeks washing and airing it daily outside, be very careful !
I flattened the metal around the hole where the tank rib is using some g-clamps and hardwood cut to the shape I wanted. Actually installing the retainer ring was tedious (I held it with one hand inside the fuel filler while threading the first bolts with the other hand) but possible with patience. I used Permatex Aviation #3 around the gasket, that stuff is messy but seems effective.
Wish I took a photo of it prior to install but here is the module in the tank with the first bit of fuel on it. You can kind of make out the tray is angled and flush with the bottom...
Last edited by daz_au; 04-27-2014 at 02:35 AM.
04-27-2014, 02:25 AM
#6
Pro
Thread Starter
Here is a pic of the tank going back in, looks a lot different to what I pulled out. I got some new antisqueak strips and painted up all the straps and hardware.
By the way, I used Aeroquip AN6 fittings throughout and that is their Startlite Hose kevlar/nomex braided also. This stuff is really easy to work with, I am impressed so far.
Next I made some stainless brackets underneath the tank to mount the filter/regulator. I am going to put a cover on the back also to protect it, but it bolts to the original tire carrier holes, I am not putting the carrier back in.
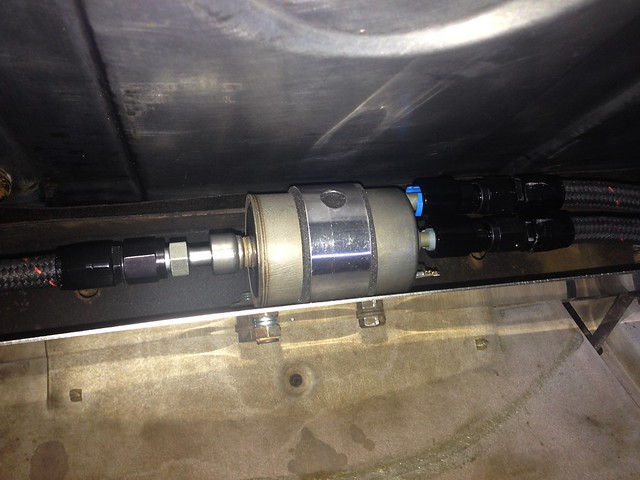
At this point I connected the regulator output to a pressure gauge, put some gas in and powered up pump. Success, no leaks and gauge showing around 60psi like its supposed to.
By the way, I used Aeroquip AN6 fittings throughout and that is their Startlite Hose kevlar/nomex braided also. This stuff is really easy to work with, I am impressed so far.
Next I made some stainless brackets underneath the tank to mount the filter/regulator. I am going to put a cover on the back also to protect it, but it bolts to the original tire carrier holes, I am not putting the carrier back in.
At this point I connected the regulator output to a pressure gauge, put some gas in and powered up pump. Success, no leaks and gauge showing around 60psi like its supposed to.
Last edited by daz_au; 04-27-2014 at 02:36 AM.
04-27-2014, 03:02 AM
#7
Pro
Thread Starter
Actually looking at brake options now, this is the most likely winner.
I was in Sunnyvale, CA for a few years but recently moved back to Sydney, Australia and bought the cars with me !
I was in Sunnyvale, CA for a few years but recently moved back to Sydney, Australia and bought the cars with me !
05-29-2014, 01:34 AM
#8
Pro
Thread Starter
I probably should have warned this wont be the fastest project as I only get time here and there to work on the car. In order to clear up space around the garage and tidy up a bit I finished some other projects, mostly non-corvette except this seat recovering.
I had already done one of the seats, I got the set of covers and new foam from Corvette America some time ago. When I stripped down the second seat it had a couple of issues.
1) A broken seat frame - I was going to have it welded back up but decided on repairing it with some brackets as it was a small area (near where one of the springs attaches to the frame body) and I was worried it would just break again. So I bent up some stainless to wrap and join the break and it worked out nice.
2) It had no back board - I was wondering why the broken spring made a hole right through the old cover, the board that was in the other seat was totally missing from this one. I made a template and cut one out from 3mm MDF, worked out fine.
Anyway, I was happy with the result, these covers fit up nice and the job isnt that hard.
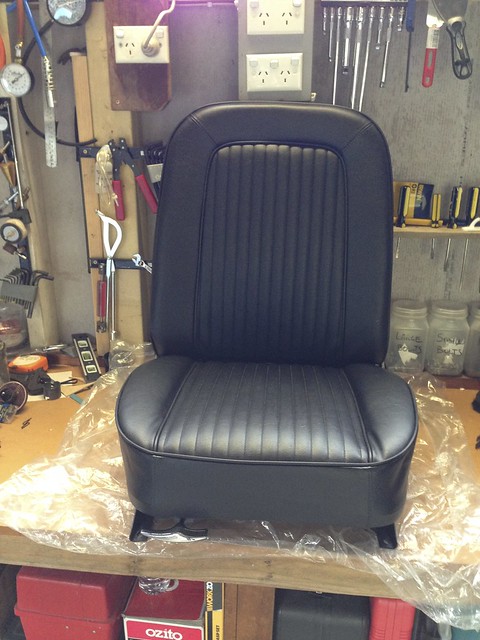
I will say one thing though, the Corvette America hardware kit didnt quite have all the clips required for the job so I had to make some of them myself out of wire. On the positive side though, their installation videos are pretty good and made the job easy.
I had already done one of the seats, I got the set of covers and new foam from Corvette America some time ago. When I stripped down the second seat it had a couple of issues.
1) A broken seat frame - I was going to have it welded back up but decided on repairing it with some brackets as it was a small area (near where one of the springs attaches to the frame body) and I was worried it would just break again. So I bent up some stainless to wrap and join the break and it worked out nice.
2) It had no back board - I was wondering why the broken spring made a hole right through the old cover, the board that was in the other seat was totally missing from this one. I made a template and cut one out from 3mm MDF, worked out fine.
Anyway, I was happy with the result, these covers fit up nice and the job isnt that hard.
I will say one thing though, the Corvette America hardware kit didnt quite have all the clips required for the job so I had to make some of them myself out of wire. On the positive side though, their installation videos are pretty good and made the job easy.
05-29-2014, 02:01 AM
#9
Pro
Thread Starter
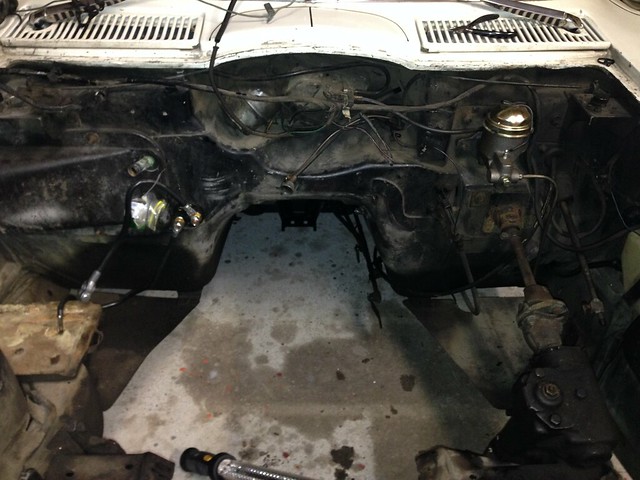
With the garage clear, it was time to empty the engine bay.
First thing I had to deal with was the exhaust, this is supposed to be easy, but instead of relying on the clamps in the middle by the transmission mount, someone decided to weld them together on this car.
I thought about climbing under there and trying to grind the welds to separate them, but since I will not be re-using it, I cut it behind the holes in the chassis with the sawzall. Was still tight, but less sparks and drama than a grinder.
Next was the transmission mount and shifter and there was some surprises !
1) One of the bolts from the bracket to the rubber mount was gone altogether and the other was pretty loose, so the whole thing was kind of flopping about, probably the cause of a decel vibration the car had developed. The one remaining bolt was incorrect also, so they were obviously lost and replaced... and not very well.
2) I went to remove the shifter arms from the box and found this :
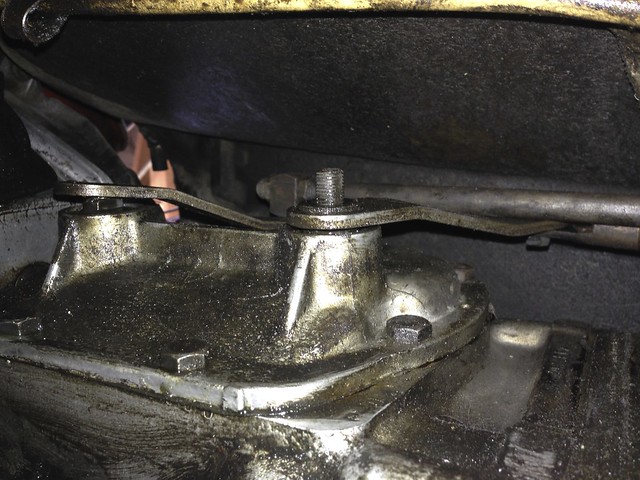
Aside from all the grime and leaks, at some point the 3-4 shift shaft thread has been sheared off and the "fix" was to remove a washer and use the remaining 1 or 2 threads to attach the arm. Oh and the nut used was hand tight and the wrong size, possibly metric.
Also, the threads on 1-2 and 3-4 shafts are different sizes, I believe the larger fine thread is from later muncies so this box has been messed with a bit, but it turns out the case numbers match the vin so some of it is original
First thing I had to deal with was the exhaust, this is supposed to be easy, but instead of relying on the clamps in the middle by the transmission mount, someone decided to weld them together on this car.
I thought about climbing under there and trying to grind the welds to separate them, but since I will not be re-using it, I cut it behind the holes in the chassis with the sawzall. Was still tight, but less sparks and drama than a grinder.
Next was the transmission mount and shifter and there was some surprises !
1) One of the bolts from the bracket to the rubber mount was gone altogether and the other was pretty loose, so the whole thing was kind of flopping about, probably the cause of a decel vibration the car had developed. The one remaining bolt was incorrect also, so they were obviously lost and replaced... and not very well.
2) I went to remove the shifter arms from the box and found this :
Aside from all the grime and leaks, at some point the 3-4 shift shaft thread has been sheared off and the "fix" was to remove a washer and use the remaining 1 or 2 threads to attach the arm. Oh and the nut used was hand tight and the wrong size, possibly metric.
Also, the threads on 1-2 and 3-4 shafts are different sizes, I believe the larger fine thread is from later muncies so this box has been messed with a bit, but it turns out the case numbers match the vin so some of it is original
Last edited by daz_au; 05-29-2014 at 02:12 AM.
05-29-2014, 06:17 AM
#10
Bud2

Member Since: Jul 2005
Location: Warrnambool Victoria
Posts: 1,237
Likes: 0
Received 4 Likes
on
4 Posts

G'day Mate!
Glad to see another Ozzie gettin' his hands soiled. I'm watching the Geelong-Sydney game right now and I'm no liking what I see! I'm in the first half of a body off on my 64 now. I've got a string 383 in mine. Still, I'll follow alone to see how it all goes for you. Good on ya!
Was wondering what you were going to do for a tranny? If you can use a near new Hurst shifter let me know. I'm putting in a Keisler 5-speed and won't be using mine any more.
Keep posting Mate!
Bud.
05-29-2014, 09:12 AM
#11
Le Mans Master


Subscribed! I also have a no power option '64 coupe I was considering mothballing my matching engine someday in favor of this swap while using my stock frame. I really loved the smooth power of the LS3 when I had the C6, but I'll never give up this car! I'm watching.
Bonus points to you for using the word "spanner," I'll be sure and try and work that into conversation with my young son today when we go out to tinker...you won't even hear my bad Australian accent impression when i do it!
Bonus points to you for using the word "spanner," I'll be sure and try and work that into conversation with my young son today when we go out to tinker...you won't even hear my bad Australian accent impression when i do it!
05-29-2014, 06:18 PM
#12

Had the same problem with my M20 when I went to install new linkage. I cut the balance of the stud flush, carefully center punched and drilled it about 3/4" deep, and tapped it for the same size ( I believe it was 5/16-24. I then threaded a new hardened bolt in until the threads bound at the bottom of the tapped hole. Then just cut the rest of the bolt off, leaving about 3/4" of stud to reattach the linkage. I expect it will last another 50 years and was easier than opening the trany and replacing the lever.
05-29-2014, 06:27 PM
#13
Pro
Thread Starter
Hi Bud, I will probably end up with a tko also, but I am using the muncie to move the project along and make sure I can get it all to fit right. How did you go about getting the gearbox down here, just have it freighted or find a local supplier ?
05-30-2014, 03:48 AM
#14
Pro
Thread Starter
Actually I read about that approach on this forum and I may still give that a go. I was able to find a replacement shaft and they seem easy to replace so I have a fallback plan at least !
05-30-2014, 04:09 AM
#15
Pro
Thread Starter
Next I disconnected the driveshaft from the rear of the Muncie and then the only thing remaining is the shifter. You can remove the two mounting bolts from the bracket on the Muncie and leave it in the car, but I decided to take a look at it and bring it out.
Up in the car, unscrew the ball off the top and remove the reverse lockout lever, it pops right out. Back under the car, the two bolt heads can be seen in this pic :

They are tight to get to, but you can move the disconnected shift levers to get better clearance to the bottom one.
With the rear end all disconnected, the engine is easy to unhook, just the wiring for the starter and sensors, oil pressure gauge, I already had the radiator etc out, but left the support in place. I even left the distributor in place but pulled the carby to attach the lifting brackets.
Up in the car, unscrew the ball off the top and remove the reverse lockout lever, it pops right out. Back under the car, the two bolt heads can be seen in this pic :
They are tight to get to, but you can move the disconnected shift levers to get better clearance to the bottom one.
With the rear end all disconnected, the engine is easy to unhook, just the wiring for the starter and sensors, oil pressure gauge, I already had the radiator etc out, but left the support in place. I even left the distributor in place but pulled the carby to attach the lifting brackets.
05-30-2014, 04:31 AM
#16
Pro
Thread Starter
I have never pulled an engine from a car that doesn't have an easily removable front end. Its a bit tricky with a regular shop hoist as it has to come right up over the front and you cant do it from the front because it needs to tilt and most are not long enough.
So the done thing apparently is to remove a front wheel and work the crane from that side. Thats what I did and it was surprisingly easy. I think the trick though is a good lift bracket. I was going to buy something like this :

.. but it didnt seem long enough so I used some heavy steel angle I had and made something up, you can see it well here in the "after" photo, just two pieces exactly the right length bolted to the carby studs :
This made attaching the load spreader (highly recommended) very simple, just two small pieces of chain which keeps the crane arm nice and low to the engine (I was worried about running out of lift height !).
Then its just a matter of lifting a bit, tilting a bit, moving forward a bit... repeat.

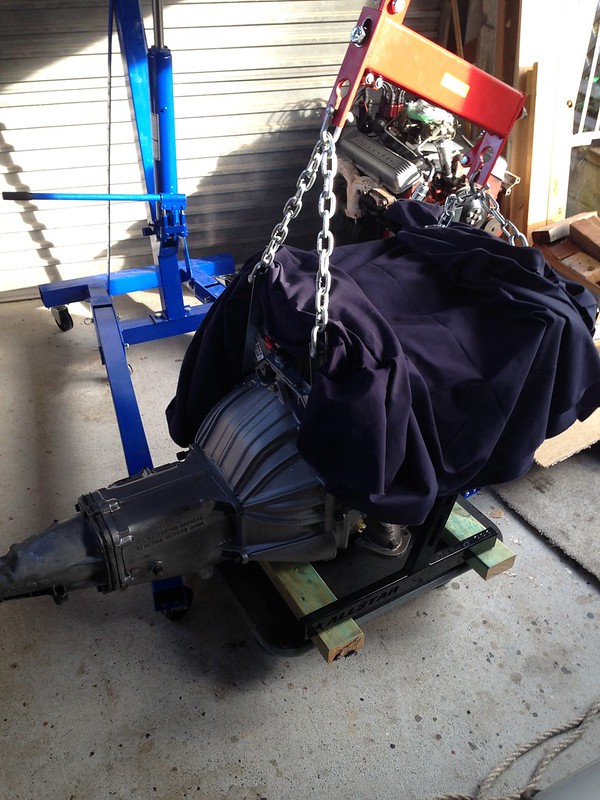
You need to pull the crane sideways out from under the car, a rope on one of the legs before you put it in helps, so does having someone on the side of the crane to keep it moving evenly... and you are out :

Note in that last pic the muncie is gone, I lowered it down and removed it before the pic was taken, but it came out of the car as one unit !
So the done thing apparently is to remove a front wheel and work the crane from that side. Thats what I did and it was surprisingly easy. I think the trick though is a good lift bracket. I was going to buy something like this :
.. but it didnt seem long enough so I used some heavy steel angle I had and made something up, you can see it well here in the "after" photo, just two pieces exactly the right length bolted to the carby studs :
This made attaching the load spreader (highly recommended) very simple, just two small pieces of chain which keeps the crane arm nice and low to the engine (I was worried about running out of lift height !).
Then its just a matter of lifting a bit, tilting a bit, moving forward a bit... repeat.
You need to pull the crane sideways out from under the car, a rope on one of the legs before you put it in helps, so does having someone on the side of the crane to keep it moving evenly... and you are out :
Note in that last pic the muncie is gone, I lowered it down and removed it before the pic was taken, but it came out of the car as one unit !
 05-30-2014, 05:12 PM
#18
Intermediate

Hi Daz,
Where are you located in Sydney. Live in Picton and we are doing a full body off restoration on our 64 convertible we bought last year and stripped the car down in Febuary and hoping to only take about 12 months to finish it. We have had the chassis blasted and powder coated along with all suspension parts. Still trying to work out how to post pics. Body is being worked on as it has had a lot of hits here and their. I read this forum regularly and as everybody states it is a wealth of knowledge for you.
Where are you located in Sydney. Live in Picton and we are doing a full body off restoration on our 64 convertible we bought last year and stripped the car down in Febuary and hoping to only take about 12 months to finish it. We have had the chassis blasted and powder coated along with all suspension parts. Still trying to work out how to post pics. Body is being worked on as it has had a lot of hits here and their. I read this forum regularly and as everybody states it is a wealth of knowledge for you.
05-30-2014, 10:34 PM
#19
Burning Brakes

[QUOTE=daz_au;1586759382]Actually looking at brake options now, this is the most likely winner.
I just finished installing this very kit in my 64......was very easy to do, bolts right in.....also switched to a dual master cylinder as well.....they work very nice, and the car stops straight as an arrow....
The real plus is the seller (Mike) includes his cell # and will answer any questions, he definitely stands behind his product....good luck with your project.
06-10-2014, 07:56 AM
#20
Pro
Thread Starter
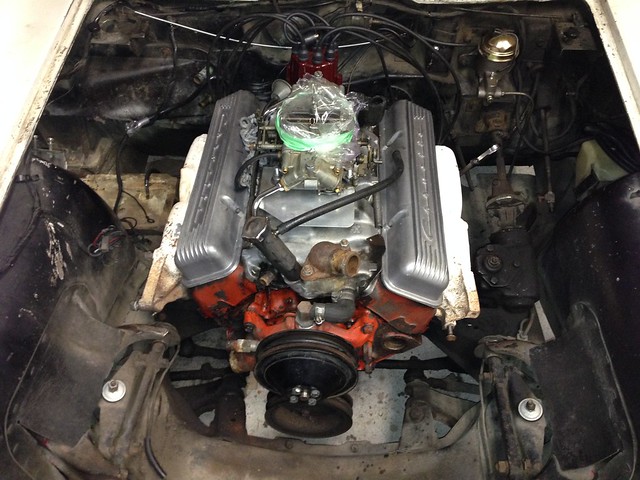
Well the engine was in briefly this weekend. I wanted to lift the LS3 onto the mounts to see how close to the "stock location" the Dingo mounts would be and to check for any unknown clearance issues.
I made my own lift brackets that attach to the LS heads with 2 M10 bolts each. These had to be cut to make sure the chain runs above the plastic intake but low enough to clear the body at the rear when the motor comes close to the firewall.
I also needed more angle to get over the front with the deeper LS pan, so i had to get the spreader setup so that the engine is level with it in the rear most position like this :
Eventually, the engine approached the mounts :
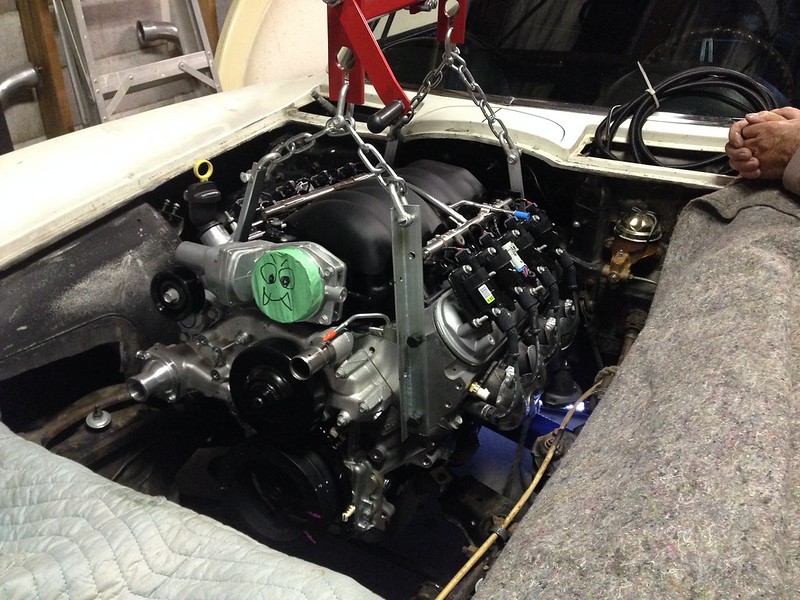
As the engine leveled out the steering arm made it difficult to get the deep oil pan past while keeping the bell housing under the firewall. I simply dropped the idler arm off (2 bolts) to move past that point. The good news is that with the engine on the mounts, and the idler arm back in place, the steering clears :
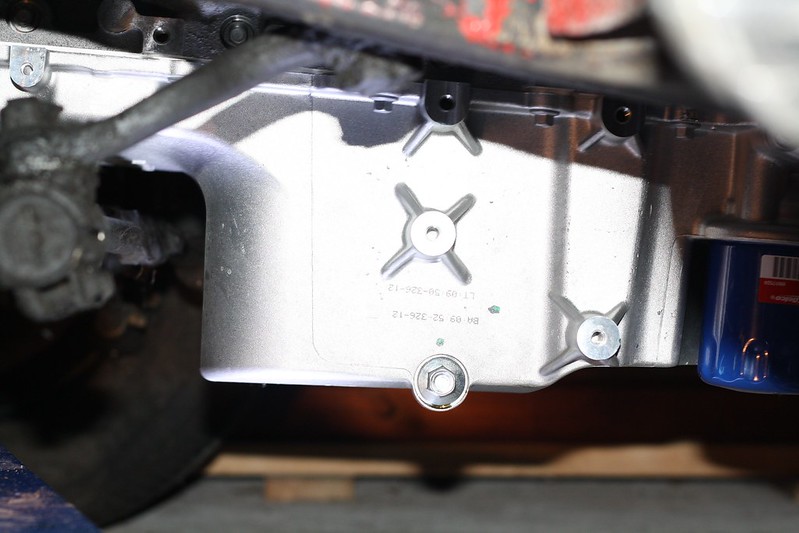
So as it turns out, with this HSV/Commodore oil pan (assume same as on Pontiac G8) and manual steering, everything looks fine....
Of course, the one issue which was pretty much assured is the water pump, now I have my own photos just like all the other LS swappers have of this problem :
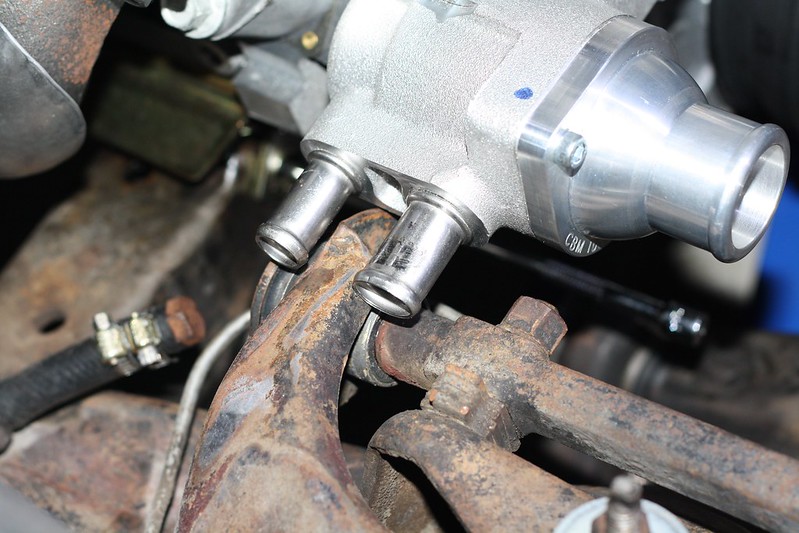
Luckily, there are some known solutions to this, so I will be removing the pump and getting that heater hose plumbing re-routed.
Apart from that, looking around the engine, I am pretty happy. The Muncie also seems to have landed in the right location, also a bonus as the engine plates seem to have located it very close to stock.
I made my own lift brackets that attach to the LS heads with 2 M10 bolts each. These had to be cut to make sure the chain runs above the plastic intake but low enough to clear the body at the rear when the motor comes close to the firewall.
I also needed more angle to get over the front with the deeper LS pan, so i had to get the spreader setup so that the engine is level with it in the rear most position like this :
Eventually, the engine approached the mounts :
As the engine leveled out the steering arm made it difficult to get the deep oil pan past while keeping the bell housing under the firewall. I simply dropped the idler arm off (2 bolts) to move past that point. The good news is that with the engine on the mounts, and the idler arm back in place, the steering clears :
So as it turns out, with this HSV/Commodore oil pan (assume same as on Pontiac G8) and manual steering, everything looks fine....
Of course, the one issue which was pretty much assured is the water pump, now I have my own photos just like all the other LS swappers have of this problem :
Luckily, there are some known solutions to this, so I will be removing the pump and getting that heater hose plumbing re-routed.
Apart from that, looking around the engine, I am pretty happy. The Muncie also seems to have landed in the right location, also a bonus as the engine plates seem to have located it very close to stock.
The following users liked this post:
Rex Kershner (12-22-2016)

