Building a scale `67 Corvette L-88 version of the $3.5 million car


 05-25-2014, 06:57 PM
#44
Pro

Thread Starter

Oh, I wish. Hopefully the prices of 3d printers, etc. will come down in the future enough so that someone like me, on a working man`s salary, can afford them. Right now, I am using either kit parts (the steering wheel parts all came in the kit) carefully painted/detailed, or making the parts from scratch styrene and wires. The labels and tag card were printed.
05-25-2014, 07:20 PM
#45
Le Mans Master

Oh, I wish. Hopefully the prices of 3d printers, etc. will come down in the future enough so that someone like me, on a working man`s salary, can afford them. Right now, I am using either kit parts (the steering wheel parts all came in the kit) carefully painted/detailed, or making the parts from scratch styrene and wires. The labels and tag card were printed.
 05-26-2014, 06:40 PM
#47
Pro
Thread Starter
It is flocking material....The stuff they use for felt on cards. I lay a coat of paint down, and then will it is still wet, I cover the area with flocking. It's tricky because you must use flat paints which dry quickly, but you also have to be careful to only paint what will be covered. And there are a few spots (like around the heel plate) that are tight and have precise lines.
05-26-2014, 07:48 PM
#48

I appreciate it! I think I only need a shot of the passenger side engine compartment so I can see the coolant connections and the way the battery is wired, as well as the drivers side so I can see the details and any markings on the steering box and shafts. I think a picture of the labels on the radiator would be helpful too. A pic looking back toward the firewall would help me with the wiring. If you are able to do this, I gotta find a way to return the favor though! It would be a big help.
05-28-2014, 06:32 PM
#49
Pro
Thread Starter
Thanks Skrape! I appreciate anything you can get!
Ok, so I am going to give fabricating the `67 wheel a try. From all of these I have sold, I have never had a complaint about the `68 style wheels, so I am not sure I am going to go with whatever I accomplish here. Keep in mind, this is still very much in progress. I have alot of work to do yet. Here is what I am working next to the `68 style wheel:
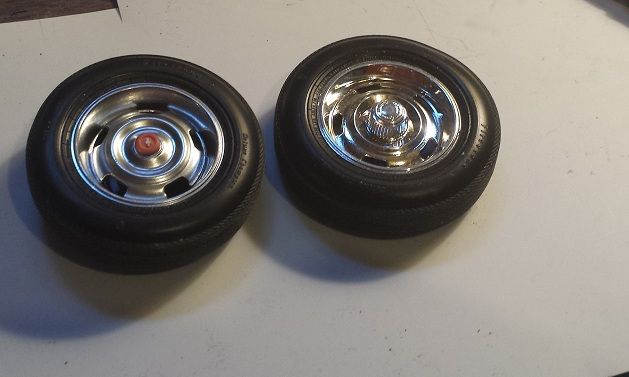
What do you think? Am I on track?
Ok, so I am going to give fabricating the `67 wheel a try. From all of these I have sold, I have never had a complaint about the `68 style wheels, so I am not sure I am going to go with whatever I accomplish here. Keep in mind, this is still very much in progress. I have alot of work to do yet. Here is what I am working next to the `68 style wheel:
What do you think? Am I on track?
05-28-2014, 06:38 PM
#50
Team Owner

Member Since: Feb 2003
Location: Sitting in his Nowhere land Hanover Pa
Posts: 48,984
Received 6,927 Likes
on
4,774 Posts
2015 C2 of Year Finalist

Looks good.
 06-04-2014, 05:22 PM
#52
Pro
Thread Starter
Thanks again guys.
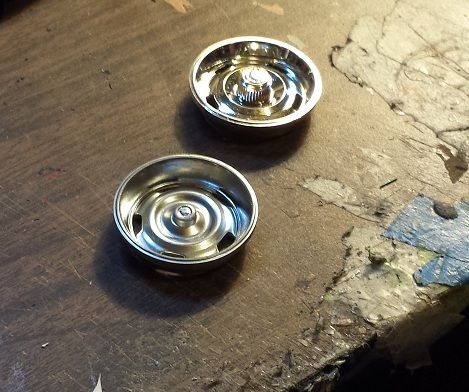
Ok, I think I am just about satisfied with the wheel. I have spent waaaayyyy to much time on these. Now to assemble and cast them. I think I will have to have them chromed, as the chrome spray plating isn`t quite brilliant enough. What do you think?
Ok, I think I am just about satisfied with the wheel. I have spent waaaayyyy to much time on these. Now to assemble and cast them. I think I will have to have them chromed, as the chrome spray plating isn`t quite brilliant enough. What do you think?
06-05-2014, 12:34 AM
#54
Which wheel are you using, the 68 "derby" cap wheel, or the other one ?
06-05-2014, 12:56 PM
#55
Pro
Thread Starter
Thanks guys! I shot it with a quick coat of chrome spray to see how it looks before casting it. I will hopefully be sending these out for chrome and then detail painting them with aluminum paint around the wheel, leaving the center caps and outer rim chrome.
Thanks!
Thanks!
08-08-2014, 04:02 PM
#56
Pro
Thread Starter
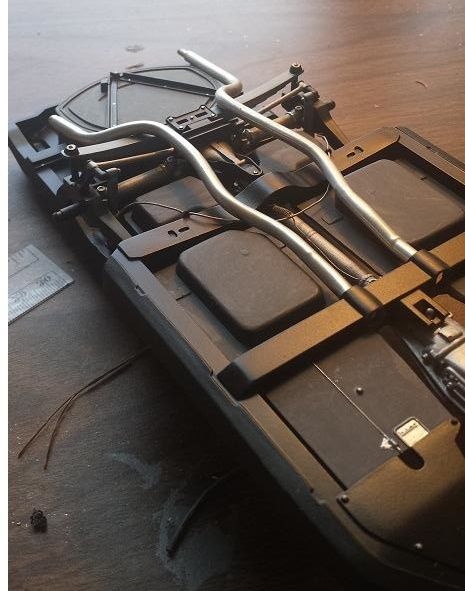
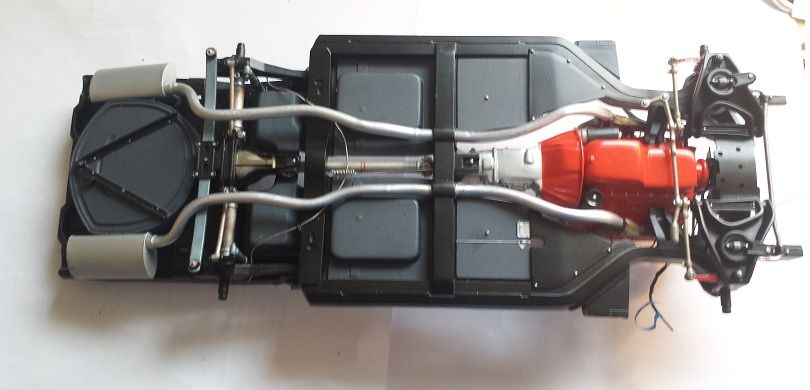
A little more work on this. I have been working on the exhaust, and it is a little more complex to bend then originally thought. Plus the bends are tighter than they look. But I think I am really close now. My fingers and thumbs are aching though. For those of you who have never bent tubing by hand, and since I don`t happen to have a mandrel on me  , it requires putting progressively smaller tubing inside the exterior tubing to keep it from kinking. What you end up with is a nearly solid tube, which makes it resistant to bending, even with the soft bendable tubing. Anyway, I need to add the muffler inlet tubes and cast the mufflers. I also have to do some careful sanding in some places to imitate the D shaped pipes.
I also have to cast the wheels yet. Hopefully I will have them done soom.
, it requires putting progressively smaller tubing inside the exterior tubing to keep it from kinking. What you end up with is a nearly solid tube, which makes it resistant to bending, even with the soft bendable tubing. Anyway, I need to add the muffler inlet tubes and cast the mufflers. I also have to do some careful sanding in some places to imitate the D shaped pipes. I also have to cast the wheels yet. Hopefully I will have them done soom.
08-08-2014, 04:54 PM
#57
Melting Slicks

Member Since: Feb 2007
Location: OP Kansas
Posts: 2,923
Received 134 Likes
on
95 Posts
C2 of Year Finalist (appearance mods) 2019

I don't build models, but I have a trick for bending tubes without kinking them. I fill copper tubes with aluminum oxide packed tightly and then seal the ends. This makes the copper bend like it's solid. Give it a shot and see if it makes the job any easier.
You can also try a spring that fits tightly over the tube, but it's not as easy to do.
Your work is amazing. I assume you use some type of magnification to do the incredible detail on your interior trim pieces. I hope the guy that owns that car sees your work, I'm sure he will want it more than anyone else.
08-08-2014, 05:19 PM
#58
Pro
Thread Starter
 No magnification. Just a very fine brush or toothpick and my squinty eyes.

Does anyone know who ended up with this car anyway? I would assume it went to a museum?
08-23-2014, 04:38 PM
#59
Pro
Thread Starter
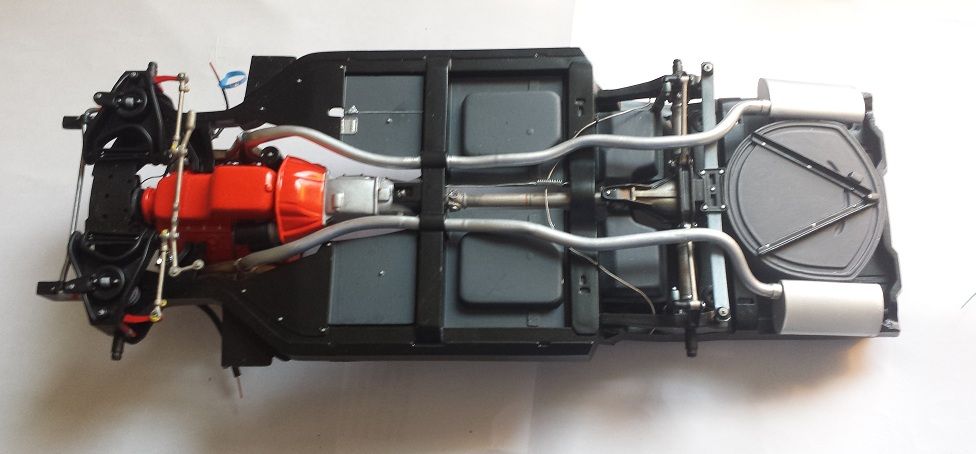
Alright, finally got the exhaust complete. It was more work than I thought..constantly rebending to get things right. I also wasn`t satisfied with my first master of the mufflers, so I created two molds, and cast the mufflers from the second mold. For my first time scratch-building and casting mufflers, I am happy.
I am also in the middle of modifying and recasting the wheels because I am not happy with the originals. I am pretty sure the master is ready now though, and hope to have some pictures soon.
This seems like the never-ending project. Not sure I will be able to part with it once it is done.
I am also in the middle of modifying and recasting the wheels because I am not happy with the originals. I am pretty sure the master is ready now though, and hope to have some pictures soon.
This seems like the never-ending project. Not sure I will be able to part with it once it is done.
08-23-2014, 04:42 PM
#60
Team Owner


Member Since: Oct 2000
Location: Washington Michigan
Posts: 38,899
Received 1,856 Likes
on
1,099 Posts
You do great work! The steering linkage & tie rods should be black.

