When you click on links to various merchants on this site and make a purchase, this can result in this site earning a commission. Affiliate programs and affiliations include, but are not limited to, the eBay Partner Network.
When trying to slide on my reveal molding onto the retainers, it's stiff as heck. Once I get it on, I can barely get it off. Is this normal?? I think it's suppose to slide on easily, but considering it's screwed down tight, not sure how this is possible. Any tricks of the trade?
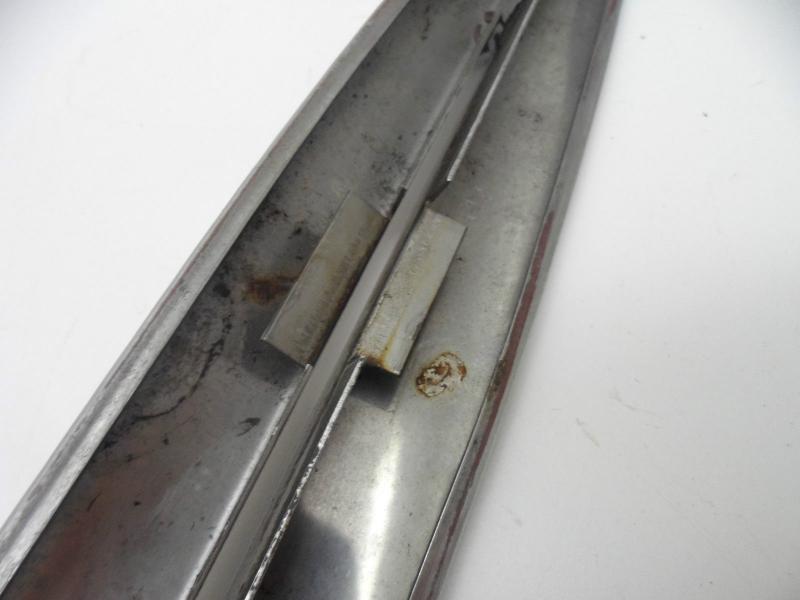
BTW...it is powder coated, but the underside outside edge lip has the coating removed.
Last edited by jusplainwacky; 07-23-2014 at 10:55 PM.
When trying to slide on my reveal molding onto the retainers, it's stiff as heck. Once I get it on, I can barely get it off. Is this normal?? I think it's suppose to slide on easily, but considering it's screwed down tight, not sure how this is possible. Any tricks of the trade?
BTW...it is powder coated, but the underside outside edge lip has the coating removed.
search for window seal, trim,fuzzies, there is a nice pdf all about it,you have to trial fit all the pieces including the window, seal, trim inside and out, door post because its takes alot if finesse to put the whole assembly together and make it run right.
It needs to run good before it goes on.
Last edited by John S 1961; 07-23-2014 at 11:50 PM.
Thanks John for your response. I have already put in new fuzzies, test fitted everything, etc. The only issue I'm having is the reveal molding not sliding along the retainer easily.
They are installed by simply sitting over the reinforcement and clip over the outer edge. I recall yours are repros. You may have to add small shims/thin washers under them before screwing them down to raise the lip just a bit.
Every pre mid-'59 door I've ever worked on had the reinforcements cut into 2 pieces with the center area removed. I believe the design was flawed as a one piece part, and the factory ended up cutting them to get things to fit. Others here have seen this too.
Take yours off and cut them like pictured below, reinstall with additional holes/screws. Don't forget to use flatnuts under the screws and use short screws. Then get them positioned so the reveal will slip over the 2 pieces and clipped to the edges. Then you can attach them using small screws into the faces of the reinforcements as designed.
Trying to slide them onto a fresh paint job is not the way they're designed to be installed. It will damage paint. They MUST clip over.
Yep, kind of a crappy design. It did not take GM long to change to stud clips to retain this molding. Most originals you run across are completely rusted away, and I usually just retrofit to stud clips like was used on later years.
Yup, like the rusted set I ended up repairing with some brazing and rework.
Yes they had to change the SS reveal itself as well so it had lips underneath for the clips to grab on to.
One other thing Dennis....
You could add one "later" style clip in the middle of the reveal to hold the outer edge down if it doesn't fit flush. It'll grab the outer edge only so you have to orient it properly in there so when you tighten the stud from underneath it grabs it.
That's what that big hole is in that red door in the pic above. It had the reinf's AND the clip to hold the reveal on.
Well guess that explains why they don't slip on very easily.
Speaking of rust...it's the reason I powdered coated mine.
I'll try putting them on without sliding and see how they fit.
Since we are talking about this area on the door....anyone have a picture showing the door post guide pin area? I had to fix the passenger side and I just went with what I thought looked good.
Thanks Rick...I didn't notice it. I see on the picture, that the hole is not completely enclosed. I enclosed the one on the passenger side....in fact I remove the slotted one also, cause I didn't want to "guess" when I put this thing all back together.
It's sometime difficult to remember, that when they built 75 to 100 of these cars a day, that they just ......."got it done". Whatever it took to get them built on time was common.
However, that makes it difficult to decipher if St Louis did something, or if it was "bubba" years later.
Hey Rick....after thinking of your response...I'm confused, cause how to you get the reveal on the door post and feed the end of the fuzzy tube on to the door post unless you slide it on?
You cut those reinforcements right? You need to take about a inch or so out of the middle so make 2 cuts.
You get the tip of the fuzzy stainless bead started in the channel bead, then finesse the reveal down over the reinforcement and into the post end.
It's a 3 part insertion process getting them all in at the same time. After the bead is started, with the back end of the reveal up in the air a bit, push onto the post end while bringing it down over the reinforcement.
There's a little bit of sliding. I always put a little piece of waxed paper under the areas of any trims when it's against paint and blue masking tape all around the "susceptible' areas as extra safety against slippage. You're in pre-paint but after paint you'll want to.
I wonder if anyone has converted the 58 style reveal molding to fit like the 59. Just wondering if you could cut the stainless and bend it up so the clips catch the side. That is such a better design, which I didn't know existed....I thought they all took the retainers.
There's no metal to bent up on originals, so you have to buy the 59-up reveal to use the clips. It's a different design with bent tabs under the inner edges for the clips.
Yup, like the rusted set I ended up repairing with some brazing and rework.
Yes they had to change the SS reveal itself as well so it had lips underneath for the clips to grab on to.
One other thing Dennis....
You could add one "later" style clip in the middle of the reveal to hold the outer edge down if it doesn't fit flush. It'll grab the outer edge only so you have to orient it properly in there so when you tighten the stud from underneath it grabs it.
That's what that big hole is in that red door in the pic above. It had the reinf's AND the clip to hold the reveal on.
Here's the clip....
Zip DR-443
Rich
Do these "stud clips" replace the reinforcement attaching plates?
Yep, kind of a crappy design. It did not take GM long to change to stud clips to retain this molding. Most originals you run across are completely rusted away, and I usually just retrofit to stud clips like was used on later years.
Regards, John McGraw
John, do the stud clips "replace" the original molding retainer plates? Thanks Dennis
If your reveal trims are 56-59E, with holes for small screws to hold them to the reinforcements.... No. Note it must be installed before sideglass.
Or you could install glass but leave sash unattached, dropped down at bottom of door, then install trim with screws to reinforcements,, then raise glass and attach sash to regulator rail.
If your trims are 59L-62 .... Yes. Those 2 clips grab a rolled lip on the outside lower edge of the trim. Tricky but with glass rolled up you can reach the nuts with some dexterity.
If not sure what you have post a photo of the underside of your trims.
 07-23-2014, 10:52 PM


![Name: DSCN2865[1].jpg
Views: 1341
Size: 51.1 KB](https://www.corvetteforum.com/forums/attachments/c1-and-c2-corvettes/47814216d1406170359-58-installing-door-window-reveal-molding-dscn2865-1-.jpg)