Project Jimmy Joe, Loud, Proud & Ugly
 05-03-2015, 10:47 PM
#41
Burning Brakes


I slobbered on your car in Knoxville.....the thing that stood out to me was the sharp definition of the blisters as they sit on the fenders/quarters. However, the skirt kind of ties it together. ....but then you went and added the kickout...and broke the flow of the rear of wheel opening.
Meh. Not my car, but you asked LOL. I salute you for actually trying to improve a near perfect design. Carry on, sir, you will still retain hero status from me.
....but then you went and added the kickout...and broke the flow of the rear of wheel opening. Meh. Not my car, but you asked LOL. I salute you for actually trying to improve a near perfect design. Carry on, sir, you will still retain hero status from me.
 05-04-2015, 02:39 PM
#42
Melting Slicks

Thread Starter

I slobbered on your car in Knoxville.....the thing that stood out to me was the sharp definition of the blisters as they sit on the fenders/quarters. However, the skirt kind of ties it together.....but then you went and added the kickout...and broke the flow of the rear of wheel opening.
Meh. Not my car, but you asked LOL. I salute you for actually trying to improve a near perfect design. Carry on, sir, you will still retain hero status from me.
....but then you went and added the kickout...and broke the flow of the rear of wheel opening. Meh. Not my car, but you asked LOL. I salute you for actually trying to improve a near perfect design. Carry on, sir, you will still retain hero status from me.
Just got a call from builder. Major changes coming after me taking Lydia up to shop yesterday and leaving it. Shop wanted to do some comparisons between the two bodies.
1. Lower front fender will move outward at bottom for better tire coverage. That means Rocker will change again.
2. Shop wants to change rear 1/4's flare by 1.0" across tire opening, yet still keep door interface to rear 1/4 belt line look it has now. No Coke Bottle look like my other 64 body has. Lydia is flared 6.0" total in rear, so Jimmy Joe's flare width will become 5.0" Total across rear.
Not only does 1/4 change, but door skin and door jam have to be modified again to compensate for 1.0" change to 1/4 panel's flare change.
Can shop do it? Cost of these changes are not coming out of my pocket, but shops. Seems they want to try and screw up my try for "UGLY" part for this project. Seem this is just to get 1.0" more exposed wheel hoop for wheels that will be going on car.
05-04-2015, 11:10 PM
#44
Melting Slicks
Thread Starter
Here's the problem.


I have to do something to make this build look a little different to people when these to builds are parked near one another. If everyone hasn't figured it out yet, I'm all about tire coverage and to do that the bodies will resemble one another because I try to make bodies look like they were designed for wide tires and rims and there are few ways to do that without totally ruining C2 original design concept.
Looking into side of each they would be to much alike if I don't do something. The rocker panel is the only thing I have to play with to try and make them look a little different looking into side of each of them. Unless you are looking down the side of them from front to rear or rear to front, people do not see the Coke Bottle effect of one vs the more stock look of the other. Sort of like a yearly body update. This year it's the Ugly change like 67's rear backup light change. It at least gives people something to talk about....LOL
Going with stock rear exhaust layout on back, helps on rear vs the other one, an if I can pull off change to front spoiler/air dam to wrap it around bottom of front end an outline it, while covering some of the exposed tire sticking out beyond it's almost stock front end look, by letting it go all the way back to wheel well opening and up it to just below bumper and have that portion hang out in air stream and hide some of the exposed tire there. Have to be careful there as well. You can make the front end look to Fat.
But like the rocker panel, you will see it's design will resembles the one on Lydia, unless I change it's design, maybe with a more modern splitter look to it.
It's like a Vette car show where once you've one, you've seen them all exterior wise except for yearly model changes. That's why we pray a Fuelie oy BB car is at show so we can slobber all over the engine...LOL
The best change I could make to look, is if I could get a taller tire. One with around 28.3" rather than 26.6" one C6 has. The C6 tires don't fill up the wheel well opening enough even with the ride height set correctly.
The more I study build, the more I think I've nailed the Ugly Look even if rocker didn't have the rear kick out on it...LOL Should have gotten renderings done so I could see effect of change(s) to original body's design rather than guessing what they could like on car.
Last edited by Poorhousenext; 07-30-2017 at 01:07 AM.
05-05-2015, 10:28 PM
#45
Melting Slicks
Thread Starter
Drove up to Knoxville, Tn to shop this morning to find out why Shop wanted to go from a 1 1/2" tire fit, 2.0" center point flared 1/4 panel to a 2 1/2" tire fit flared rear quarter panel. As expected if was to try and get more exposed polished lip on wheels. I was OK with what exposed lip some of the wheel manufactures are making for C6 wheel, about 1.0".
Shop also wants to flare front fenders another 3/4" of inch to allow them to handle 1.0" more wheel lip on front rims to match up lip wise with rear wheels.
Just in case there was a mistake made in front or rear offset measurement, Shop wants wheels in hand to build body too, so we needed to agree on a wheel choice.
Since wheels like paint, are a real make or break items for a build, while I do make the final call on both choices, I do like to know Shop likes that choice also.
I had already picked a wheel style that I liked and Shop's owners likes it as well for build. The only hold up now is what size rims can be used on front because of rotor and caliper size being used. That alone with available tire dia and widths I'm looking for for rear wheels will determine final rear wheel and front tire wheel size choices.
Because of available tires sizes for 18" rims I would like to have 17s on front and 18s on rear. I know I can get a taller 18" tire to help fill up rear wheel well than I have been able to find for either 19s or 20s inch wheels. We have a tire man that is going to research available 17, 18, 19 & 20 inch dia and widths tire for each sizes for us so we can decide on what tire dia's and widths there are to choose from for each possible wheel sizes.
If I can't run 17's on front then I'll most likely have to go with 19's & 20's ,same as a C6. All of this is a lot easier if you just go with the flow and do a standard build.
My original plan was to try and make the body's belt line to resemble stock's as well as original owner had planned.
We had gotten away from that with some changes we made to belt line's contour at wheel well centers to give them more of a curve.
I got my body man back that did 95% of the work on my 1st build, explained to him what the original goal was, Shop Owner explained changes he wanted to do and why.
Body man is bringing his 67 C2 coupe to shop to use as a comparison and as soon as wheels come in he is going to give it the Old Redneck built in a Barn try to see how close we can come to my goal for build.
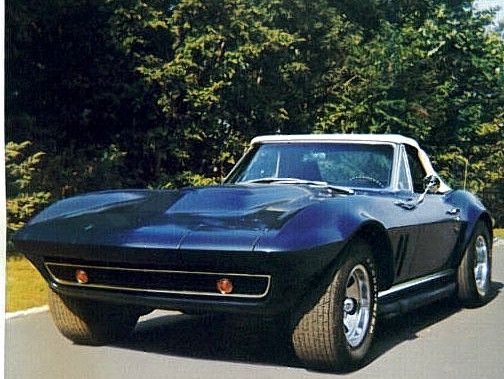
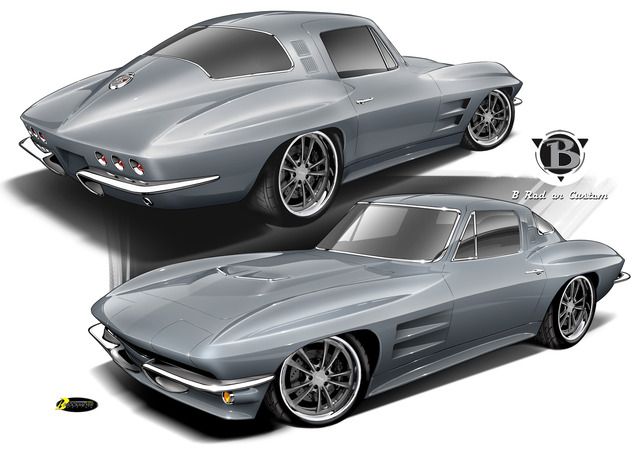
Shop owner gets what he wanted. I just hope we can get close to look we have now, or better yet very, very close to look in picture above especially with the amount of flare the front and rear panels will have.
This will be the last update for a while since build will be held up until wheels come in.
Wheel choice. It's an old style five spoke wheel with centers of spokes milled out to give it a more modern look.
Shop also wants to flare front fenders another 3/4" of inch to allow them to handle 1.0" more wheel lip on front rims to match up lip wise with rear wheels.
Just in case there was a mistake made in front or rear offset measurement, Shop wants wheels in hand to build body too, so we needed to agree on a wheel choice.
Since wheels like paint, are a real make or break items for a build, while I do make the final call on both choices, I do like to know Shop likes that choice also.
I had already picked a wheel style that I liked and Shop's owners likes it as well for build. The only hold up now is what size rims can be used on front because of rotor and caliper size being used. That alone with available tire dia and widths I'm looking for for rear wheels will determine final rear wheel and front tire wheel size choices.
Because of available tires sizes for 18" rims I would like to have 17s on front and 18s on rear. I know I can get a taller 18" tire to help fill up rear wheel well than I have been able to find for either 19s or 20s inch wheels. We have a tire man that is going to research available 17, 18, 19 & 20 inch dia and widths tire for each sizes for us so we can decide on what tire dia's and widths there are to choose from for each possible wheel sizes.
If I can't run 17's on front then I'll most likely have to go with 19's & 20's ,same as a C6. All of this is a lot easier if you just go with the flow and do a standard build.
My original plan was to try and make the body's belt line to resemble stock's as well as original owner had planned.

We had gotten away from that with some changes we made to belt line's contour at wheel well centers to give them more of a curve.
I got my body man back that did 95% of the work on my 1st build, explained to him what the original goal was, Shop Owner explained changes he wanted to do and why.
Body man is bringing his 67 C2 coupe to shop to use as a comparison and as soon as wheels come in he is going to give it the Old Redneck built in a Barn try to see how close we can come to my goal for build.
Shop owner gets what he wanted. I just hope we can get close to look we have now, or better yet very, very close to look in picture above especially with the amount of flare the front and rear panels will have.
This will be the last update for a while since build will be held up until wheels come in.
Wheel choice. It's an old style five spoke wheel with centers of spokes milled out to give it a more modern look.

Last edited by Poorhousenext; 08-21-2017 at 10:51 AM.
05-15-2015, 12:11 AM
#46
Melting Slicks
Thread Starter
Any of you who haven't read thread "Fender Flare Help", TC Racing gives us a history record of Flares for C2. Thread is a great read with lots of pictures.
https://www.corvetteforum.com/forums...lare-help.html
Thread explains 2 of the 3 means of flaring to so you can run wider tires and wheels.
1. Add Wheel Well flares. These type flares only flare out fender around wheel well.
2. Flared Fenders. Fender is flared outward from front to rear of it at belt line. Flaring can effect only lower belt line portion of fenders and or the upper blister portion too to provide more clearance for wide wheels when tires moves up and inward.
3. Full body flare. This one has been around awhile too, just not seen a lot in the past. That seems to be changing in last 3 years as more Pro Touring cars have starting doing this.
A full body flare means the entire side of the car, including front and rear end of car is flared outward a given amount. In the case of car in video, 2.0" at top an can flares outward more depending on shape of car's side.
Full Body Flaring of a C2 is not as easy as with some cars above. C2's body design doesn't give you much leeway. Flare has to start a center line of front and rear fender blisters. Can include both upper portion of fender blisters or just lower belt line portion. It means door skin has to move outward to match look of stock body's belt line meaning skin at door jams and front hinge post has to move outward to match up with change to flaring front fender, and because it's a full body flare, front end has to be flared out too. Change to rear end is governed by flaring of 1/4 panel.
Flaring of Front End is a little more challenging if you do a full body flare. That means the front end outward of front fender blister's center line has to be widen to match. So looking into front of car the turn signal housing has to move outward, not just the upper portion of fender from center line of blister. There goes the front bumper fitment too.
With Jimmy Joe (aka JJ ) only thing that keeps JJ from being a full body flare car, is door at at hinge pillar. Want move that portion outward.
To try and keep at least stock exposed tire same or maybe a little less with C6 wheels and tires before decision was made to move tire outward 1.0" more, we are going to widen front of car too.
Never posted of picture of front end mod to match 1/2" change to wheel offset, just hope the change of that to full 1.00" want make the front end's design look to fat/wide.
1/2" inch change.

1.00" inch change to match 1.00" change to front fender's flare. Tire will move out 3/4" more exposing more of tire than shown when new wheels are installed.
Change to front flare of front fender should be completed next week.
Have to wait until new wheels and tires arrived before the rear 1/4 can be flared out another inch, and door skin and jams moved outward try and match semblance of stock body's belt line look where door and 1/4 panel meet.
https://www.corvetteforum.com/forums...lare-help.html
Thread explains 2 of the 3 means of flaring to so you can run wider tires and wheels.
1. Add Wheel Well flares. These type flares only flare out fender around wheel well.
2. Flared Fenders. Fender is flared outward from front to rear of it at belt line. Flaring can effect only lower belt line portion of fenders and or the upper blister portion too to provide more clearance for wide wheels when tires moves up and inward.
3. Full body flare. This one has been around awhile too, just not seen a lot in the past. That seems to be changing in last 3 years as more Pro Touring cars have starting doing this.
A full body flare means the entire side of the car, including front and rear end of car is flared outward a given amount. In the case of car in video, 2.0" at top an can flares outward more depending on shape of car's side.
Full Body Flaring of a C2 is not as easy as with some cars above. C2's body design doesn't give you much leeway. Flare has to start a center line of front and rear fender blisters. Can include both upper portion of fender blisters or just lower belt line portion. It means door skin has to move outward to match look of stock body's belt line meaning skin at door jams and front hinge post has to move outward to match up with change to flaring front fender, and because it's a full body flare, front end has to be flared out too. Change to rear end is governed by flaring of 1/4 panel.
Flaring of Front End is a little more challenging if you do a full body flare. That means the front end outward of front fender blister's center line has to be widen to match. So looking into front of car the turn signal housing has to move outward, not just the upper portion of fender from center line of blister. There goes the front bumper fitment too.
With Jimmy Joe (aka JJ ) only thing that keeps JJ from being a full body flare car, is door at at hinge pillar. Want move that portion outward.
To try and keep at least stock exposed tire same or maybe a little less with C6 wheels and tires before decision was made to move tire outward 1.0" more, we are going to widen front of car too.
Never posted of picture of front end mod to match 1/2" change to wheel offset, just hope the change of that to full 1.00" want make the front end's design look to fat/wide.
1/2" inch change.


1.00" inch change to match 1.00" change to front fender's flare. Tire will move out 3/4" more exposing more of tire than shown when new wheels are installed.

Change to front flare of front fender should be completed next week.
Have to wait until new wheels and tires arrived before the rear 1/4 can be flared out another inch, and door skin and jams moved outward try and match semblance of stock body's belt line look where door and 1/4 panel meet.
Last edited by Poorhousenext; 07-30-2017 at 01:09 AM.
06-02-2015, 11:23 PM
#47
Melting Slicks
Thread Starter
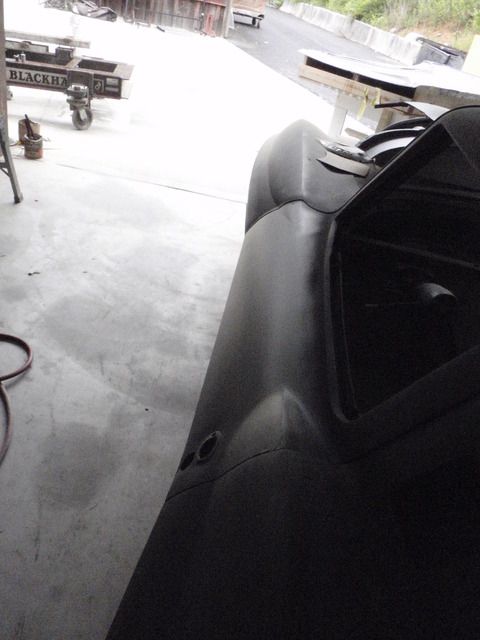
Jimmy Joe now has a hood look. May be the first C2 to use this very under use hood as most C2 that use the C3 L88 style hood use the tall one as well as most C3 too.
We are going to use the skin off the C3 LT1 hood I picked up at Corvette Expo.
LT1 hood is not as tall as the C3 L88 BB Hood. Going to fit skin off it to C2 small block hood at approximately the same location as it is on C3 hood, rather than move hood's bulge back like C3 L88 style aftermarket C2 hood. We are also going to remove the stinger off the front end so as to keep the look of hood the same as it is on a C3.
Had it not been for a picture Kerrmudgeon posted of his 66 on an old thread I would never had thought of doing that. Removing the stinger/bulge off nose just cleans the look of hood up with an L88 style and even more with lower style LT1 hood.
C3 LT1 Hood
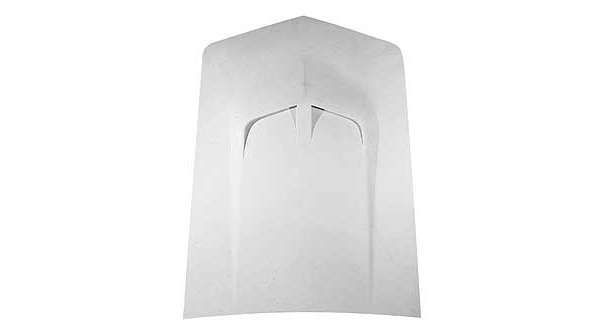
LT1 look
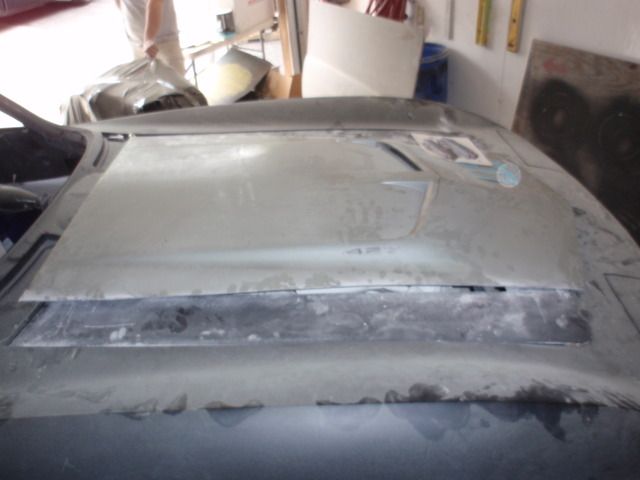
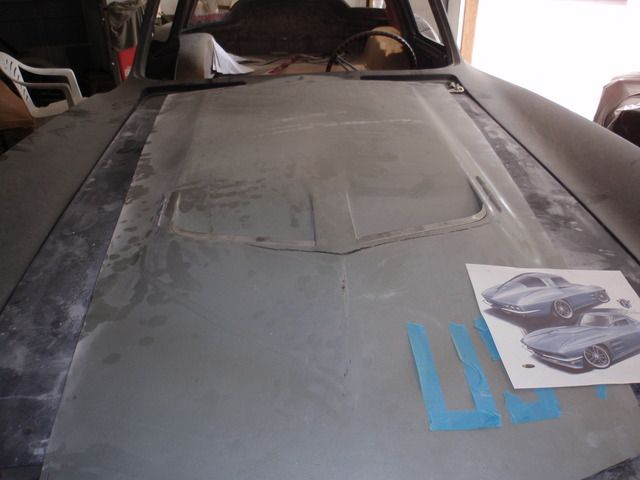
Fresh air vents will be removed and glassed in, and rear cowl hump cut down and widen to match up with look of hood at back. Have to say when you stand back and look at car, the LT1 hood skin has optical illusion of making front end of car look longer.
Hope to have a rendering by Eric Brockmeyer of all the body mods done so far, and LT1 hood mod we sent pictures of to him this afternoon in next couple of days. Eric will be providing design for front spoiler/splitter for car.
Hope to receive the new wheels for car in next couple of weeks so can start redoing left side of car from door back.
We are going to use the skin off the C3 LT1 hood I picked up at Corvette Expo.
LT1 hood is not as tall as the C3 L88 BB Hood. Going to fit skin off it to C2 small block hood at approximately the same location as it is on C3 hood, rather than move hood's bulge back like C3 L88 style aftermarket C2 hood. We are also going to remove the stinger off the front end so as to keep the look of hood the same as it is on a C3.
Had it not been for a picture Kerrmudgeon posted of his 66 on an old thread I would never had thought of doing that. Removing the stinger/bulge off nose just cleans the look of hood up with an L88 style and even more with lower style LT1 hood.

C3 LT1 Hood

LT1 look


Fresh air vents will be removed and glassed in, and rear cowl hump cut down and widen to match up with look of hood at back. Have to say when you stand back and look at car, the LT1 hood skin has optical illusion of making front end of car look longer.
Hope to have a rendering by Eric Brockmeyer of all the body mods done so far, and LT1 hood mod we sent pictures of to him this afternoon in next couple of days. Eric will be providing design for front spoiler/splitter for car.
Hope to receive the new wheels for car in next couple of weeks so can start redoing left side of car from door back.
Last edited by Poorhousenext; 07-30-2017 at 01:11 AM.
06-04-2015, 07:34 PM
#48
Melting Slicks
Thread Starter
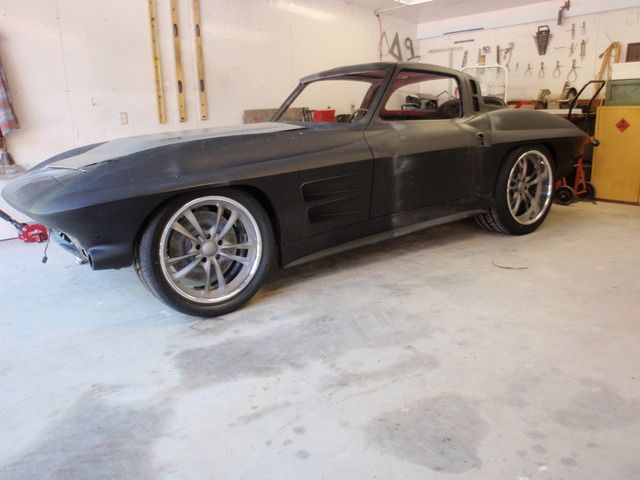
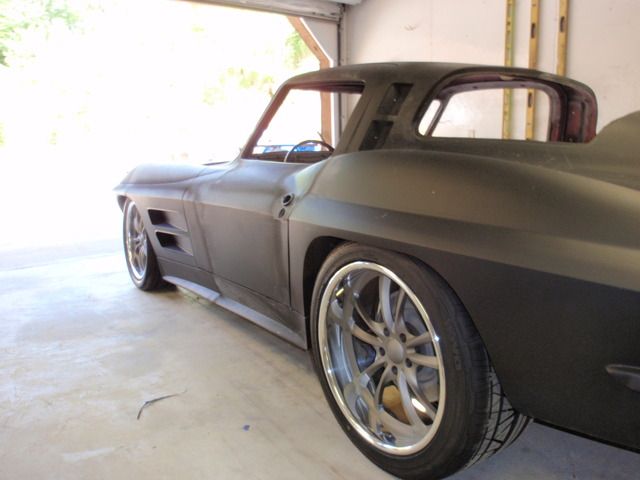
Well, except for color Jimmy Joe will be, here is Rendering of most likly what car will look like when finished.
When I built Lydia, we had rendering done before we started, but with Jimmy Joe, we did the designing as we went, as I had no idea what I wanted to do for a hood, or spoiler/spliter.
Like I mention in last post, credit for spoiler design goes to Eric Brockmyer, the rest of design is a partnership of myself, Larry and PJ Burchett. Other than a possibility of exhaust being moved from stock location to center of rear valance, what you see in rendering is what body should look like.


Last edited by Poorhousenext; 07-30-2017 at 01:12 AM.
 07-10-2015, 08:50 PM
#50
Melting Slicks
Thread Starter
New wheels came in last week and we finally got tires on them this week.
Went with 285/35ZR19s on front that have a dia of 26.73" inches an 11.30" inches wide. Width is almost the same as stock C6 front tire size, but dia is almost 1.0" more.
On rear went with 315/35ZR20 that are 28.62" in dia, but only 12.40" wide. Gave up 1.10" in tire width to get 2.0" inches in dia to better fill the wheel wells, along with a less of a Rubber band look to them.
Front wheel exposed wheel hoop.

Rear wheel exposed wheel hoop.
Now all we have to do, is re-flare the entire side of car to get the wheels and tires back inside of wheel wells. I'm not sure the Front wheels were ordered with correct offset. They were supposed to be ordered with 1/2" less offset to move them outward 1/2" that we had already flared the fender to fit that offset change. Looks like it's a a 3/4 to 1.0" change instead as had to lean tire & wheel inward to get it inside wheel well.
Knew the rear 1/4 and door would have to be redone, but front fender was not supposed to have had to be re-flared also. If it does, what was going to be a challenge to keep the stock body belt line look, becomes almost impossible to pull off without moving the door's hing line out too. Just have to see what happens when we take a look at things next week.
Head on look at left side, front end tire coverage with 1.00" flare of front end.
Head on look at right stock front end tire coverage of C6 tire and wheel. Please ignore the caster emergency brake.
Went with 285/35ZR19s on front that have a dia of 26.73" inches an 11.30" inches wide. Width is almost the same as stock C6 front tire size, but dia is almost 1.0" more.
On rear went with 315/35ZR20 that are 28.62" in dia, but only 12.40" wide. Gave up 1.10" in tire width to get 2.0" inches in dia to better fill the wheel wells, along with a less of a Rubber band look to them.


Front wheel exposed wheel hoop.

Rear wheel exposed wheel hoop.

Now all we have to do, is re-flare the entire side of car to get the wheels and tires back inside of wheel wells. I'm not sure the Front wheels were ordered with correct offset. They were supposed to be ordered with 1/2" less offset to move them outward 1/2" that we had already flared the fender to fit that offset change. Looks like it's a a 3/4 to 1.0" change instead as had to lean tire & wheel inward to get it inside wheel well.
Knew the rear 1/4 and door would have to be redone, but front fender was not supposed to have had to be re-flared also. If it does, what was going to be a challenge to keep the stock body belt line look, becomes almost impossible to pull off without moving the door's hing line out too. Just have to see what happens when we take a look at things next week.
Head on look at left side, front end tire coverage with 1.00" flare of front end.

Head on look at right stock front end tire coverage of C6 tire and wheel. Please ignore the caster emergency brake.

Last edited by Poorhousenext; 07-30-2017 at 01:14 AM.


 07-25-2015, 02:17 PM
#53
Melting Slicks
Thread Starter
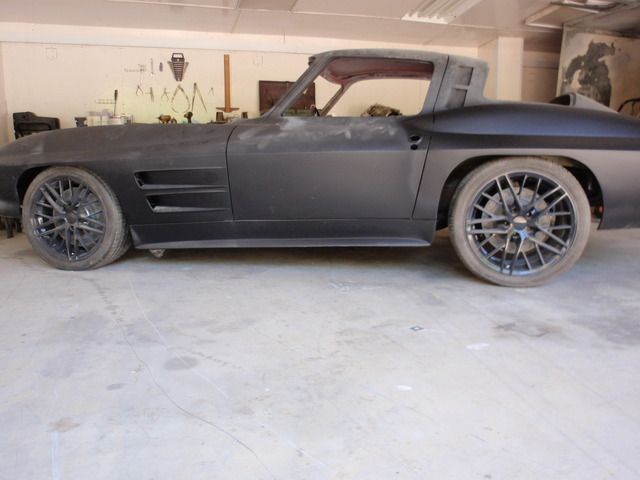
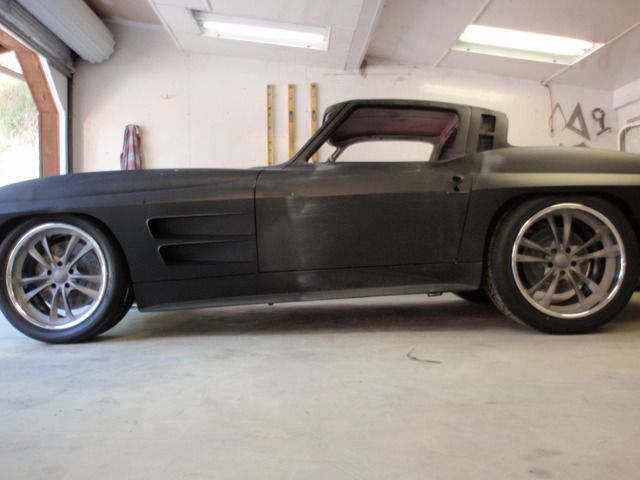
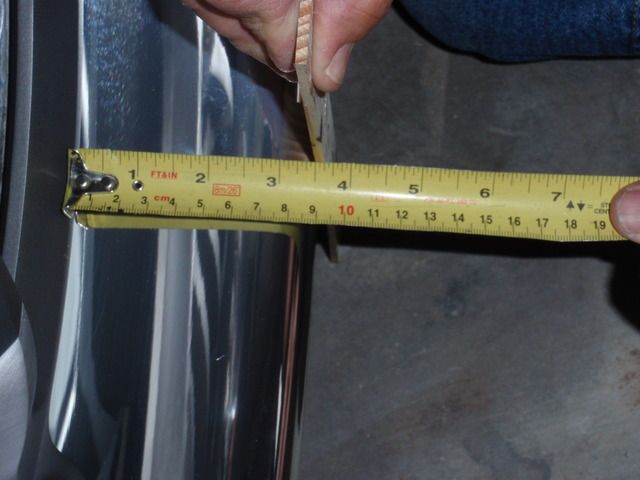
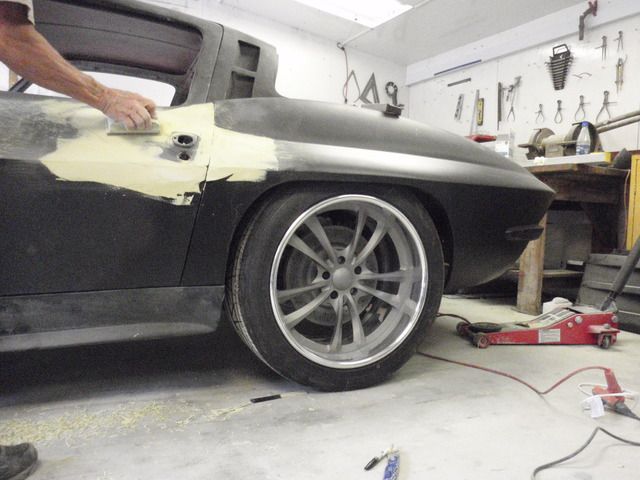
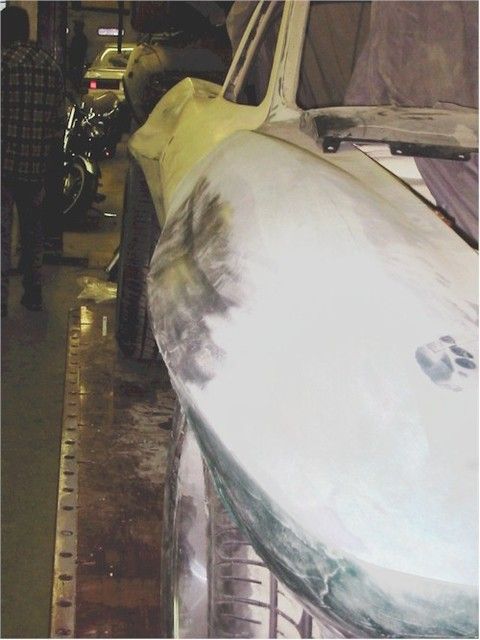
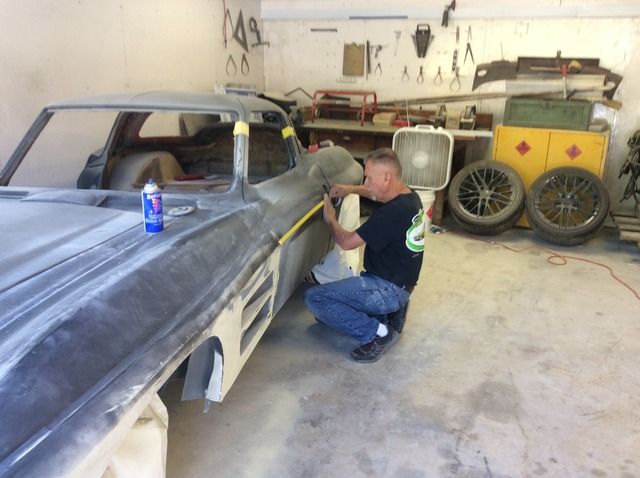
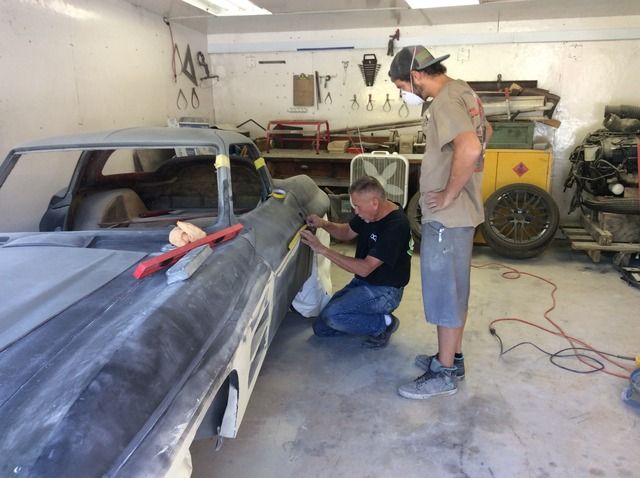
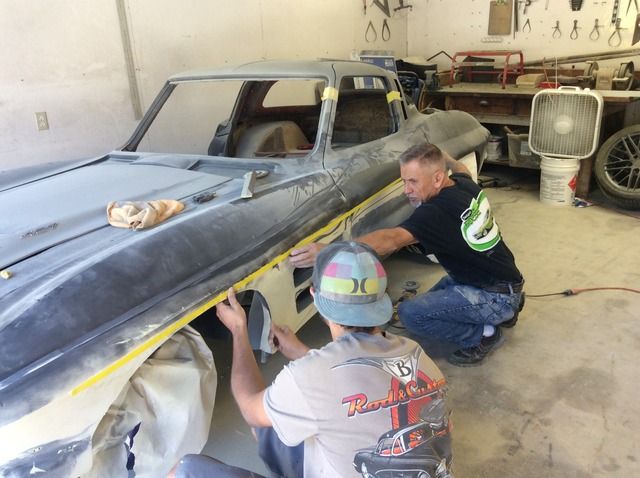
Spent half the day yesterday at Shop trying to get belt line to were it looked almost stock again after adding 1.00" inch more flare to rear quarter panel to make total flare width of 2.5" inches to get new rear wheel to fit back inside of body.
That extra 1.00" inch biggest problem is in trying to get back illusion that belt line of car was stock, looking down side of car, not just looking into side of car. I've never show how it was done with 1.5" inch flare in this thread. I did show part of how it was done in below thread but not all of what is required to try for stock belt line look without having a lot of exposed tire sticking out in air stream.
https://www.corvetteforum.com/forums...c-request.html
All we are trying to do is make a 2.5" flared 1/4 panel's belt line look as close as possible to stock as at quarter panel to door interface, as well as get same tire coverage on front side of wheel well as we had before wheel offset change.
What we are shooting for.
The door's skin, door's jam and door's lock pillar have to be modified, to try and get close to stock belt line look and get front side of tire back inside body. Shop had already flared the quarter outward 1.00" inch so it fit inside the wheel well as well as pulled out rear side of 1/4 at bottom to get the extra exposed rear tire created by change to wheel offset back the same as car had.
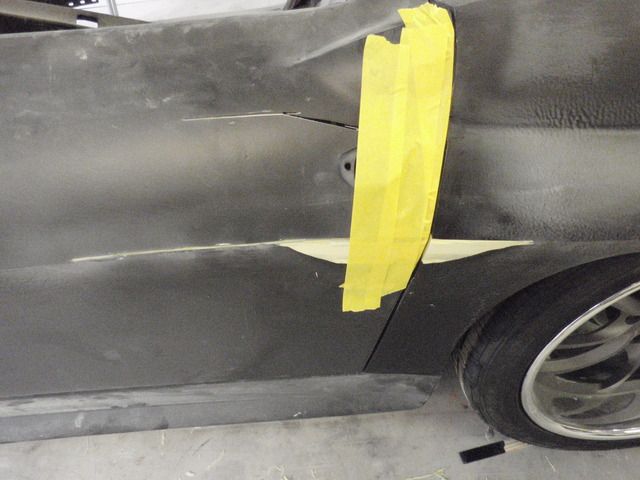
1st. Decide were to cut door skin.
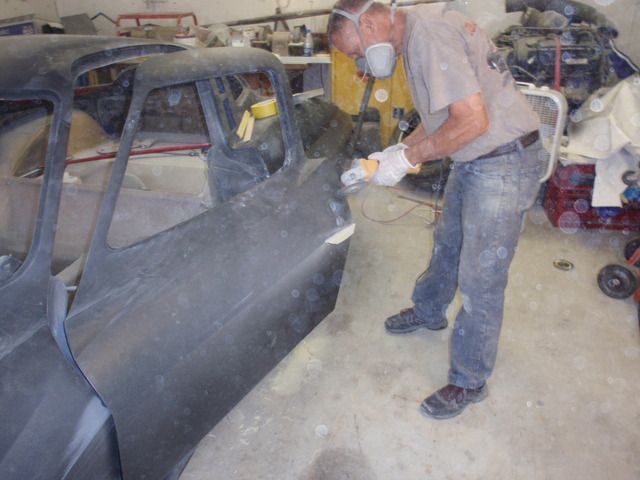
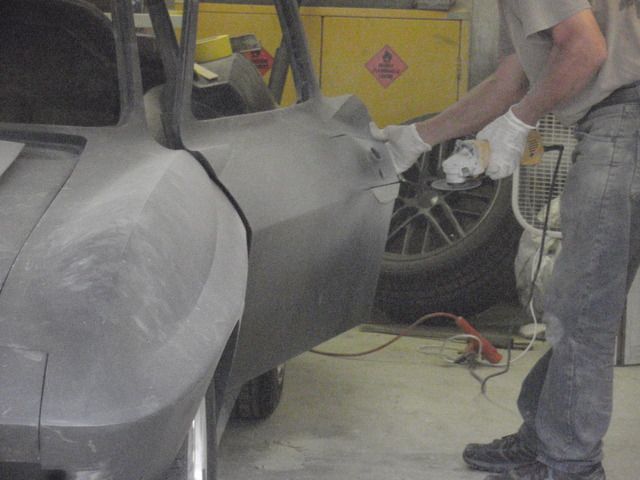
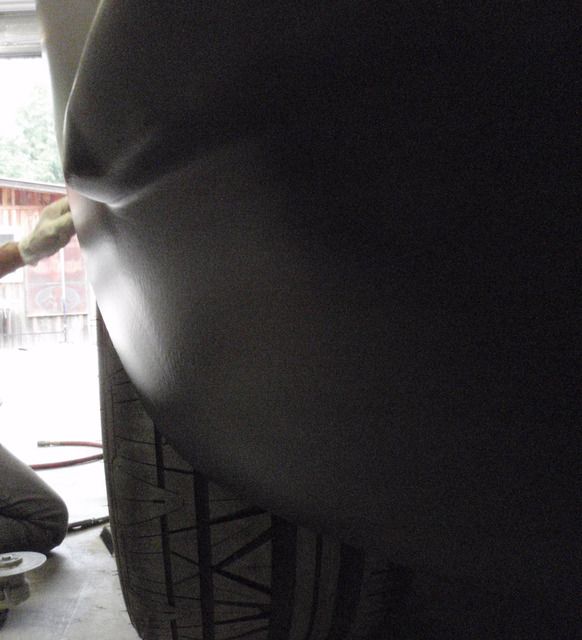
As you will see, Paint Stir Sticks are a Body man's best friend as well as Sawsall and Bondo for this job....LOL
Note: Don't worry about all the Bondo used to on side of car to shape panels. Left side of Car will be digitally scanned, any contour problem areas fixed and molds made to make replacement panels for ones on car now.
Right hand side panels molds will be made from flip of Left side data. If we were not having to re-flare panels, the cuts to panels would have been glassed to produce body surfaces an no molds made.

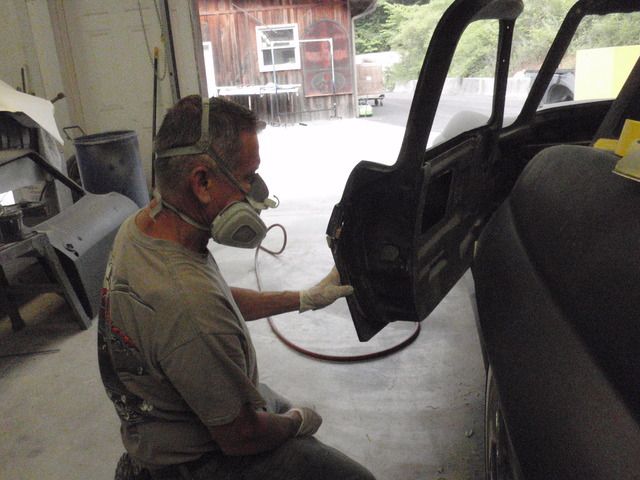

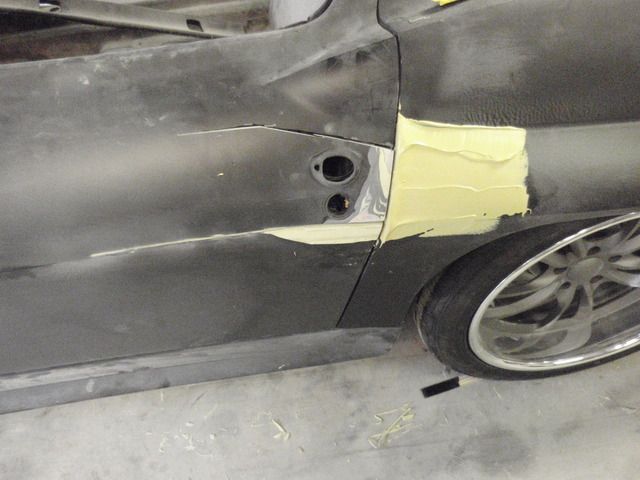
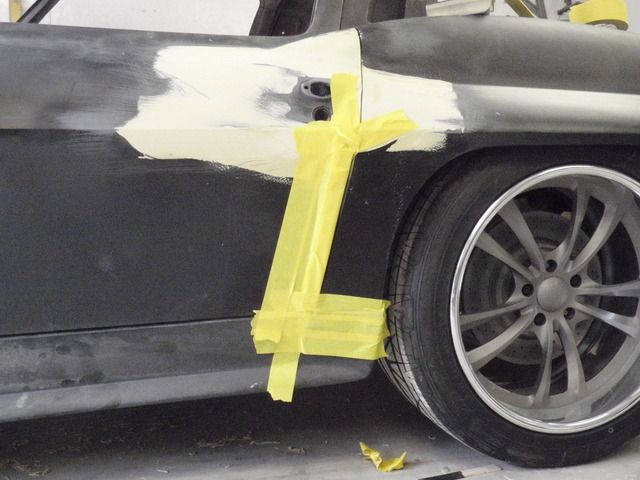
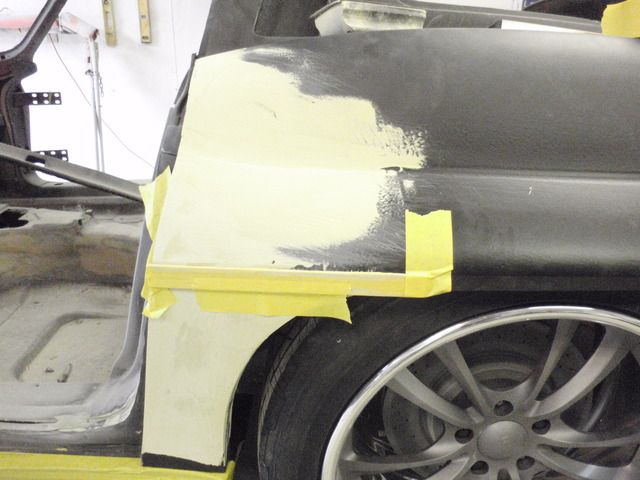
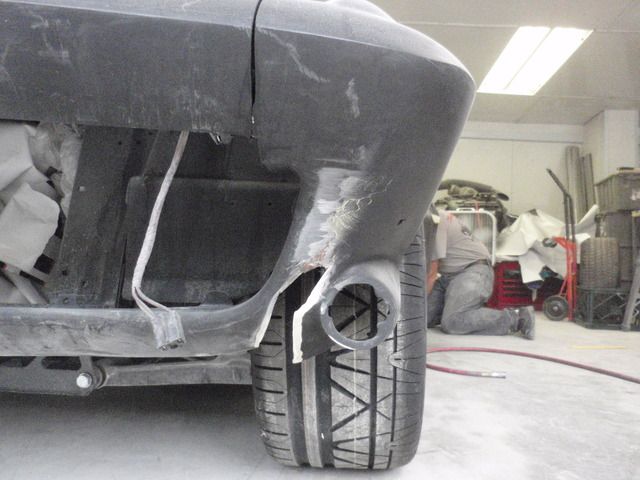
You can see both door jam and sill plate were cut to allow quarter panel to be moved outward, as well as amount of Bondo that was added to panel and door skin to get front side tire coverage. Door will be removed to finish it out.
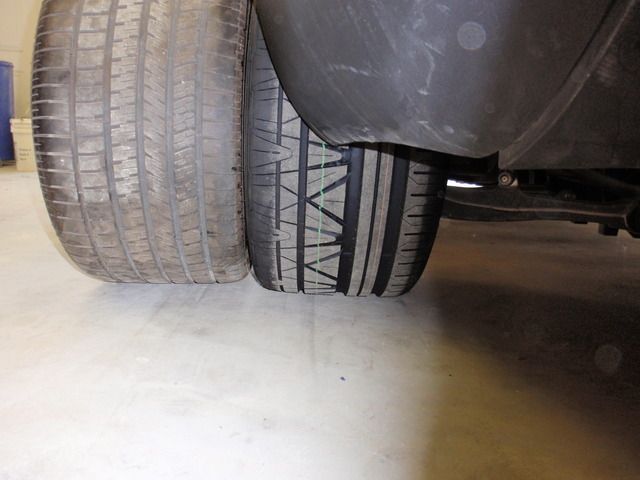
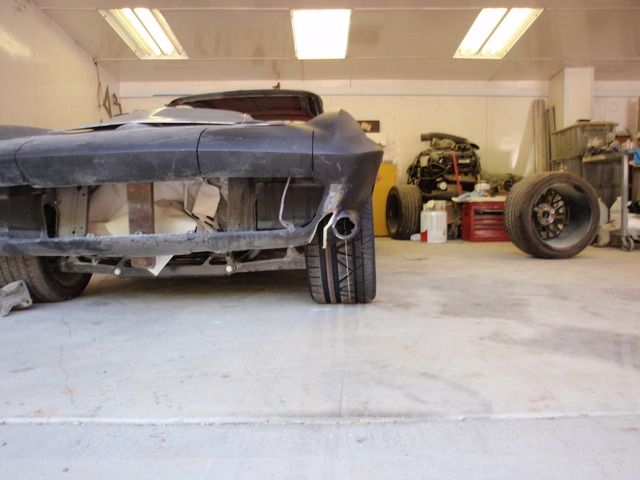
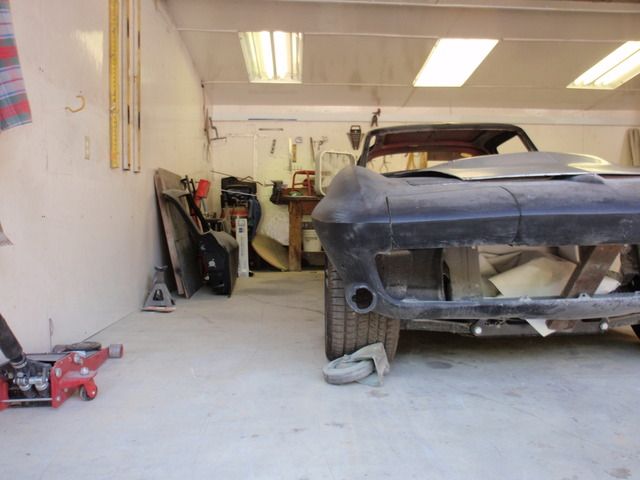
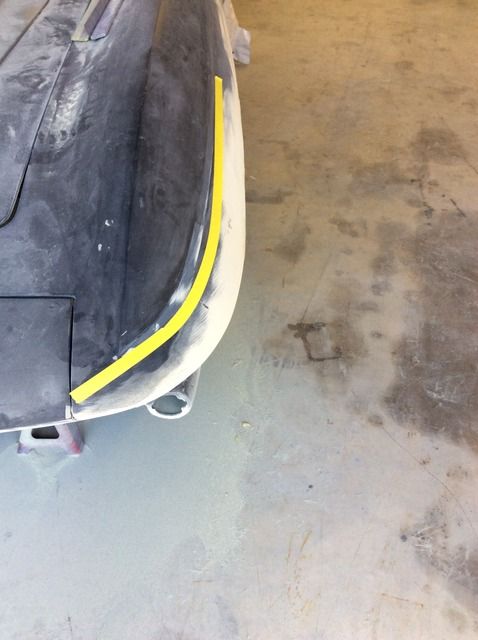
Exposed Rear tire before re-flaring 1/4 panel. Suspension is adjusted to let tire/wheel fit up under 1/4. There is 1.0" inch of exposed tire at top of wheel well opening.
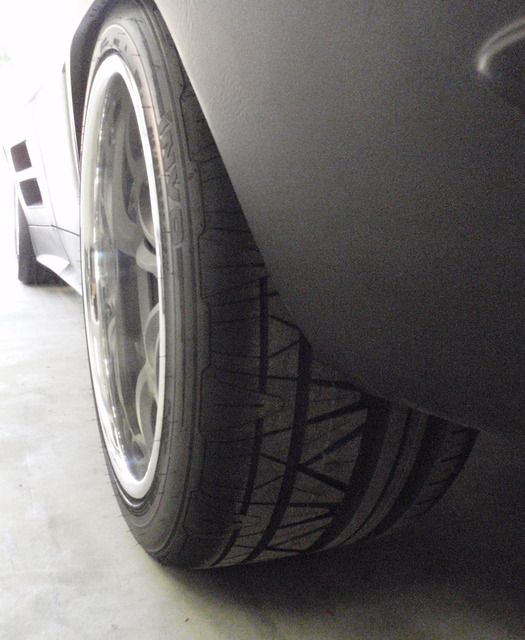
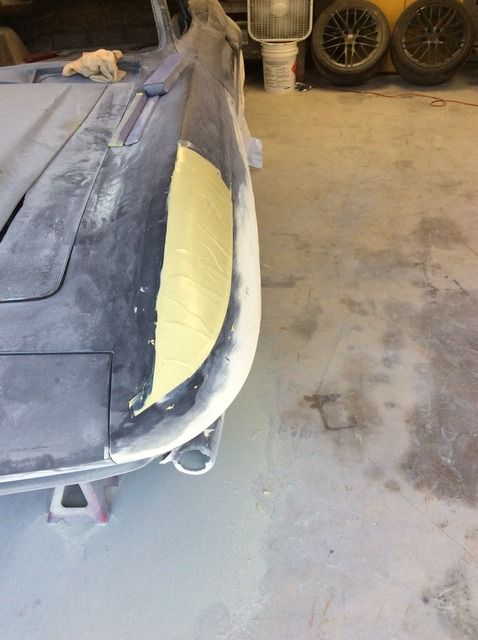
Rear tire coverage after 1/4 has been re-flared and bottom of it pulled out to provide same rear tire coverage as before. To do that also requires a number of other unseen part changes too.
Front fender was re-flared 1.00" inch so front tire would fit inside wheel well. The 1.00" inch added to front end between grill opening and turn signal housing made up for the 1.00" inch offset added to new wheel vs that of C6 Tires and wheels. Tire width is same as C6 only tire's dia is 1.00" inch more to help fill fender well and provide less rubber band look to them.
Right hand front unchanged look.
That extra 1.00" inch biggest problem is in trying to get back illusion that belt line of car was stock, looking down side of car, not just looking into side of car. I've never show how it was done with 1.5" inch flare in this thread. I did show part of how it was done in below thread but not all of what is required to try for stock belt line look without having a lot of exposed tire sticking out in air stream.
https://www.corvetteforum.com/forums...c-request.html
All we are trying to do is make a 2.5" flared 1/4 panel's belt line look as close as possible to stock as at quarter panel to door interface, as well as get same tire coverage on front side of wheel well as we had before wheel offset change.
What we are shooting for.

The door's skin, door's jam and door's lock pillar have to be modified, to try and get close to stock belt line look and get front side of tire back inside body. Shop had already flared the quarter outward 1.00" inch so it fit inside the wheel well as well as pulled out rear side of 1/4 at bottom to get the extra exposed rear tire created by change to wheel offset back the same as car had.
1st. Decide were to cut door skin.
As you will see, Paint Stir Sticks are a Body man's best friend as well as Sawsall and Bondo for this job....LOL
Note: Don't worry about all the Bondo used to on side of car to shape panels. Left side of Car will be digitally scanned, any contour problem areas fixed and molds made to make replacement panels for ones on car now.
Right hand side panels molds will be made from flip of Left side data. If we were not having to re-flare panels, the cuts to panels would have been glassed to produce body surfaces an no molds made.


You can see both door jam and sill plate were cut to allow quarter panel to be moved outward, as well as amount of Bondo that was added to panel and door skin to get front side tire coverage. Door will be removed to finish it out.


Exposed Rear tire before re-flaring 1/4 panel. Suspension is adjusted to let tire/wheel fit up under 1/4. There is 1.0" inch of exposed tire at top of wheel well opening.

Rear tire coverage after 1/4 has been re-flared and bottom of it pulled out to provide same rear tire coverage as before. To do that also requires a number of other unseen part changes too.

Front fender was re-flared 1.00" inch so front tire would fit inside wheel well. The 1.00" inch added to front end between grill opening and turn signal housing made up for the 1.00" inch offset added to new wheel vs that of C6 Tires and wheels. Tire width is same as C6 only tire's dia is 1.00" inch more to help fill fender well and provide less rubber band look to them.

Right hand front unchanged look.
Last edited by Poorhousenext; 07-30-2017 at 01:19 AM.
07-25-2015, 09:33 PM
#54

I don't know how I have missed this thread but I see your up to it again with some fantastic ideas. I love the way you step out of the box while keeping your cars true to form.
 07-26-2015, 09:53 AM
#57
Race Director


Member Since: Jan 2002
Location: Close to DC
Posts: 14,541
Received 2,127 Likes
on
1,466 Posts
C2 of the Year Finalist - Modified 2020

Wow! Amazing attention too detail Dennis
Dennis
07-26-2015, 01:02 PM
#58
Melting Slicks
Thread Starter
Without the craftsmanship of Larry (one in the picture) and his Son PJ (an artist craftsman) that make me think, neither the car in my avatar, or this one would be. Strange story about how we met. Stranger story about how 3 people with different ideas can work together. Seem we know what we don't like, but don't always know what we might like. That seems to be the common bond we have.
I'd love to see the car in your Avatar built. If the man who did the rendering, Kris did as I expected, computer digitally design it to scale, an if design could be re-scaled full size, it could be possible to make molds off the digital data extracted for each body panel. If so it would cut you build time and cost down. You might want to look into that if you decide to build it.
I'm not making the molds, Shop is, and reason behind that is cost is about the same as trying to hand duplicate the left hand side exactly or near that for right hand side.
The cost of the molds, digitizing body, changes to body Flare amount from 1.5", are out of pocket Shop's costs, not my pocket, my cost was fixed before project started.
I could have possession of molds, but in fairness, since I can also make changes over and above what was discussed before project was started without more out of pocket cost, the shop will own them. I did asked they not duplicate lower fender design any time in the near future. It's not that great and most people would want to stay with 63-67 designs anyway.
Lower fender changes to suit others would not be a problem, and if shop would digitize the right and side, that would allow either the original 1.5" side that most likely be what majority would prefer or 2.5" rear, 1.0" front if someone wanted either more of the old school deep dish look to wheels or the modern look wheels. Might be possible to allow use of original metal rocker panels with 1.5". We played with that idea, but I opted for the aero look rocker.
Problem with these body panels is you have to be able too, or have a body shop that knows how to do the Door Jam mods. That area will be scanned so base parts can be made, but most likely no two bodies will be alike so one has to have the skill and knowledge to make adjustment as needed and maybe even layup your own parts to make things work in some cases. It's not your average do it at home mod like doing a 1.5" aftermarket flared 1/4 panel.
Your dash an interior design(s) would go well with either flare. You have great Imagineering skills as seen in the dash your building for your car. Adding your on touches to body panels could be done.
Last edited by Poorhousenext; 07-27-2015 at 10:31 AM.
08-02-2015, 05:00 AM
#59
Le Mans Master


This is for sure the best build i have seen since "Lydia"
Keep up the good work Jere
By the way i sendt you a couple of email a little while ago
Keep up the good work Jere
By the way i sendt you a couple of email a little while ago
10-02-2015, 06:00 PM
#60
Melting Slicks
Thread Starter
Been a rough couple of months since last update on progress on Jimmy Joe. Rough was having a friend diagnosed with Stage 4 liver cancer last of July. He pasted away Aug 26. Three day prior to his passing he made be Executor of his estate, so I've been tied up most days since sorting out his estate.
I've only been able to go up and work with shop 3 different times for 1/2 a day trying to get body lines back in some semblance of where I could live with them. Adding the extra 1.00" to the body flared rear 1/4 panel created part of problem, an making the front end 1.00 wider to front fender across the wheel well opening 2.00", possibly 2.5" wider cause the second half of the problem at door's hinge line. I'm going to breakup the three visits based on part of car we were working on to try to get belt line acceptable as possible. I'm doing this in hopes someday someone will find the post helpful with there build.
Can't say I didn't know it was going to happen, it was just worst than I thought, making it harder to get body's belt line to look even close to right. I had seen the front side of door hinge line do the same thing when using the full 2.5" flared front fenders used on race cars. I did see where there are now partial 2.5" flared front fenders were the part of fender were the lower front fenders and part of the upper fender are left on so belt line matches up with door's because both are left stock in that area on Tom Willard's thread on his build. Prior to that I was familiar with problem because of another member, 67Heaven build detailed on the web. It played a major part in the inspirations to body changes for Lydia's build.
Here is what happens when you try to make C2's body's belt line resemble stock body's when body flaring front fender, door and rear 1/4 panel. Widening front end 1.0 effects the front fender blisters the most. They have to be re-shaped to keep things in proportion.
Stock body.
Car with 2.5" Corvette City front and rear flared fenders looking down right side of car. Notice door's skin is left stock, so there is no "V" shape on aft side of door hinge's line. "V" angle is only on front vender side.
Body flared Fwd and Aft of door's hinge line, and door flared outward to try and make it look more stock like at door with 2.5" body flared rear 1/4 panel. Move the door's hinge line outward to match front and rear fenders flare amount and you can make body look very stock, and avoid problem(s) I'm fooling with. If you look back at post 53 of this thread you can see where the aft side of door hinge line problem starts. The front side will make the "V" shape at doors hinge line get worst when we start body flaring front fender to fit new tire's larger dia and new wheel's offset.
We will start by trying to reshape the doors belt line so that it fairs in at a steeper angle so that it goes back closer to that of stock door belt line about 8.0"-10.0" aft of the door's hinge line. Shop had already started work on front fender's belt line and lower fender vent height.


Remember the 1.0" we widened the front end. Cut started at bottom between the grill opening and front turn signal housing, but to keep cut at top from having to run the length of hood surround, the cut was continued so it ended up outer side of front fender blister. That means we have to start building up side of blister to get it back in proportion to where the outer side of the fender's belt line has been move/flared outward too.
There is still a lot of work that will be needed to side of car to get belt line and body more to my liking. Only being able to spend 1/2 day at shop every couple of weeks is really slowing things to a crawl. Hope to get next half day work posted soon.
I've only been able to go up and work with shop 3 different times for 1/2 a day trying to get body lines back in some semblance of where I could live with them. Adding the extra 1.00" to the body flared rear 1/4 panel created part of problem, an making the front end 1.00 wider to front fender across the wheel well opening 2.00", possibly 2.5" wider cause the second half of the problem at door's hinge line. I'm going to breakup the three visits based on part of car we were working on to try to get belt line acceptable as possible. I'm doing this in hopes someday someone will find the post helpful with there build.
Can't say I didn't know it was going to happen, it was just worst than I thought, making it harder to get body's belt line to look even close to right. I had seen the front side of door hinge line do the same thing when using the full 2.5" flared front fenders used on race cars. I did see where there are now partial 2.5" flared front fenders were the part of fender were the lower front fenders and part of the upper fender are left on so belt line matches up with door's because both are left stock in that area on Tom Willard's thread on his build. Prior to that I was familiar with problem because of another member, 67Heaven build detailed on the web. It played a major part in the inspirations to body changes for Lydia's build.
Here is what happens when you try to make C2's body's belt line resemble stock body's when body flaring front fender, door and rear 1/4 panel. Widening front end 1.0 effects the front fender blisters the most. They have to be re-shaped to keep things in proportion.
Stock body.

Car with 2.5" Corvette City front and rear flared fenders looking down right side of car. Notice door's skin is left stock, so there is no "V" shape on aft side of door hinge's line. "V" angle is only on front vender side.

Body flared Fwd and Aft of door's hinge line, and door flared outward to try and make it look more stock like at door with 2.5" body flared rear 1/4 panel. Move the door's hinge line outward to match front and rear fenders flare amount and you can make body look very stock, and avoid problem(s) I'm fooling with. If you look back at post 53 of this thread you can see where the aft side of door hinge line problem starts. The front side will make the "V" shape at doors hinge line get worst when we start body flaring front fender to fit new tire's larger dia and new wheel's offset.

We will start by trying to reshape the doors belt line so that it fairs in at a steeper angle so that it goes back closer to that of stock door belt line about 8.0"-10.0" aft of the door's hinge line. Shop had already started work on front fender's belt line and lower fender vent height.


Remember the 1.0" we widened the front end. Cut started at bottom between the grill opening and front turn signal housing, but to keep cut at top from having to run the length of hood surround, the cut was continued so it ended up outer side of front fender blister. That means we have to start building up side of blister to get it back in proportion to where the outer side of the fender's belt line has been move/flared outward too.


There is still a lot of work that will be needed to side of car to get belt line and body more to my liking. Only being able to spend 1/2 day at shop every couple of weeks is really slowing things to a crawl. Hope to get next half day work posted soon.
Last edited by Poorhousenext; 07-30-2017 at 01:23 AM.