1966 427/425 vert Project build with lots of dumb questions
 11-28-2014, 04:45 PM
#1
Instructor

Thread Starter

I’ve owned a number of different vettes including C4, C5, C6 and ZR1 however the C2 has always been my favorite. I’ve finally had the opportunity to get a C2 and purchased a Project. It is a Project with a capital P as far as I’m concerned because I’ve never really been a mechanic. 1966 vert 427 425hp triple black car. I’m re-building this car with my son and daughter.
I’ve got the Nolan book, the restoring corvette book, restoring vette chassis book and have ordered the NCRS judging book. I’m also armed with google/bing/etc search engines.
Here are some initial pictures. Here is the body and frame being separated so the body can be finished/primed and then painted.
I took the parts and the frame home and you can see how it made the trip and then its new home in my garage.
 11-28-2014, 04:49 PM
#2
Instructor
Thread Starter
I've looked in the books I have and here on the forum, but can't find out which way the throwing out bearing goes into the fork. Is this right?
 11-28-2014, 05:57 PM
#4
Racer
Member Since: Oct 2006
Location: Marysville Washington
Posts: 357
Received 79 Likes
on
46 Posts
2023 Corvette of the Year Finalist - Unmodified
2022 C1 of the Year Winner - Unmodified

I’ve owned a number of different vettes including C4, C5, C6 and ZR1 however the C2 has always been my favorite. I’ve finally had the opportunity to get a C2 and purchased a Project. It is a Project with a capital P as far as I’m concerned because I’ve never really been a mechanic. 1966 vert 427 425hp triple black car. I’m re-building this car with my son and daughter.
I’ve got the Nolan book, the restoring corvette book, restoring vette chassis book and have ordered the NCRS judging book. I’m also armed with google/bing/etc search engines.
Here are some initial pictures. Here is the body and frame being separated so the body can be finished/primed and then painted.
I took the parts and the frame home and you can see how it made the trip and then its new home in my garage.
I’ve got the Nolan book, the restoring corvette book, restoring vette chassis book and have ordered the NCRS judging book. I’m also armed with google/bing/etc search engines.
Here are some initial pictures. Here is the body and frame being separated so the body can be finished/primed and then painted.
I took the parts and the frame home and you can see how it made the trip and then its new home in my garage.
Kent
11-28-2014, 08:08 PM
#5
Safety Car


Member Since: Aug 2006
Location: Horsham Pa
Posts: 3,571
Received 1,044 Likes
on
575 Posts
C2 of Year Finalist (appearance mods) 2019
I don't know how correct you are trying make this car, but the bell housing is not all orange, it was painted bolted on the engine and only about 4 inches of it was orange the rest is natural and all natural on the inside. If your not going original, then paint it all it looks nicer.
11-29-2014, 03:44 PM
#7
Team Owner


Member Since: Oct 2000
Location: Washington Michigan
Posts: 38,899
Received 1,857 Likes
on
1,100 Posts
 11-30-2014, 10:49 AM
#8
Instructor
Thread Starter
11-30-2014, 11:02 AM
#9
Instructor
Thread Starter
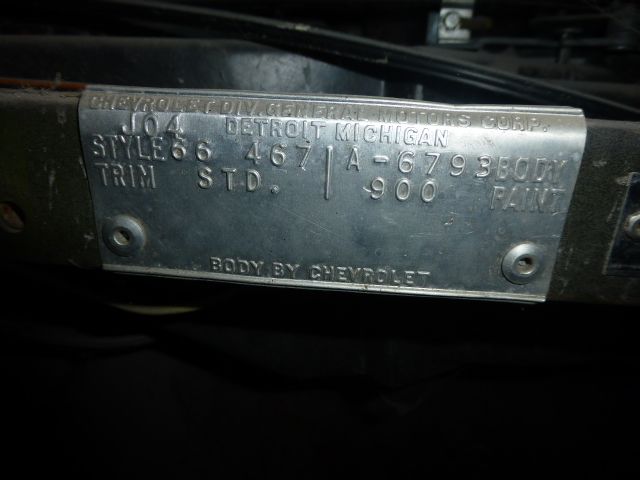
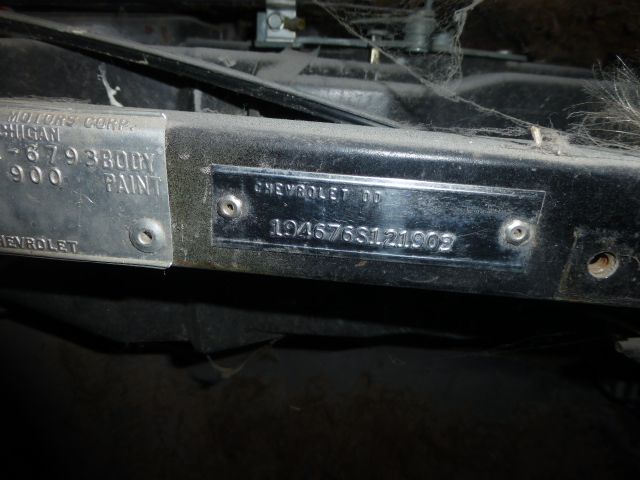
Here are some pictures of the different numbers. While I originally wasn't interested in a numbers matching car, at first pass these look good to me. The engine has been rebuilt with new paint in places including the stamp pad, the trans, carb, and diff have been rebuilt.
11-30-2014, 11:11 AM
#11
Instructor
Thread Starter
I don't know how correct you are trying make this car, but the bell housing is not all orange, it was painted bolted on the engine and only about 4 inches of it was orange the rest is natural and all natural on the inside. If your not going original, then paint it all it looks nicer.
Parts of this rebuild will be done multiple times as I figure things out, show myself and my kids how things go together/work. and decide what is best. Even if I go the NCRS route, I still plan on driving the car a lot (2-3k a year).
11-30-2014, 11:22 AM
#12
Melting Slicks

I don't know how correct you are trying make this car, but the bell housing is not all orange, it was painted bolted on the engine and only about 4 inches of it was orange the rest is natural and all natural on the inside. If your not going original, then paint it all it looks nicer.
Big block bell housings differ in their amount of paint coverage as compared to the SB bell housing. Granted it was not painted inside however the bell housing was pretty much covered with paint.
11-30-2014, 11:22 AM
#13
Instructor
Thread Starter
And now to the point you've all been waiting for... the dumb question of the day. 
I'm trying to join the trans with the engine. I've put in a new pilot bushing (that goes over the trans ping just fine prior to inserting into engine shaft. However I can't get the trans to join up.
I've tried it with the bell housing on the trans, I get it to the last inch, but no further. I tried putting the bell housing on the engine, but the trans doesn't get past the "fingers." I have the assembly manual and the electronic service manuals. I tried google/bing searches for C2 trans installation videos or instructions but that was epic fail as I get a lot of C2 headlight, etc. results..
But I'm not seeing the answer.
11-30-2014, 11:54 AM
#14
Instructor
Thread Starter
 11-30-2014, 11:57 AM
#15
Instructor
Thread Starter
And now to the point you've all been waiting for... the dumb question of the day.
I'm trying to join the trans with the engine. I've put in a new pilot bushing (that goes over the trans ping just fine prior to inserting into engine shaft. However I can't get the trans to join up.
I've tried it with the bell housing on the trans, I get it to the last inch, but no further. I tried putting the bell housing on the engine, but the trans doesn't get past the "fingers." I have the assembly manual and the electronic service manuals. I tried google/bing searches for C2 trans installation videos or instructions but that was epic fail as I get a lot of C2 headlight, etc. results..
But I'm not seeing the answer.
Is there a way to get it in without making the internal hole smaller?
Is there a way to open it back up?
Is it time for a trip to the parts store and get a 3rd bushing?
11-30-2014, 02:14 PM
#16
Instructor
Thread Starter
While collecting numbers off parts I decided to look at the frame deeper. The chassis restoration book says the Serial number 6S121903 should be on the top rail driver side next to the #3 and #4 frame attach point.
The frame has been sand blasted twice by the previous owner and then painted with an etching primer. With the frame painted as such I could not see the serial number. I stripped the paint off the frame rail, on top, in front of the #2, #3, and #4 frame attach point. There are no markings that I can find at #2 and #3. Here are pictures from #4. It looks like 6S121903 or could be 68I21903.
Now, the questions are;
1. shouldn't the serial number impressions be deeper?
2. Is #4 correct?
3. If #4 is correct, how should I repaint so it can be seen to be judged
4. If #4 is correct, how much will NCRS deduct with the missing #3
5. if both incorrect, how much of a point deduction? Is it worth pursuing NCRS or should I just rebuild for myself (quality, chrome, ,nice painted frame/etc. driver)
Really appreciate the thoughts.
11-30-2014, 02:27 PM
#17
Team Owner
Member Since: Oct 2000
Location: Washington Michigan
Posts: 38,899
Received 1,857 Likes
on
1,100 Posts
Now, the questions are;
1. shouldn't the serial number impressions be deeper?
2. Is #4 correct?
3. If #4 is correct, how should I repaint so it can be seen to be judged
4. If #4 is correct, how much will NCRS deduct with the missing #3
5. if both incorrect, how much of a point deduction? Is it worth pursuing NCRS or should I just rebuild for myself (quality, chrome, ,nice painted frame/etc. driver)
Really appreciate the thoughts.
 11-30-2014, 05:59 PM
#18
Instructor
Thread Starter
Install of Flywheel, clutch, and transmission
1. Install Flywheel, Torque bolts (65 ft lbs)
a. Make sure face is clean of dirt, oil, etc.
2. Install Pilot bearing,
a. Put pilot bearing in freezer for 6 hours prior to install,
b. grease outside of bearing and then install
3. Confirm Transmission goes into pilot bearing easily
4. Using guide, place clutch on CLEANED flywheel and then install CLEANED pressure plate; torque bolts (35 ft lbs) in star fashion do prevent warping flywheel
5. Install clutch throw-out bearing on clutch fork; insure clips are inside bearing. Grease bearing and fork spring prior to assembly
6. Install clutch fork into bellhousing; grease bell stud prior to fork install
7. Install bellhousing onto transmission torque bolts (45-60 ft lbs)
a. grease trans gear prior to inserting through throw-out bearing.
8. Remove clutch guide
9. Install bellhousing/transmission assembly to engine. Torque bolts (30 ft lbs)
10. Install bellhousing front cover
Steps not needed;
• Install pilot bushing
• Skip step 3 (confirming transmission goes into pilot bearing
• During step 9, confirm transmission will not go on engine.
• Ask children to leave room
• CURSE
• Go to auto parts store, get new bushing and buy pilot bushing removal tool
• Attempt to remove pilot bushing, break tool
• Go back to auto parts store, get new tool
• Remove pilot bushing
• Recheck manuals and google search for instructions
• Install Pilot bushing and move through steps 2-8 (still skipping step 3 above) and confirm transmission will not go on engine.
• Try multiple ways to get trans on engine
• Ask children to leave room
• CURSE loudly
• Go to Corvette forum, post pictures
• Strip paint off inside of bellhousing just in case NCRS guys look
• Remove pilot bushing again
• Go to step 2 above
• Recognize that if takes 10 hours for a 1-1/2 hour job, this rebuild is going to take a lot longer than planned.
I think I'll keep posting here so folks know what not to do.....
11-30-2014, 06:03 PM
#19
Instructor
Thread Starter
11-30-2014, 10:24 PM
#20
Burning Brakes

Install of Flywheel, clutch, and transmission
1. Install Flywheel, Torque bolts (65 ft lbs)
a. Make sure face is clean of dirt, oil, etc.
2. Install Pilot bearing,
a. Put pilot bearing in freezer for 6 hours prior to install,
b. grease outside of bearing and then install
3. Confirm Transmission goes into pilot bearing easily
4. Using guide, place clutch on CLEANED flywheel and then install CLEANED pressure plate; torque bolts (35 ft lbs) in star fashion do prevent warping flywheel
5. Install clutch throw-out bearing on clutch fork; insure clips are inside bearing. Grease bearing and fork spring prior to assembly
6. Install clutch fork into bellhousing; grease bell stud prior to fork install
7. Install bellhousing onto transmission torque bolts (45-60 ft lbs)
a. grease trans gear prior to inserting through throw-out bearing.
8. Remove clutch guide
9. Install bellhousing/transmission assembly to engine. Torque bolts (30 ft lbs)
10. Install bellhousing front cover
Steps not needed;
• Install pilot bushing
• Skip step 3 (confirming transmission goes into pilot bearing
• During step 9, confirm transmission will not go on engine.
• Ask children to leave room
• CURSE
• Go to auto parts store, get new bushing and buy pilot bushing removal tool
• Attempt to remove pilot bushing, break tool
• Go back to auto parts store, get new tool
• Remove pilot bushing
• Recheck manuals and google search for instructions
• Install Pilot bushing and move through steps 2-8 (still skipping step 3 above) and confirm transmission will not go on engine.
• Try multiple ways to get trans on engine
• Ask children to leave room
• CURSE loudly
• Go to Corvette forum, post pictures
• Strip paint off inside of bellhousing just in case NCRS guys look
• Remove pilot bushing again
• Go to step 2 above
• Recognize that if takes 10 hours for a 1-1/2 hour job, this rebuild is going to take a lot longer than planned.
I think I'll keep posting here so folks know what not to do.....
1. Install Flywheel, Torque bolts (65 ft lbs)
a. Make sure face is clean of dirt, oil, etc.
2. Install Pilot bearing,
a. Put pilot bearing in freezer for 6 hours prior to install,
b. grease outside of bearing and then install
3. Confirm Transmission goes into pilot bearing easily
4. Using guide, place clutch on CLEANED flywheel and then install CLEANED pressure plate; torque bolts (35 ft lbs) in star fashion do prevent warping flywheel
5. Install clutch throw-out bearing on clutch fork; insure clips are inside bearing. Grease bearing and fork spring prior to assembly
6. Install clutch fork into bellhousing; grease bell stud prior to fork install
7. Install bellhousing onto transmission torque bolts (45-60 ft lbs)
a. grease trans gear prior to inserting through throw-out bearing.
8. Remove clutch guide
9. Install bellhousing/transmission assembly to engine. Torque bolts (30 ft lbs)
10. Install bellhousing front cover
Steps not needed;
• Install pilot bushing
• Skip step 3 (confirming transmission goes into pilot bearing
• During step 9, confirm transmission will not go on engine.
• Ask children to leave room
• CURSE
• Go to auto parts store, get new bushing and buy pilot bushing removal tool
• Attempt to remove pilot bushing, break tool
• Go back to auto parts store, get new tool
• Remove pilot bushing
• Recheck manuals and google search for instructions
• Install Pilot bushing and move through steps 2-8 (still skipping step 3 above) and confirm transmission will not go on engine.
• Try multiple ways to get trans on engine
• Ask children to leave room
• CURSE loudly
• Go to Corvette forum, post pictures
• Strip paint off inside of bellhousing just in case NCRS guys look
• Remove pilot bushing again
• Go to step 2 above
• Recognize that if takes 10 hours for a 1-1/2 hour job, this rebuild is going to take a lot longer than planned.
I think I'll keep posting here so folks know what not to do.....
 . It's knowing that we all have those 1.5 hour jobs that turn into 2 days takes the sting out of it.
 I was just thinking today how much I have enjoyed working on my cars dispite the set backs and stupid, hasty decisions I've made.