'61 FI won't start all of a sudden - Please Help
 04-10-2015, 01:19 PM
#41
Instructor

Thread Starter

If by this you mean the black wire from the points, then, no. Connect this wire to coil (-).
This is a little ambiguous. Here is what you should have:
There should be a wire from the ignition harness which connects to one side of the ballast resistor. As I recall, this wire is green. The wiper motor also connects to this same ballast resistor terminal. You should have the electric solenoid valve wired to this terminal also.
The coil(+) connects to the OTHER side of the ballast resistor.
No, as described above, coil(-) connects to the black lead coming out of the distributor.
I have a + from points going to right side of ballast resister. It's the only thing on that side of the BR. Everything else is on the left side.
Instead, I should have both + wires from points and + coil going to right side of BR?
Where does the - coil wire connect to in the distributor?
 04-10-2015, 01:32 PM
#42
Race Director

Member Since: Feb 2007
Location: northern california
Posts: 13,608
Received 6,519 Likes
on
3,001 Posts
C2 of Year Finalist (track prepared) 2019

Ok, I think I'm getting somewhere Jim. So two wires should be coming out of the distributor ( one + and one -)?
I have a + from points going to right side of ballast resister. It's the only thing on that side of the BR. Everything else is on the left side.
Instead, I should have both + wires from points and + coil going to right side of BR?
Where does the - coil wire connect to in the distributor?
I have a + from points going to right side of ballast resister. It's the only thing on that side of the BR. Everything else is on the left side.
Instead, I should have both + wires from points and + coil going to right side of BR?
Where does the - coil wire connect to in the distributor?
There is no other wire coming out of the distributor when you have points ignition.
04-10-2015, 01:37 PM
#43
Instructor
Thread Starter
You should have one(1) wire coming out of the distributor. It is black (if your car's wiring follows standard GM color code) and connects to coil(-). Inside the distributor this wire connects to one of the sets of points.
There is no other wire coming out of the distributor when you have points ignition.
There is no other wire coming out of the distributor when you have points ignition.
I'm pretty sure I attached the distributor wire to +. I will fix it and try again! Thank you so much for your help.
04-10-2015, 01:44 PM
#44
Race Director
Member Since: Feb 2007
Location: northern california
Posts: 13,608
Received 6,519 Likes
on
3,001 Posts
C2 of Year Finalist (track prepared) 2019
Huh? Since the points replace the Pertronix thingy, anything with the word "pertronix" on it ought to now be over on your bench.
04-10-2015, 01:49 PM
#45
Instructor
Thread Starter
Correct. Petronix is off the car. What I'm saying is that I think I installed the points incorrectly. I attached the wire coming out of the distributor to a +, not a - to the coil like you are saying.
04-10-2015, 01:56 PM
#46
Team Owner


Member Since: Mar 2003
Location: Greenville, Indiana
Posts: 26,118
Received 1,843 Likes
on
1,398 Posts

If you try the test light method, hook your test light to the (-)minus side of the coil. That's the wire that goes into the distributor.
I mistakenly said above to put your light on the (+)plus terminal.
For what it's worth, I've wired coils backwards before and they ran.
04-10-2015, 07:45 PM
#47
Race Director
Member Since: Feb 2007
Location: northern california
Posts: 13,608
Received 6,519 Likes
on
3,001 Posts
C2 of Year Finalist (track prepared) 2019
Earlier today I gave incorrect wiring advice. I wrote:
Delete, ignore, flush, dump, dispose or whatever, but pay no attention to that drivel.
This is more better:
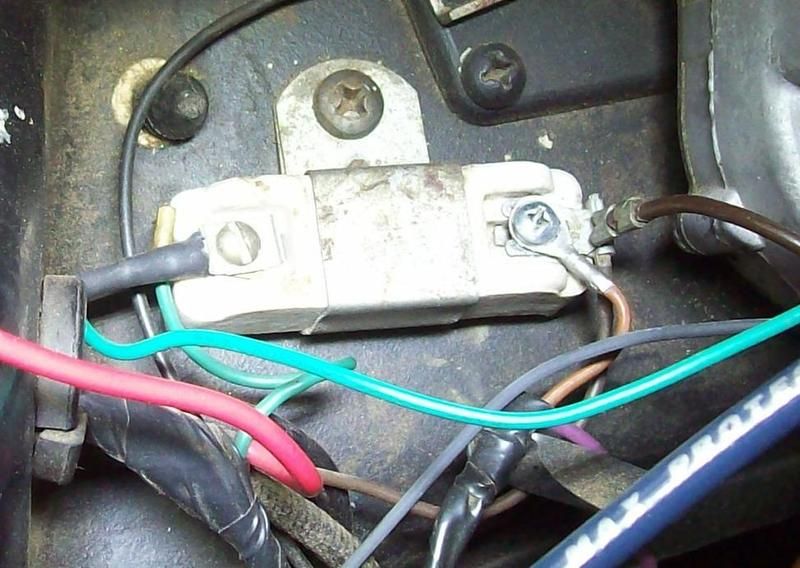
There are two wires from the ignition harness which connect to opposite ends of the ballast resistor.
One wire is a heavy brown wire and usually connects to the left or driver's side of the resistor. The wiper motor wire, the harness pigtail for the cold enrichment heater, and the solenoid valve wire should connect to this terminal also.
The other harness wire, usually connected to the right or passenger's side of the resistor is green. The wire which connects to coil(+) and which is normally also green connects to this terminal.
You can see these connections here:
At the coil, the connections look like this:
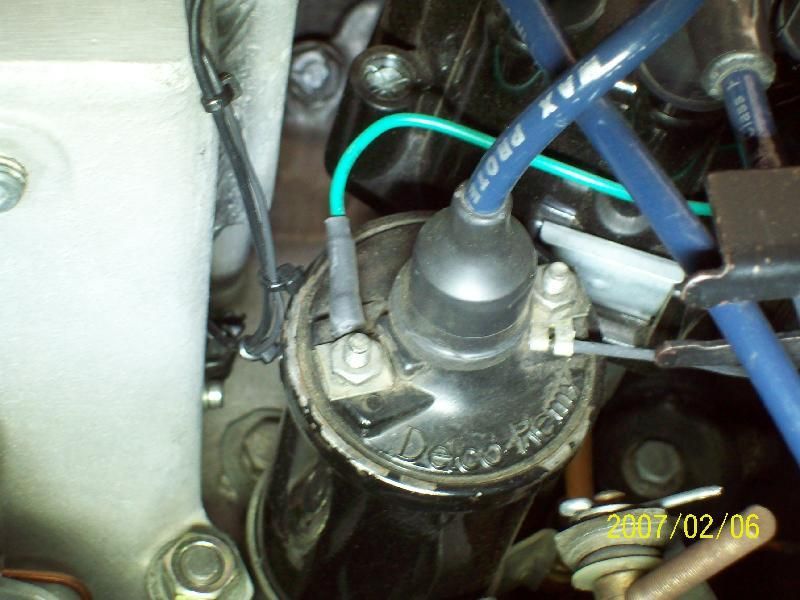
The green wire connects to coil(+) and the black wire (looks blue in the photo, but it's really black), which comes from the distributor, connects to coil(-).
I apologize for the bad info previously.
Jim
There should be a wire from the ignition harness which connects to one side of the ballast resistor. As I recall, this wire is green. The wiper motor also connects to this same ballast resistor terminal. You should have the electric solenoid valve wired to this terminal also.
This is more better:
There are two wires from the ignition harness which connect to opposite ends of the ballast resistor.
One wire is a heavy brown wire and usually connects to the left or driver's side of the resistor. The wiper motor wire, the harness pigtail for the cold enrichment heater, and the solenoid valve wire should connect to this terminal also.
The other harness wire, usually connected to the right or passenger's side of the resistor is green. The wire which connects to coil(+) and which is normally also green connects to this terminal.
You can see these connections here:

At the coil, the connections look like this:

The green wire connects to coil(+) and the black wire (looks blue in the photo, but it's really black), which comes from the distributor, connects to coil(-).
I apologize for the bad info previously.
Jim
Last edited by jim lockwood; 04-10-2015 at 10:08 PM.
04-11-2015, 01:59 PM
#48
Team Owner
Member Since: Mar 2003
Location: Greenville, Indiana
Posts: 26,118
Received 1,843 Likes
on
1,398 Posts
I guess he got it cranked up.
04-11-2015, 02:17 PM
#49
Race Director
Member Since: Feb 2007
Location: northern california
Posts: 13,608
Received 6,519 Likes
on
3,001 Posts
C2 of Year Finalist (track prepared) 2019
04-11-2015, 04:14 PM
#50
Instructor
Thread Starter
I followed your pictures Jim and I now have spark at the plugs. It still would not start so I put a drill on the drive cable and I got it to stumble (didn't seem like it was spinning fast enough for fuel). I got it to stumble and it backfired. I think I am too advanced. I tried retarding the distributor by about 1/8 turn clockwise. It was cranking then it struggled to turn, so I stopped cranking. Thoughts of hydro lock keep going through my head.
What should I do now?
What should I do now?
04-11-2015, 04:23 PM
#51
Team Owner
Member Since: Mar 2003
Location: Greenville, Indiana
Posts: 26,118
Received 1,843 Likes
on
1,398 Posts
I followed your pictures Jim and I now have spark at the plugs. It still would not start so I put a drill on the drive cable and I got it to stumble (didn't seem like it was spinning fast enough for fuel). I got it to stumble and it backfired. I think I am too advanced. I tried retarding the distributor by about 1/8 turn clockwise. It was cranking then it struggled to turn, so I stopped cranking. Thoughts of hydro lock keep going through my head.
What should I do now?
What should I do now?
https://www.corvetteforum.com/forums...-advanced.html
04-11-2015, 04:24 PM
#52
Racer

So the problem is definitely electrical now. At one point I had spark at the plug, but not now.
I tested the Petronix unit AND new points I purchased. I have never used points before, so I had an experienced C1 Corvette owner come over and check my work. He helped me adjust the points as best we could without a feeler gauge. Again, nothing form the engine.
I tested the Petronix unit AND new points I purchased. I have never used points before, so I had an experienced C1 Corvette owner come over and check my work. He helped me adjust the points as best we could without a feeler gauge. Again, nothing form the engine.
1) Feeler gauge, and
2) Dwell meter
If you did not use one of the above, you're wasting your time. The points MUST be accurately set, especially a dual point set-up.
Yogi
04-11-2015, 04:39 PM
#53
Race Director
Member Since: Feb 2007
Location: northern california
Posts: 13,608
Received 6,519 Likes
on
3,001 Posts
C2 of Year Finalist (track prepared) 2019
The good news is that with points in the distributor you can set the timing fairly accurately with the engine off.
Say the plugs should fire at 10 degrees BTDC. Manually rotate the engine until the timing mark on the balancer aligns with the 10 degree mark on the timing tab.
Connect a test light to coil(-) and, of course, to ground.
Loosen the distributor clamp above the cross shaft which drives the tach and the FI pump.
Turn on the ignition. The test lamp may or may not light.
If the lamp lights, rotate the distributor cap clockwise until the test light goes out. Then with a delicate touch, rotate the cap counter clockwise until the test light just lights. Stop! Lock the distributor clamp.
If the lamp did not light when you turned on the ignition, turn the distributor cap counter-clockwise until the lamp just turns on. Stop! Lock the distributor clamp.
The timing is now set to within +/- 2 degrees of the goal and will not be an issue.
Try to start the car.
Oh, and regarding the pump turning over enough..... that's a "positive displacement pump". If it turns, it will pump fuel. Period. The use of the drill was an interesting experiment, but honestly, I don't know how to interpret the results.
Jim
04-11-2015, 05:21 PM
#54
Racer
The good news is that with points in the distributor you can set the timing fairly accurately with the engine off.
Say the plugs should fire at 10 degrees BTDC. Manually rotate the engine until the timing mark on the balancer aligns with the 10 degree mark on the timing tab.
Connect a test light to coil(-) and, of course, to ground.
Loosen the distributor clamp above the cross shaft which drives the tach and the FI pump.
Turn on the ignition. The test lamp may or may not light.
If the lamp lights, rotate the distributor cap clockwise until the test light goes out. Then with a delicate touch, rotate the cap counter clockwise until the test light just lights. Stop! Lock the distributor clamp.
If the lamp did not light when you turned on the ignition, turn the distributor cap counter-clockwise until the lamp just turns on. Stop! Lock the distributor clamp.
The timing is now set to within +/- 2 degrees of the goal and will not be an issue.
Try to start the car.
Oh, and regarding the pump turning over enough..... that's a "positive displacement pump". If it turns, it will pump fuel. Period. The use of the drill was an interesting experiment, but honestly, I don't know how to interpret the results.
Jim
Say the plugs should fire at 10 degrees BTDC. Manually rotate the engine until the timing mark on the balancer aligns with the 10 degree mark on the timing tab.
Connect a test light to coil(-) and, of course, to ground.
Loosen the distributor clamp above the cross shaft which drives the tach and the FI pump.
Turn on the ignition. The test lamp may or may not light.
If the lamp lights, rotate the distributor cap clockwise until the test light goes out. Then with a delicate touch, rotate the cap counter clockwise until the test light just lights. Stop! Lock the distributor clamp.
If the lamp did not light when you turned on the ignition, turn the distributor cap counter-clockwise until the lamp just turns on. Stop! Lock the distributor clamp.
The timing is now set to within +/- 2 degrees of the goal and will not be an issue.
Try to start the car.
Oh, and regarding the pump turning over enough..... that's a "positive displacement pump". If it turns, it will pump fuel. Period. The use of the drill was an interesting experiment, but honestly, I don't know how to interpret the results.
Jim
Yogi
04-11-2015, 07:30 PM
#55
Team Owner
Member Since: Mar 2003
Location: Greenville, Indiana
Posts: 26,118
Received 1,843 Likes
on
1,398 Posts
Just wonder if the OP tried my test light method? Doesn't sound right. That'd tell him if the points are working and gapped in the ballpark, among other things.
04-11-2015, 07:42 PM
#56
Race Director
Member Since: Feb 2007
Location: northern california
Posts: 13,608
Received 6,519 Likes
on
3,001 Posts
C2 of Year Finalist (track prepared) 2019
Better to have the spark happen at the right moment than requiring dwell to be spot on while getting the starting problem resolved.
Last edited by jim lockwood; 04-12-2015 at 08:38 AM.
04-12-2015, 09:51 AM
#57
Instructor
Thread Starter
Yesterday I did properly gap them to .016 while lobe on distributor shaft was touching the plastic contact thing on the points. Sorry, I forgot to mention that.
I'm headed to the car now to try the engine off timing method and I have one question.
I don't recall a way to turn the engine manually with a breaker bar. Isn't the crank pulley in the way? I think mine is smooth in the middle with no place for a socket to turn the crank.
If that's the case, should I loosen all plugs to release compression and bump the engine with the ignition?
04-12-2015, 10:19 AM
#58
Race Director
Member Since: Feb 2007
Location: northern california
Posts: 13,608
Received 6,519 Likes
on
3,001 Posts
C2 of Year Finalist (track prepared) 2019
I don't recall a way to turn the engine manually with a breaker bar. Isn't the crank pulley in the way? I think mine is smooth in the middle with no place for a socket to turn the crank.
If that's the case, should I loosen all plugs to release compression and bump the engine with the ignition?
However, I would expect that your car's crank snout has been drilled and tapped for a balancer bolt. The head of that balancer bolt is a convenient place to put a socket and to use a breaker bar.
It is a little awkward to turn the engine this way but it can be done and it's the only way to precisely position the timing mark like you need to do.
So has your crank been tapped for a balancer bolt?
Jim
04-12-2015, 10:45 AM
#59
Instructor
Thread Starter
Hmmmmm...... It's true that as the engine was originally built by the factory, there isn't a convenient way to grip and rotate the crank.
However, I would expect that your car's crank snout has been drilled and tapped for a balancer bolt. The head of that balancer bolt is a convenient place to put a socket and to use a breaker bar.
It is a little awkward to turn the engine this way but it can be done and it's the only way to precisely position the timing mark like you need to do.
So has your crank been tapped for a balancer bolt?
Jim
Nothing is easy on this car! Any suggestions? I'll just be staring at the car until then...
04-12-2015, 10:51 AM
#60
Race Director
Member Since: Jun 2006
Location: Inverness FL
Posts: 17,891
Received 727 Likes
on
621 Posts
St. Jude Donor '07
Bill
Last edited by wmf62; 04-12-2015 at 10:54 AM.