How to restore aluminum valve covers
 04-16-2015, 08:29 AM
#41
Race Director


Member Since: Mar 2001
Location: Mustang OK
Posts: 13,852
Received 3,772 Likes
on
1,674 Posts
2023 C1 of the Year Finalist - Modified
2015 C1 of the Year Finalist

It is a raised, VERY THIN, line across the top of the covers, from the fin on one side to the fin on the other side, it goes right through the center of the o in Corvette.It is more prominent on some covers than it is on other covers. I have seen several covers where an ATTEMPT has been made to remove the flaw. Some attempts have been better than others-------------------but it is still there on all of them! The most difficult area to remove the flaw is in and around the o.
 04-16-2015, 08:46 AM
#42

making a small sanding block will speed things up some. I have used Sharkhyde before, but not on underhood surfaces. It might yellow, I dont know.
I'd use something like 400 wet and work up to 6 or 800 wet and then use buffing compounds from Caswell Plating (a good american company BTW). These come in fairly large bars, way more than you need. Store em in ziptop bags, or cut off about a 3rd and sell the rest LOL. Their buffing wheels and instructions are very good. Once you get them polished, make sure you clean any residue off and just apply a good way, like Meguiars NXT Tech with a clean cloth. Take em off every once in awhile, strip the old wax off with wax and grease remover, solvent or dawn dish soap. A little mag wheel polish should be enough to bring the shine back if you dont want to use the White polish compound. Re-wax and there you go.
I'd use something like 400 wet and work up to 6 or 800 wet and then use buffing compounds from Caswell Plating (a good american company BTW). These come in fairly large bars, way more than you need. Store em in ziptop bags, or cut off about a 3rd and sell the rest LOL. Their buffing wheels and instructions are very good. Once you get them polished, make sure you clean any residue off and just apply a good way, like Meguiars NXT Tech with a clean cloth. Take em off every once in awhile, strip the old wax off with wax and grease remover, solvent or dawn dish soap. A little mag wheel polish should be enough to bring the shine back if you dont want to use the White polish compound. Re-wax and there you go.
04-16-2015, 10:40 AM
#43
Advanced


The flaw is inside the O. It is half filled. Some are flush with the surface and some are raised just a bit. It can be removed if you are good or have access to a precision mill. I have seen guys try to do it by hand and it looks terrible. The flaw is however correct on the later cars.
04-16-2015, 01:34 PM
#44
Race Director
Member Since: Mar 2001
Location: Mustang OK
Posts: 13,852
Received 3,772 Likes
on
1,674 Posts
2023 C1 of the Year Finalist - Modified
2015 C1 of the Year Finalist
Here is a virgin cover WITH the flaw. As can be seen, the line goes partly around one side on this one. SOME just have the line from fin to fin.

Here is a polished/chrome plated cover WITHOUT the flaw.
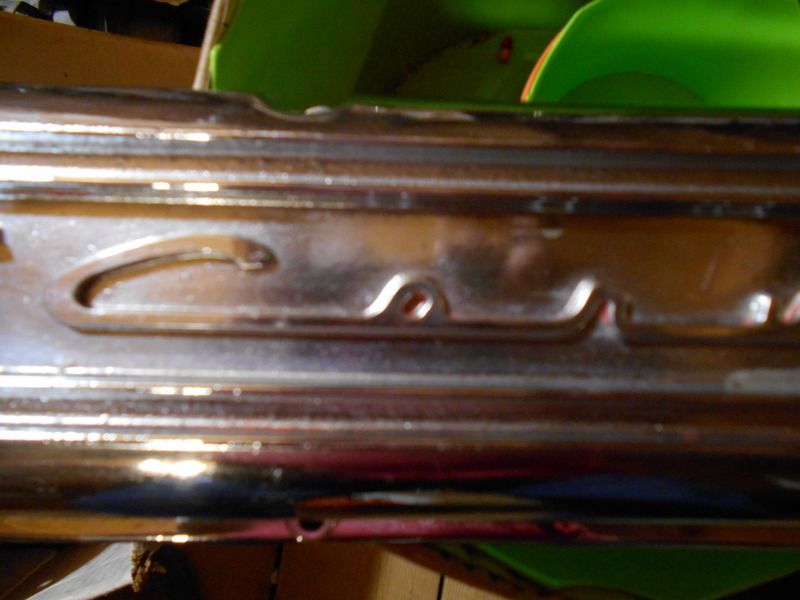
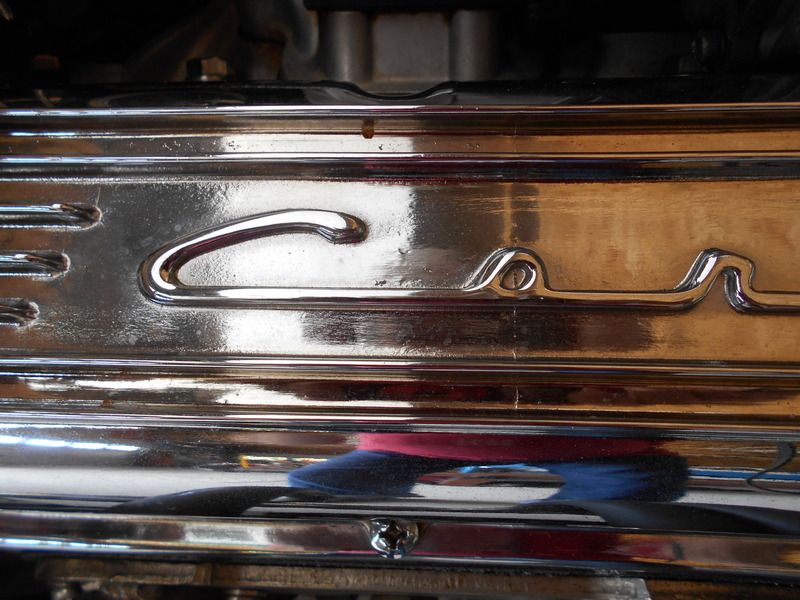
Here is a polished/chrome plated cover WITH the flaw. As can be seen, polishing just does not completely remove the flaw.
Here is a polished/chrome plated cover WITHOUT the flaw.
Here is a polished/chrome plated cover WITH the flaw. As can be seen, polishing just does not completely remove the flaw.
04-16-2015, 01:50 PM
#45
The chrome cover WITH flaw..there are still a lot of surface imperfections under the chrome. A lot of people don't know that chrome is like paint - it doesn't HIDE sins, it MAGNIFIES them. Additionally that line is perpendicular to the way your eye views the cover, which makes it stand out even more. If the flaw was parallel to the 'fins', it would be much easier to hide.
04-16-2015, 02:06 PM
#46
Safety Car


Member Since: Apr 2013
Location: Arlington TX
Posts: 4,833
Received 931 Likes
on
533 Posts
2023 Restomod of the Year Finalist
2023 C1 of the Year Finalist - Unmodified

Here is a virgin cover WITH the flaw. As can be seen, the line goes partly around one side on this one. SOME just have the line from fin to fin.
Here is a polished/chrome plated cover WITHOUT the flaw.
Here is a polished/chrome plated cover WITH the flaw. As can be seen, polishing just does not completely remove the flaw.
Here is a polished/chrome plated cover WITHOUT the flaw.
Here is a polished/chrome plated cover WITH the flaw. As can be seen, polishing just does not completely remove the flaw.
04-16-2015, 02:29 PM
#47
Safety Car

Nope, the dies were broken and repaired. All that are made now have the flaw. Somebody like Jerry MacNiesh can make the flaw completely go away, but they all have the flaw now, when they are cast.
Regards, John McGraw
Regards, John McGraw
04-16-2015, 03:22 PM
#48
Race Director
Member Since: Mar 2001
Location: Mustang OK
Posts: 13,852
Received 3,772 Likes
on
1,674 Posts
2023 C1 of the Year Finalist - Modified
2015 C1 of the Year Finalist
Bottom line, the early covers WITHOUT the flaw are ONLY 60/mid-66 versions and have become rather pricy.
Last, the REAL EARLY staggered bolt pattern covers were also available for MANY years and those DID NOT have a flaw. And those were also cheap.
The 9-fin covers (56/mid-57) are somewhat rare, but their usage is rather limited to 56/mid-57 cars and they cannot be used on 60-later heads (unless you cheat). At one time, 9-fin covers brought big $$$, but not so much any more. Probably the highest priced 9-fin cover is a GENUINE (they can be, and have been faked) early 57 cover with the notch in the top fin for FI engines.
04-16-2015, 04:46 PM
#49
Team Owner


Member Since: Oct 2000
Location: Washington Michigan
Posts: 38,899
Received 1,857 Likes
on
1,100 Posts
On new covers, Paragon charges about $75.00 per cover to remove the flaw. 
04-19-2015, 06:09 PM
#50
Pro

Here are the results I got from polishing my L82 valve covers as we talked about a few days ago. I started wet sanding some of the rougher spots with 400 grit, then overall with 600 followed by 800. Then I buffed with Tripoli compound on my 1800 rpm buffing wheel, and then white rouge. Lastly some hand rubbing with Mothers aluminum/mag polish. I am pretty happy with the way they look. You don't have to look very hard to see flaws, it is obvious that these castings were never meant to be polished. But good enough for me, I am not building a show car.
04-19-2015, 08:05 PM
#51
Advanced
Here are the results I got from polishing my L82 valve covers as we talked about a few days ago. I started wet sanding some of the rougher spots with 400 grit, then overall with 600 followed by 800. Then I buffed with Tripoli compound on my 1800 rpm buffing wheel, and then white rouge. Lastly some hand rubbing with Mothers aluminum/mag polish. I am pretty happy with the way they look. You don't have to look very hard to see flaws, it is obvious that these castings were never meant to be polished. But good enough for me, I am not building a show car.
04-21-2015, 11:25 AM
#52
Melting Slicks<br><img src="/forums/images/ranks/3k-4k.gif" border="0">

Member Since: Nov 2002
Location: Jamison Pa
Posts: 2,843
Received 233 Likes
on
179 Posts
St. Jude Donor '11-'24

I just got my 65 327/350 intake and exhaust manifolds back from Jerry. Well worth the wait. They are fantastic!
While he had them he also removed and replaced the two front water connections.
I can't wait to get them on the motor!!!!!!!
Bob K.
While he had them he also removed and replaced the two front water connections.
I can't wait to get them on the motor!!!!!!!
Bob K.
 04-21-2015, 03:44 PM
#54

The reworked Paragon covers have their own logo cast on the underside.
04-21-2015, 07:53 PM
#55
Team Owner
Member Since: Oct 2000
Location: Washington Michigan
Posts: 38,899
Received 1,857 Likes
on
1,100 Posts
04-21-2015, 09:25 PM
#56

Tumblers will only polish. Oil, gas and other stains embedded in the 'pores' of the metal are first glass beaded then tumbled.
CJ
CJ
 04-22-2015, 09:11 AM
#57
Melting Slicks<br><img src="/forums/images/ranks/3k-4k.gif" border="0">
Member Since: Nov 2002
Location: Jamison Pa
Posts: 2,843
Received 233 Likes
on
179 Posts
St. Jude Donor '11-'24
Here are pictures of the exhaust and intake manifolds, along with the valve covers that we done last year.
The exhaust manifolds came back "white" with some Hi-temp paint. They have the first coat on them, but if you look in the bottom of the exhaust manifolds you can still kinda see the white.
The exhaust manifolds came back "white" with some Hi-temp paint. They have the first coat on them, but if you look in the bottom of the exhaust manifolds you can still kinda see the white.
04-29-2017, 12:35 PM
#59
Advanced
This is a pair of covers I bought in probably early '67 to dress up my base engine '63. (Luckily, I saved the originals and put them back on when I did a chassis only restoration.) I dug the cast with seam covers out for my project car and cleaned them with walnut shells. The walnut shells seem to only clean without removing any parent material. As I examined the first one, I noticed that there were some kind of rubbing marks on the side facing the intake manifold and asked myself what could have been rubbing on this to make such a mark? Then, when I looked at the second one, SAME THING! Must have been from being ejected from the die.
04-30-2017, 05:24 PM
#60
Burning Brakes

Member Since: Jul 2005
Location: Off the coast of somewhere beautiful
Posts: 904
Likes: 0
Received 8 Likes
on
7 Posts
What is a set of these covers running now? I have a set of staggered hole NOS no flaw covers my uncle had. I acquired them as his sole beneficiary after he passed away in March. Really have nothing to put them on so wondering what a fair asking price it for them.