C1 & C2 Corvettes General C1 Corvette & C2 Corvette Discussion, Technical Info, Performance Upgrades, Project Builds, Restorations

My next Restomod project. 54 Vette

Thread Tools
 
Search this Thread
 
Old 09-21-2015, 11:20 PM
  #21  
Brucebodyman
Racer
Thread Starter
 
Brucebodyman's Avatar
 
Member Since: Jul 2007
Location: Bridgeport MI
Posts: 391
Received 58 Likes on 47 Posts

Default

Originally Posted by Brucebodyman
Got my accessory drive. I like to use March Pro Track
Wanted to drop motor in. Leaving for Vegas wed. Morning. It will have to wait till I get back. Watch for my posts from Vegas.
Old 09-30-2015, 07:24 PM
  #22  
Brucebodyman
Racer
Thread Starter
 
Brucebodyman's Avatar
 
Member Since: Jul 2007
Location: Bridgeport MI
Posts: 391
Received 58 Likes on 47 Posts

Default

Test fit the LS3 today. Had to make minor adjustment to motor mounts on frame side. Good thing is the mounts are part of a removable cross member so I could remove it and modify it. Re-test fit problem solved. Now I have to bodywork it and repaint it then set motor back in for last time..
The following users liked this post:
Aussie Bob. (10-15-2015)
Old 10-02-2015, 10:51 PM
  #23  
Brucebodyman
Racer
Thread Starter
 
Brucebodyman's Avatar
 
Member Since: Jul 2007
Location: Bridgeport MI
Posts: 391
Received 58 Likes on 47 Posts

Default

Motor mount painted once it's dry motor goes back in for last time. Since I had paint in the spray gun I figured I'd paint the fuel rail covers.


Old 10-05-2015, 06:43 PM
  #24  
randingo8
1st Gear
 
randingo8's Avatar
 
Member Since: Mar 2015
Posts: 1
Likes: 0
Received 0 Likes on 0 Posts
Default

Wow! Nice car! Looking forward to watching the rest of the build.
Old 10-14-2015, 07:59 PM
  #25  
Brucebodyman
Racer
Thread Starter
 
Brucebodyman's Avatar
 
Member Since: Jul 2007
Location: Bridgeport MI
Posts: 391
Received 58 Likes on 47 Posts

Default Update


Originally Posted by randingo8
Wow! Nice car! Looking forward to watching the rest of the build.


Old 10-14-2015, 08:05 PM
  #26  
Brucebodyman
Racer
Thread Starter
 
Brucebodyman's Avatar
 
Member Since: Jul 2007
Location: Bridgeport MI
Posts: 391
Received 58 Likes on 47 Posts

Default Update

A/C lines made and installed. Power steering reservoir and hoses installed. Heater hoses made and installed. motor is in for last time. Trans goes in tomorrow.
One big job out of the way is installing and hiding the LS engine and Trans wiring. Anybody that's ever done one of these knows how tough it is to hide it all. I put the ECM behind pass kick panel. Fuse box for connect and cruise under pass. fender area. There was already s close out panel made to cover this area. Since I did the last one they have made the Trans controller much smaller. I installed that on inside of frame rail out of site. Once it's all buttoned up the LS wiring should be hard to see.
Old 10-14-2015, 09:59 PM
  #27  
Not Red Rob
Drifting
Support Corvetteforum!
 
Not Red Rob's Avatar
 
Member Since: Jun 2003
Location: Jonesboro AR
Posts: 1,920
Received 655 Likes on 297 Posts
2024 Corvette of the Year Finalist - Modified
2023 C4 of the Year Winner - Modified
2021 C2 of the Year Finalist - Modified

Default

AC lines look great!
Old 10-14-2015, 11:23 PM
  #28  
Randy G.
Race Director
 
Randy G.'s Avatar
 
Member Since: May 2006
Location: Eagle, Idaho
Posts: 14,692
Received 552 Likes on 378 Posts

Default

This one is for sale on Craigslist for $139,000. I took these last year.


Old 10-16-2015, 08:13 PM
  #29  
Brucebodyman
Racer
Thread Starter
 
Brucebodyman's Avatar
 
Member Since: Jul 2007
Location: Bridgeport MI
Posts: 391
Received 58 Likes on 47 Posts

Default

Installed transmission today. Motor and Trans bolted in and in final position. Finished hiding LS wiring. Won't be long it will be running


Also test fit fuel rail covers.
The following 3 users liked this post by Brucebodyman:
Loren Smith (11-13-2015), OHSIXX (10-17-2015), Zoomin (10-17-2015)
Old 10-17-2015, 05:25 AM
  #30  
haccpguy
54 Vette Rod
Support Corvetteforum!
 
haccpguy's Avatar
 
Member Since: Aug 1999
Location: Orlando/Sebastian FL
Posts: 1,000
Received 7 Likes on 7 Posts

Default

You are very talented, It looks amazing. Please keep sharing pics.
Old 10-17-2015, 07:12 AM
  #31  
OHSIXX
Team Owner

Support Corvetteforum!
 
OHSIXX's Avatar
 
Member Since: Dec 1999
Location: Florida
Posts: 26,485
Received 258 Likes on 172 Posts
2021 C2 of the Year Finalist - Modified
C2 of the Year Finalist - Modified 2020
C2 of Year Finalist (performance mods) 2019
St. Jude Donor 03-'04-'05-'06-'07-'08-'09-10-'11-'12-'13-'14-'15-'16-'17-'18-'19-'20-'21-'22-'23-'24


Default

Your work is so incredible.
Old 10-17-2015, 08:41 AM
  #32  
Zoomin
Team Owner
Support Corvetteforum!
 
Zoomin's Avatar
 
Member Since: Oct 1999
Location: Land of Thunder
Posts: 33,596
Received 217 Likes on 160 Posts
2018 C2 of Year Finalist
St. Jude Donor '12-'13-'14-'15, '19

Default

If I may say, the throttle body needs to be painted. It just sticks out like a sore thumb on an otherwise glorious work of art.
Old 10-17-2015, 09:41 AM
  #33  
ohiovet
Melting Slicks
 
ohiovet's Avatar
 
Member Since: Feb 2011
Location: Middletown Ohio
Posts: 2,892
Received 167 Likes on 130 Posts
2016 C1 of Year Finalist
Default

Bruce,
Your car is excellent.
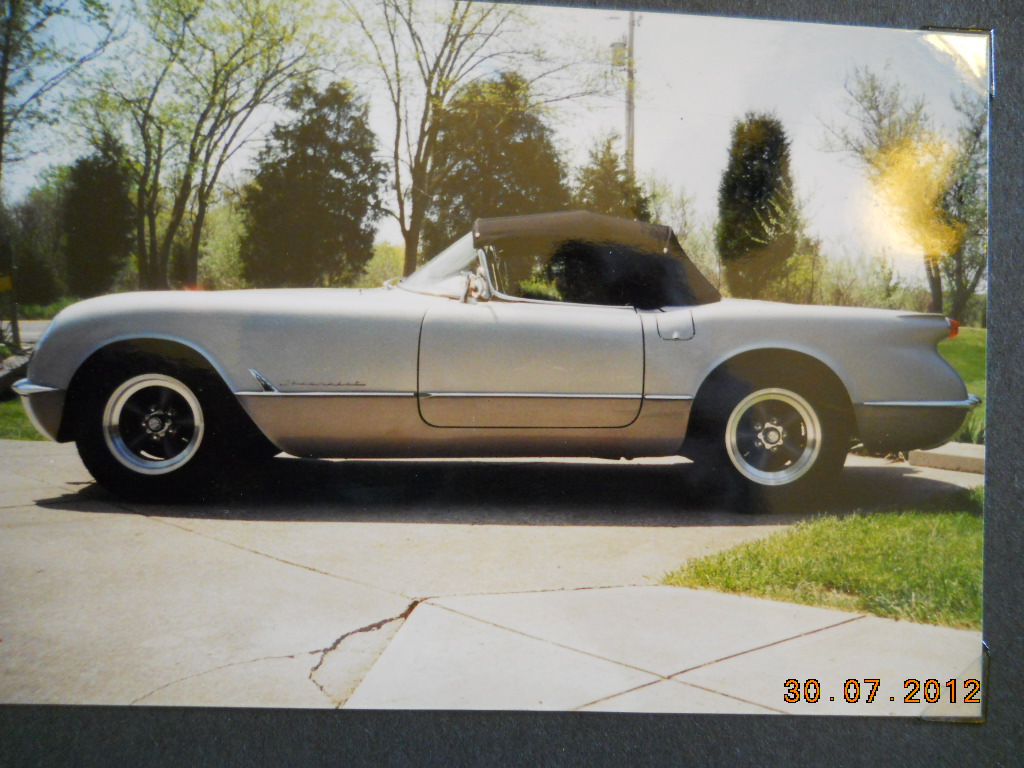
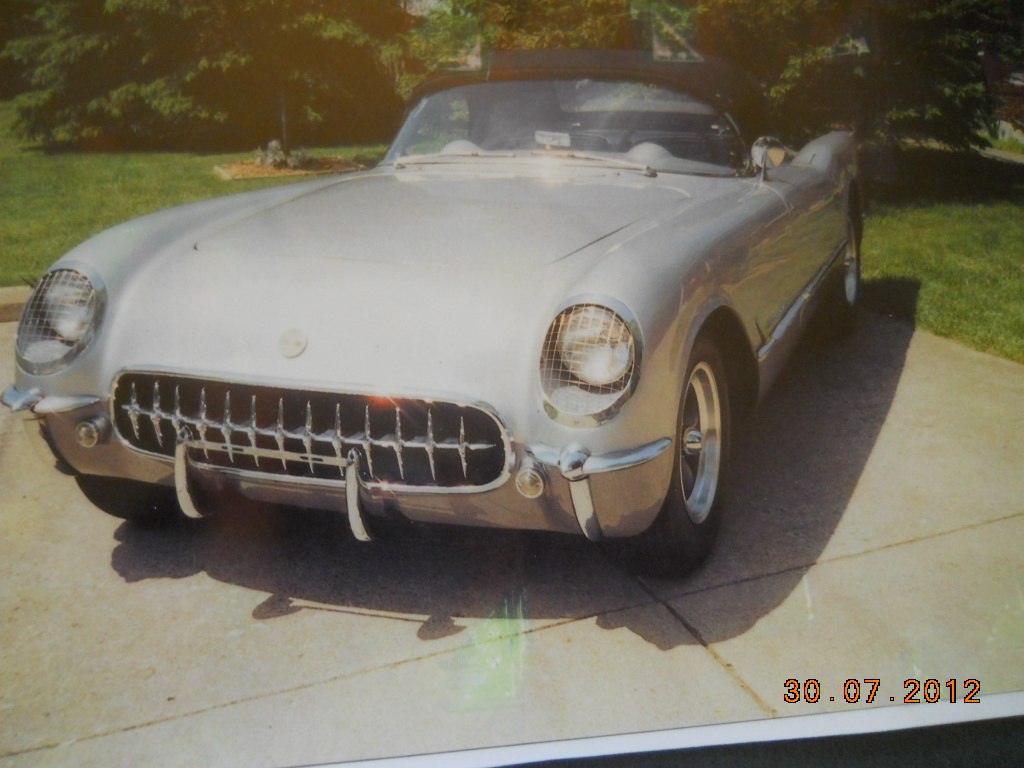
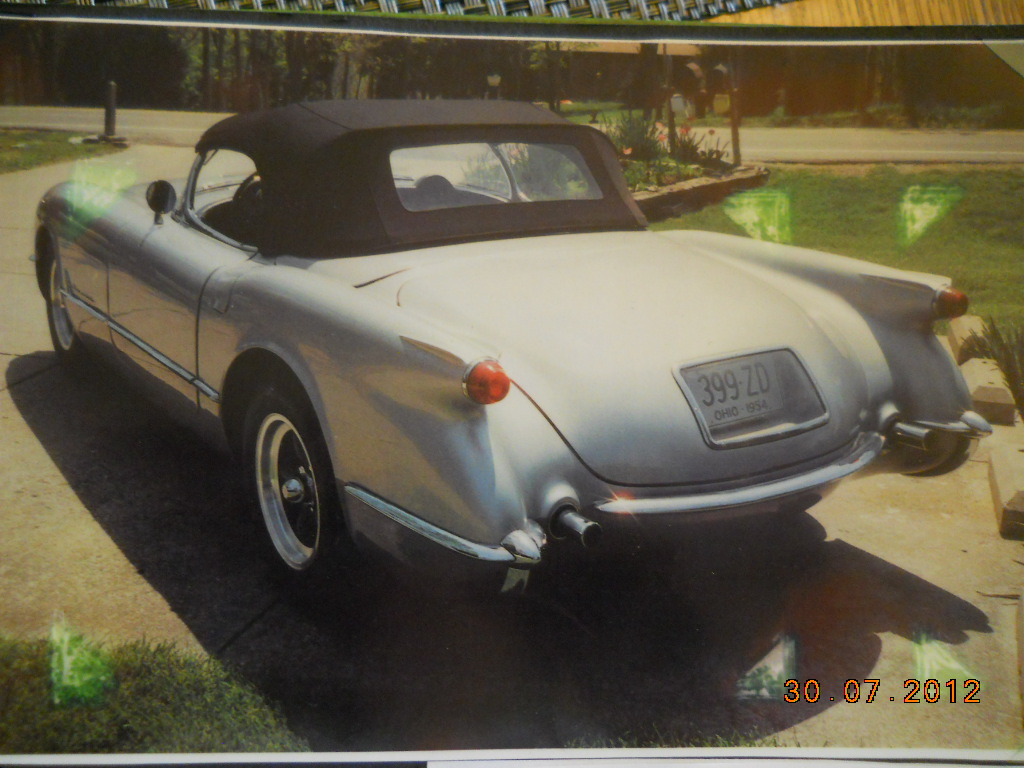
Here is a picture of my 54 custom, restomod, modified Corvette that I did in the 1990's. Date on pics is incorrect.
I actually built it for my wife. Small block, turbo 350, Hartzz Top.
Nothing major like yours but a cool car for the day.
It was just on Ebay for the 4th time, looks horrible now, bright yellow, etc....
It is a very early car (103X)with many original parts that the guy I sold it to removed and threw away. Convertible top flippers, shifter, gauges, etc.
Bruce B

Name:  THE 54 003.JPG
Views: 662
Size:  291.3 KB

Name:  THE 54 001.JPG
Views: 655
Size:  288.2 KB

Name:  THE 54 002.JPG
Views: 693
Size:  273.9 KB
Old 10-17-2015, 03:32 PM
  #34  
Brucebodyman
Racer
Thread Starter
 
Brucebodyman's Avatar
 
Member Since: Jul 2007
Location: Bridgeport MI
Posts: 391
Received 58 Likes on 47 Posts

Default

Originally Posted by Zoomin
If I may say, the throttle body needs to be painted. It just sticks out like a sore thumb on an otherwise glorious work of art.
Point taken but there is a lot of yellow under there already.
Old 10-17-2015, 09:46 PM
  #35  
Zoomin
Team Owner
Support Corvetteforum!
 
Zoomin's Avatar
 
Member Since: Oct 1999
Location: Land of Thunder
Posts: 33,596
Received 217 Likes on 160 Posts
2018 C2 of Year Finalist
St. Jude Donor '12-'13-'14-'15, '19

Default

Originally Posted by Brucebodyman
Point taken but there is a lot of yellow under there already.
Actually, I was thinking black. It's a stunning car regardless. I'd be round to own it.
Old 10-18-2015, 01:51 AM
  #36  
claysmoker
Race Director
 
claysmoker's Avatar
 
Member Since: Dec 2004
Location: PARADISE
Posts: 10,293
Received 58 Likes on 50 Posts
St. Jude Donor '09-'11-'12-'13-'14

Default

WOW!
Old 10-28-2015, 09:28 PM
  #37  
Brucebodyman
Racer
Thread Starter
 
Brucebodyman's Avatar
 
Member Since: Jul 2007
Location: Bridgeport MI
Posts: 391
Received 58 Likes on 47 Posts

Default

Had a new radiator built at a local shop. The one that was in it didn't have a radiator fill it was in the upper hose. I had a split tank built with both hoses on the same side of radiator.. If the radiator filler neck looks like its at the wrong angle in the first picture it's because when rad is in car rad is at an angle and filler neck is level then. I also had this one made a little smaller. The other one was so big you couldn't lift it out the top you had to drop entire radiator support with radiator in it to get it out. It's much more user friendly this way. Won't be long it will be running and moving under it's own power. Won't get much done next week going to SEMA show in Vegas

Get notified of new replies

To My next Restomod project. 54 Vette

Old 10-28-2015, 09:36 PM
  #38  
Brucebodyman
Racer
Thread Starter
 
Brucebodyman's Avatar
 
Member Since: Jul 2007
Location: Bridgeport MI
Posts: 391
Received 58 Likes on 47 Posts

Default


Originally Posted by Brucebodyman
Had a new radiator built at a local shop. The one that was in it didn't have a radiator fill it was in the upper hose. I had a split tank built with both hoses on the same side of radiator.. If the radiator filler neck looks like its at the wrong angle in the first picture it's because when rad is in car rad is at an angle and filler neck is level then. I also had this one made a little smaller. The other one was so big you couldn't lift it out the top you had to drop entire radiator support with radiator in it to get it out. It's much more user friendly this way. Won't be long it will be running and moving under it's own power. Won't get much done next week going to SEMA show in Vegas


Old 11-12-2015, 09:21 PM
  #39  
Brucebodyman
Racer
Thread Starter
 
Brucebodyman's Avatar
 
Member Since: Jul 2007
Location: Bridgeport MI
Posts: 391
Received 58 Likes on 47 Posts

Default

Haven't posted an update in a while. I was at SEMA show last week. Got my Dynotech drive shaft and installed it. Can't say enough about these guys. You download an order form take the measurements they ask for on form and it's at your door in 3-5 days. I have my air induction installed. Also fabbed up a cover for the ugly LS wiring that runs from pass front wheel tub to engine. Just need to paint it. Back on it full time now.


LS wiring running to motor


Sheet metal cover to hide wiring


Dynotech driveshaft. Fit perfect right out of the box.


Old 11-12-2015, 09:30 PM
  #40  
Brucebodyman
Racer
Thread Starter
 
Brucebodyman's Avatar
 
Member Since: Jul 2007
Location: Bridgeport MI
Posts: 391
Received 58 Likes on 47 Posts

Default Fuel rail covers

I also made molds of fuel rail covers. I haven't found an engine cover I would be happy with so I'm going to make my own so I need to start with fuel rail covers and fill in from there. Here's pics of process and finished molds.


Molds before I popped fuel rail covers out of them. Learned how to make molds while building the 62 restomod.


Finished molds. Next step is to glue them onto boards so they can't move around while making parts.


Quick Reply: My next Restomod project. 54 Vette


All times are GMT -4. The time now is 09:26 AM.