Restoration Question
 10-12-2015, 08:54 PM
#61
Team Owner

Member Since: Feb 2003
Location: Sitting in his Nowhere land Hanover Pa
Posts: 48,984
Received 6,928 Likes
on
4,774 Posts
2015 C2 of Year Finalist

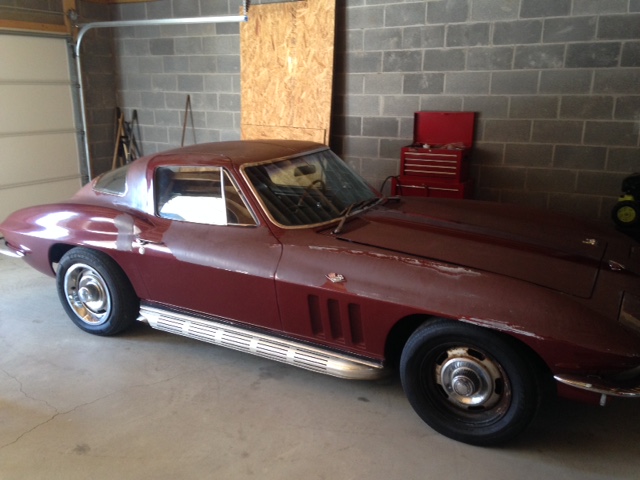
There's no right or wrong answer to when a car should be restored. Everyone would answer differently, and Jeht's is the only answer that matters. As earlier advised, why not make it look as good as you can without major work now, drive it, enjoy it, and think about it. No point in painting it if you're going to restore it. Tanks for the pics of the blems, Jeht, but I still think it looks great. Are you sure that's not original paint?
Right or wrong would also depend on the owners skill set, space available and finances. Let's face it to do a restoration right it takes a little bit of skill, a large area to work, time management and most importantly it takes a lot of coin.
 10-13-2015, 02:54 PM
#62
Instructor


 10-19-2015, 01:03 PM
#64
Le Mans Master


Jeht- great find! I'm painting and weatherstripping my 64 now, used mostly Kleen strip aircraft stripper and am 90%+ done and moved to some sanding. The razor blade didn't work for me.
I can tell you, go ahead and remove All the trim. It has to come off and you'll save yourself time not having to go over the same panel again and again.
If you decide to do your door jambs then you'll be stripping even more aggravating parts. Having painted a few I'd say without reservation that stripping is THE WORST part of the job.
My cars paint was similar to yours and I had no choice but to paint it when I was struck by a semi. My car was in lacquer so it all had to come off.
Again, I love your starting point!
10-19-2015, 01:29 PM
#65
Advanced
Thread Starter

Jeht- great find! I'm painting and weatherstripping my 64 now, used mostly Kleen strip aircraft stripper and am 90%+ done and moved to some sanding. The razor blade didn't work for me.
I can tell you, go ahead and remove All the trim. It has to come off and you'll save yourself time not having to go over the same panel again and again.
If you decide to do your door jambs then you'll be stripping even more aggravating parts. Having painted a few I'd say without reservation that stripping is THE WORST part of the job.
My cars paint was similar to yours and I had no choice but to paint it when I was struck by a semi. My car was in lacquer so it all had to come off.
Again, I love your starting point!
I can tell you, go ahead and remove All the trim. It has to come off and you'll save yourself time not having to go over the same panel again and again.
If you decide to do your door jambs then you'll be stripping even more aggravating parts. Having painted a few I'd say without reservation that stripping is THE WORST part of the job.
My cars paint was similar to yours and I had no choice but to paint it when I was struck by a semi. My car was in lacquer so it all had to come off.
Again, I love your starting point!
10-19-2015, 03:36 PM
#66
Le Mans Master
 ) but member DUB who owns a shop in Charlotte talked to me extensively about the various methods of stripping. Like him, I'm using Kleen Strip 354 aircraft stripper. Buy a GOOD respirator (about $25 at an autobody shop) the stuff is toxic but truthfully the fumes won't knock you over with the doors open. That said, wear the respirator.
I cut down a handful of cheap brushes, 3" wide, to about 3/8" bristles so they are stiff. Put the stuff on thick and work in small areas first until you get a rhythm. let it sit a few minutes and scrape off with a harder plastic scraper. At first I was using "bondo" type scrapers and finally moved to the kind you squeegy screen printed t-shirts with (I cut these in 1/3's).
On my lacquer the stripper seemed to dry, but on reflection it actually seems to be emulsifying the paint in a thick hard layer pretty fast. If this happens before you scrape, apply a little more and it will reconstitute. I have MOSTLY one coat of lacquer but it takes me about three passes to strip any given area. By the third application you may find the stripper can stay on the area longer minutes without drying. The can says to clean with water but (like DUB) I have been removing it with automotive grade lacquer thinner (buy a 5 gallon or larger container you'll use it for a lot). Other opinions may vary but when I'm done I'm washing the whole thing with DAWN soap to make sure I've got it out of the crannies.
On the whole, I cannot imagine sanding or razor blading the more difficult areas without losing definition. My fiberglass surface literally shines in certain lights, it's so smooth! My hood indents and side coves are a good example of where I think the chemicals made it easier and better.
I am doing my door jambs about halfway in and my whole roof rails, and sealing the rest of my jamb/hinge area with epoxy since this is a driver car. Then 2K all over for blocking, then another coat of epoxy to seal.
I did not remove my window stainless and am waiting on the right tool to arrive to complete it.
A word of warning- the door glass felts are known to be somewhat substandard reproductions based on what I've heard, and a booger to remove and install, so admit to leaving them in place. My vent window rubber came out however.
You are welcome to PM me if you need any advice that you don't want on your thread- I'm happy to help if I can. So far I've used two gallons and will need a little of a third. Plan on the car taking you a workweek to strip if you are like me. It costs a fortune to pay shop rates to have this done because it's a stinky, thankless job and can be monotonous, but it must be done.

You may find the stripper sets up less on the initial applications if you keep your stiff brush moving on the surface and keep a light coat applied. It's one of those things I learned

Here is a link to my thread, the later photos show the stripping, but not the very latest I'm afraid. Our winters are mild and I still hope to paint early next month, maybe the middle. -Benton
https://www.corvetteforum.com/forums...e-rebuild.html
PS- when you get close to the fiberglass, you will find a terrycloth towel soaked in lacquer thinner removes a lot what's left. You may choose to stop at factory primer when you see it left in places. I also now have the maroon stripping pads for scuffing the last of the paint in the jambs and I bet one of those soaked in lacquer thinner would go a long way on getting the final bits of paint.
Last edited by ChattanoogaJSB; 10-19-2015 at 03:41 PM. Reason: PS


 12-30-2015, 06:56 AM
#68
Drifting

Member Since: Jul 2010
Location: Minnesota
Posts: 1,273
Received 423 Likes
on
249 Posts
2023 C1 of the Year Finalist - Modified
2020 Corvette of the Year Finalist (track prepared))
2019 C1 of Year Finalist (track prepared)

Looks great, Jeht! Decided to take the plunge, huh? Nice to have the advice of good guys that have been there... like Chattanoogajsb & Bill32. Are you doing the work yourself? If so, you're a handy guy. Take it one task at a time. Don't get overwhelmed!
I hope you'll put a correct looking finish on the frame and keep those underside body panels unpainted. Base coat/clear coat? Nice and durable, but will you knock down the shine in the clear a little to try to give it that lacquer look?
I hope you'll put a correct looking finish on the frame and keep those underside body panels unpainted. Base coat/clear coat? Nice and durable, but will you knock down the shine in the clear a little to try to give it that lacquer look?
Last edited by Todd H.; 12-30-2015 at 07:09 AM.
12-30-2015, 09:41 AM
#69
Safety Car

Since you've decided to restore the car make sue you follow the NCRS judging manual.
In the case of a Corvette the NCRS and original are very close. Ok, extremely close. That's going to make your life easier.
You really have 2 choices when you restore a car. You can restore it to original or you can restore it to the judging manual. I would always pick the judging manual. That's where the value is.
Given the cost of a restoration today you want to make sure the car is worth at least a little more when you're done. NCRS and Bloomington Gold cars bring the most money. People will pay for documentation.
Richard Newton
Historic Race Cars
12-30-2015, 10:45 AM
#70
Advanced
Thread Starter
Yes, doing the work myself when time permits. I think I'm going to farm the frame blasting out local rather than doing this. I plan on leaving the natural fiberglass look for the underneath areas, just clean it up. Everyone has been helpful and a wealth of knowledge, thanks to everyone.
12-30-2015, 11:10 AM
#71
Advanced
Thread Starter
Need some help regarding alternator numbers, I just had the one rebuilt on the car. Numbers are: 1100 834 37A
9D17-12VREG
It has DELCO REMY on the housing but numbers are different from one of the books stating info provided for the 66 year?
1966 327/300, all other numbers from trans/block/heads/carb, etc....match.
9D17-12VREG
It has DELCO REMY on the housing but numbers are different from one of the books stating info provided for the 66 year?
1966 327/300, all other numbers from trans/block/heads/carb, etc....match.
12-30-2015, 11:42 AM
#72
Burning Brakes


Need some help regarding alternator numbers, I just had the one rebuilt on the car. Numbers are: 1100 834 37A
9D17-12VREG
It has DELCO REMY on the housing but numbers are different from one of the books stating info provided for the 66 year?
1966 327/300, all other numbers from trans/block/heads/carb, etc....match.
9D17-12VREG
It has DELCO REMY on the housing but numbers are different from one of the books stating info provided for the 66 year?
1966 327/300, all other numbers from trans/block/heads/carb, etc....match.
02-08-2016, 06:32 PM
#74
Drifting
Member Since: Jul 2010
Location: Minnesota
Posts: 1,273
Received 423 Likes
on
249 Posts
2023 C1 of the Year Finalist - Modified
2020 Corvette of the Year Finalist (track prepared))
2019 C1 of Year Finalist (track prepared)
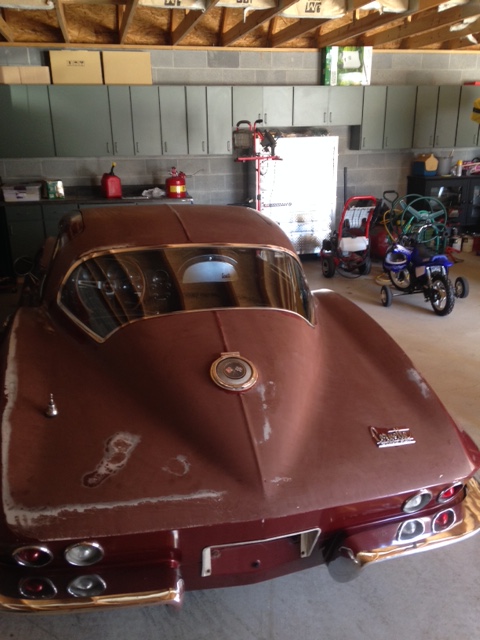
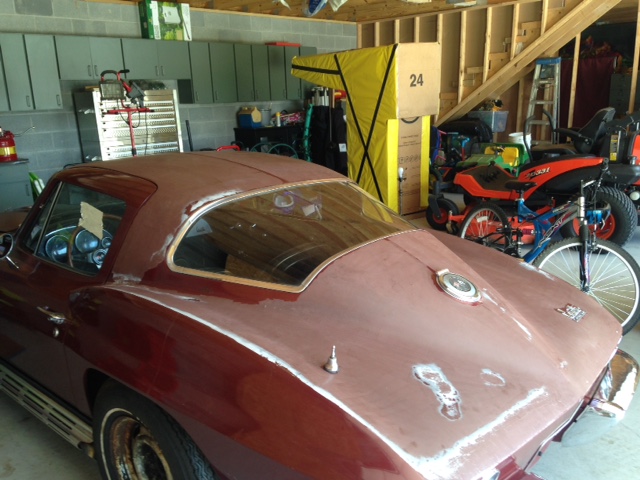
Yes Jeht, those appear to be factory seams... and they're in the right places in what you're showing.
I hope you'll be careful to sand the beltline and the tops of the fenders just right. They don't look right sanded too sharp, or sanded too much so they're dulled. You might want to find a good restoration guide book.
I hope you'll be careful to sand the beltline and the tops of the fenders just right. They don't look right sanded too sharp, or sanded too much so they're dulled. You might want to find a good restoration guide book.
02-08-2016, 06:46 PM
#75
Team Owner


Member Since: Oct 2000
Location: Washington Michigan
Posts: 38,899
Received 1,856 Likes
on
1,099 Posts
02-08-2016, 06:56 PM
#76
Drifting
Member Since: Jul 2010
Location: Minnesota
Posts: 1,273
Received 423 Likes
on
249 Posts
2023 C1 of the Year Finalist - Modified
2020 Corvette of the Year Finalist (track prepared))
2019 C1 of Year Finalist (track prepared)
I think it could be a confusion of terminology, John. Those are clearly factory seams, Jeht, but the bonding strips are always underneath, reinforcing the joint of the two factory panels. The dark grey line is the bonding adhesive.
Another good reason why it's smart to have some good restoration books handy so you can ask the right questions of guys on here.
Another good reason why it's smart to have some good restoration books handy so you can ask the right questions of guys on here.
02-08-2016, 06:58 PM
#77
Race Director


QUESTION:
Are you chemically stripping the car ???? or sanding the paint off???
PROFESSIONAL ADVICE:
I am IN NO WAY trying to kill your MOJO.
From what I read on this thread...you are going to be taking the body off and working on the frame. WELL...PLEASE keep in mind...that IF you strip the body and are also working on the frame. AND your body is BARE fiberglass....and all of this is being done in a confined space....You might be inviting problems that could have been avoided.
You can do you car as you see fit. But...having done so many off-frame projects. When the body is bare fiberglass and also mechanical work is also being preformed in the same confined space....the body should be protected very well so no oil mists and any other contaminants can get onto the surface and penetrate the fiberglass....thus causing for a possible NIGHTMARE.
Actually I would not strip the pant until the frame and running gear is all completed. Once that was completed... I would address the firewall and floor pan areas of the body.
OR...you can strip the body and do all you body work and paint while it is on a body dollie and then work on the frame. I prefer to do ALL my body work when the car is back on the frame and properly shimmed and secure. That way I can set a and correct any body gaps and panel issues.
My only fear is that if you get it completely stripped and it sits BARE for a long time...while you perform 'other' work that is not body related...that it could come back and 'bite you' if the body is not protected VERY well.
And also PLEASE keep this in mind. I am do not know the conditions of a persons shop...so this is just a generalized comment and I am NOT directly it at you specifically. If a shop is having sprayable products that are oils and penetrating fluids, etc. And they are shot on a part. The mists and overspray can migrate to surround areas (depending on the shops air flow dynamics) and or migrate to surfaces that are already dust covered....which can come down later carrying this oil based substance and cause for a PROBLEM when body work is being preformed or the SAME SPACE it being used as a paint booth.
DUB
02-08-2016, 07:19 PM
#78
Advanced
Thread Starter
Thanks for the advise, simply an error on my part using words in context.
The car is being stripped with razor, lightly sanding primer and filler. After this is completed I will primer and block car, then prime again before the body/frame are separated.
This work is being performed at my house so I can control the environment.
Question regarding the frame, is there a shop in the surrounding area/states that offer this service? Only one that I can find is HillyBilly Vette in Kingsport TN.
02-09-2016, 06:38 PM
#79
Race Director
Thanks for the advise, simply an error on my part using words in context.
The car is being stripped with razor, lightly sanding primer and filler. After this is completed I will primer and block car, then prime again before the body/frame are separated.
This work is being performed at my house so I can control the environment.
Question regarding the frame, is there a shop in the surrounding area/states that offer this service? Only one that I can find is HillyBilly Vette in Kingsport TN.
The car is being stripped with razor, lightly sanding primer and filler. After this is completed I will primer and block car, then prime again before the body/frame are separated.
This work is being performed at my house so I can control the environment.
Question regarding the frame, is there a shop in the surrounding area/states that offer this service? Only one that I can find is HillyBilly Vette in Kingsport TN.
And rather wait until you get your frame done and then put the body back down and do it then.....SO all your hard work does not possibly get damaged in some way when the body is being taken off AFTER do did all that work. I can correctly lift off a body and support a body and do all that stuff...and I know that 'things' can happen no matter how careful you are.
DUB
02-09-2016, 08:14 PM
#80
Advanced
Thread Starter
You can do it how ever you choose. NOT passing judgement....just commenting from past experiences. But does it not seem to be a bit more logical to NOT do anything to the body...specifically if it is being taken off the frame?
And rather wait until you get your frame done and then put the body back down and do it then.....SO all your hard work does not possibly get damaged in some way when the body is being taken off AFTER do did all that work. I can correctly lift off a body and support a body and do all that stuff...and I know that 'things' can happen no matter how careful you are.
DUB
When I remove the doors, do they fit in one position only or can you adjust from the hinge attachment? Frame restoration, you offer this service or any recommendations?

