M21 speedometer gear spins freely
 01-09-2017, 11:01 AM
#1
Le Mans Master

Thread Starter
Member Since: Feb 2004
Location: Norcal CA
Posts: 6,717
Received 551 Likes
on
444 Posts
2018 C1 of Year Finalist

This weekend, I decided to tackle the non-functioning speedometer. Its the only non-working gauge. The cable is not kinked. I replaced the cable. I thought it was a stripped plastic gear. I took off the retainer which holds the gear in place. The gear came out fine and does not show any missing teeth.
So my next step is to see what is going on with the speedometer gear drive.
I think I need to take the tail housing off to replace the gear drive. Is that correct?
I can spin the plastic gear while it is in the transmission.
Is this something I can do without needing special tools. I never dove into the transmission before.
Thanks!
Last edited by jimh_1962; 01-09-2017 at 11:01 AM.
 01-09-2017, 11:44 AM
#2
Race Director


There are two possible and different drive gears on the Muncies which are different diameters. The driven gear needs to correspond to the drive gear installed. I would first check the plastic gear you have to see which drive gear it takes. Maybe just changing the plastic gear is possible.
Also you can use a drill to spin the speedo cable and see if the speedometer works. That should help in the troubleshooting.
Speedometer gears and size/tooth count/etc information has been discussed before and should be in the C2 archives if you search.
Larry
Also you can use a drill to spin the speedo cable and see if the speedometer works. That should help in the troubleshooting.
Speedometer gears and size/tooth count/etc information has been discussed before and should be in the C2 archives if you search.
Larry
Last edited by Powershift; 01-09-2017 at 11:45 AM.
01-09-2017, 11:53 AM
#3
Team Owner


There is a metal clip that holds the plastic drive gear in place, its broke. You will have to remove the tail housing to fix this.
Looks like a transmission R&R.
Looks like a transmission R&R.
01-09-2017, 12:24 PM
#4
Le Mans Master
Thread Starter
Member Since: Feb 2004
Location: Norcal CA
Posts: 6,717
Received 551 Likes
on
444 Posts
2018 C1 of Year Finalist
There are two possible and different drive gears on the Muncies which are different diameters. The driven gear needs to correspond to the drive gear installed. I would first check the plastic gear you have to see which drive gear it takes. Maybe just changing the plastic gear is possible.
Also you can use a drill to spin the speedo cable and see if the speedometer works. That should help in the troubleshooting.
Speedometer gears and size/tooth count/etc information has been discussed before and should be in the C2 archives if you search.
Larry
Also you can use a drill to spin the speedo cable and see if the speedometer works. That should help in the troubleshooting.
Speedometer gears and size/tooth count/etc information has been discussed before and should be in the C2 archives if you search.
Larry
Also you can use a drill to spin the speedo cable and see if the speedometer works. That should help in the troubleshooting.
Done that already. In this case I had the cable sitting freely in the garage while the car was on jack stands.
01-09-2017, 12:25 PM
#5
Le Mans Master
Thread Starter
Member Since: Feb 2004
Location: Norcal CA
Posts: 6,717
Received 551 Likes
on
444 Posts
2018 C1 of Year Finalist
Thats what I am thinking. I tried two different gears. One which was in the case and a replacement one. I first thought it was the gear so I ordered one.
01-09-2017, 01:07 PM
#6
Race Director

Member Since: Mar 2001
Location: Mustang OK
Posts: 13,852
Received 3,772 Likes
on
1,674 Posts
2023 C1 of the Year Finalist - Modified
2015 C1 of the Year Finalist
This issue comes up from time to time, so I'll try to explain it in detail. And yes, I'm extremely familiar with Muncies, as of 2017 I've been rebuilding 4spds (mostly Muncies) for 50yrs.
FIRST, as I understand what you said, you removed the speedo fitting from the tail housing and discovered the plastic DRIVE gear on the main shaft turns freely. This was a major mistake GM made and the ONLY fix is removal of the tranny and removal of the tail housing. In the beginning, the drive gear was a pressed on STEEL gear. Later in the 60s, the steel drive gear was changed to a plastic gear which was retained by a flimsy clip. Once the clip beaks or becomes dislodged from the tiny hole in the main shaft, the speedometer is done! The ONLY sensible fix is to replace the plastic drive gear with the earlier style pressed on drive gear.
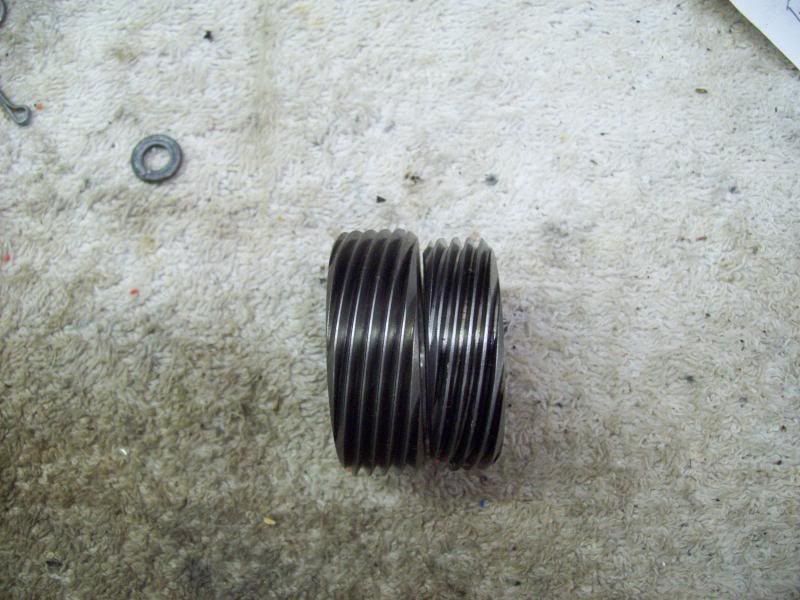
MOST, but not all, Muncies have an 8tooth drive gear. In the steel versions of the drive gear, they came in 2 sizes. Big (1.84in diameter) and small (1.76in).
Here is a comparison of the big and small steel DRIVE gears.
The big gear mates with a SMALL plastic driven gear which is available in 17-22 teeth. These combinations are GENERALLY used with rearend gear ratios of 3.08 to 3.70.
The small drive gear mates with a LARGE driven gear in 22-25 teeth and GENERALLY this combination is used with rearend gear ratios of 3.70 to 4.56. ALLLLLLLLLLLLLLLLL of the plastic driven gears (both large and small) come in different colors. And yes, there is BOTH a large and small 22 teeth driven gear.
Small driven gears:
Purple-17
Brown-18
Natural-19
Blue-20
Red-21
Gray-22
Large driven gears:
Green-22
Black-23
Yellow-24
Orange-25
As I mentioned, the only way to fix the problem is to replace the plastic DRIVE gear inside the tail housing (when you remove it, throw it in the river!!!).
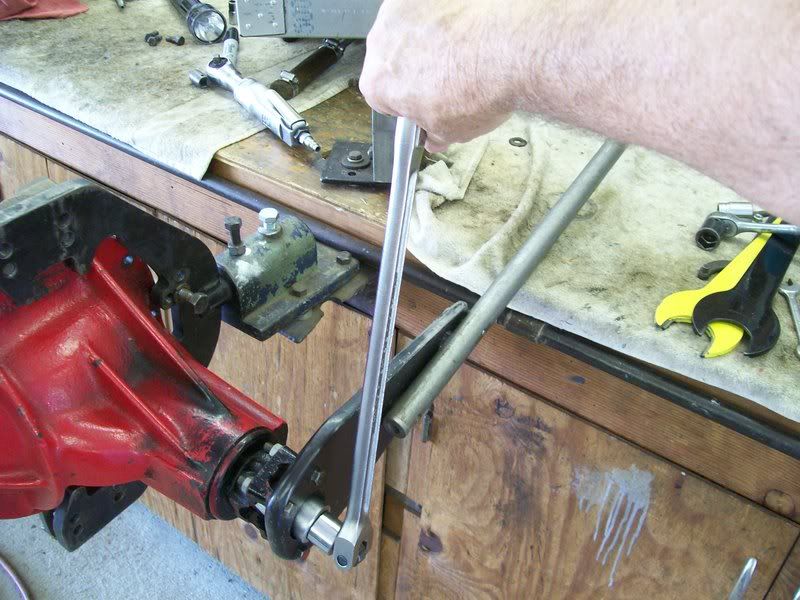
With the transmission out of the car, there is a tapered retaining pin which holds the reverse shifter shaft in place. Using the correct size punch, drive out the pin (it comes out from the top), and pull out on the reverse shifter shaft (this disengages the reverse shifter fork from reverse gear).
Remove the 5 bolts which attach the tail housing from the main case.
CAUTION, CAUTION, CAUTION!!!!!!!!!!!!! Only allow the tail housing to separate from the mid plate---------------DO NOT, DO NOT, DO NOT allow the mid plate to separate from the back side of the main case!!!!!!!! If that happens, parts will come apart and fall into the main case-----------------and then it will really become fun!!!
Since the plastic DRIVE gear is already loose on the main shaft, it should simply slide right off (and yes, yes, yes you can go back with another plastic drive gear and clip if you choose-------------but remember, I warned you not to!). Obtain a steel gear of the correct size, slide it down onto the main shaft. I use an appropriate length of pipe to drive the steel gear into place.
(oh ya, before I forget, you will need a new gasket to go between the tail housing and mid plate)
THE FOLLOWING IS IMPORTANT WHEN DRIVING THE STEEL GEAR ONTO THE MAIN SHAFT!
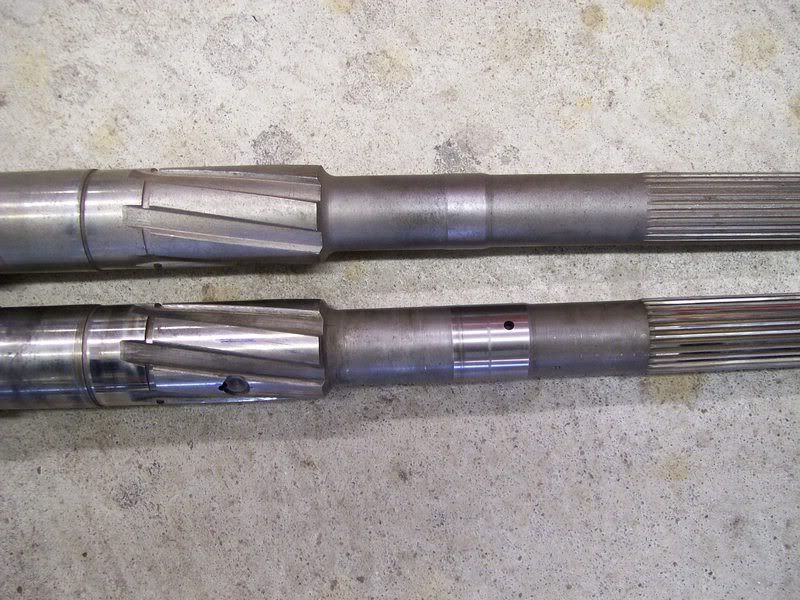
NOTICE the surface on the 2 shafts where the drive gear is positioned. The top shaft is used in early Muncies (63-64) which had the speedo fitting on the left (driver) side. The lower shaft is used in 65-later Muncies which has the speedo fitting on the right side. The lower shaft can be used in any Muncie because it has the longer surface for positioning a drive gear, but the top shaft can ONLY BE USED with a tail housing that has the hole for the speedo fiting on the left side. SOOOOOOOOOOOO, if your Muncie has the speedo fitting on the left side, then the steel gear is positioned at the forward part of the surface, and if the speedo fitting is on the right side then the steel gear will be positioned at the rear of the surface-------where the little hole is for the clip which retains a plastic drive gear.
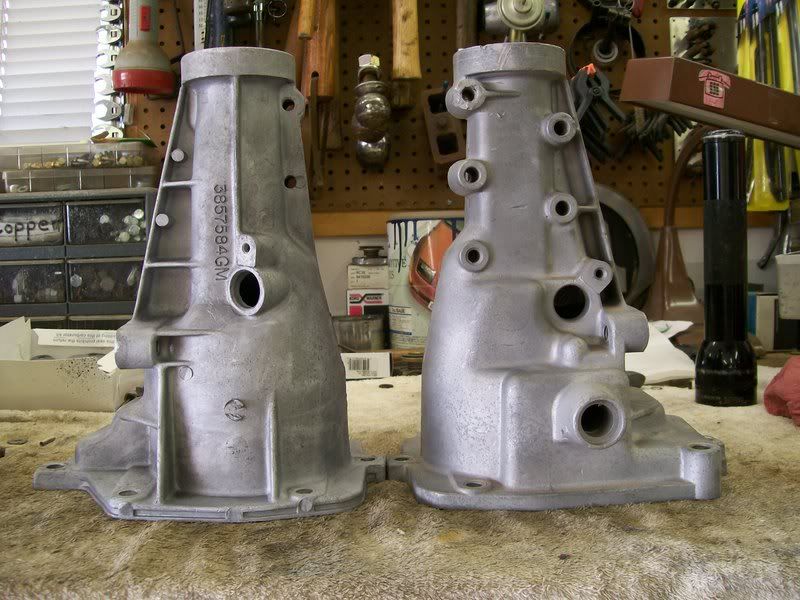
Below is a comparison of tail housings with a left and right hole for the speedo fitting. As can be seen, those holes are NOT in the same position, which clearly shows why it is important to properly position the drive gear onto the main shaft.
Now it's time to re-install the tail housing back onto the transmission. Install the new gasket (of course, after cleaning the gasket surfaces). I like to apply a very light coat of gasket sealer to both sides of the gasket.
This is best done with the transmission standing up (tail shaft pointing up).
With the reverse shifter shaft still pulled out, position the shifter shaft into the FORWARD position (which would be engagement of reverse). Raise up the reverse gear and place a screwdriver handle between the gear and the mid plate.
Assure the reverse shifter fork is aligned for engagement onto the flange of reverse gear.
Slowly guide the tail housing down over the tail shaft and use a flashlight to look up into the tail housing to see where the shift fork will become aligned with the flange on reverse gear. When the fork and flange are aligned, tap on the end of the shifter shaft to engage the fork with the flange. Then shift it out of the reverse position. Remove the screwdriver and set the tail housing down onto the mid plate and install the 5 bolts.
DON'T FORGET TO RE-INSTALL THE LITTLE TAPERED PIN INTO THE HOLE FOR THE REVERSE SHIFTER SHAFT! I personally like to cover both ends of this pin with some JB Weld because it often will leak oil in time.
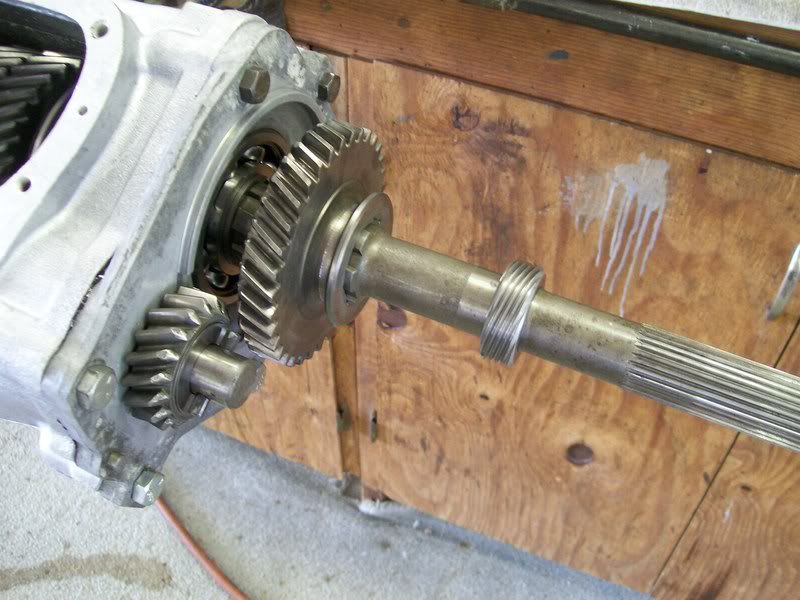
This shows the speedo drive gear installed (for a right side speedo fitting) before installing the tail housing (as can be seen, I have temporary bolts installed in the mid plate to assure it does not separate from the main case while the tail housing is being made ready for re-installation).
Now, while you have all this apart, this would be an excellent opportunity to install a new rear bushing and rear seal if the bushing shows noticeable signs of wear.
Finished, ready to go.

FIRST, as I understand what you said, you removed the speedo fitting from the tail housing and discovered the plastic DRIVE gear on the main shaft turns freely. This was a major mistake GM made and the ONLY fix is removal of the tranny and removal of the tail housing. In the beginning, the drive gear was a pressed on STEEL gear. Later in the 60s, the steel drive gear was changed to a plastic gear which was retained by a flimsy clip. Once the clip beaks or becomes dislodged from the tiny hole in the main shaft, the speedometer is done! The ONLY sensible fix is to replace the plastic drive gear with the earlier style pressed on drive gear.
MOST, but not all, Muncies have an 8tooth drive gear. In the steel versions of the drive gear, they came in 2 sizes. Big (1.84in diameter) and small (1.76in).
Here is a comparison of the big and small steel DRIVE gears.
The big gear mates with a SMALL plastic driven gear which is available in 17-22 teeth. These combinations are GENERALLY used with rearend gear ratios of 3.08 to 3.70.
The small drive gear mates with a LARGE driven gear in 22-25 teeth and GENERALLY this combination is used with rearend gear ratios of 3.70 to 4.56. ALLLLLLLLLLLLLLLLL of the plastic driven gears (both large and small) come in different colors. And yes, there is BOTH a large and small 22 teeth driven gear.
Small driven gears:
Purple-17
Brown-18
Natural-19
Blue-20
Red-21
Gray-22
Large driven gears:
Green-22
Black-23
Yellow-24
Orange-25
As I mentioned, the only way to fix the problem is to replace the plastic DRIVE gear inside the tail housing (when you remove it, throw it in the river!!!).
With the transmission out of the car, there is a tapered retaining pin which holds the reverse shifter shaft in place. Using the correct size punch, drive out the pin (it comes out from the top), and pull out on the reverse shifter shaft (this disengages the reverse shifter fork from reverse gear).
Remove the 5 bolts which attach the tail housing from the main case.
CAUTION, CAUTION, CAUTION!!!!!!!!!!!!! Only allow the tail housing to separate from the mid plate---------------DO NOT, DO NOT, DO NOT allow the mid plate to separate from the back side of the main case!!!!!!!! If that happens, parts will come apart and fall into the main case-----------------and then it will really become fun!!!
Since the plastic DRIVE gear is already loose on the main shaft, it should simply slide right off (and yes, yes, yes you can go back with another plastic drive gear and clip if you choose-------------but remember, I warned you not to!). Obtain a steel gear of the correct size, slide it down onto the main shaft. I use an appropriate length of pipe to drive the steel gear into place.
(oh ya, before I forget, you will need a new gasket to go between the tail housing and mid plate)
THE FOLLOWING IS IMPORTANT WHEN DRIVING THE STEEL GEAR ONTO THE MAIN SHAFT!
NOTICE the surface on the 2 shafts where the drive gear is positioned. The top shaft is used in early Muncies (63-64) which had the speedo fitting on the left (driver) side. The lower shaft is used in 65-later Muncies which has the speedo fitting on the right side. The lower shaft can be used in any Muncie because it has the longer surface for positioning a drive gear, but the top shaft can ONLY BE USED with a tail housing that has the hole for the speedo fiting on the left side. SOOOOOOOOOOOO, if your Muncie has the speedo fitting on the left side, then the steel gear is positioned at the forward part of the surface, and if the speedo fitting is on the right side then the steel gear will be positioned at the rear of the surface-------where the little hole is for the clip which retains a plastic drive gear.
Below is a comparison of tail housings with a left and right hole for the speedo fitting. As can be seen, those holes are NOT in the same position, which clearly shows why it is important to properly position the drive gear onto the main shaft.
Now it's time to re-install the tail housing back onto the transmission. Install the new gasket (of course, after cleaning the gasket surfaces). I like to apply a very light coat of gasket sealer to both sides of the gasket.
This is best done with the transmission standing up (tail shaft pointing up).
With the reverse shifter shaft still pulled out, position the shifter shaft into the FORWARD position (which would be engagement of reverse). Raise up the reverse gear and place a screwdriver handle between the gear and the mid plate.
Assure the reverse shifter fork is aligned for engagement onto the flange of reverse gear.
Slowly guide the tail housing down over the tail shaft and use a flashlight to look up into the tail housing to see where the shift fork will become aligned with the flange on reverse gear. When the fork and flange are aligned, tap on the end of the shifter shaft to engage the fork with the flange. Then shift it out of the reverse position. Remove the screwdriver and set the tail housing down onto the mid plate and install the 5 bolts.
DON'T FORGET TO RE-INSTALL THE LITTLE TAPERED PIN INTO THE HOLE FOR THE REVERSE SHIFTER SHAFT! I personally like to cover both ends of this pin with some JB Weld because it often will leak oil in time.
This shows the speedo drive gear installed (for a right side speedo fitting) before installing the tail housing (as can be seen, I have temporary bolts installed in the mid plate to assure it does not separate from the main case while the tail housing is being made ready for re-installation).
Now, while you have all this apart, this would be an excellent opportunity to install a new rear bushing and rear seal if the bushing shows noticeable signs of wear.
Finished, ready to go.
Last edited by DZAUTO; 01-09-2017 at 01:23 PM.
The following 2 users liked this post by DZAUTO:
64roadster (01-13-2017),
Plasticman (01-12-2017)
01-09-2017, 01:17 PM
#7
Le Mans Master
Thread Starter
Member Since: Feb 2004
Location: Norcal CA
Posts: 6,717
Received 551 Likes
on
444 Posts
2018 C1 of Year Finalist
Very helpful explanation! Thanks!
I will see about tackling this soon. Looks like I will be pulling things apart and tearing it into. Definitely will replace it with steel gear instead.
Thanks Tom!
I will see about tackling this soon. Looks like I will be pulling things apart and tearing it into. Definitely will replace it with steel gear instead.
Thanks Tom!
Last edited by jimh_1962; 01-09-2017 at 01:17 PM.
01-09-2017, 05:19 PM
#8
Drifting

 01-10-2017, 02:27 AM
#9
Le Mans Master
Member Since: Nov 2015
Location: Really Central IL Illinois
Posts: 5,208
Received 1,534 Likes
on
1,036 Posts
IGNORE THIS, I JUST RE-READ THE ORIGINAL POST - JUST ME BEING DUMB
Hey DZAUTO, is it possible he has the small gear on the shaft and the small #22 plastic driven gear??
If this is a car he bought that the speedo has never worked in, I would stick my finger in the tail shaft hole and see if I could feel the gear on the shaft and also see if it spins before I removed the transmission, if it is not already out. If it is out, look in the hole to see if the gear is aligned and stripped.
Even if it is out, alignment of the reverse shifter fork with the flange on the reverse gear for reassembly is a real PIA. I generally struggle with losing the detent ball on the selector and etc., etc. Any advice for him and me there??
Last edited by R66; 01-10-2017 at 07:13 AM.
01-10-2017, 05:37 PM
#10
Race Director
Member Since: Mar 2001
Location: Mustang OK
Posts: 13,852
Received 3,772 Likes
on
1,674 Posts
2023 C1 of the Year Finalist - Modified
2015 C1 of the Year Finalist
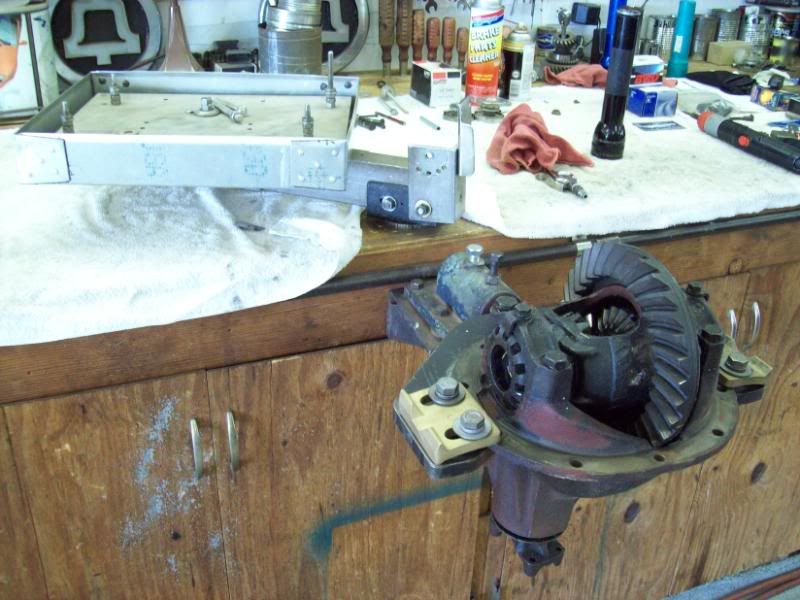
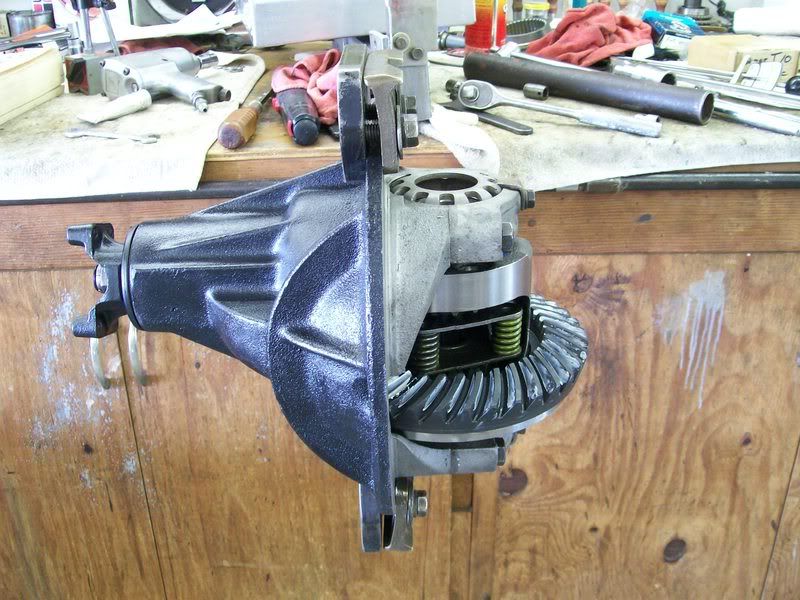
That fixture which the Muncie is bolted to is a Kent Moore fixture made specifically for holding rearends (below) and Powerglide transmissions. I bought it for $10 about 40yrs ago from a guy who used to be the Powerglide mechanic at a Chevy dealer in Okla City. I drilled and tapped some extra holes so that I could attach manual trannys to it.
 01-10-2017, 05:40 PM
#11
Race Director
Member Since: Mar 2001
Location: Mustang OK
Posts: 13,852
Received 3,772 Likes
on
1,674 Posts
2023 C1 of the Year Finalist - Modified
2015 C1 of the Year Finalist
IGNORE THIS, I JUST RE-READ THE ORIGINAL POST - JUST ME BEING DUMB
Hey DZAUTO, is it possible he has the small gear on the shaft and the small #22 plastic driven gear??
If this is a car he bought that the speedo has never worked in, I would stick my finger in the tail shaft hole and see if I could feel the gear on the shaft and also see if it spins before I removed the transmission, if it is not already out. If it is out, look in the hole to see if the gear is aligned and stripped.
Even if it is out, alignment of the reverse shifter fork with the flange on the reverse gear for reassembly is a real PIA. I generally struggle with losing the detent ball on the selector and etc., etc. Any advice for him and me there??
Hey DZAUTO, is it possible he has the small gear on the shaft and the small #22 plastic driven gear??
If this is a car he bought that the speedo has never worked in, I would stick my finger in the tail shaft hole and see if I could feel the gear on the shaft and also see if it spins before I removed the transmission, if it is not already out. If it is out, look in the hole to see if the gear is aligned and stripped.
Even if it is out, alignment of the reverse shifter fork with the flange on the reverse gear for reassembly is a real PIA. I generally struggle with losing the detent ball on the selector and etc., etc. Any advice for him and me there??
BUUUUUUUUUUUUUT, as you mention, if he has a small drive gear, and a small driven gear, then it stands to reason that is the problem--------- PROVIDED the drive gear is not turning freely.


 01-10-2017, 08:07 PM
#13
Le Mans Master
Member Since: Nov 2015
Location: Really Central IL Illinois
Posts: 5,208
Received 1,534 Likes
on
1,036 Posts
If I correctly understood his original comment, he said the DRIVE gear on the main shaft was turning freely. And if that is correct, the only fix is removal of the tail housing to replace the drive gear.
BUUUUUUUUUUUUUT, as you mention, if he has a small drive gear, and a small driven gear, then it stands to reason that is the problem--------- PROVIDED the drive gear is not turning freely.
BUUUUUUUUUUUUUT, as you mention, if he has a small drive gear, and a small driven gear, then it stands to reason that is the problem--------- PROVIDED the drive gear is not turning freely.
I have a friend with the same problem on a car he bought and I think he said it has a 3.73:1 rear gear. Thinking the parts shack may have given the previous owner the wrong driven gear and that could save him many hours of labor to find the driven gear is the wrong because of the smaller drive gear.

By the way, you just educated an old fool with new information. Thanks.
 01-11-2017, 02:48 PM
#14
Instructor

 01-12-2017, 08:42 AM
#15
Le Mans Master
Thread Starter
Member Since: Feb 2004
Location: Norcal CA
Posts: 6,717
Received 551 Likes
on
444 Posts
2018 C1 of Year Finalist
Update... False alarm. Note to self: Speed up! We were going too slow while it is on jack stands. Yesterday, I took the corvette out for a drive. Sure enough the needle is moving. Now, its not accurate by any means but that's ok. The needle is not bouncing so things are looking up! I just to have to make sure to pad the numbers if a police officer asks how fast was I going.
Officer: You know how fast your were going?
Me: No Officer
Officer: 50 in 40 zone.
Me: Heck, I thought I was doing 60...
All of the gauges are now working. The ammeter gauge wiring needs to be reversed.
My to do list is getting smaller and smaller...
Officer: You know how fast your were going?
Me: No Officer
Officer: 50 in 40 zone.
Me: Heck, I thought I was doing 60...
All of the gauges are now working. The ammeter gauge wiring needs to be reversed.
My to do list is getting smaller and smaller...
01-12-2017, 09:48 AM
#16
Race Director
Member Since: Mar 2001
Location: Mustang OK
Posts: 13,852
Received 3,772 Likes
on
1,674 Posts
2023 C1 of the Year Finalist - Modified
2015 C1 of the Year Finalist
So what did you do to get the speedo to work?
01-12-2017, 11:06 AM
#17
Le Mans Master
Thread Starter
Member Since: Feb 2004
Location: Norcal CA
Posts: 6,717
Received 551 Likes
on
444 Posts
2018 C1 of Year Finalist
I replaced the speedometer gear which "might" have helped (from white to red). Really, I think the gear was not seated all the way. For now, I am happy to see the big needle move even though the tire ratio might cause it to be off.
I have not had a speedometer since I was able to drive it. It was the last non-working gauge.
I remember at some point I kept breaking off one of the ends on the cable. This time around I made sure everything was seated properly and no kinks. The cable is repop but correct for 62.
I have not had a speedometer since I was able to drive it. It was the last non-working gauge.
I remember at some point I kept breaking off one of the ends on the cable. This time around I made sure everything was seated properly and no kinks. The cable is repop but correct for 62.
Last edited by jimh_1962; 01-12-2017 at 11:09 AM.
01-12-2017, 02:18 PM
#18
Race Director
Member Since: Mar 2001
Location: Mustang OK
Posts: 13,852
Received 3,772 Likes
on
1,674 Posts
2023 C1 of the Year Finalist - Modified
2015 C1 of the Year Finalist
So, are you saying the DRIVE gear inside the tail housing was not turning freely on the main shaft after all? If so, THAT'S GOOD!
s
s
01-12-2017, 04:11 PM
#20
Safety Car

Member Since: Apr 2000
Location: New York New York
Posts: 4,819
Received 1,126 Likes
on
553 Posts
2023 C2 of the Year Finalist - Unmodified
2023 C1 of the Year Finalist - Unmodified
It is made by OTC and I have had 63-79 and 80-82 rear assemblies on it with no problem. As you can see from the trans pics it is very adaptable.
Joe
https://www.amazon.com/OTC-7020-Benc.../dp/B00063XZ7Q