Draining coolant from the block
 12-10-2004, 09:28 AM
#1
Burning Brakes

Thread Starter

Member Since: Mar 2001
Location: Thornton Co
Posts: 1,171
Likes: 0
Received 0 Likes
on
0 Posts

I'd like to drain the coolant from the radiator and block and replace it with a new coolant/distilled water mix. Anyone have any tips or tricks on how to drain all the coolant out of the block. I really don't want to remove any freeze plugs.
Thanks
Thanks
 12-10-2004, 09:39 AM
#2
Safety Car

Member Since: Apr 2001
Location: Middleboro/Boston MA
Posts: 3,574
Likes: 0
Received 0 Likes
on
0 Posts
There is a bolt on the side of my block for this, although the last time I tried to use it, it was frozen on there. In which case the wet vac will do the job after removing the thermostat and sucking from there.
12-10-2004, 10:34 AM
#3
Le Mans Master


There are block drain bolts on both sides of block (your shop manual will show you exactly where on either side of the pan, or some kind sould will post a picture), if they haven't been opended in awhile expect not too much to happen when you remove the bolts, you then poke a screw driver up in the hole to break through the crud and have a catch basin ready.

 12-10-2004, 10:54 AM
#5
Team Owner


Member Since: Oct 2000
Location: Washington Michigan
Posts: 38,899
Received 1,857 Likes
on
1,100 Posts

Originally Posted by paul67
Would a Prestone T-flush attachment do it? See **** in heater hose at bottom of pic. Hook up the garden hose and run water until the flow is clear.
 12-10-2004, 11:18 AM
#7
Drifting


Had this problem a few years back -- I was unable to remove the pipe plugs on the side of the block despite my efforts. Ended up rounding the corners on the hexs', so tried something else.
I took out the outboard, lower, aft head bolt on the right bank. It is under the #8 exhaust port, so exhaust manifold was off to gain access. (Other bolts may work -- that's the one I used). The threaded hole goes into the block water jacket, and you'll have considerable trapped coolant peeing out when first removed until the level in the block goes down. (Radiator drained, of course, before you do this). Then I inserted a nice, long length of vinyl tube into the hole & used my Mighty Vac to evacuate the block. Took a while, and probably not a great way to get all the crud that JohnZ spoke of. Don't forget to dope up the bolt threads with sealant before replacing. I've had miserable experiences replacing freeze plug(s) in the past, and (myself) would never try that method.
I took out the outboard, lower, aft head bolt on the right bank. It is under the #8 exhaust port, so exhaust manifold was off to gain access. (Other bolts may work -- that's the one I used). The threaded hole goes into the block water jacket, and you'll have considerable trapped coolant peeing out when first removed until the level in the block goes down. (Radiator drained, of course, before you do this). Then I inserted a nice, long length of vinyl tube into the hole & used my Mighty Vac to evacuate the block. Took a while, and probably not a great way to get all the crud that JohnZ spoke of. Don't forget to dope up the bolt threads with sealant before replacing. I've had miserable experiences replacing freeze plug(s) in the past, and (myself) would never try that method.
 12-10-2004, 11:37 AM
#8
Race Director


Member Since: May 2000
Location: Redondo Beach USA
Posts: 12,487
Received 1,974 Likes
on
1,188 Posts
The plugs are soft steel and it's common for the hex to round off. Using a six point socket will help prevent this. IIRC the size is 9/16".
Clean the threads and reinstall the plugs with pipe dope. Just tighten them enough to seal - proabably no more than 10-15 lb-ft.
Duke
Clean the threads and reinstall the plugs with pipe dope. Just tighten them enough to seal - proabably no more than 10-15 lb-ft.
Duke
 12-10-2004, 09:27 PM
#11
Burning Brakes
I just pulled my engine out of my 62 and found those bolts extremely difficult to remove on an engine stand. Once out, however, I noticed the threads were pretty corroded and there was a lot of gunk behind both bolts. I chased the threads with a tap, wire brushed the plug threads to clean and would suggest you do the same before installing with sealant. You'll be glad you did. Good Luck.

 12-11-2004, 12:28 PM
#13
Pro

I also had difficulties removing the drain plugs on my '56 265. When came time to replace them, I installed radiator drain valves instead, made it much easier whenever I drain the engine again.
Pierre
Pierre
01-01-2005, 08:59 AM
#14
Advanced


Member Since: Jun 2002
Location: Severna Park MD
Posts: 65
Likes: 0
Received 0 Likes
on
0 Posts
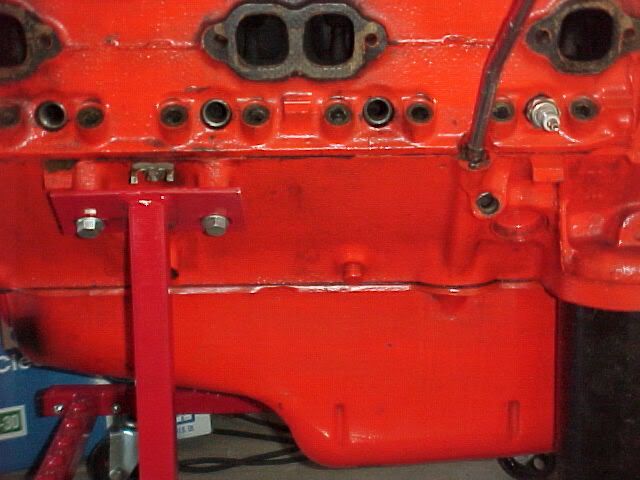
Need to replace my water pump (more information once I remove it) but was looking for the drains noted. My engine is a '65 L79. Couldn't find them. I assume the bolts adjacent to the drain shown in the picture are the oil pan? Any further guidance on locating these bolts would be appreciated. Last time I drained the block, I removed all of the individual drains, which required removing all of the chrome wire dressing. Would like to avoid that path if possible.
01-01-2005, 09:14 AM
#15
Melting Slicks


There's one on each side. Both of them are about in the middle, right above the oil pan. See the picture. That bump to the right in the picture is where the dipstick goes. The one on the other side is about in the same place. Also note that the guy in the picture is holding a spark plug wire out of the way. On most small blocks, there is a spark plug wire holder nearby. The spark plug wires are routed to that holder such that the plug is almost covered by them. Look for them. You'll find them. There's no other plugs on the side of the block down by the oil pan.
Only use a 6 point socket on them. You might still round the head off with a 6 point. But you don't stand a chance with a 12 point.
The sides aren't connected. You've got to get both off.
Use anti-seize on the plug when you put it back. Some mechanic 50 years from now will be grateful.
Only use a 6 point socket on them. You might still round the head off with a 6 point. But you don't stand a chance with a 12 point.
The sides aren't connected. You've got to get both off.
Use anti-seize on the plug when you put it back. Some mechanic 50 years from now will be grateful.
01-01-2005, 09:48 AM
#16
Melting Slicks

Concur with all the bad experiences getting the plugs out. The amount of crud that builds up in block is unbelievable. This is on a 1000 mile per year car. My old 283 got to the point it would overheat in just a few minutes despite new radiator, heavy duty flushes, thermostat vs no thermostat, different fans, pulling heads, etc. Remove and plugs and crud and it went back to running cool again.
My new 350 is starting to show some of same residue as well as rust on radiator cap, so I have added some corrosion inhibitor to the antifreeze mix. Make sure you use a tapered pipe thread plug; there are similar sized bolt threads which will not tighten up and seal.
Using drain ***** may be convenient but add possibility of working open and draining water out.
01-01-2005, 12:33 PM
#17
Melting Slicks
Originally Posted by Boatingdobbins
Need to replace my water pump (more information once I remove it) but was looking for the drains noted. My engine is a '65 L79. Couldn't find them. I assume the bolts adjacent to the drain shown in the picture are the oil pan? Any further guidance on locating these bolts would be appreciated. Last time I drained the block, I removed all of the individual drains, which required removing all of the chrome wire dressing. Would like to avoid that path if possible.
 01-01-2005, 09:37 PM
#18
Safety Car
No doubt those block plugs can be a real bear to remove. I had to score a couple of replacements out of a couple of donor engines. It took 4 tries on 4 plugs using a breaker bar and 6-point extended socket
to get two that were in good shape with their hex heads intact.
Do use a 6-point socket and make sure it is perpendicular to the hex head when making the attempt to remove them.
John
to get two that were in good shape with their hex heads intact.
Do use a 6-point socket and make sure it is perpendicular to the hex head when making the attempt to remove them.
John