
Monza Gas Filler - Questions
 06-11-2006, 10:21 AM
#1
Racer

Thread Starter

Here are a couple of snapshots of a Monza Gas Filler on a C3.
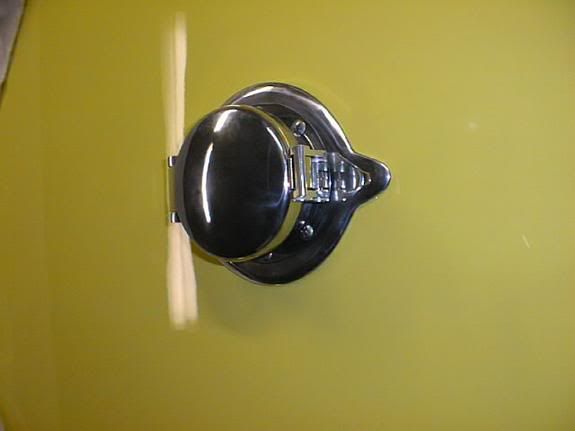
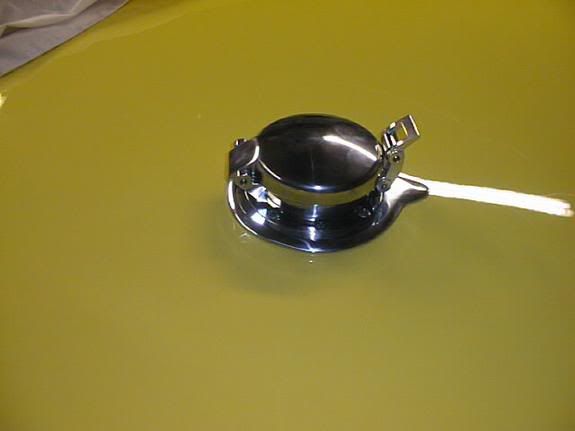
I am not sure exactly how they work. I realize they replace the current gas lid, but I am not sure if they replace the current gas cap (and if so, do you have to build an extension to the gas tank neck to make this work).
If the Monza filler just replaces the original gas lid, then the original gas cap stays in place. Correct?
I like the look and am considering the purchase, but need a bit more information before I was into it.
Any feedback on these things?
Thanks.
Bryan
 06-11-2006, 10:40 AM
#2
Instructor
Member Since: May 2006
Location: Las Cruces NM
Posts: 178
Likes: 0
Received 0 Likes
on
0 Posts
No, you do not leave the original gas cap in place. You must remove it and the filler neck. Yes, there is an adaptor you have to machine/have machined.
Here's some links:
http://www.corvettefaq.com/c3/gasfiller/gasfiller.html
http://www.corvettefaq.com/c3/gascap.jpg
Here's some links:
http://www.corvettefaq.com/c3/gasfiller/gasfiller.html
http://www.corvettefaq.com/c3/gascap.jpg


 06-11-2006, 01:33 PM
#4
Le Mans Master


Originally Posted by Nacho_Libre
No, you do not leave the original gas cap in place. You must remove it and the filler neck. Yes, there is an adaptor you have to machine/have machined.
Here's some links:
http://www.corvettefaq.com/c3/gasfiller/gasfiller.html
http://www.corvettefaq.com/c3/gascap.jpg
Here's some links:
http://www.corvettefaq.com/c3/gasfiller/gasfiller.html
http://www.corvettefaq.com/c3/gascap.jpg

Last edited by Jclgodale3; 06-11-2006 at 01:37 PM.
06-11-2006, 01:55 PM
#5
Safety Car

Originally Posted by 300ZXTwinTurbo
Here are a couple of snapshots of a Monza Gas Filler on a C3.
I am not sure exactly how they work. I realize they replace the current gas lid, but I am not sure if they replace the current gas cap (and if so, do you have to build an extension to the gas tank neck to make this work).
If the Monza filler just replaces the original gas lid, then the original gas cap stays in place. Correct?
I like the look and am considering the purchase, but need a bit more information before I was into it.
Any feedback on these things?
Thanks.
Bryan
You don't have to remove the stock filler neck if you do what I did, as mine is non functional. The stock filler cap is beneath, if you have average size hands like me (the hole is 3" wide), you can pop the monza cap, reach inside and remove the original cap. I have made a couple for people on the forum, one all the way in Norway and they said they had no issues getting their hands inside to remove the cap.
I made an outer ring to sit inside the stock opening, then made 4
l-shape brackets that line up with the stock mounting holes. These are welded to the bottom of the filler neck, you unscrew the monza cap, with a short screwdriver put the 4 screws in place, screw back on the cap..voila done.
Nick
06-11-2006, 02:27 PM
#6
Instructor
Member Since: May 2006
Location: Las Cruces NM
Posts: 178
Likes: 0
Received 0 Likes
on
0 Posts
Originally Posted by Jclgodale3
No...the removal of the original filler neck is NOT necessary
06-11-2006, 02:54 PM
#7
Le Mans Master
Originally Posted by Nacho_Libre
True, but if you want the cap to function as designed, you have to replace the filler neck with a machined version. If you want to do the "reach-around", then follow the above instructions.
 06-11-2006, 03:21 PM
#8
Instructor
Member Since: May 2006
Location: Las Cruces NM
Posts: 178
Likes: 0
Received 0 Likes
on
0 Posts
Originally Posted by Jclgodale3
No...actually, your wrong again. Do you have one of these on your car? Or are you giving advice based on other peoples articles? Mine is fully functional without using the original cap inside.
You, on the other hand, apparently modified your filler neck to accept the Daytona fuel fill. Instead of making your statement that "the filler neck doesn't need to be removed", you could have, for the benefit of the original poster, indicated you were using your original filler neck WITHOUT the original cap, subsituting the Daytona gas cap in its place.
However, instead of being helpful, you posted your comment just to quash my "incorrect" statement. But, I guess the OP will just have to beg you for an alternative to machining the neck.
And yes, I have the same cap, but I machined the new neck for safety reasons...mine won't separate from the tank as yours probably will in the event of a rear-end collision.
06-11-2006, 03:41 PM
#9
Le Mans Master
[QUOTE=Nacho_Libre]
You, on the other hand, apparently modified your filler neck to accept the Daytona fuel fill. Instead of making your statement that "the filler neck doesn't need to be removed", you could have, for the benefit of the original poster, indicated you were using your original filler neck WITHOUT the original cap, subsituting the Daytona gas cap in its place.
However, instead of being helpful, you posted your comment just to quash my "incorrect" statement. But, I guess the OP will just have to beg you for an alternative to machining the neck.
[QUOTE]
I'm more than glad to help or give instruction to anyone in need, as many here have helped me. You, on the other hand, would prefer to make negative comments on so many others posts, it get's unproductive.
There was "NO" modification to my filler neck. You seem to have the answers to everyone else's modifications and the way they were done. Would you mind posting a picture of "yours" so we can see how "you" did it?
Last edited by Jclgodale3; 06-11-2006 at 03:46 PM.
06-11-2006, 03:51 PM
#11
Instructor
Member Since: May 2006
Location: Las Cruces NM
Posts: 178
Likes: 0
Received 0 Likes
on
0 Posts
Originally Posted by Jclgodale3
[[B][U]QUOTE=Nacho_Libre]
I'm more than glad to help or give instruction to anyone in need, as many here have helped me. There was "NO" modification to my filler neck. You seem to have the answers to everyone else's modifications and the way they were done. Would you mind posting a picture of "yours" so we can see how "you" did it?
I'm more than glad to help or give instruction to anyone in need, as many here have helped me. There was "NO" modification to my filler neck. You seem to have the answers to everyone else's modifications and the way they were done. Would you mind posting a picture of "yours" so we can see how "you" did it?
My filler neck was done exactly how you'll see as in the above links.
06-11-2006, 03:54 PM
#12
Racer
Thread Starter
Originally Posted by lvrpool32
I recognise those pictures!
You don't have to remove the stock filler neck if you do what I did, as mine is non functional. The stock filler cap is beneath, if you have average size hands like me (the hole is 3" wide), you can pop the monza cap, reach inside and remove the original cap. I have made a couple for people on the forum, one all the way in Norway and they said they had no issues getting their hands inside to remove the cap.
I made an outer ring to sit inside the stock opening, then made 4
l-shape brackets that line up with the stock mounting holes. These are welded to the bottom of the filler neck, you unscrew the monza cap, with a short screwdriver put the 4 screws in place, screw back on the cap..voila done.
Nick
Do you have any pictures of how this looks with your cap open?
I will probably go your route as I believe my hand will fit inside to open the stock gas cap and I like the thought that I will have that in place in the case of an accident. Besides, I would rather not go through the trouble of fabricating a gas filler 'extension' (although the pictures posted of that were beautiful!!).
Excellent information provided; thank you all for the valuable specifics.
Where would be the best place to purchase this cap?
Thanks.
Bryan
06-11-2006, 04:09 PM
#13
Senior Member since 1492

Originally Posted by Nacho_Libre
So why didn't you just post how you did it instead of trying to "start" something with me? Who's getting counter-productive here?
My filler neck was done exactly how you'll see as in the above links.
My filler neck was done exactly how you'll see as in the above links.

 06-11-2006, 04:22 PM
#15
Le Mans Master
Originally Posted by 300ZXTwinTurbo
Nick,
Do you have any pictures of how this looks with your cap open?
I will probably go your route as I believe my hand will fit inside to open the stock gas cap and I like the thought that I will have that in place in the case of an accident. Besides, I would rather not go through the trouble of fabricating a gas filler 'extension' (although the pictures posted of that were beautiful!!).
Excellent information provided; thank you all for the valuable specifics.
Where would be the best place to purchase this cap?
Thanks.
Bryan
06-11-2006, 04:24 PM
#16
Le Mans Master
Originally Posted by Nacho_Libre
My filler neck was done exactly how you'll see as in the above links.
 so we can see another example, k?
06-11-2006, 04:48 PM
so we can see another example, k?
06-11-2006, 04:48 PM
#17
Instructor
Member Since: May 2006
Location: Las Cruces NM
Posts: 178
Likes: 0
Received 0 Likes
on
0 Posts
Originally Posted by Jclgodale3
Then please, post your so we can see another example, k?
so we can see another example, k? 06-11-2006, 05:20 PM
#20
Le Mans Master
Originally Posted by Nacho_Libre
There is no "other" example. I fashioned mine exactly as described in the links. If you'd like to see it, you're welcome to drop by.