
Rub-N-Buff metal refinishing (dial-up? don't even try)
 02-15-2007, 02:42 PM
#1
Pro

Thread Starter
I posted an article on using Rub-N-Buff and Calyx to refinish bare metal parts a while back. I occasionally get questions about it's durability. On the Vette it looks like the day I put it on almost two years ago, but there is a reason why. The vette hasn't left the garage since then so it's not a good example. However I did use it for this engine (alternator, heat shields, throttle body, etc.):

It's been in my Ciera (parked outside, daily driver) for over a year and a half without any additional care. If left unatended most of the parts will develop a gray haze. I think this is the wax drying to a powder, but it didn't migrate to adjacent parts and would shine back up with a light buffing. The heat shields had started to show some rust spots, but nothing like before they were treated and no large areas. These rust spots easily buffed out and were returned to the installed condition with a refresh coat. The throttle body buffed up without any additional application.
Has anyone else used this technique? If so could you share your experience, Good or bad? Especially if you used it on the Carb.
If you missed the article, here it is again.....
After disassembling Gator in the beginning of it's restoration I made a pact with myself that nothing that did not look new would go back on the car. This left a bunch of stuff on the shelf that was awaiting painting or replacement.
Before reinstalling the exhaust manifolds I decided to refurbish them with Calyx manifold dressing. It appeared to be some sort of metalic particles suspended in a wax of some sort. It worked really well on the manifolds, so I decided to try it on my cast master cylinder and cast water pump. It worked really well on them as well.
Shortly after refreshing the exhaust manifold and while accompanying my wife to a craft store I came across some stuff called Rub 'n Buff made by Amaco - American Art Clay Co. The front of the package said it was "The Original Wax Metallic Finish". The Back read "Rub 'n Buff is a wax base metalic finish that is formulated from imported carnauba waxes, fine metalic powders and select pigments..." It sounded a little like Calyx so I got a tube of silver.
I decided to try it on my valve cover to air cleaner breather tube since it was slated for painting/replacement.

Once I put it on it buffed up really nicely and looked brand new. I wanted to see how it reacted to heat so I put it in the oven at 400 degees for 3 hours (I got occupied with other things and forgot about it). While it was still hot I wiped it with a clean white rag, no residue came off on the rag and the tube got real shiney. After it cooled I scrubed it with soap and water, still no residue on the rag. Then I wiped it down with gas, still no residue on the white rag. Next I wiped it down with carb cleaner, there was a slight discoloration on the rag but not much (it looked like it would take some heavy scrubbing with the carb cleaner to get it off. The After picture above is after all the experimentation on the finish.
I have tried this on several types of metal. metals that have a slight tooth will leave residue on a rag even after the heating. These would be things like the master cylinder base, steering box and alternator cover.
Next I tried it on the master cylinder cover that I was going to toss. Now it looks brand new and does not need replacement. The best thing is it's not paint and once you pull the bails up you just buff out the scrapes.
I thought that the silver looked too bright or too silvery to emulate natural steel. It needed to be more blue. I thought since the Calyx is a blue gray color that adding it to the silver Rub 'n Buff might make it look more like steel. It turns out that the best ratio was 2 parts Calyx to 1 part Silver Rub 'n Buff. The Calyx is semi-transparent and the Rub 'n Buff is opaque. When you mix the two together you get a semi-opaque steel color that lets a little of the natural metal shine through for a very natural appearance. I put the mixture on my metal pump to carb fuel line. I don't have a picture but it now looks like a new stainless line.
I thought that the addition of the calyx did the trick so I rubbed calyx over the master cylinder cover that I had already rubbed with the silver Rub 'n Buff. It produced yet another finish since the opaque silver masked any of the underlying metal and the semi-transparent calyx darkened and blued the final finish. Here is a before and after.

The base of the master cylinder is just Calyx.
I bake most of the parts at 400 degrees for 1 hour but I'm not sure it's necessary (BTW I have been authorized by the owner of the oven to use it for this process since it produces a candle-like aroma instead of a smelly paint aroma). Here is my drivers side hood latch that I did without removing it from the car.

The picture does not do it justice because in person it looks like I just pulled it new out of a box.
Here is a before and after of my brake shields.

I refurbished my front spindle assembly to like new without a drop of paint.

The only new pieces are the wheel studs and dust caps. The rest was done with Calyx and Calyx/Rub 'n Buff mixtures.
Here you can see the difference between the silver finish on the dipstick handle and the Calyx/silver finish of the dipstick tube.

So I ended up with four finishes.
1) straight Calyx.
2) straight silver Rub 'n Buff.
3) straight silver Rub 'n Buff then top coated with Calyx.
4) silver Rub 'n Buff and Calyx mixture.
The Rub 'n Buff comes in several metalic finishes and several colors.
http://www.amaco.com/pdfs/AC17.pdf?
I am interested in the pewter (to alter the color of the silver/calyx finish) Gold (to try and emulate gold cladding) and ebony (to emulate chrome moly and refinish black body bolts without using paint). Oh yeh, the stuff works great on old bolt heads, it makes them look brand new. In the future I may get some zinc cold galvanizing compound from Eastwood to add to the mix to protect the bare metal.
Upon further investigation into the Eastwood zink cold galvanizing compound I found out that it was like a paint and probably would not work in the mixture. I also tried to find zinc powder on the internet. I found some but the quantities were in pounds and the cost was prohibative.
Note: I can not attest to the longevity of this process since I just started doing it, but it is really easy to apply and not very expensive. Refreshing it occasionally should be no big deal. My only concern may be staining of adjacent surfaces over time. I will have to keep a close eye on it once the car is back on the road.
I applied this mixture to the alternator on my Wife's minivan about 9 months ago to see how it would hold up on a component in the engine bay of a daily driver. After 9 months it is still on the alternator and does not apear to have migrated to any of the black plastic surfaces adjacent to the area that it was applied to. It also looked pretty good and while it still left residue on a rag it buffed up nicely
Some additional tips and observations:
I apply the mixture with a small stencil brush or an old tooth brush. A small amount goes a long long way, it goes on very thin, I still have about a 1/4 tube of the silver Rub 'n Buff left after coating a boat load of parts. The package says it will cover 20 square feet, mixing with the calyx makes it go even farther. Don't put it on very thick or you will just be wasting it. Some small parts I could do with the tooth brush that is already coated with the mixture (I keep it in a plastic bag to keep it from drying out).
It does not require much buffing. It buffs up pretty quick. I mostly just use old cut up bed sheets, but have also used toilet paper. I have also used my buffing wheel to get some parts really shiney.
I clean the parts before coating. Most of the parts get wire brushed then sprayed with phosphoric acid to remove any residual rust then rinsed and dried. The hood springs above did not get cleaned before coating and they turned out fine. Clean parts turn out better when using the semi-opaque calyx/RnB mixture. If the part still looks dirty after cleaning (like the brake shields did) then I coat them with RnB first to mask the discoloration, bake them, then coat it with the calyx and bake them again (probably overkill on the baking part).
If you use straight Rub n Buff then the finish will be more opaque or more of a monotone color. Adding the Calyx makes the Rub n Buff semi transparent and the color variations of the underlying metal show through. I've done it both ways and tend to prefer the semi transparent because it looks more metalic and less like paint. If the metal is really stained or large portions of the original plating is missing or there are a bunch of rust areas then I would probably use straight Rub n Buff because I wouldn't want any of the original finish to show through. If the plating is in fair shape but just looks old then I would probably add the Calyx.
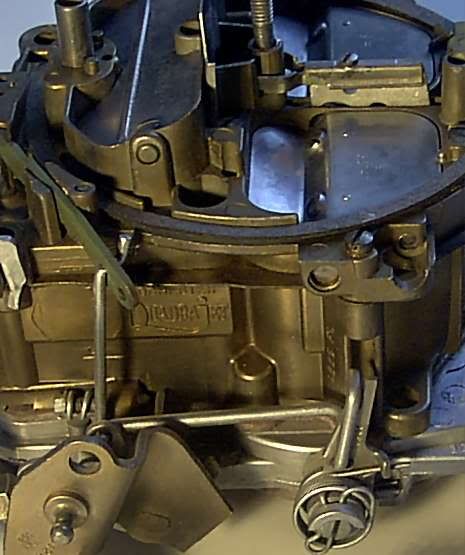
I also used this method to refresh my old Q-jet
Here are a few before and after shots:

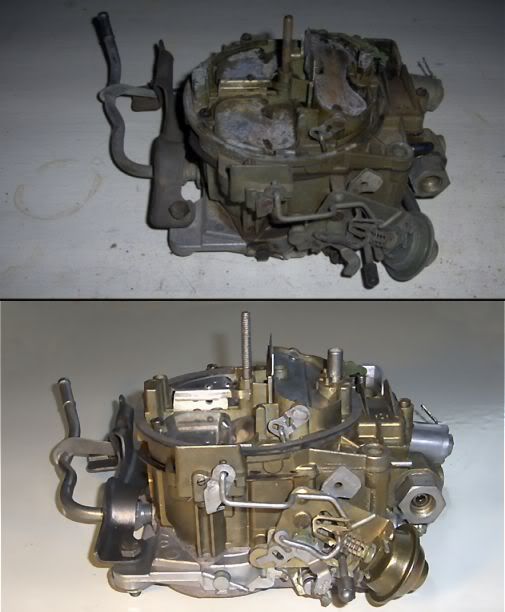
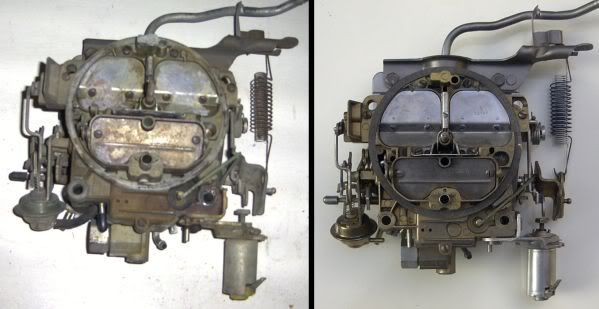
I used a 3 parts Calyx to 1 part Grecian Gold Rub 'n Buff for the base and 2 parts Calyx to 1 part Silver Rub 'n Buff for the rest except for the rear bracket that got plain Calyx.
I did the gold first and heated it for 2 hours with my shop lights (no way could I get away with putting the carb in the wifes oven). Then I did the silver and heated again then buffed.
This is not the "correct" color just better than old looking. It looks like it could use a little yellow and a little green. I didn't attempt "correct" color because I didn't have a new one to go by and would have just been guessing. Besides I think that it looks better less green.
If I had to do it again I probably would do it all in silver
Again, I have no idea about the permanence, but it only took a total of two hours not including heating time.
Another Tip: I used a dry brush technique to apply the gold leafing so as to minimize the amount of material actually on the carb. Using a small stipple brush from the craft store I would dip it in the mixture then rub most of it off before applying it to the carb. only use enough material to make the color change (which isn't much stuff at all).
Since originally revealing this I have not heard anything negative about using this method and have heard of it being used on items as big as a power brake booster.
If I was smart I would have kept this all to myself and developed a line of zinc fortified automotive metal refinishing wax's. But as you can see I'm just not that bright. But I did get about 2 dozen items off my to be painted/replaced shelf.
David
It's been in my Ciera (parked outside, daily driver) for over a year and a half without any additional care. If left unatended most of the parts will develop a gray haze. I think this is the wax drying to a powder, but it didn't migrate to adjacent parts and would shine back up with a light buffing. The heat shields had started to show some rust spots, but nothing like before they were treated and no large areas. These rust spots easily buffed out and were returned to the installed condition with a refresh coat. The throttle body buffed up without any additional application.
Has anyone else used this technique? If so could you share your experience, Good or bad? Especially if you used it on the Carb.
If you missed the article, here it is again.....
After disassembling Gator in the beginning of it's restoration I made a pact with myself that nothing that did not look new would go back on the car. This left a bunch of stuff on the shelf that was awaiting painting or replacement.
Before reinstalling the exhaust manifolds I decided to refurbish them with Calyx manifold dressing. It appeared to be some sort of metalic particles suspended in a wax of some sort. It worked really well on the manifolds, so I decided to try it on my cast master cylinder and cast water pump. It worked really well on them as well.
Shortly after refreshing the exhaust manifold and while accompanying my wife to a craft store I came across some stuff called Rub 'n Buff made by Amaco - American Art Clay Co. The front of the package said it was "The Original Wax Metallic Finish". The Back read "Rub 'n Buff is a wax base metalic finish that is formulated from imported carnauba waxes, fine metalic powders and select pigments..." It sounded a little like Calyx so I got a tube of silver.
I decided to try it on my valve cover to air cleaner breather tube since it was slated for painting/replacement.
Once I put it on it buffed up really nicely and looked brand new. I wanted to see how it reacted to heat so I put it in the oven at 400 degees for 3 hours (I got occupied with other things and forgot about it). While it was still hot I wiped it with a clean white rag, no residue came off on the rag and the tube got real shiney. After it cooled I scrubed it with soap and water, still no residue on the rag. Then I wiped it down with gas, still no residue on the white rag. Next I wiped it down with carb cleaner, there was a slight discoloration on the rag but not much (it looked like it would take some heavy scrubbing with the carb cleaner to get it off. The After picture above is after all the experimentation on the finish.
I have tried this on several types of metal. metals that have a slight tooth will leave residue on a rag even after the heating. These would be things like the master cylinder base, steering box and alternator cover.
Next I tried it on the master cylinder cover that I was going to toss. Now it looks brand new and does not need replacement. The best thing is it's not paint and once you pull the bails up you just buff out the scrapes.
I thought that the silver looked too bright or too silvery to emulate natural steel. It needed to be more blue. I thought since the Calyx is a blue gray color that adding it to the silver Rub 'n Buff might make it look more like steel. It turns out that the best ratio was 2 parts Calyx to 1 part Silver Rub 'n Buff. The Calyx is semi-transparent and the Rub 'n Buff is opaque. When you mix the two together you get a semi-opaque steel color that lets a little of the natural metal shine through for a very natural appearance. I put the mixture on my metal pump to carb fuel line. I don't have a picture but it now looks like a new stainless line.
I thought that the addition of the calyx did the trick so I rubbed calyx over the master cylinder cover that I had already rubbed with the silver Rub 'n Buff. It produced yet another finish since the opaque silver masked any of the underlying metal and the semi-transparent calyx darkened and blued the final finish. Here is a before and after.
The base of the master cylinder is just Calyx.
I bake most of the parts at 400 degrees for 1 hour but I'm not sure it's necessary (BTW I have been authorized by the owner of the oven to use it for this process since it produces a candle-like aroma instead of a smelly paint aroma). Here is my drivers side hood latch that I did without removing it from the car.
The picture does not do it justice because in person it looks like I just pulled it new out of a box.
Here is a before and after of my brake shields.
I refurbished my front spindle assembly to like new without a drop of paint.
The only new pieces are the wheel studs and dust caps. The rest was done with Calyx and Calyx/Rub 'n Buff mixtures.
Here you can see the difference between the silver finish on the dipstick handle and the Calyx/silver finish of the dipstick tube.
So I ended up with four finishes.
1) straight Calyx.
2) straight silver Rub 'n Buff.
3) straight silver Rub 'n Buff then top coated with Calyx.
4) silver Rub 'n Buff and Calyx mixture.
The Rub 'n Buff comes in several metalic finishes and several colors.
http://www.amaco.com/pdfs/AC17.pdf?
I am interested in the pewter (to alter the color of the silver/calyx finish) Gold (to try and emulate gold cladding) and ebony (to emulate chrome moly and refinish black body bolts without using paint). Oh yeh, the stuff works great on old bolt heads, it makes them look brand new. In the future I may get some zinc cold galvanizing compound from Eastwood to add to the mix to protect the bare metal.
Upon further investigation into the Eastwood zink cold galvanizing compound I found out that it was like a paint and probably would not work in the mixture. I also tried to find zinc powder on the internet. I found some but the quantities were in pounds and the cost was prohibative.
Note: I can not attest to the longevity of this process since I just started doing it, but it is really easy to apply and not very expensive. Refreshing it occasionally should be no big deal. My only concern may be staining of adjacent surfaces over time. I will have to keep a close eye on it once the car is back on the road.
I applied this mixture to the alternator on my Wife's minivan about 9 months ago to see how it would hold up on a component in the engine bay of a daily driver. After 9 months it is still on the alternator and does not apear to have migrated to any of the black plastic surfaces adjacent to the area that it was applied to. It also looked pretty good and while it still left residue on a rag it buffed up nicely
Some additional tips and observations:
I apply the mixture with a small stencil brush or an old tooth brush. A small amount goes a long long way, it goes on very thin, I still have about a 1/4 tube of the silver Rub 'n Buff left after coating a boat load of parts. The package says it will cover 20 square feet, mixing with the calyx makes it go even farther. Don't put it on very thick or you will just be wasting it. Some small parts I could do with the tooth brush that is already coated with the mixture (I keep it in a plastic bag to keep it from drying out).
It does not require much buffing. It buffs up pretty quick. I mostly just use old cut up bed sheets, but have also used toilet paper. I have also used my buffing wheel to get some parts really shiney.
I clean the parts before coating. Most of the parts get wire brushed then sprayed with phosphoric acid to remove any residual rust then rinsed and dried. The hood springs above did not get cleaned before coating and they turned out fine. Clean parts turn out better when using the semi-opaque calyx/RnB mixture. If the part still looks dirty after cleaning (like the brake shields did) then I coat them with RnB first to mask the discoloration, bake them, then coat it with the calyx and bake them again (probably overkill on the baking part).
If you use straight Rub n Buff then the finish will be more opaque or more of a monotone color. Adding the Calyx makes the Rub n Buff semi transparent and the color variations of the underlying metal show through. I've done it both ways and tend to prefer the semi transparent because it looks more metalic and less like paint. If the metal is really stained or large portions of the original plating is missing or there are a bunch of rust areas then I would probably use straight Rub n Buff because I wouldn't want any of the original finish to show through. If the plating is in fair shape but just looks old then I would probably add the Calyx.
I also used this method to refresh my old Q-jet
Here are a few before and after shots:
I used a 3 parts Calyx to 1 part Grecian Gold Rub 'n Buff for the base and 2 parts Calyx to 1 part Silver Rub 'n Buff for the rest except for the rear bracket that got plain Calyx.
I did the gold first and heated it for 2 hours with my shop lights (no way could I get away with putting the carb in the wifes oven). Then I did the silver and heated again then buffed.
This is not the "correct" color just better than old looking. It looks like it could use a little yellow and a little green. I didn't attempt "correct" color because I didn't have a new one to go by and would have just been guessing. Besides I think that it looks better less green.
If I had to do it again I probably would do it all in silver
Again, I have no idea about the permanence, but it only took a total of two hours not including heating time.
Another Tip: I used a dry brush technique to apply the gold leafing so as to minimize the amount of material actually on the carb. Using a small stipple brush from the craft store I would dip it in the mixture then rub most of it off before applying it to the carb. only use enough material to make the color change (which isn't much stuff at all).
Since originally revealing this I have not heard anything negative about using this method and have heard of it being used on items as big as a power brake booster.
If I was smart I would have kept this all to myself and developed a line of zinc fortified automotive metal refinishing wax's. But as you can see I'm just not that bright. But I did get about 2 dozen items off my to be painted/replaced shelf.
David
Last edited by GATOR454; 02-15-2007 at 04:41 PM.


 02-15-2007, 04:04 PM
#9
Pro
Thread Starter
Hi Len,
I moved to Raleigh, North Carolina last May and have been in an apartment ever since. Apartment living sucks and the new house won't be finished until the end of June. Gator is in a detached garage at the apartment but it's so full of other stuff there is no room to work on him. I don't anticipate working on him again until sometime in September. I keep telling myself that I'm going to work on some small parts but the new job and house hunting in combination with no place to work have kept me from doing just about anything.
David
02-15-2007, 05:51 PM
#10
Drifting

Member Since: Oct 2003
Location: VetteMOD
Posts: 1,426
Likes: 0
Received 1 Like
on
1 Post
St. Jude Donor '05-'07

David, I remember when you posted this and I did a few parts also. They still lookk great but have not seen much use (OK, any use).
Is the picture of the 3400 Ciera engine a current picture or after you did the Rub n' Buff? You said the heat sheilds were a litlle rusted, were they rusty when you treated them?
Is the picture of the 3400 Ciera engine a current picture or after you did the Rub n' Buff? You said the heat sheilds were a litlle rusted, were they rusty when you treated them?
Last edited by BBShark; 02-15-2007 at 07:10 PM.
02-15-2007, 10:32 PM
#12
 Do you know where to get both the Calyx and the Rub n Buff in a local Big chain store . I have found R+B on ebay but a google on calyx returned nothing
02-15-2007, 10:41 PM
Do you know where to get both the Calyx and the Rub n Buff in a local Big chain store . I have found R+B on ebay but a google on calyx returned nothing
02-15-2007, 10:41 PM
#13
Safety Car

WOW..... that looks fantastic. I need to find this stuff too.
I have a lot of old looking metal in my engine compartment that has been waiting for this product.
Thanks for the article.
kdf
I have a lot of old looking metal in my engine compartment that has been waiting for this product.
Thanks for the article.
kdf
02-15-2007, 10:57 PM
#14
Melting Slicks

Member Since: Nov 2003
Location: St. Charles Mo
Posts: 2,655
Likes: 0
Received 104 Likes
on
49 Posts
CI 5 & 8 Veteran
Gator, I too, followed your lead back when you first posted about Rub & Buff.  I haven't tried it on anything real big but it has been great on the small parts like vacuum actuators, master cylinder lids, hood braces, etc. etc. that I have tried. Thanks again for your guidance
Bullshark
P.S. My wife doesn't appreciate the gold and silver fingerprints all over the house though.

I haven't tried it on anything real big but it has been great on the small parts like vacuum actuators, master cylinder lids, hood braces, etc. etc. that I have tried. Thanks again for your guidance Bullshark
P.S. My wife doesn't appreciate the gold and silver fingerprints all over the house though.
Last edited by Bullshark; 02-15-2007 at 11:00 PM.
02-15-2007, 11:08 PM
#15
Melting Slicks
i remember when u 1st posted about calyx and Rub n Buff, i was blown away by your work and filed it in the back of my mind. when i redid my eng compartment & suspension last spring i went to the hobby store & bought some Rub n Buff & used it on my fuel line & power steering lines. i was amazed how it just smears on & just a lil bit goes a long way & it looks great & comes in a variety of colors. thanks for the tip.


02-15-2007, 11:20 PM
#16
Le Mans Master

Member Since: Jan 2007
Location: Omaha NE
Posts: 5,006
Received 1,813 Likes
on
824 Posts
2023 C3 of the Year Finalist - Unmodified
2022 C3 of the Year Finalist - Unmodified
2020 C3 of the Year Finalist - Unmodified

Ecklers has Calyx for $18. I've been using it for years on my manifolds and it works great.


 02-16-2007, 04:33 AM
#19
Senior Member since 1492

Rub n buff....I try to get my wife to do that. 
Good to see you back on the forum again Dave.
Good to see you back on the forum again Dave.
02-16-2007, 08:26 AM
#20
Instructor


Member Since: Nov 2006
Location: Indian Trail NC
Posts: 162
Likes: 0
Received 0 Likes
on
0 Posts
Yeah I had found it at Ecklers and other online stores, but I was trying to avoid shipping $$!! I guess it's time to get a big order ready to justify the shipping